TrueNAS Mini R Basic Rack
giriiş
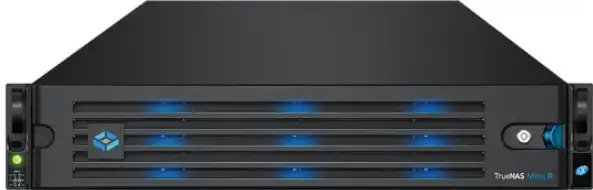
- TrueNAS Mini R, on iki (2) çalışırken değiştirilebilir 12 inç sürücü yuvasına ve raf veya masaüstü montaj arasında seçim yapma seçeneğine sahip bir 3.5U Depolama Dizisidir.
- Sisteminiz TrueNAS işletim sistemi önceden yüklenmiş olarak gelir.
- Review Mini R'yi kullanmadan veya bir rafa monte etmeden önce güvenlik hususları ve gereksinimleri.
Emniyet
- UYARI: The TrueNAS Mini products use a Closed Cap style CMOS battery, which is a non-consumer replaceable part due to regulatory requirements.
- Replacement should be performed by a qualified individual in a child-free environment. Contact our support services via support@truenas.com eğer değiştirilmesi gerekiyorsa.
- Kullanılmış pilleri yerel düzenlemelere göre çıkarın ve derhal geri dönüştürün veya atın ve çocuklardan uzak tutun. Pilleri ev çöpüne atmayın veya yakmayın.
- Kullanılmış piller bile ciddi yaralanmalara veya ölüme yol açabilir.
- Tedavi bilgisi için bölgenizdeki zehirlenme kontrol merkezini arayın.
- Uyumlu Pil tipi (CR2032).
- Nominal Hacimtag3V'un e'si.
- Şarj edilemeyen piller şarj edilmemelidir.
- Do not force recharge, disassemble, heat above (Manufacturer’s specified temperature rating) or incinerate. Doing so may result in injury due to venting, leaking or explosion resulting in chemical burns.
- TrueNAS sistemini en az iki kişinin kaldırmasını öneririz.
- Uyarı: Never attempt to lift a TrueNAS system loaded with drives! Install the system in a rack before adding drives. Remove drives before unracking the system.
- Mümkün olduğunda sistemi yanlardan veya alttan tutun. Gevşek kablolara veya konektörlere daima dikkat edin ve mümkün olduğunca bu elemanların sıkışmasından veya çarpmasından kaçının.
- Bu belgede, bir sistemin veya rafın önüne bakarken bakış açınıza göre "sol" ve "sağ" ifadeleri kullanılmıştır.
Gereksinimler
- We recommend these tools when installing a Mini R system in a rack.
- 2 numaralı Philips tornavida
- Seviye
System Specifications and Compliance
| Mini R Specifications | |
| Boyutlar (Y x G x U) | 3.43 in x 17.2 in x 25.5 in (87 mm x 438 mm x 647.7 mm) |
| Net Ağırlık (Tam Yüklü) | 50 lbs (23 kg) |
| Çalışma Sıcaklığı | 41°F – 95°F (5°C – 35°C) |
| Çalışmayan Sıcaklık | -40°F – 158°F (-40°C – 70°C) |
| Çalışma Nemi (yoğuşmasız) | %8 - %90 |
| Tedarik Hacmitage | 100-240VAC, 10-5A 50-60 Hz |
The TrueNAS Mini R is a network storage servers intended for use in home, home‑lab, and small office environments.
The apparatus is designed to be operated:
- In indoor residential or office environments, within the specified ranges for temperature, humidity, and supply voltage
- In properly grounded electrical installations, in accordance with local electrical codes
- On a stable, well‑ventilated surface or shelf, with unobstructed airflow around the chassis
- In accordance with the TrueNAS software documentation, including configuration, operation, and maintenance instructions
This product is not designed or intended for:
- Use in professional or industrial environments with demanding environmental conditions (e.g., heavy vibration, conductive dust, or exposure to chemicals)
- Use in situations requiring specialized environmental controls (e.g., clean rooms, high-temperature, or high-humidity installations)
- Any application outside the conditions and purposes described in this manual and the TrueNAS software documentation
- For detailed configuration and operational guidance, refer to the TrueNAS software documentation provided with the product and available from TrueNAS.
The Mini R is FCC/CE-marked and complies with:
- FCC 47 CFR Part 15, Class A – Radiated and conducted emissions limits for commercial IT equipment (EMI/EMC)
- Düşük Hacimtage Directive (LVD) 2014/35/EU – Electrical safety
- Electromagnetic Compatibility (EMC) Directive 2014/30/EU – Electromagnetic interference and immunity
- RoHS Directive 2011/65/EU, as amended by (EU) 2015/863 – Restriction of hazardous substances
- WEEE Directive 2012/19/EU – Waste electrical and electronic equipment
- For regulatory or compliance-related queries, contact compliance@truenas.com.
- EU Authorized Representative: Obelis S.A. – Boulevard Général Wahis 53, B-1030 Brussels, BELGIUM
Important – Battery Information
- This product contains a lithium coin cell (CMOS battery) used to maintain system settings. Do not dispose of the battery with household waste.
- Used batteries must be collected and disposed of separately in accordance with local regulations and the EU Battery Directive 2006/66/EC.
- The crossed-out wheeled bin symbol indicates that the battery must be taken to an appropriate collection facility for recycling.
Sistem Bileşenleri
- TrueNAS birimleri, mükemmel durumda olacak şekilde dikkatli bir şekilde paketlenir ve güvenilir taşıyıcılarla gönderilir.
- If there is any shipping damage or missing parts, please take photos and contact TrueNAS Support immediately at support@truenas.com, 1-855-GREP4-iX (1-855-473-7449), or 14089434100.
- Hızlı başvuru için lütfen her kasanın arkasındaki donanım seri numaralarını bulun ve kaydedin.
Nakliye kutularını dikkatlice açın ve şu bileşenleri bulun:
- Mini R Depolama Dizisi

- Mini R Çerçeve

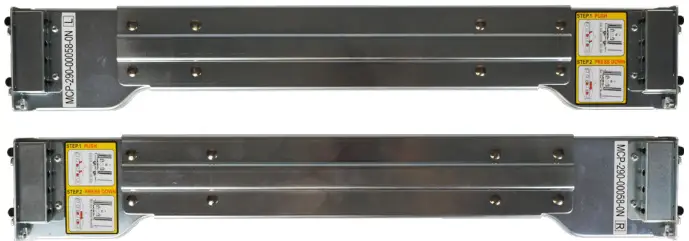
- Set of standard rack mount rails with hardware.
- Kaç tane satın aldığınıza bağlı olarak en fazla on iki (12) sürücüye sahip on iki (3.5) 12" tepsi.
Aksesuar çantası:
- Bir (1) C13 - 5-15P güç kablosu
- İki (2) Ethernet kablosu
- Bir (1) torba HDD vidası
- İki (2) çerçeve anahtarı
- Dört (4) adet lastik ayak.
- Bir (1) torba ray kiti vidası

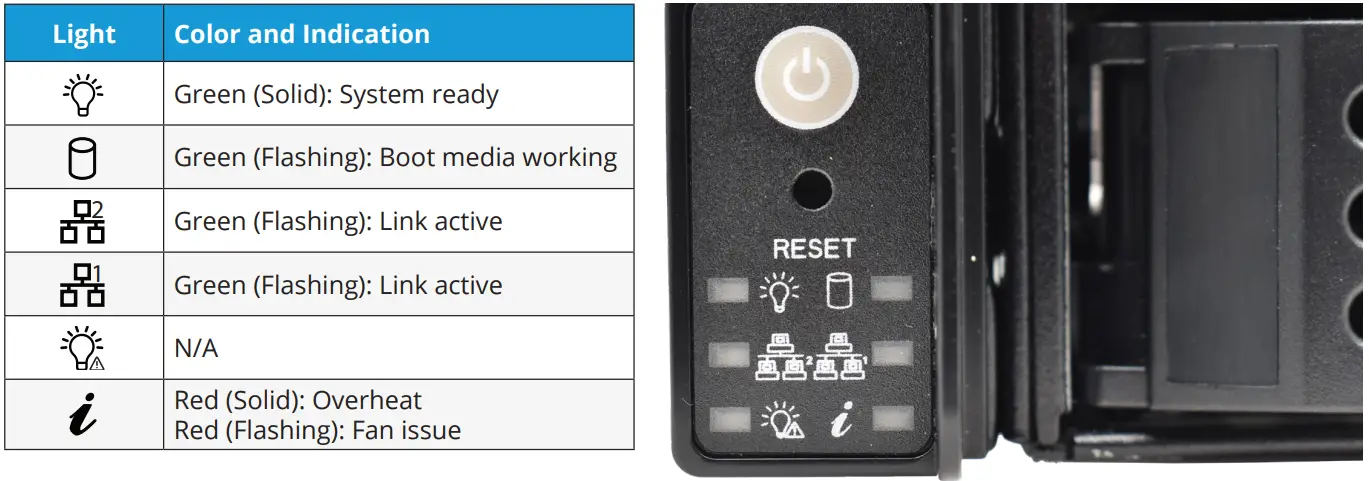
Ön Göstergeler
- Mini R'de güç ve sistem sıfırlama için ön panel düğmeleri bulunur. Ayrıca güç, önyükleme ortamı etkinliği, ağ arabirimi etkinliği ve sistem bilgileri için gösterge ışıkları da bulunur.
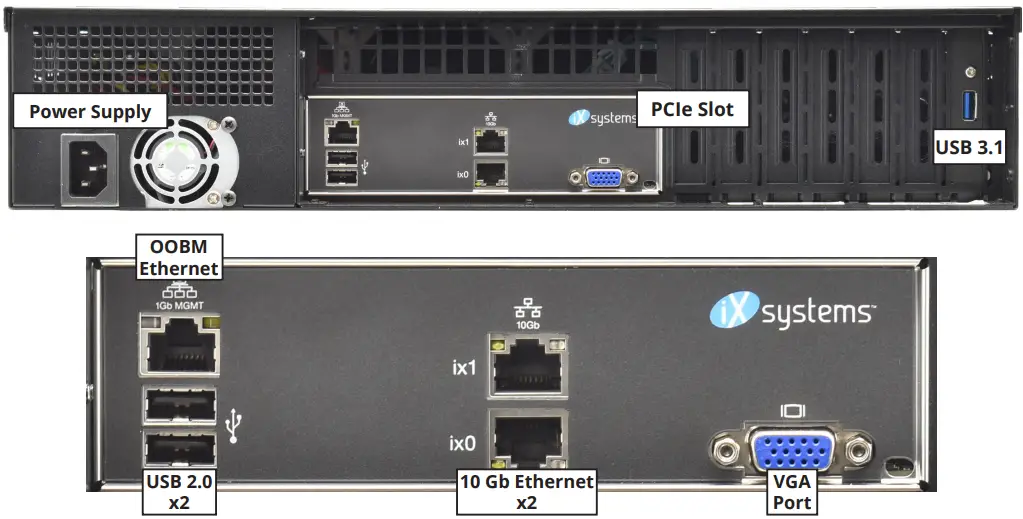
Arka Bileşenler ve Bağlantı Noktaları
- Mini R'de tek bir güç kaynağı, bir PCIe yuvası ve çeşitli ağ ve bağlantı bağlantı noktaları bulunur.
- If you are mounting the Mini R on a desktop instead of in a rack, skip to “4 Install Rubber Feet.
Mini R'yi rafa kaldırın
- The Mini R requires an EIA-310 compliant rack and comes with a standard or extended rail kit based on your order.
- The standard rails support racks 19.2” – 26.6” (48.8 cm – 67.6 cm) deep.
- The extended rails support racks 26.6” – 36.5” (67.7 cm – 92.7 cm) deep.
Şasi Raylarını Takma
- Sisteme monte etmeden önce kasa rayını raf rayından çıkarmalısınız. Metal mandal onu durdurana kadar kasa rayını dışarı doğru kaydırın. Serbest bırakma mandalını itin ve kasa rayını serbest kalana kadar raf rayından dışarı kaydırın.

- Align the chassis rail on the side of the system designated by the stickers and ensure they are right-side-up.
- Place the rail slots over the chassis tabs, then slide the rail toward the front of the system until it clicks into place. Secure the rail to the system using one of the low profile #6 ray vidaları. Bu işlemi diğer ray için de tekrarlayın.

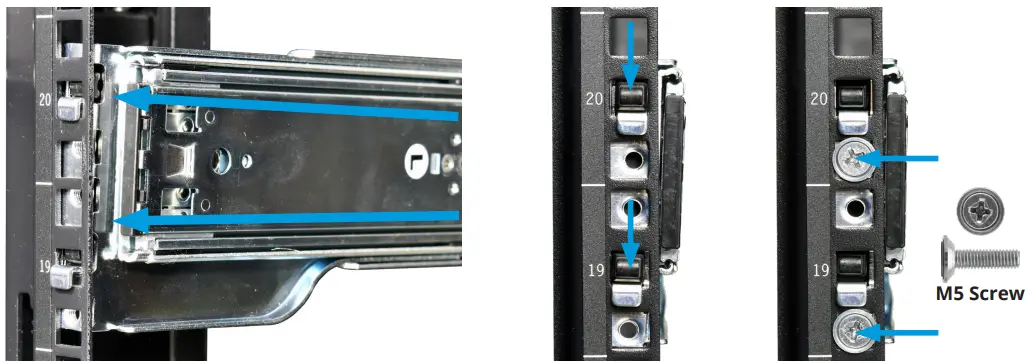
Raf Raylarını Takın
- Align a rack rail with the yellow sticker toward the front of the rack. The flat side must face outside the rack, and the empty inner rail must face inside the rack.
- Place the front tabs and black retaining buttons just above the center holes of each U you are mounting the rail in. Push the tabs into them until the black buttons fully depress, then slide the tabs down.
- Place two M5 machine screws with flush washers in the top and bottom threaded holes.
- Rayın ön kısmı takılıyken, raf rayının arkasını arka raf direği üzerindeki eşdeğer bağlantı noktalarına doğru uzatın. Rayın önden arkaya doğru düz kaldığından emin olun. Diğer raf rayını takmak için bu işlemi izleyin.
Mini R'yi Rafa Takma
- Uyarı – Pinch Point
- The Mini R can pinch or crush fingers when sliding the rail sleeves onto the rack rails.
- Team-lift the system and align the chassis rails with the rack rails. Slide the ends of the chassis rails into the rack rails and push the Mini R forward until the safety catches lock.
- Press the catch releases down and keep sliding the system forward until it is flush with the front of the rack.
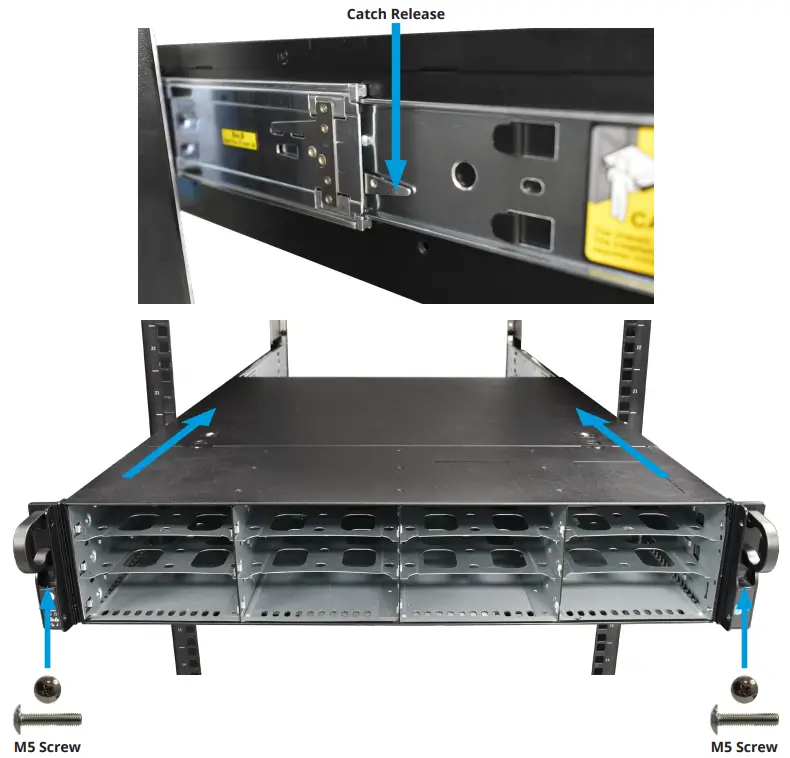
M5 Vida
- Mini R'yi rafa sabitlemek için her bir kulaktaki deliklere uzun bir M5 vida takın.
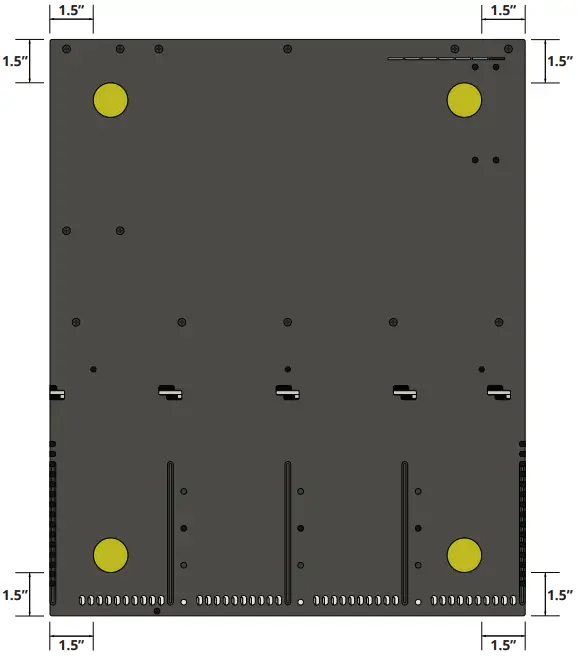
Lastik Ayakların Takılması
- Mini R, sistemi raf yerine masaüstüne monte etmek için 1¼” yapışkanlı lastik ayaklarla birlikte gelir.
- Aşağıdaki şema Mini R'nin alt kısmına en uygun ayak yerleşimini göstermektedir.
Sabit Sürücüleri Kurun
- The Mini R supports TrueNAS‑qualified hard drives up to 18 TB. The Mini R also requires hard drives designed for Network Attached Storage (NAS). These drives run cooler and quieter than desktop drives.
- Please see the Drive Compatibility List available at https://www.truenas.com/truenas-mini1.
- Sabit sürücüler olmadan sipariş edildiğinde sürücü tepsileri koruyucu dolgu ekleriyle birlikte gönderilir. Tüm bölmeleri sabit sürücülerle doldurmazsanız, doldurucuları korumak için boş tepsilerde tutun.
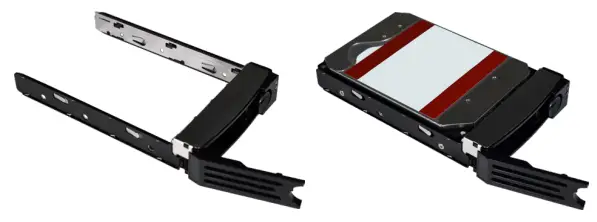
Sürücü Tepsilerini Çıkarın
- Büyük dairesel düğmeyi sağa doğru iterek kilitleme kolunu serbest bırakın. Kilitleme kolunu tamamen açın, ardından tepsinin üst ve alt kısmını nazikçe kavrayın ve çıkarın.

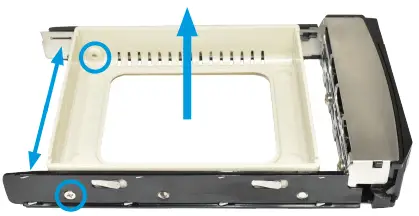
Sürücü Dolgularını Çıkarma
- Dolguyu tutan iki arka vidayı çıkarın. Pimler serbest kalana kadar tepsinin her iki tarafını da dolgudan uzağa doğru yavaşça açın, ardından dolguyu çıkarın.
Sürücüleri Tepsilere Yerleştirin
- Sabit sürücüyü tepsiye yerleştirin ve dört vidayla sabitleyin.

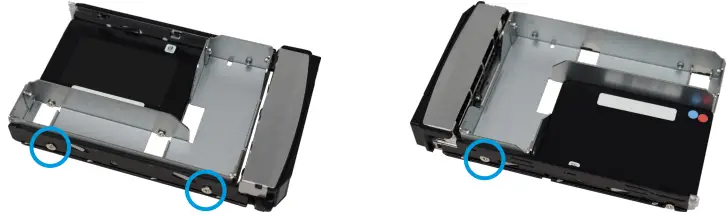
3.5” ila 2.5” SSD Adaptörleri
- Kullanıcılar adaptörlerle Mini R 3.5” HDD tepsilerini 2.5” SSD tepsilere dönüştürebilir.
- Attach an SSD to the adapter using two of the SSD screws that came with the adapter. Ensure the SSD connector faces outside the adapter. Place the adapter in a drive tray and use the last SSD screw to secure the SSD to the tray.
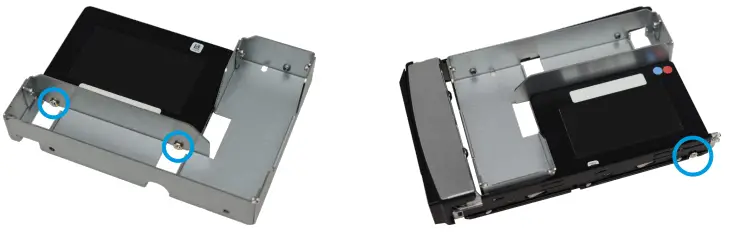
- Adaptörü ve SSD'yi sürücü tepsisine takmak için üç HDD vidası kullanın.
- Tepsiyi sisteme takmak için "5.5 Sürücü Tepsilerini Takma" sayfa 10 bölümündeki talimatları izleyin. SSD'yi adaptöre, konnektör sisteme bakacak şekilde taktığınızdan emin olun.
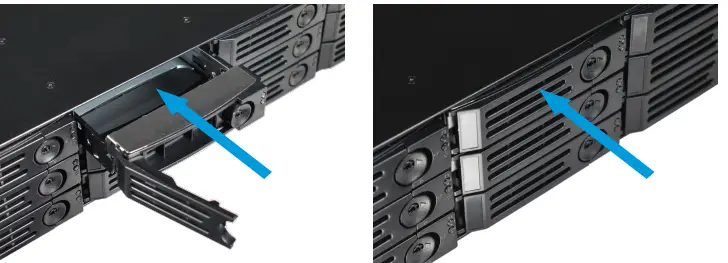
Sürücü Tepsilerini Takma
- Tepsiyi durana kadar yavaşça sürücü bölmesine yerleştirin. Kilitleme kolunu kilitlenene kadar kapatın. Tüm sabit sürücüler için aynı işlemi tekrarlayın, ardından dolgulu tepsileri kalan boş bölmelere yükleyin.
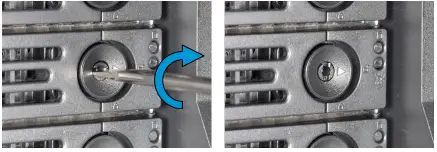
- For extra security, you can lock the drive tray into the system. The tray button is unlocked when the inner slot is horizontal and locked when the slot is vertical.
- To lock a tray, insert a flat‑head screwdriver into the center button slot and gently turn it ninety degrees clockwise until the slot is vertical.
Çerçeveyi takın
(İsteğe bağlı)
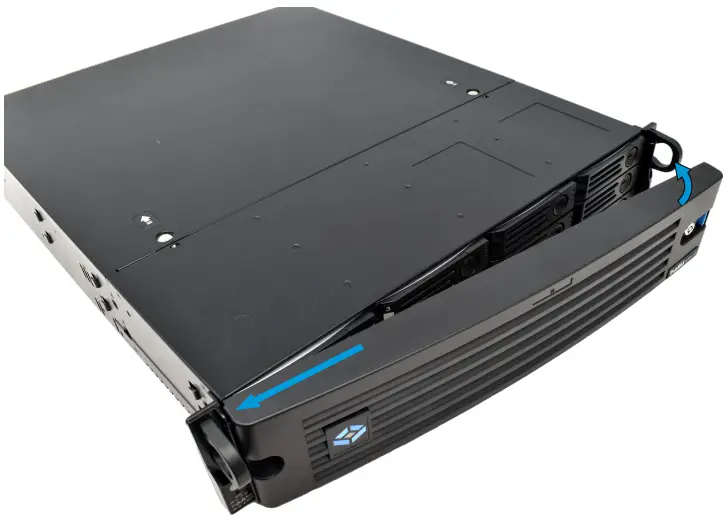
- Çerçevenin sol tarafını sol kulaktaki bağlantı noktalarına kaydırın, ardından çerçevenin sağ tarafını kilitlenene kadar sağ kulak mandalına doğru itin.
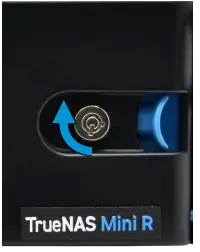
- Daha fazla güvenlik için çerçeveyi kilitleyebilirsiniz. Bunu yapmak için kilide bir anahtar sokun ve saat yönünde doksan derece çevirin.
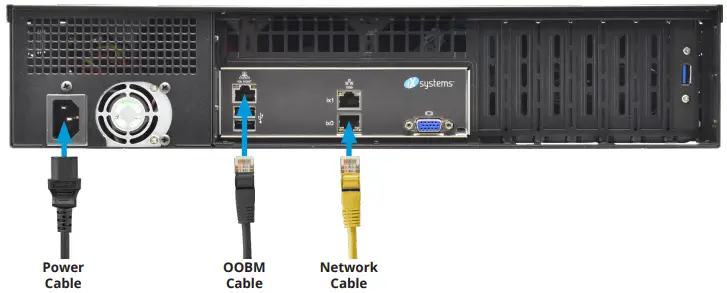
Ağ ve Güç Kablolarını Bağlayın
- Ağ kablolarını yönlendiriciden bağlayın veya gigabit ağ bağlantı noktasına ve OOBM ethernet bağlantı noktasına geçin.
- Güç kablosunu Mini R'ye, ardından elektrik prizine takın.
TrueNAS Mini'yi Açma
- The Power and Reset buttons control the power state of the TrueNAS Mini. These buttons behave in the same manner as standard PC power and reset buttons. When the system is off, pressing the power button turns the system on.
- Pressing and holding the power button while the system is running performs a hard power off. The reset button reboots the system.
- Varsayılan olarak Mini, kabloyu canlı bir güç kaynağına taktığınız anda açılır. Güç kaybı durumunda Mini R, güç geri geldiğinde hemen açılır.
Warning – Grounded Connection
- Always connect power cords to properly grounded connections.
Uyarı: Yüksek Çekimli USB Cihazları
- The current draw on the Mini power supply +5Vsb line can exceed specifications if you leave high‑draw USB devices attached to the rear USB ports when the Mini R is powered off.
- Unplug high‑draw devices (such as bus‑powered USB hard drives) before powering off your Mini R.
Konsol Kurulumu
- You can connect a VGA monitor and USB keyboard for console access, but they are not required. If a monitor and keyboard are attached, you can see the Console Setup Menu.
- For more details about the Console options, see https://www.truenas.com/docs/scale/gettingstarted/install/consolesetupmenuscale/2.
- IPMI aracılığıyla uzaktan bant dışı yönetim (OOBM) istiyorsanız IPMI bağlantı noktasına bir ağ kablosu bağlayın. Mini IPMI bağlantı noktanızı bulmak için sayfa 2.2'teki “4 Arka Bileşenler ve Bağlantı Noktaları” bölümüne bakın.
Uyarı – BIOS ve IPMI Firmware
- Sisteminiz kutudan çıkar çıkmaz optimum BIOS ve IPMI ürün yazılımı ile donatılmıştır.
- Sisteminizin BIOS'unu ve IPMI üretici yazılımını YÜKSELTMEYİN.
- IPMI'nin İnternet erişimi olmayan ayrı ve güvenli bir ağda olmasını öneririz. Sisteminizin BIOS'unu veya IPMI donanım yazılımını yükseltmeniz gerekiyorsa lütfen destek ile iletişime geçin.
GerçekNAS Web Arayüz
- TrueNAS, sistemin çoğu ağda ek kurulum gerektirmeden erişilebilir olmasını sağlamak için Bonjour veya mDNS olarak da bilinen Çok Noktaya Yayın DNS hizmetini kullanır.
- Bir tane aç web aynı ağdaki başka bir bilgisayardaki tarayıcı. TrueNAS'ı açın web truenas.local'a (veya Mini R IP adresinize) giderek arayüz.
Connect to the TrueNAS Interface
- Doğru NAS web interface uses default credentials for first‑time logins.
- Kullanıcı adı: yönetici
- Şifre: abcd1234
- Oturum açtıktan sonra sistem güvenliğini artırmak için Kimlik Bilgileri > Yerel Kullanıcılar bölümünde yönetici hesabı şifresini değiştirin.
- Ağa bağlı birden fazla TrueNAS cihazınız varsa mDNS'de ad çakışmaları yaşanabilir.
- Ana bilgisayar adını değiştirmek için web Kullanıcı arayüzüne gidin, Ağ'a gidin ve Genel Yapılandırma widget'ında Ayarlar'a tıklayın.
Bant Dışı Yönetim
- Bant dışı oturum açma işlemleri TrueNAS'tan ayrı kimlik bilgilerine sahiptir web arayüz. Kimlik bilgileri rastgele seçilir ve TrueNAS Mini R kasasının arkasına eklenir. Daha fazla ayrıntı için bkz. https://www.truenas.com/docs/sb-3273.
- For more on Mini R Out-of-band Management, see: https://www.truenas.com/docs/files/MiniX+OOBM25011.pdf4.
TrueNAS Sürümlerini Değiştir
- If you want to upgrade or run a different version of TrueNAS, you can find new and legacy versions at https://www.truenas.com/download-truenas-community-edition5 (ÖLÇEK).
- After downloading your desired version, you must use image utility like balenaEtcher or Rufus to flash the ISO file bir USB sürücüsüne.
- Plug the flashed USB drive into a USB port on your Mini and select it from the boot menu during system startup. Follow the install instructions on our Documentation Hub.

Ek Kaynaklar
- TrueNAS Documentation Hub, eksiksiz yazılım yapılandırması ve kullanım talimatlarına sahiptir. TrueNAS'ta Kılavuzu tıklayın web arayüz veya doğrudan şu adrese gidin: https://www.truenas.com/docs
- Ek donanım kılavuzları ve makaleler Documentation Hub'ın Donanım bölümündedir: https://www.truenas.com/docs/hardware
- TrueNAS Forumları, diğer TrueNAS kullanıcılarıyla etkileşim kurma ve yapılandırmalarını tartışma fırsatları sunar: https://forums.truenas.com
Bize Ulaşın
- Having issues? Please contact TrueNAS Enterprise Support to ensure a smooth resolution.
| Iletişim yöntemi | İletişim Seçenekleri |
| Web | https://www.truenas.com/support |
| E-posta | support@truenas.com |
| Telefon | Monday‑Friday, 6:00AM to 6:00PM Pacific Standard Time:
• Yalnızca ABD'de ücretsiz: 18554737449 Seçenek 2 • Yerel ve uluslararası: 14089434100 Seçenek 2 |
| Telefon | Mesai Sonrası Telefon (yalnızca 24×7 Altın Seviye Desteği):
• Yalnızca ABD'de ücretsiz: 18554995131 • Uluslararası: 1408-8783140 (Uluslararası arama ücretleri geçerli olacaktır) |
| Adres | iXsystems, Inc. dba TrueNAS ‑ 541 Division St, Campçan, CA 95008, ABD |

- Destek: 8554737449 veya 14089434100
- E-posta: support@truenas.com
Uyumluluk
Bu cihaz FCC kurallarının 15. Bölümüne uygundur. Çalışma aşağıdaki iki koşula tabidir:
- Bu cihaz zararlı girişimlere neden olamaz.
- Bu cihaz, istenmeyen çalışmaya neden olabilecek girişimler de dahil olmak üzere alınan her türlü girişimi kabul etmelidir.
MODEL ADI:
- TrueNAS Model Mini E+:
- CAN BUZ-3 (A) / NMB-3 (A)
- CİLTTAGE: 100-240VAC
- Current 10-5A Max
- UYARI: To remove all hazardous voltages, tüm güç kablolarının bağlantısını kesin.

- FREKANS: 50/60Hz
- TEMAS ETMEK: support@iXsystems.com
- www.iXsystems.com
- 18554737449
Belgeler / Kaynaklar
 |
TrueNAS Mini R Basic Rack [pdf] Kullanıcı Kılavuzu Mini R Basic Rack, Mini R, Basic Rack, Rack |