giriiş
This manual provides detailed instructions for the setup, operation, maintenance, and troubleshooting of your Pisichen 24-inch Touchscreen Monitor with Built-in Webcam (Model 238TS-CMR). This monitor features a 2K QHD (2560x1440) resolution display with a 100Hz refresh rate, 10-point multi-touch functionality, and an integrated pop-up webcam, designed to enhance your productivity and interactive experience.
Güvenlik Bilgileri
- Kazara düşmeleri önlemek için monitörü her zaman sabit ve düz bir yüzeye yerleştirin.
- Monitörü yağmura, neme veya aşırı sıcaklıklara maruz bırakmayın.
- Aşırı ısınmayı önlemek için havalandırma açıklıklarını tıkamaktan kaçının.
- Yalnızca monitörle birlikte verilen güç adaptörünü kullanın.
- Temizlemeden önce veya monitör uzun süre kullanılmayacaksa, güç kablosunu prizden çıkarın.
- Monitörü kendiniz sökmeye veya onarmaya çalışmayın. Tüm bakım işlemlerini yetkili personele yaptırın.
Paket İçeriği
Lütfen paketinizde tüm öğelerin mevcut olduğundan emin olun:
- Pisichen 24-inch Touchscreen Monitor (Model 238TS-CMR)
- Monitör Sehpası (Taban ve Kol)
- Güç Adaptörü ve Kablosu
- HDMI Kablosu
- USB-C'den USB-C'ye Kablo
- USB-A to USB-B Cable (for touch functionality with non-USB-C devices)
- Kullanım Kılavuzu (bu belge)
Kurmak
1. Stand Montajı
- Monitörü ambalajından dikkatlice çıkarın ve çizilmeleri önlemek için yumuşak ve temiz bir yüzeye yüzü aşağı bakacak şekilde yerleştirin.
- Attach the stand arm to the back of the monitor using the provided screws.
- Connect the stand base to the stand arm and secure it with the designated screw.
- Once assembled, carefully lift the monitor and place it upright on your desk.

Figure 1: Monitor stand assembly and adjustment capabilities.
2. Cihazınıza Bağlanma
The monitor supports multiple connection types. Choose the appropriate cable for your device.
- Güç Bağlantısı: Connect the power adapter to the monitor's DC power port and then plug it into a power outlet.
- USB-C Connection (Recommended for full functionality): If your device has a USB-C port that supports DisplayPort Alternate Mode, connect the monitor using the provided USB-C to USB-C cable. This single cable can transmit video, audio, and touch signals, and may also provide power delivery to your laptop.
- HDMI or DisplayPort Connection: Connect an HDMI or DisplayPort cable from your device to the corresponding port on the monitor for video and audio. For touch functionality, you must also connect the USB-A to USB-B cable from your device's USB port to the monitor's USB-B upstream port.
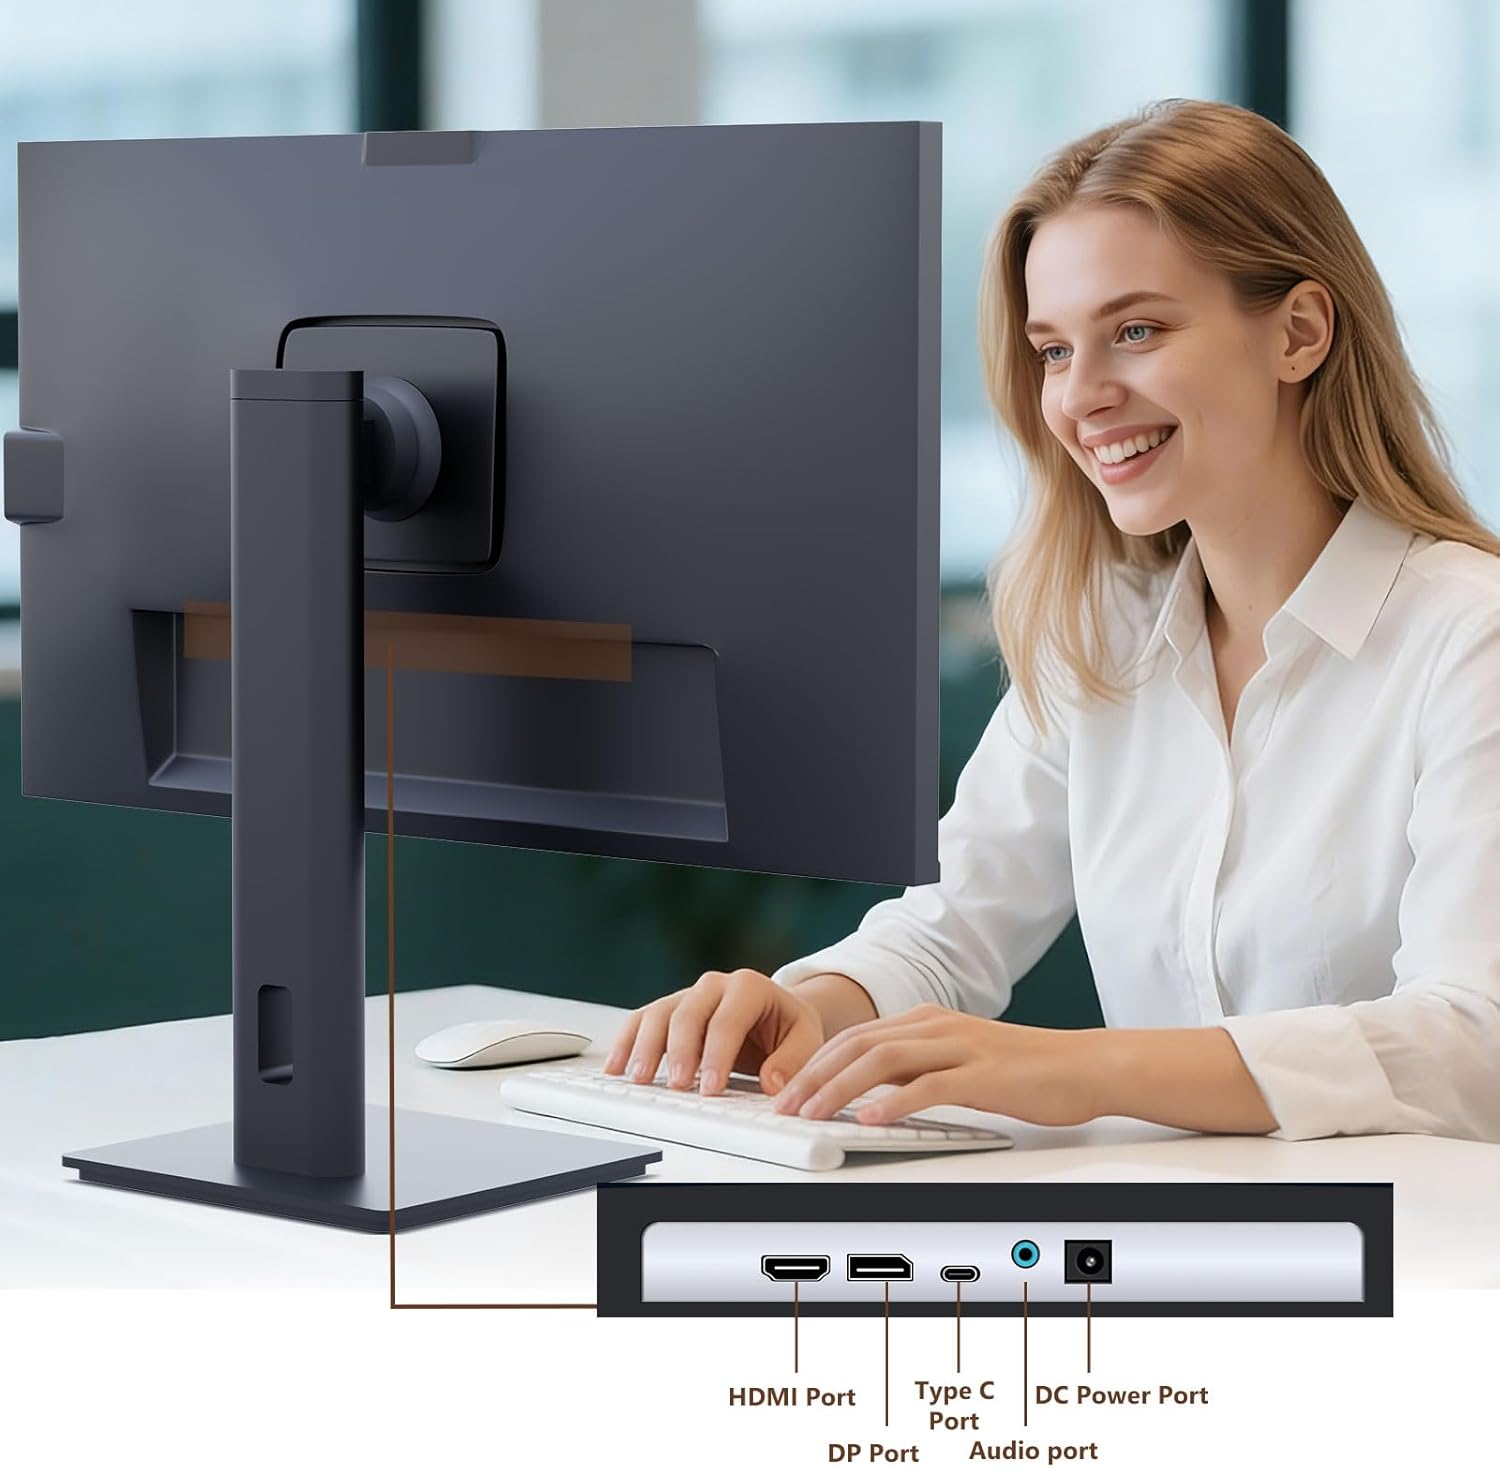
Figure 2: Available ports on the Pisichen monitor.

Figure 3: USB-C one-cable connection for simplified setup.

Figure 4: Connection options for desktop and laptop devices.
3. İlk Güç Açma
Press the power button located on the monitor to turn it on. The monitor will automatically detect the active input source. If multiple sources are connected, you may need to select the correct input via the On-Screen Display (OSD) menu.
Kullanım Talimatları
1. Dokunmatik Ekran İşlevselliği
The monitor supports 10-point multi-touch. Ensure the USB-C cable is connected (for full functionality) or the USB-A to USB-B cable is connected in addition to your video cable for touch input to work. Touch gestures are similar to those used on tablets or smartphones.
- Musluk: Single touch for selection or activation.
- Sürüklemek: Touch and hold, then move your finger to move items.
- Sıkıştırma/Yayma: Yakınlaştırmak veya uzaklaştırmak için iki parmağınızı kullanın.
- Tokatlamak: Ekranda kaydırmak veya gezinmek için parmağınızı ekran üzerinde hareket ettirin.

Figure 5: Demonstrating intuitive touch interaction.

Figure 6: Collaborative use of the multi-touch display.
2. Built-in Webkam Kullanımı
The monitor features a pop-up webcam for privacy and convenience. To use the webcam, gently press the top center of the monitor frame where the webcam is located. It will pop up. To retract it, gently press it down until it clicks into place.
Ensure your operating system and video conferencing software recognize the webcam. No additional drivers are typically required for basic functionality.

Figure 7: The monitor with its built-in pop-up webcam in use during a video conference.

Figure 8: High-definition video calls using the integrated webkam.
3. Ekran Üstü Görüntüleme (OSD) Menüsü
OSD menüsü, çeşitli monitör ayarlarını yapmanıza olanak tanır. Seçenekler arasında gezinmek ve seçim yapmak için monitörün arkasındaki veya altındaki düğmeleri kullanın.
- Parlaklık/Kontrast: Ekranın parlaklık ve kontrast seviyelerini ayarlayın.
- Renk ayarları: Renk sıcaklığını, gama değerini ve diğer renk ile ilgili parametreleri değiştirin.
- Giriş kaynağı: Manually select between HDMI, DisplayPort, or USB-C inputs.
- Ses: Dahili hoparlörler veya bağlı kulaklıklar için ses seviyesini ayarlayın.
- Resim Modu: Önceden ayarlanmış görüntüleme modlarını seçin (örneğin, Standart, Oyun, Film).
- Yüksek Dinamik Aralık (HDR): Enable or disable High Dynamic Range settings for improved dark detail optimization.

Figure 9: HDR feature for enhanced visual detail.
4. Ergonomik Ayarlamalar
Monitör standı, monitörünüzü en iyi şekilde kullanmanız için çeşitli ayarlamalara olanak tanır. viewkonfor:
- Yükseklik Ayarı: Monitörü hafifçe yukarı veya aşağı doğru itin veya çekin.
- Tilt: Tilt the screen forward or backward to find the ideal angle.
- Döner: Monitörü tabanı üzerinde sola veya sağa döndürün.
- Pivot: Dikey mod için ekranı 90 derece döndürün. viewIng.
Şekil 10: Optimum ergonomik ayarlamalar viewIng.
Bakım
- Ekranın Temizlenmesi: Ekranı yumuşak, tiftiksiz bir bezle nazikçe silin. İnatçı lekeler için,ampBezi su veya aşındırıcı olmayan bir ekran temizleyici ile hafifçe silin. Sıvıyı doğrudan ekrana püskürtmeyin.
- Vücudun Temizlenmesi: Monitörün yüzeyini silmek için yumuşak, kuru bir bez kullanın.asing. Güçlü deterjanlar veya aşındırıcı temizleyiciler kullanmaktan kaçının.
- Depolamak: Monitörü uzun süre saklayacaksanız, tüm kabloları çıkarın ve serin ve kuru bir yerde, tercihen orijinal ambalajında saklayın.
Sorun giderme
Güç Yok
- Güç kablosunun hem monitöre hem de elektrik prizine güvenli bir şekilde bağlandığından emin olun.
- Başka bir cihazı takarak elektrik prizinin çalıştığını doğrulayın.
- Check if the power adapter is correctly connected to the monitor.
Sinyal Yok / Boş Ekran
- Confirm the video cable (HDMI, DP, or USB-C) is securely connected to both the monitor and your device.
- Monitörün OSD menüsünde doğru giriş kaynağının seçildiğinden emin olun.
- Bilgisayarınızın ekran ayarlarını kontrol ederek monitörün algılandığından ve etkinleştirildiğinden emin olun.
- Mümkünse farklı bir video kablosu veya portu deneyin.
Touch Functionality Not Working
- If using HDMI or DisplayPort, ensure the USB-A to USB-B cable is connected from your device to the monitor.
- If using USB-C, ensure your device's USB-C port supports DisplayPort Alternate Mode and touch data transmission.
- Check your operating system's touch settings.
- Note that some devices, such as game consoles (PS3/4/5, Xbox, Steam Deck, Fire TV Cube) and certain Apple products (iPhone, iPad, Switch), do not support touch functionality with this monitor.

Figure 11: Touch compatibility chart for various devices.
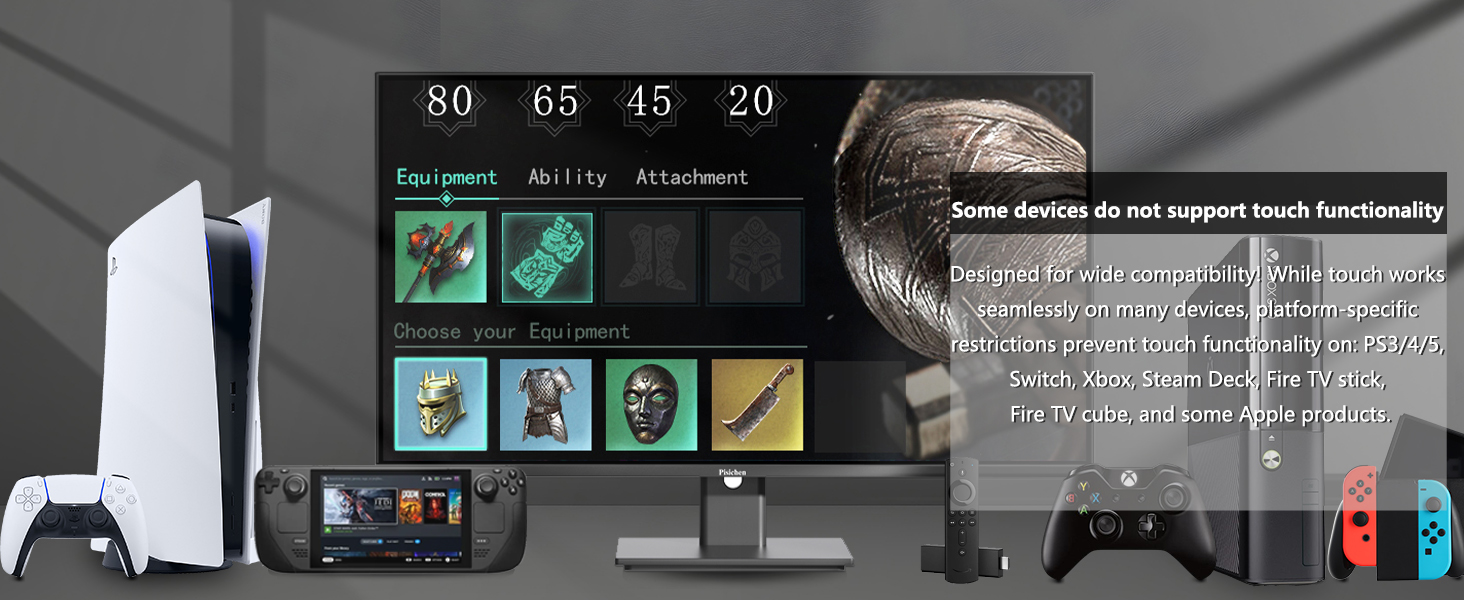
Figure 12: Devices that do not support touch functionality.
WebKamera algılanmadı
- Sağlamak webcam is fully popped up.
- Verify that the USB connection (either USB-C or USB-A to USB-B) is properly established.
- İşletim sisteminizin gizlilik ayarlarını kontrol ederek kameranın uygulamalara erişim izni verildiğinden emin olun.
- Bilgisayarınızı yeniden başlatın.
Özellikler
| Özellik | Tanım |
|---|---|
| Model Numarası | 238TS-CMR |
| Ekran Boyutu | 23.8 inç |
| Çözünürlük | 2560 x 1440 (QHD Geniş 1440p) |
| Yenileme Hızı | 100Hz |
| Parlaklık | 400 Kandela (nit) |
| Kontrast Oranı | 3000:1 |
| Dokunma Teknolojisi | 10 Noktalı Çoklu Dokunma |
| Webkam | Built-in Pop-up Camera |
| Bağlantı | HDMI, DisplayPort (DP), USB Type-C, USB-B (upstream), Audio Out, DC Power |
| En Boy Oranı | 16:9 |
| Ekran Yüzeyi | Parlak |
| Ürün Boyutları | 1.97 x 21.26 x 12.6 inç |
| Ürün Ağırlığı | 11.53 pound |
| Üretici | Shenzhen Konowa Elektronik A.Ş. |
Garanti ve Destek
Your Pisichen monitor is covered by a limited warranty. Please refer to the warranty card included in your package for specific terms and conditions, including the warranty period and coverage details.
For technical support, troubleshooting assistance, or warranty claims, please contact Pisichen customer service. Contact information can typically be found on the manufacturer's websitede veya garanti belgesinde yer almaktadır.
When contacting support, please have your monitor's model number (238TS-CMR) and purchase information readily available.


