1. Giriş
This manual provides detailed instructions for the installation, configuration, and operation of your ASRock X870 Taichi Creator Motherboard. This high-performance ATX motherboard is designed to support AMD Ryzen 9000, 8000, and 7000 Series Processors with an AM5 socket, offering advanced features for creators and enthusiasts.
2. Güvenlik Bilgileri
Please read the following safety guidelines carefully before installing or operating your motherboard to prevent damage to the product or injury to yourself.
- Herhangi bir bileşene dokunmadan önce mutlaka güç kablosunu duvar prizinden çıkarın.
- Wear an anti-static wrist strap to prevent electrostatic discharge (ESD) when handling components.
- Aşırı ısınmayı önlemek için bilgisayarınızın kasasında yeterli havalandırma olduğundan emin olun.
- Anakartı nemden ve aşırı sıcaklıklardan uzak tutun.
- Refer to the CPU and other component manuals for specific installation instructions.
3. Paket İçeriği
Aşağıda listelenen tüm parçaların anakart paketinizde mevcut olduğundan emin olun. Herhangi bir parça eksik veya hasarlıysa, satıcınızla iletişime geçin.
- ASRock X870 Taichi Creator Anakart
- Hızlı Kurulum Kılavuzu
- Mevzuat Bildirimi
- SATA Veri Kabloları
- Wi-Fi Anteni
- M.2 Vidalar ve Ara Parçalar
- ASRock Graphics Card Holder
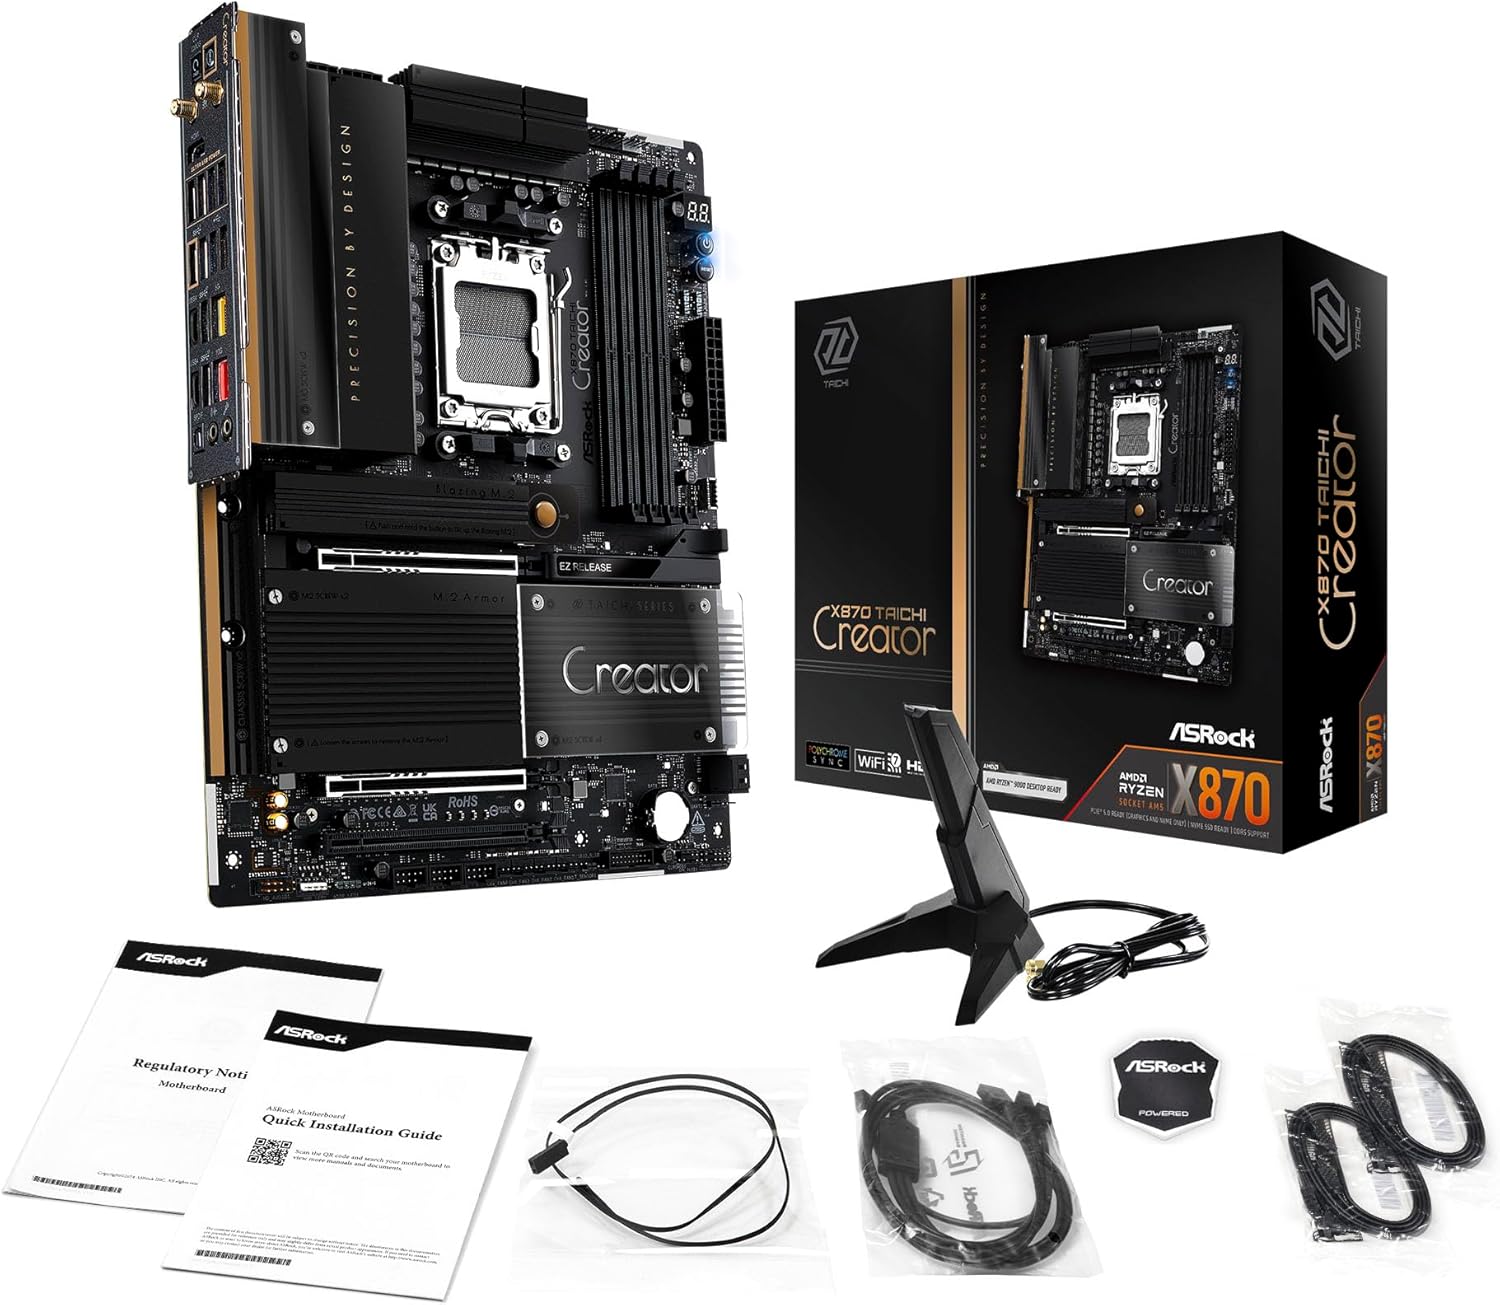
Image: The ASRock X870 Taichi Creator Motherboard shown alongside its retail packaging and various accessories, including cables, documentation, and a graphics card holder.
4. Kurulum ve Kurulum
Anakartınızın ve bileşenlerinin doğru kurulumu için aşağıdaki adımları izleyin.
4.1. İşlemci Kurulumu (Soket AM5)
- Anakart üzerinde AM5 CPU soketini bulun.
- Gently lift the CPU retention lever.
- Align the triangular mark on your AMD Ryzen processor with the corresponding mark on the socket.
- Carefully place the CPU into the socket without applying force.
- Lower the retention lever until it clicks into place, securing the CPU.

Resim: Yukarıdan aşağıya view of the ASRock X870 Taichi Creator Motherboard, highlighting the central AM5 CPU socket and surrounding components like VRMs and RAM slots.
4.2. Bellek (RAM) Kurulumu
The motherboard supports 4 x DDR5 DIMM slots for dual-channel memory technology.
- DIMM yuvasının her iki ucundaki klipsleri açın.
- DDR5 bellek modülündeki çentiği DIMM yuvasındaki anahtarla hizalayın.
- Bellek modülünü klipsler yerine oturana kadar sıkıca yuvaya yerleştirin.
- For dual-channel configuration, refer to your motherboard manual for recommended slot pairing.
4.3. Depolama Aygıtı Kurulumu
The motherboard features M.2 slots and SATA3 ports for storage.
4.3.1. M.2 SSD Kurulumu
The board includes 1 Ultra M.2 (PCIe Gen3x4), 1 Hyper M.2 (PCIe Gen4x4), and 2 Blazing M.2 (PCIe Gen5x4) slots.
- Locate the desired M.2 slot and remove the M.2 heatsink if present.
- M.2 SSD'yi yuvaya 30 derecelik bir açıyla yerleştirin.
- SSD'yi hafifçe aşağı doğru bastırın ve birlikte verilen M.2 vidası veya ara parçasıyla sabitleyin.
- En iyi termal performans için M.2 soğutucusunu tekrar takın.
4.3.2. SATA Aygıtının Kurulumu
Connect SATA storage devices (HDDs/SSDs) to the 4 SATA3 ports using SATA data cables.
4.4. PCIe Kart Kurulumu
The motherboard provides 2 PCIe 5.0 x16 (x8/x8) slots and 1 PCIe 3.0 x16 slot.
- Select an available PCIe slot.
- PC kasanızdan ilgili genişletme yuvası kapağını çıkarın.
- Align your PCIe card with the slot and press down firmly until it is seated correctly.
- Kartı bir vida kullanarak bilgisayar kasasına sabitleyin.
4.5. Güç Bağlantıları
Güç kaynağı ünitenizden (PSU) gelen 24 pinli ATX güç konektörünü ve 8 pinli (veya 4+4 pinli) CPU güç konektörünü anakart üzerindeki ilgili portlara bağlayın.
4.6. Ön Panel ve Arka Giriş/Çıkış Bağlantıları
Connect your PC case's front panel connectors (power button, reset button, USB ports, audio jacks) to the appropriate headers on the motherboard. Connect peripherals to the rear I/O panel.

Resim: Yakın çekim view of the rear I/O panel of the ASRock X870 Taichi Creator Motherboard, showing various ports including USB, HDMI, Ethernet, and audio jacks.
5. Kullanım Talimatları
5.1. İlk Önyükleme ve BIOS/UEFI Kurulumu
- Bilgisayarınızı monte ettikten sonra, monitörü, klavyeyi ve fareyi bağlayın.
- Power on your system. During startup, repeatedly press the Del or F2 BIOS/UEFI kurulum yardımcı programına girmek için tuşa basın.
- Configure boot order, enable XMP/EXPO for memory, and adjust other settings as needed.
- Değişiklikleri kaydedin ve BIOS/UEFI'den çıkın. Sistem yeniden başlatılacaktır.
5.2. Sürücü Kurulumu
İşletim sisteminizi kurduktan sonra, anakart bileşenleri için gerekli sürücüleri yükleyin. Bunları genellikle ASRock destek sayfasında bulabilirsiniz. websiteyi veya birlikte verilen sürücü CD/USB sürücüsünü kullanın.
- Yonga Seti Sürücüleri
- LAN Drivers (10Gbps, 5Gbps)
- Wi-Fi 7 + Bluetooth Drivers
- Ses Sürücüleri (Realtek ALC4082)
- USB Sürücüleri
6. Bakım
6.1. Temizlik
Regularly clean your PC to prevent dust buildup, which can lead to overheating. Use compressed air to remove dust from fans, heatsinks, and other components. Ensure the system is powered off and unplugged before cleaning.
6.2. BIOS Güncellemeleri
ASRock'ı periyodik olarak kontrol edin. website for BIOS/UEFI updates. Updates can improve system stability, add support for new CPUs, or fix bugs. Follow the instructions provided by ASRock carefully when performing a BIOS update.
7. Sorun Giderme
Sorunlarla karşılaşırsanız aşağıdaki genel sorun giderme adımlarına bakın:
- Güç Yok: Ensure all power cables (24-pin ATX, 8-pin CPU) are securely connected. Check your PSU and wall outlet.
- Görüntü yok: Verify that your monitor is connected to the correct graphics output (dedicated GPU or integrated graphics). Reseat your graphics card and RAM modules.
- Sistem Kararsızlığı: Check CPU and GPU temperatures. Ensure RAM is properly seated and configured (XMP/EXPO settings). Update drivers and BIOS.
- BIOS Flashback: The motherboard features a BIOS Flashback button on the rear I/O panel. This allows you to update the BIOS without a CPU or RAM installed. Refer to the ASRock webBu özelliğin kullanımıyla ilgili ayrıntılı talimatlar için lütfen siteyi ziyaret edin.
- CMOS'u temizle: If your system fails to boot after changing BIOS settings, you can clear the CMOS to reset BIOS settings to default. Locate the 'CLR CMOS' button or jumper on the motherboard (often near the rear I/O).
8. Özellikler
| Özellik | Şartname |
|---|---|
| Marka | ASR kaya |
| Model Adı | X870 |
| Ürün Model Numarası | 90-MXBTE0-A0UAYZ |
| CPU Soketi | Soket AM5 |
| Uyumlu İşlemciler | AMD Ryzen 9000, AMD Ryzen 8000, AMD Ryzen 7000 Serisi |
| Yonga Seti Türü | AMD X870 |
| RAM Bellek Teknolojisi | DDR5 |
| Bellek Yuvaları | 4 x DDR5 DIMM Slots (Dual Channel, up to 8000+(OC), 256GB max) |
| Grafik Çıktısı | 2 x USB4 Type-C (up to 8K 30Hz), 1 x HDMI 2.1 (up to 4K 120Hz) |
| PCIe Yuvaları | 2 x PCIe 5.0 x16 (x8/x8), 1 x PCIe 3.0 x16 |
| Depolamak | 4 x SATA3, 1 x Ultra M.2 (PCIe Gen3x4), 1 x Hyper M.2 (PCIe Gen4x4), 2 x Blazing M.2 (PCIe Gen5x4) |
| Yerel Ağ | 10Gbps LAN, 5Gbps LAN |
| Kablosuz LAN | 802.11be Wi-Fi 7 + Bluetooth |
| Ses | Realtek ALC4082 7.1 Kanal HD Ses Kodeği, Nahimic Ses |
| USB Bağlantı Noktaları (Arka) | 2 x USB 2.0, 6 x USB 3.2 Gen1, 2 x USB 3.2 Gen2, 2 x USB4 Type-C |
| USB Bağlantı Noktaları (Ön) | 6 x USB 2.0, 4 x USB 3.2 Gen1, 1 x USB 3.2 Gen2x2 Type-C |
| Form Faktörü | ATX |
| Güç Fazı Tasarımı | 18+2+1 Power Phase, 80A SPS |
9. Garanti Bilgileri
ASRock motherboards typically come with a limited manufacturer's warranty. The duration and terms of the warranty may vary by region and retailer. Please retain your proof of purchase for warranty claims. For detailed warranty information, refer to the official ASRock websiteyi ziyaret edin veya satın alma noktanızla iletişime geçin.
10. Teknik Destek
Teknik destek, sürücü indirmeleri, BIOS güncellemeleri ve daha fazla ürün bilgisi için lütfen resmi ASRock destek sitesini ziyaret edin. webalan:
You may also contact ASRock customer service directly through their webKişiselleştirilmiş destek için site.


