1. Giriş
Thank you for choosing the DAOLAR F097-E16A-3 Type 2 CEE EV Charger. This mobile charging station is designed to provide efficient and flexible charging for your electric vehicle. It features adjustable charging power and is compatible with a wide range of EVs and plug-in hybrids across Europe. Please read this manual carefully before use to ensure safe and optimal operation.
2. Önemli Güvenlik Bilgileri
- Tüm talimatları okuyunuz: Before using the charger, read all instructions and cautionary markings in this manual and on the product.
- Elektriksel Güvenlik: Bu cihaz yüksek sesle çalışırtage. Do not attempt to disassemble, repair, or modify the charger. Only qualified personnel should perform maintenance.
- Uygun Topraklama: Ensure the CEE socket used is properly grounded and installed by a certified electrician.
- Suya Maruz Kalmaktan Kaçının: Although rated IP65 for dust and water resistance, avoid submerging the charger in water. Do not operate if the charger or cables are visibly damaged or wet.
- Kablo Kullanımı: Do not drive over the charging cable. Avoid sharp bends, kinks, or crushing the cable.
- Çocuklar ve Evcil Hayvanlar: Keep the charger and cables out of reach of children and pets during operation.
- Çalışma Ortamı: Use the charger within the specified operating temperature range of -25 °C to +50 °C.
- Acil durdurma: In case of an emergency, immediately disconnect the charger from the power source.
3. Paket İçeriği
Kutuyu dikkatlice açın ve tüm ürünlerin eksiksiz ve hasarsız olduğundan emin olun. Herhangi bir ürün eksik veya hasarlıysa, lütfen müşteri desteğiyle iletişime geçin.

Resim: Üzeriview of the items included in the DAOLAR F097-E16A-3 EV Charger package. This includes the mobile wallbox unit, a set of screws for mounting, the instruction manual, a cleaning cloth, a storage bag for portability, and drilling templates for wall installation.
- DAOLAR Mobile Wallbox (EV Charger Unit with integrated cables)
- Screw Set (for wall mounting)
- Kullanım Kılavuzu
- Temizlik Bezi
- Depolama Çantası
- Drilling Templates (for wall mounting)
- EV Cable Holder (as per product specifications)
4. Kurulum
The DAOLAR F097-E16A-3 charger offers flexible installation options: it can be used as a portable unit or wall-mounted for a permanent charging station.
4.1 Portable Use (Plug & Play)
For portable use, no complex installation is required. Simply follow these steps:
- Ensure the CEE 16A industrial socket is compatible and properly installed.
- Connect the red 16A CEE industrial plug of the charger to the compatible CEE socket.
- Connect the Type 2 charging cable to your electric vehicle's charging port.
- The charger will automatically initiate the charging process.
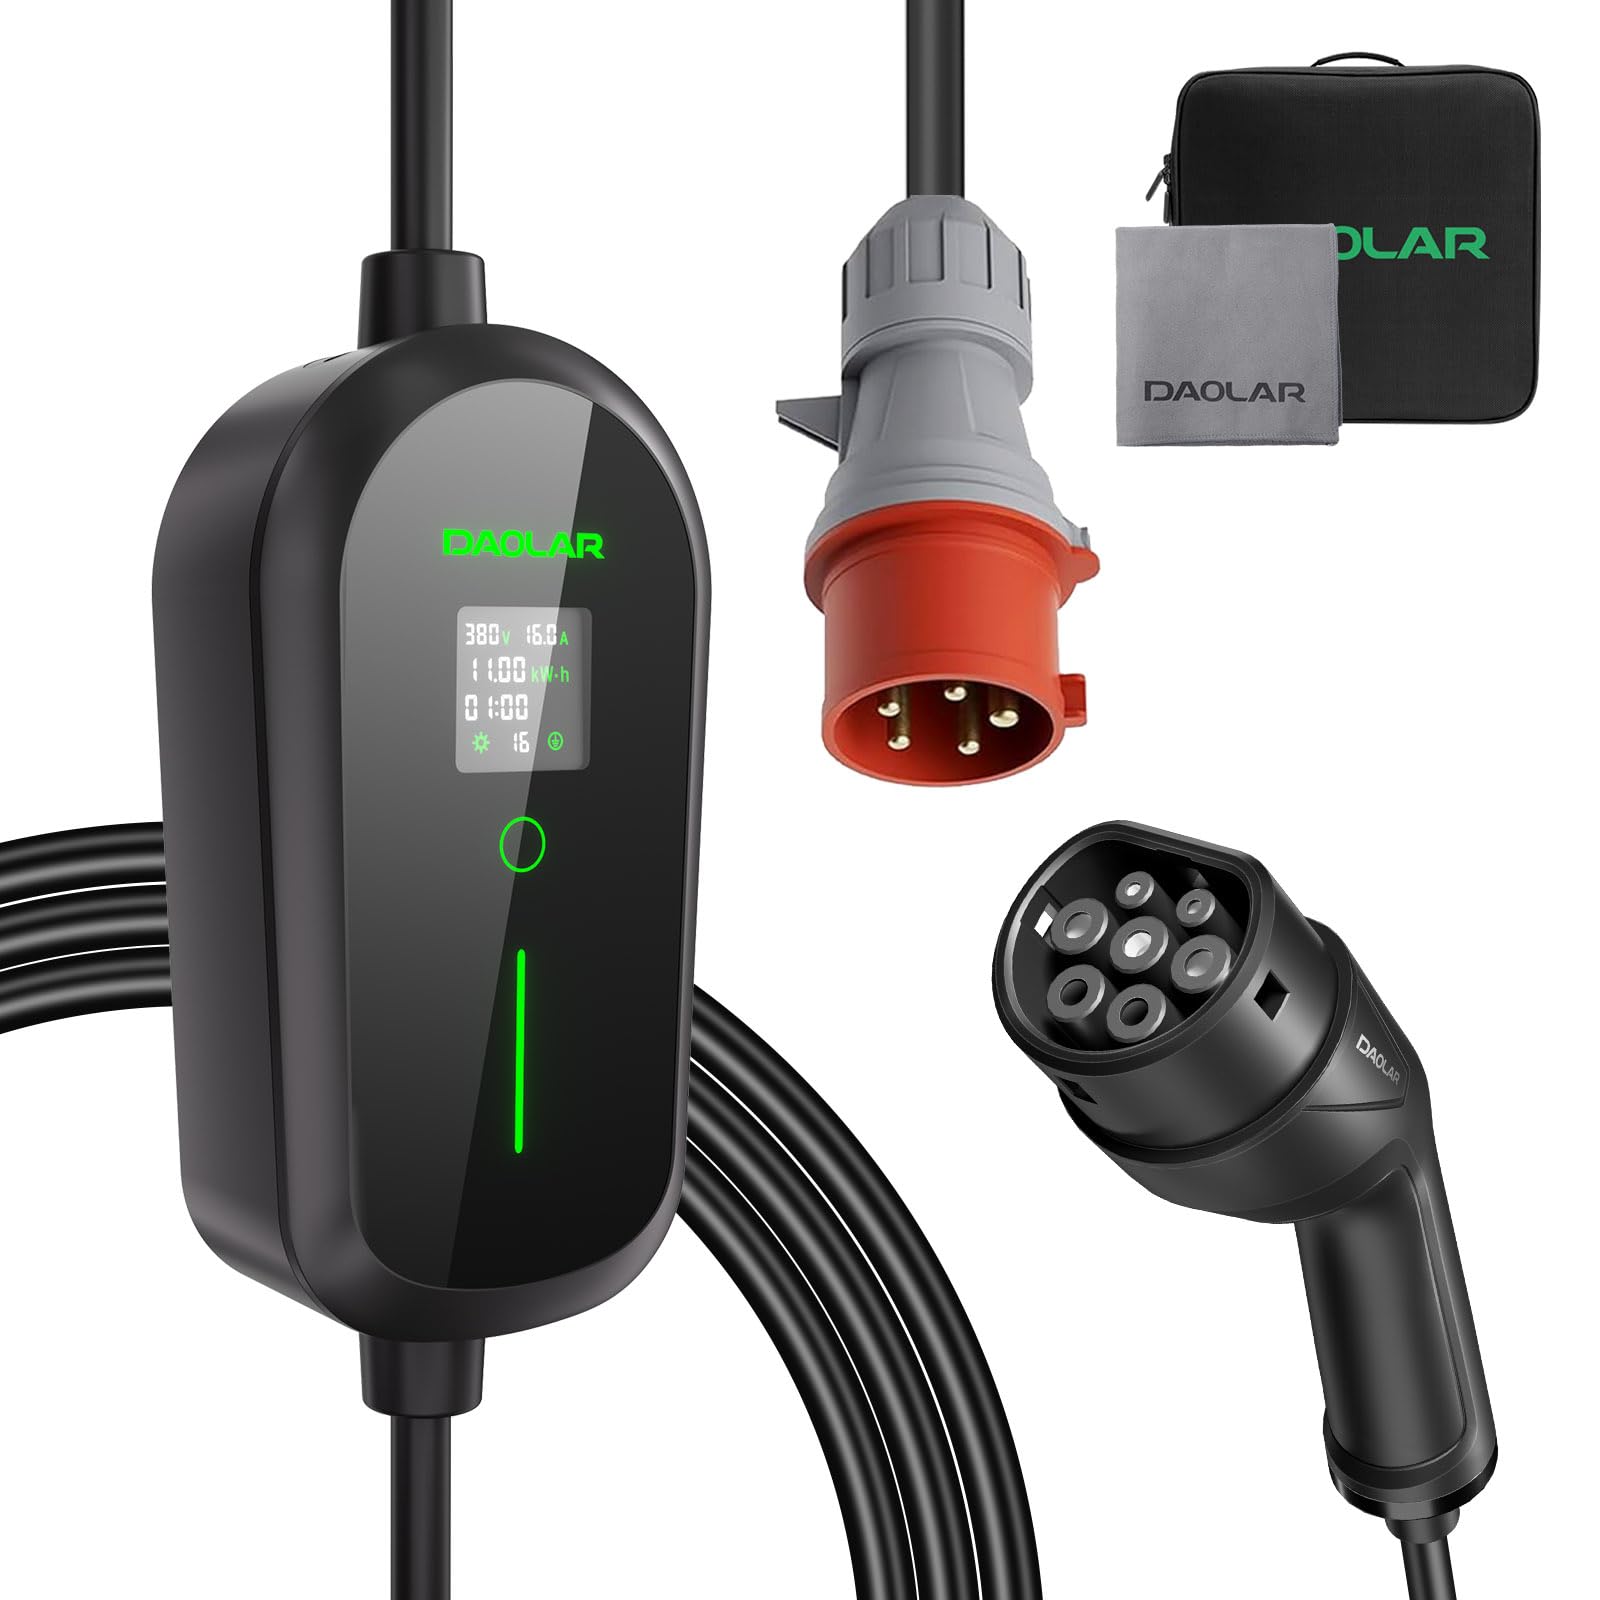
Image: Diagram illustrating the connection of the CEE industrial plug to a wall socket and the Type 2 connector to an electric vehicle. It also highlights the 62mm diameter of the CEE plug and a comparison showing 3x faster charging.
4.2 Duvara Monte Kurulum
For a more permanent setup, the charger can be wall-mounted. Use the provided drilling templates and screw set.
- Choose a suitable location near a CEE 16A industrial socket, ensuring it is protected from direct impact and excessive moisture.
- Use the drilling templates to mark the positions for the mounting screws on the wall.
- Delikler açın ve dübelleri yerleştirin.
- Secure the charger's mounting bracket to the wall using the provided screws.
- Mount the charger unit onto the bracket.
- Install the EV cable holder to keep the cable tidy when not in use.
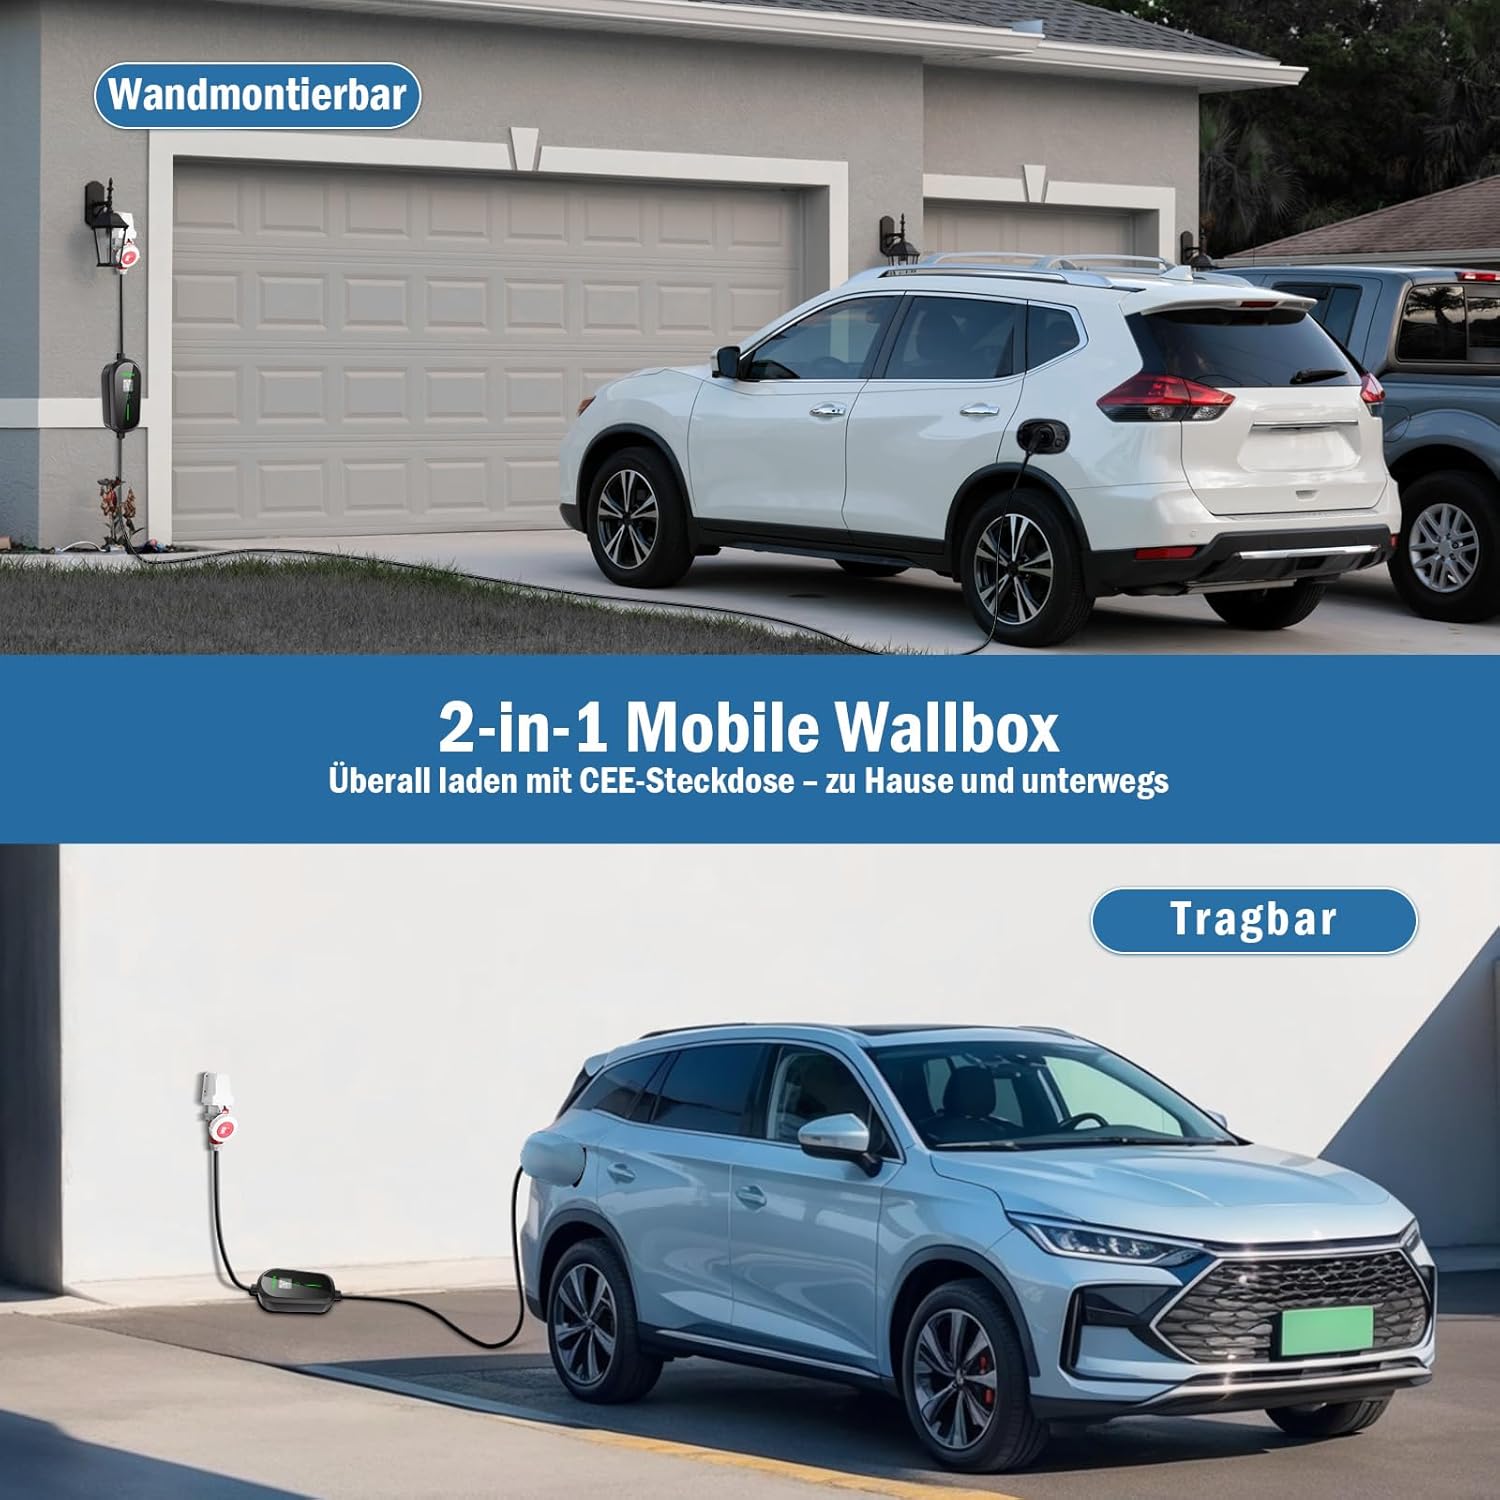
Image: This image displays the DAOLAR F097-E16A-3 EV Charger in two configurations: wall-mounted (labeled "Wandmontierbar") and portable (labeled "Tragbar"), demonstrating its versatility for home and on-the-go charging with a CEE socket.
5. Kullanım Talimatları
Once connected, the charger's display will activate, showing real-time charging information. You can adjust the charging current and set a charging schedule.
5.1 Starting the Charging Process
- Ensure the charger is securely plugged into the CEE 16A socket.
- Plug the Type 2 connector into your vehicle's charging port.
- The charger will perform a self-check and automatically begin charging.
5.2 Şarj Akımının Ayarlanması
The charger allows you to adjust the charging current to suit your needs or the capacity of your electrical system. This can help preserve battery life or manage power consumption.
- Before charging starts, or during charging (if supported by your vehicle), press the touch button located below the display.
- Each press will cycle through the available current settings: 6A / 10A / 13A / 16A.
- Select the desired current. The charger will automatically apply the new setting.
5.3 Setting a Charging Schedule (Timer)
Utilize the programmed charging feature (1-12 hours) to take advantagDüşük tarifeli elektrik tarifeleri.
- Before connecting to the vehicle, or when the charger is in standby, use the touch button to access the timer settings.
- Cycle through the timer options (1-12 hours) to set the desired delay before charging begins.
- Once the timer is set and the vehicle is connected, charging will commence after the specified delay.

Image: The charger's touchscreen display, illustrating the adjustable current settings (6A, 8A, 10A, 13A, 16A) and the programmable charging timer (1-12 hours). The display also shows real-time charging data such as voltage, current, power, and charging duration.
5.4 Stopping the Charging Process
- Tip 2 konektörünü aracınızın şarj portundan çıkarın.
- Unplug the CEE 16A industrial plug from the wall socket.
- Store the cable neatly using the provided cable holder.
6. Bakım
Regular maintenance ensures the longevity and safe operation of your DAOLAR EV charger.
- Temizlik: Use the provided cleaning cloth to wipe down the charger unit and cables. Do not use abrasive cleaners or solvents. Ensure the charger is unplugged before cleaning.
- Kablo Denetimi: Periodically inspect the charging cable and connectors for any signs of wear, cuts, fraying, or damage. If damage is found, discontinue use immediately and contact customer support.
- Depolamak: When not in use, store the charger and cables in the provided storage bag in a dry, cool place, away from direct sunlight and extreme temperatures. Use the cable holder to prevent tangling and damage.
- Çevre Koruma: The charger is designed with an IP65 rating, protecting it from dust and water splashes. However, avoid prolonged exposure to heavy rain or snow, and ensure connectors are dry before use.

Image: This image demonstrates the DAOLAR F097-E16A-3 EV Charger's durability, showing it in use during rainy and snowy conditions. It highlights the IP65 water and dust protection and its operational temperature range of -25°C to +50°C, suitable for all weather charging.
7. Sorun Giderme
Şarj cihazınızla ilgili sorunlarla karşılaşırsanız, aşağıdaki yaygın sorunlara ve çözümlere bakın:
| Sorun | Olası Neden | Çözüm |
|---|---|---|
| Şarj cihazı açılmıyor. | No power from the CEE socket; faulty socket; charger fault. | Check the CEE socket with another device. Ensure the plug is fully inserted. If the issue persists, contact customer support. |
| Şarj işlemi başlamıyor. | Vehicle not properly connected; vehicle charging port issue; charger fault; incorrect current setting. | Ensure the Type 2 connector is fully inserted into the vehicle. Check vehicle's dashboard for charging status. Try adjusting the current setting. Restart the charger by unplugging and re-plugging. |
| Charging stops unexpectedly. | Power interruption; vehicle fault; charger overheating; cable damage. | Check the power supply. Inspect the cable for damage. Allow the charger to cool down if it feels hot. Consult your vehicle's manual. |
| Ekranda bir hata kodu görünüyor. | Internal fault; communication error with vehicle. | Note the error code. Try restarting the charger. If the error persists, contact customer support with the error code. |
If these solutions do not resolve the issue, please contact DAOLAR customer support for further assistance.
8. Özellikler
| Marka | DAOLAR |
| Örnek | F097-E16A-3 |
| Şarj Gücü | Up to 11 kW (Three-phase) |
| Ayarlanabilir Akım | 6A / 10A / 13A / 16A |
| Bağlantı Tipi (Araç) | Tip 2 (IEC 62196) |
| Connector Type (Power Supply) | CEE 16A 5-Pin Industrial Plug |
| Koruma Derecesi | IP65 (Toza ve Suya Dayanıklı) |
| Çalışma Sıcaklığı | -25 °C ila +50 °C |
| Kablo Uzunluğu | Approximately 6 meters (Total length) |
| Ürün Ağırlığı | 3.8 Kilogram |
| Paket Boyutları | 34.79x34.6x16.2 cm |
| Dahil Bileşenler | EV Cable Holder, Screw Set, Instruction Manual, Cleaning Cloth, Storage Bag, Drilling Templates |
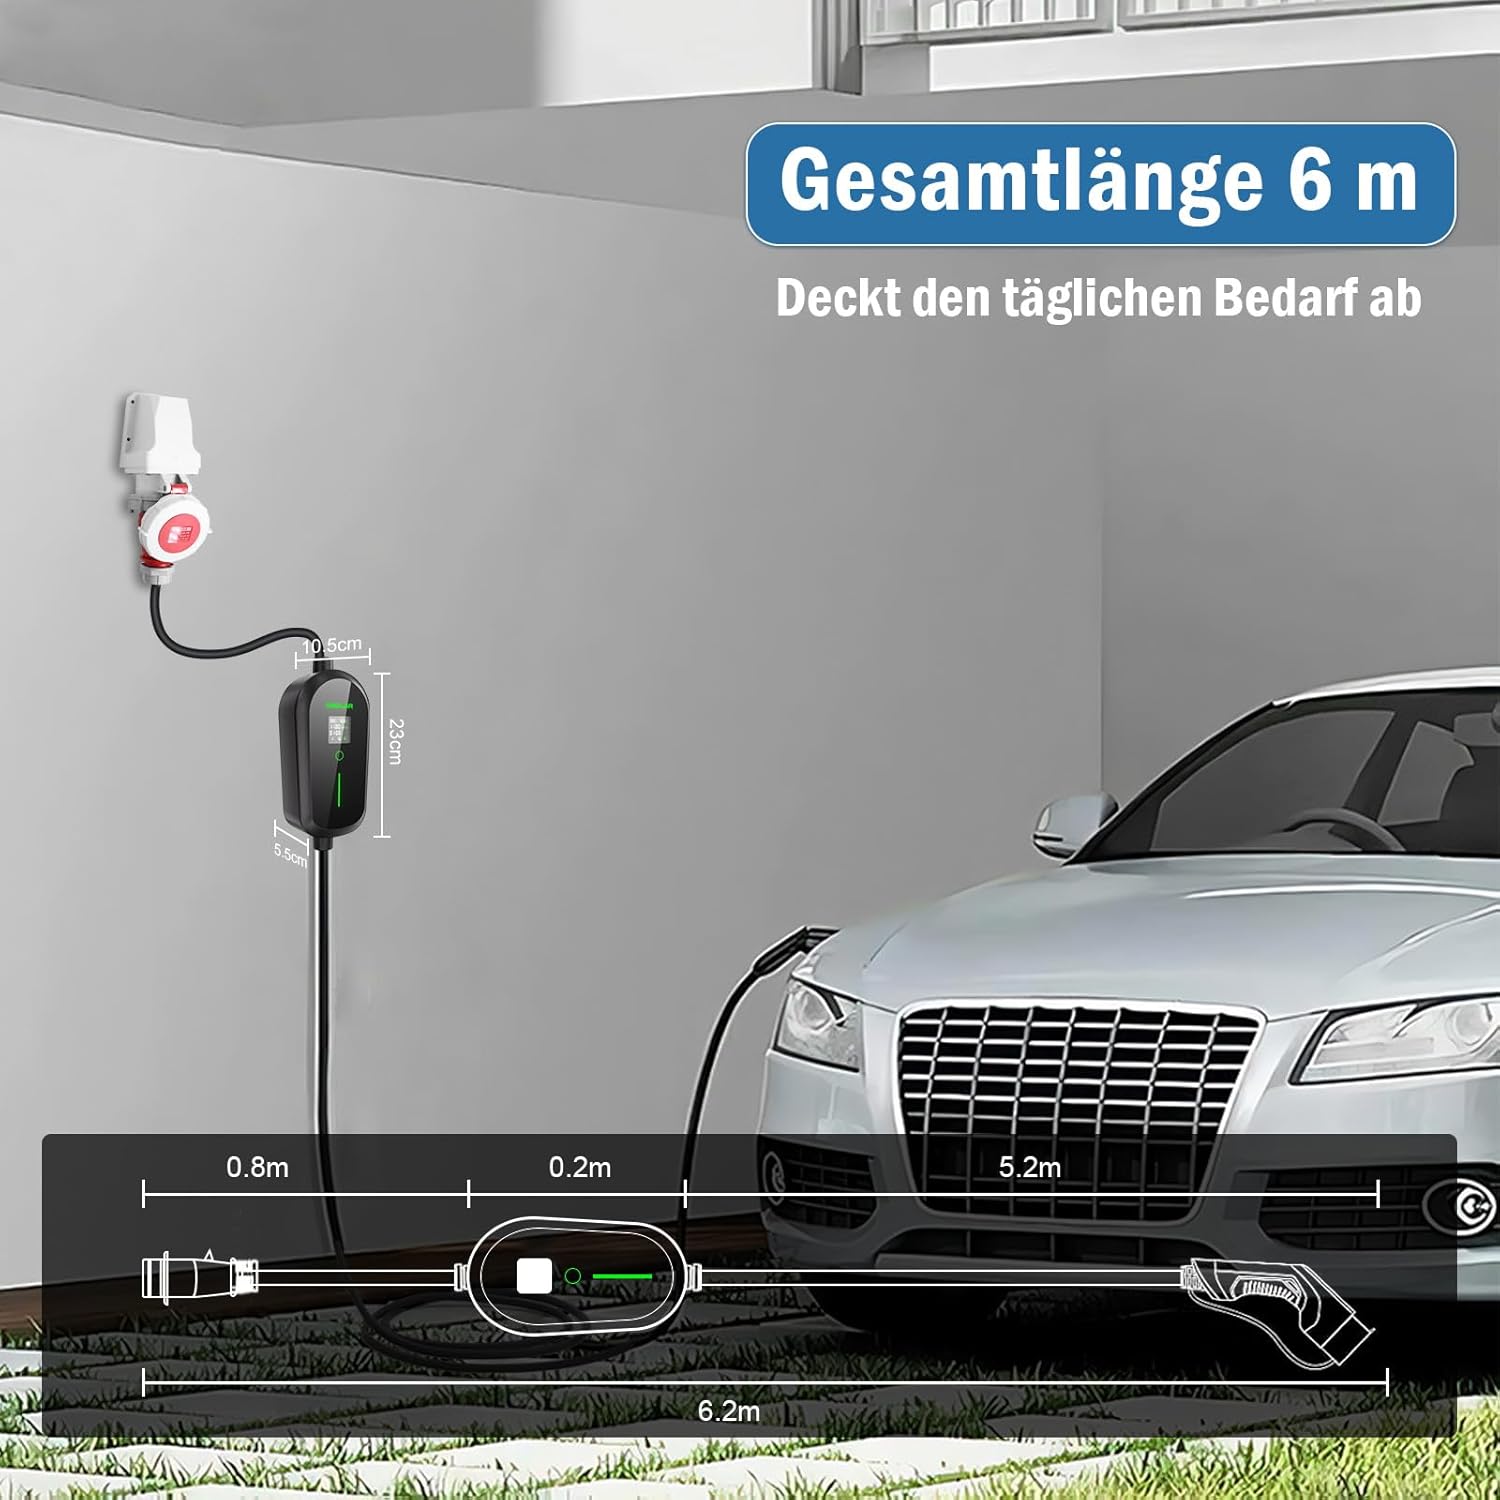
Image: Diagram illustrating the total length of the DAOLAR F097-E16A-3 EV Charger cable, which is approximately 6 meters, covering daily charging needs. It also shows the dimensions of the charger unit itself.
9. Garanti ve Destek
DAOLAR products are manufactured to high-quality standards. For warranty information and customer support, please refer to the specific warranty card included with your product or visit the official DAOLAR webalan.
- İade: This item has a return policy of 14 days for refund/replacement.
- Destek Ekibiyle İletişime Geçin: For technical assistance, troubleshooting beyond this manual, or warranty claims, please contact DAOLAR customer service.
- Online mağaza: You can visit the official DAOLAR store on Amazon for more information and products: DAOLAR Store


