giriiş
This manual provides detailed instructions for the safe installation, operation, and maintenance of your Asyko 46-inch Low Profile Ceiling Fan with Light and Remote Control. Please read all instructions carefully before beginning installation and retain this manual for future reference.
Önemli Güvenlik Bilgileri
- Kurulum veya bakım işlemlerinden önce daima ana devre kesiciden elektriği kesin.
- Tüm kablolama ulusal ve yerel elektrik yönetmeliklerine uygun olmalıdır.
- Ensure the installation site can support the fan's weight (approximately 7.09 pounds).
- Vantilatörü, kanatlarının nesnelere veya insanlara çarpabileceği bir yere monte etmeyin.
- Maintain a minimum clearance of 7 feet from the floor to the fan blades.
- Do not use a dimmer switch with this fan. Use the provided remote control for light dimming.
Paket İçeriği
Verify that all components listed below are included in your package.
- Fan Motoru Montajı
- Fan Blades (3) - Reversible (Black/Wood Grain)
- Uzaktan kumanda
- Uzaktan Alıcı
- LED Işık Kiti
- Light Dome (Plastic)
- Montaj Braketi
- Downrod (Short and Long options)
- Canopy/Shroud
- Donanım Paketi (vidalar, rondelalar, kablo bağlantı somunları vb.)
- Kullanım Kılavuzu

Image: All components of the Asyko 46-inch ceiling fan laid out, including the motor, three reversible blades, remote control, LED light, and mounting hardware.
Kurulum ve Yükleme
Başlamadan Önce
- Sigortadan elektriği kesin.
- Gerekli tüm aletlere sahip olduğunuzdan emin olun (tornavida, kablo soyucu, merdiven vb.).
- Tüm bileşenleri paketinden çıkarın ve kolay erişilebilecek şekilde yerleştirin.
1. Adım: Montaj Braketini Takın
The mounting bracket secures the fan to your ceiling junction box.

Image: Close-up of the black metal mounting bracket with screw holes, designed to attach to a standard ceiling electrical box.
Attach the mounting bracket to the ceiling junction box using the screws provided. Ensure it is securely fastened and can support the fan's weight. If your ceiling box is not rated for fan support, consult a qualified electrician.
Step 2: Assemble Downrod and Canopy
Choose the appropriate downrod length for your installation. For low-profile installations, the shorter downrod is recommended.
Feed the fan's electrical wires through the chosen downrod.
Slide the canopy (shroud) over the downrod, ensuring it rests above the fan motor assembly.

Image: The fan motor assembly with the downrod and canopy attached, ready for ceiling installation.
Step 3: Hang the Fan Motor Assembly
Carefully lift the fan motor assembly and hook it onto the mounting bracket. This allows you to make electrical connections hands-free.
Adım 4: Elektrik Bağlantıları
Connect the fan's wiring to your household wiring according to the wiring diagram in the manual and local electrical codes. Typically, this involves connecting:
- Green/Yellow wire (Ground) to the household ground wire.
- White wire (Neutral) to the household neutral wire.
- Black wire (Live) to the household live wire.
Kablo somunları kullanarak tüm bağlantıların güvenli olduğundan emin olun.
Adım 5: Fan Kanatlarını Takın
The fan blades are reversible, offering a black or wood grain finish. Choose your preferred side.
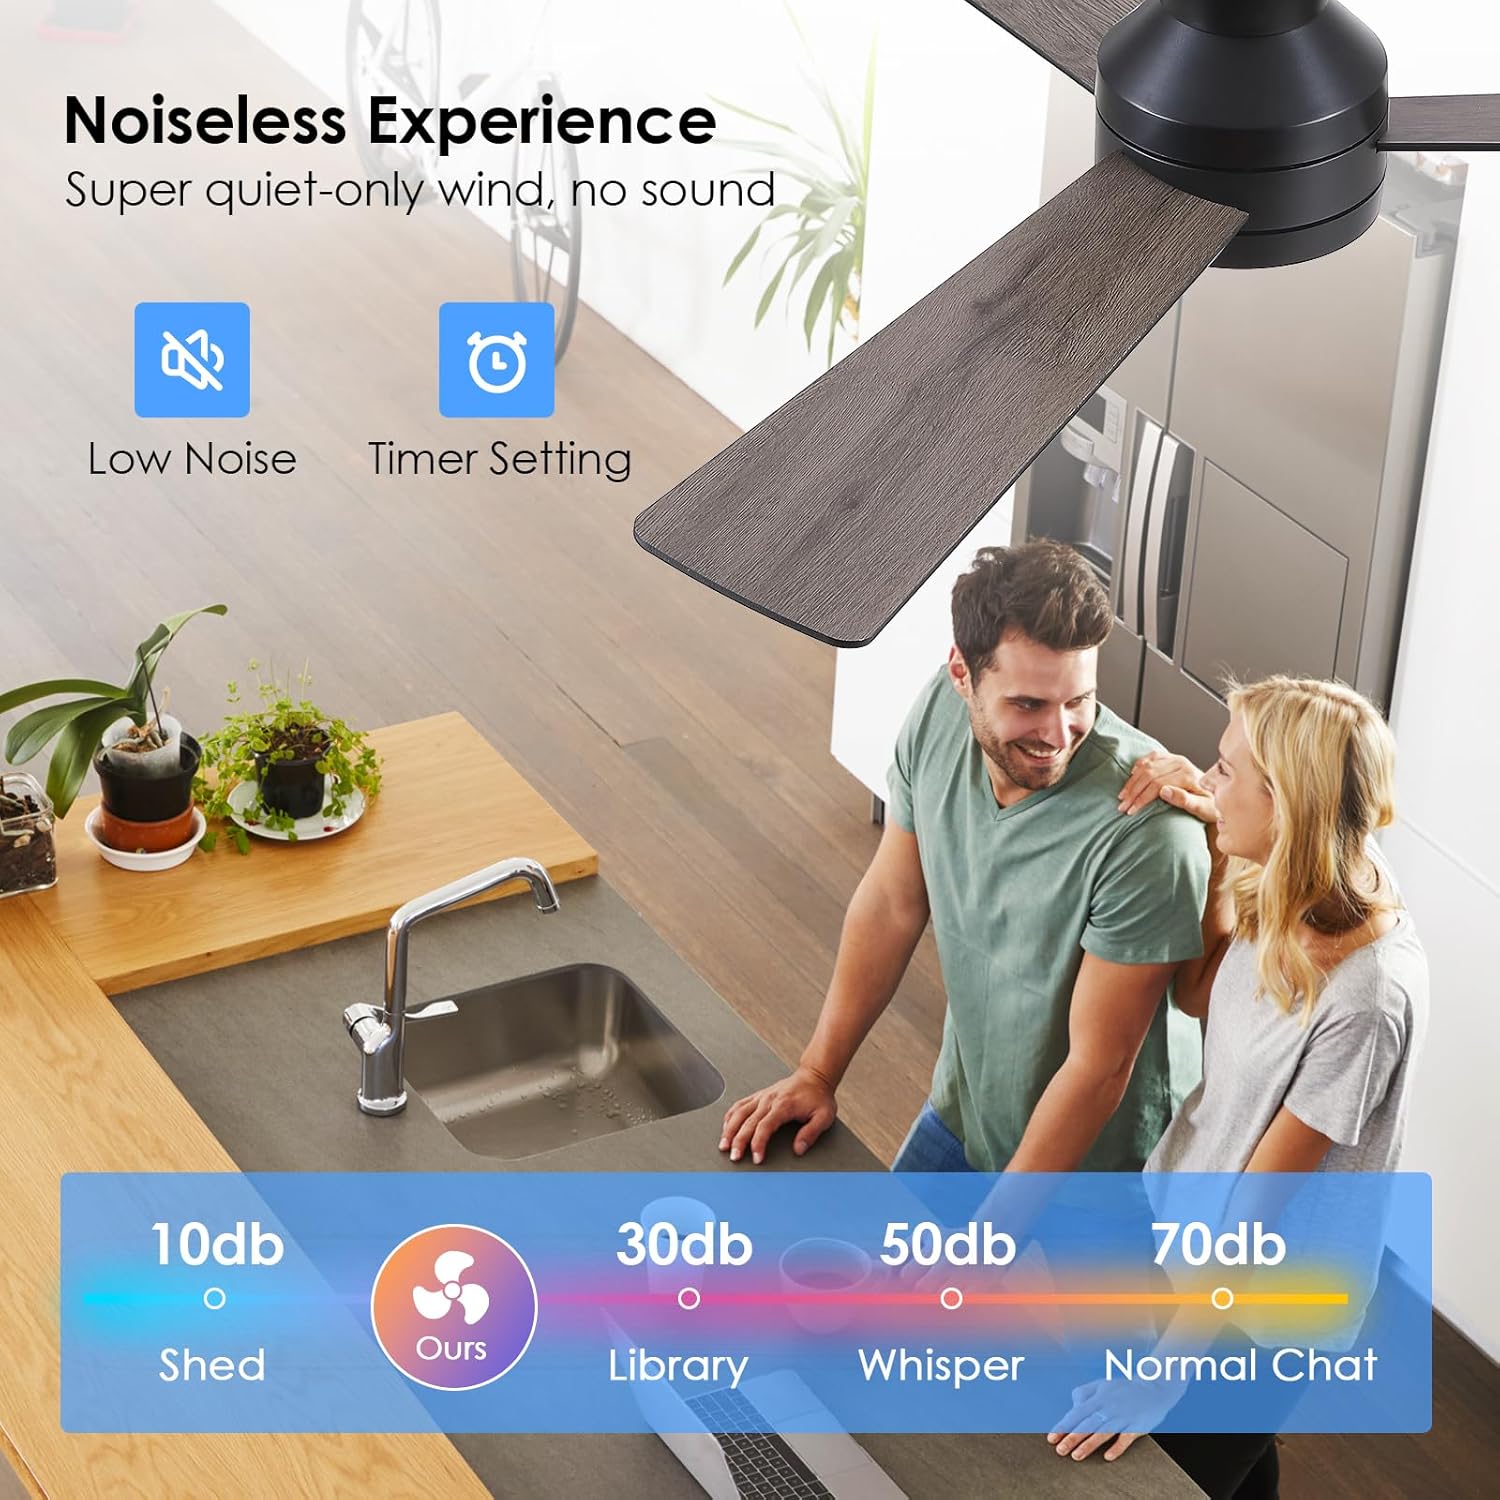
Image: Close-up of the fan blades, highlighting their reversible design with a black finish on one side and a wood grain finish on the other.
Slide each fan blade into the designated slots on the fan motor assembly. Secure them using the provided screws and washers.
Step 6: Install LED Light Kit and Light Dome
Connect the LED light kit wires to the corresponding wires from the fan motor assembly. The light kit is magnetic for easy attachment.
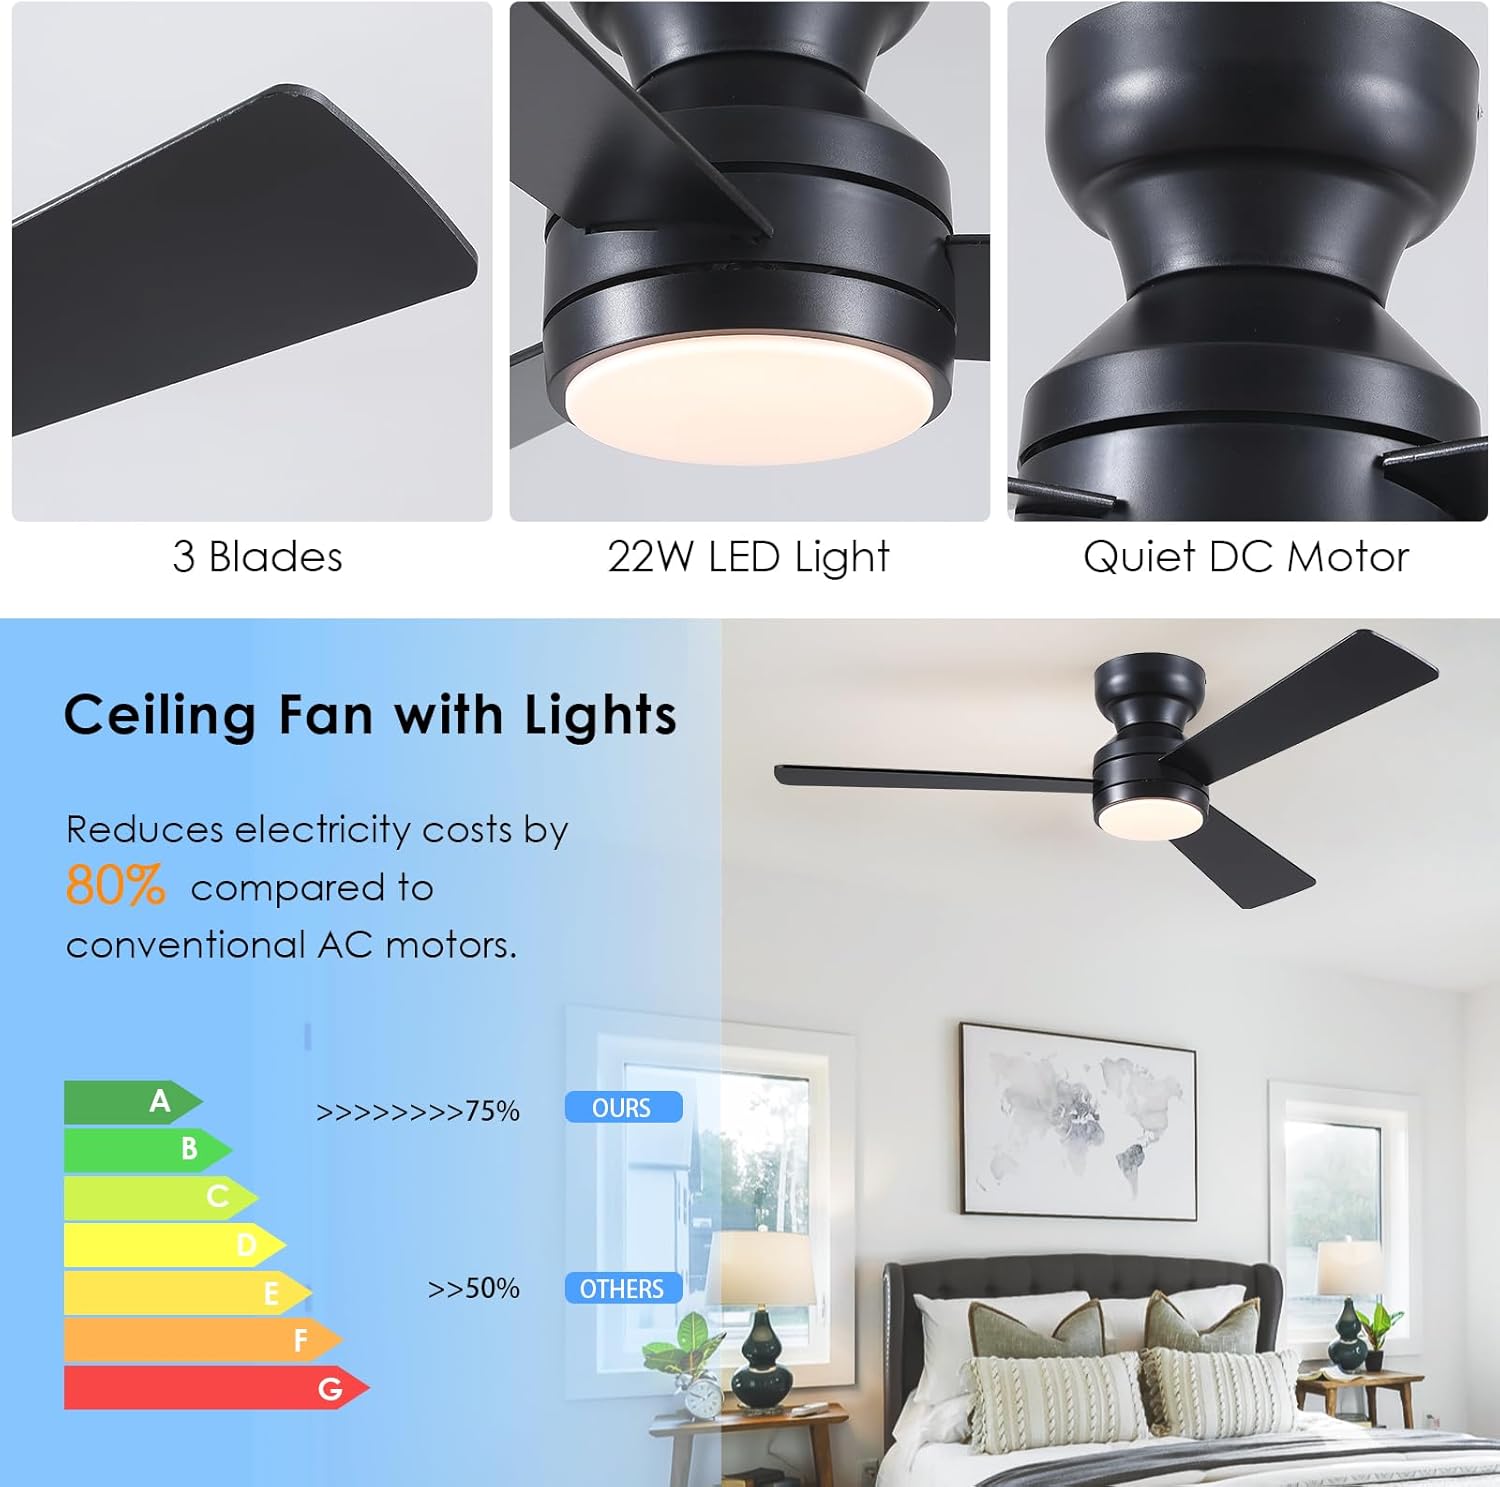
Image: Close-up of the fan's central hub showing the integrated LED light kit and its connection points.
Secure the plastic light dome by twisting it onto the fan motor assembly until it is snug.
Adım 7: Kurulumu Sonlandırın
Push the canopy up against the ceiling and secure it with the provided screws.
Sigortadan elektriği geri verin.
Kullanım Talimatları
Uzaktan Kumanda Fonksiyonları
The included remote control allows full operation of your Asyko ceiling fan.

Image: The remote control for the Asyko ceiling fan, displaying buttons for fan speed, light control, and timing functions.
- AÇIK/KAPALI: Vantilatörü ve ışığı açar/kapatır.
- Fan Hızı (1-6): Fan hızını düşük (1) ile yüksek (6) arasında ayarlar.
- Işık AÇIK/KAPALI: Işığı bağımsız olarak kontrol eder.
- Light Color Temperature (K): Cycles through 3000K (warm white), 4000K (natural white), and 6000K (cold white).
- Parlaklık Ayarı (+/-): Dims the light from 10% to 100%.
- Zamanlayıcı (1H/2H): Sets the fan to turn off automatically after 1 or 2 hours.
- F/R (Forward/Reverse): Changes the fan's rotation direction for summer (downward airflow) or winter (upward airflow).
Hafıza Fonksiyonu
The fan features a memory function. If the light is turned off for at least 10 seconds, it will retain the last brightness and color temperature settings when turned back on. The fan will also resume its last operating speed.
Ters çevrilebilir Motor
The reversible DC motor allows for year-round comfort.
- Yaz Modu (Saat yönünün tersine): Aşağı doğru bir hava akımı oluşturarak soğutma etkisi sağlar.
- Kış Modu (Saat yönünde): Yukarı doğru bir hava akımı oluşturarak, tavana yakın bölgelerde hapsolmuş sıcak havayı dolaştırır.
Video: A demonstration of the fan's features, including speed settings, light color temperature, and brightness adjustment.
Bakım
- Temizlik: Fan kanatlarını ve motor gövdesini yumuşak bir bezle düzenli olarak temizleyin.amp bezle silin. Aşındırıcı temizleyiciler veya çözücüler kullanmayın.
- Sıkma Vidaları: Tüm vidaları ve bağlantı elemanlarını yılda bir kez kontrol ederek sağlam olduklarından emin olun.
- Işık kaynağı: LED ışık kaynağı entegredir ve kullanıcı tarafından değiştirilemez. Işık arızalanırsa müşteri desteğiyle iletişime geçin.
Sorun giderme
| Sorun | Olası Neden | Çözüm |
|---|---|---|
| Fan başlamıyor | Vantilatöre elektrik gelmiyor; kablolar gevşek; uzaktan kumanda eşleştirilmemiş. | Check circuit breaker; verify all wire connections; pair remote control (refer to remote instructions). |
| Işık çalışmıyor | Loose wiring; LED light kit failure. | Check light kit wiring connections; contact customer support for LED replacement. |
| Fan sallanıyor | Loose fan blades; improper mounting. | Ensure all blade screws are tight; verify mounting bracket is securely installed. |
| Uzaktan yanıt vermiyor | Piller bitmiş; uzaktan kumanda eşleştirilmemiş. | Replace remote batteries (AAA); re-pair remote control. |
Özellikler
- Marka: Asiko
- Model Adı: Işıklı Tavan Vantilatörleri
- Ürün Model Numarası: 8511
- Boyut: 46 inches (3-Blade)
- Renk: Black (with reversible blades: Black/Wood Grain)
- Elektrikli Fan Tasarımı: Tavan Vantilatörü
- Güç Kaynağı: DC
- Stil: Modern
- Ürün Ölçüleri: 46" Diameter (Note: The provided 6"D x 6"W x 6"H dimensions appear to be packaging or internal component measurements, not the overall fan dimensions.)
- Oda Tipi: Bedroom, Living Room, Office, Study, Kitchen, Dining Area
- Özellik: Remote Controlled, Reversible Motor, Dimmable LED Light, Memory Function
- Önerilen Kullanımlar: Soğutma, Hava Sirkülasyonu
- Dahil Bileşenler: Işık Kiti
- İç/Dış Mekan Kullanımı: Kapalı
- Kontrol Yöntemi: Uzak
- Güç Seviyesi Sayısı: 6
- Motor Tipi: DC
- Kurulum Türü: Dağı Flush
- Ürün Ağırlığı: 7.09 pound
- Açık Renk Sıcaklığı: 3000K (Sıcak Beyaz), 4000K (Doğal Beyaz), 6000K (Soğuk Beyaz)
- Light Dimmability: %10-%100
Garanti ve Destek
Asyko products are designed for quality and reliability. For any questions, technical support, or warranty claims, please refer to the contact information provided in your original product packaging or visit the official Asyko website. We offer prompt customer support with a 24-hour response time to ensure your satisfaction.
Çevrimiçi destek: Ek kaynaklar ve SSS'ler için lütfen şu adresi ziyaret edin: Asyko Store on Amazon.
Kurulum Videosu: You may also find helpful installation videos by searching for "Asyko Ceiling Fan Installation" on popular video platforms.


