giriiş
Thank you for choosing the GEARGO RV Tire Pressure Monitoring System. This system is designed to enhance your driving safety by providing real-time monitoring of your RV's tire pressure and temperature. Equipped with solar and USB charging capabilities, advanced sensors, and multiple alarm modes, it ensures you are always informed about your tire conditions. Please read this manual thoroughly before installation and operation to ensure proper use and optimal performance.
Paket İçeriği
Upon opening your GEARGO TPMS package, please verify that all components listed below are present and in good condition:
- 1 x TPMS Monitor Display Unit (Solar-Powered)
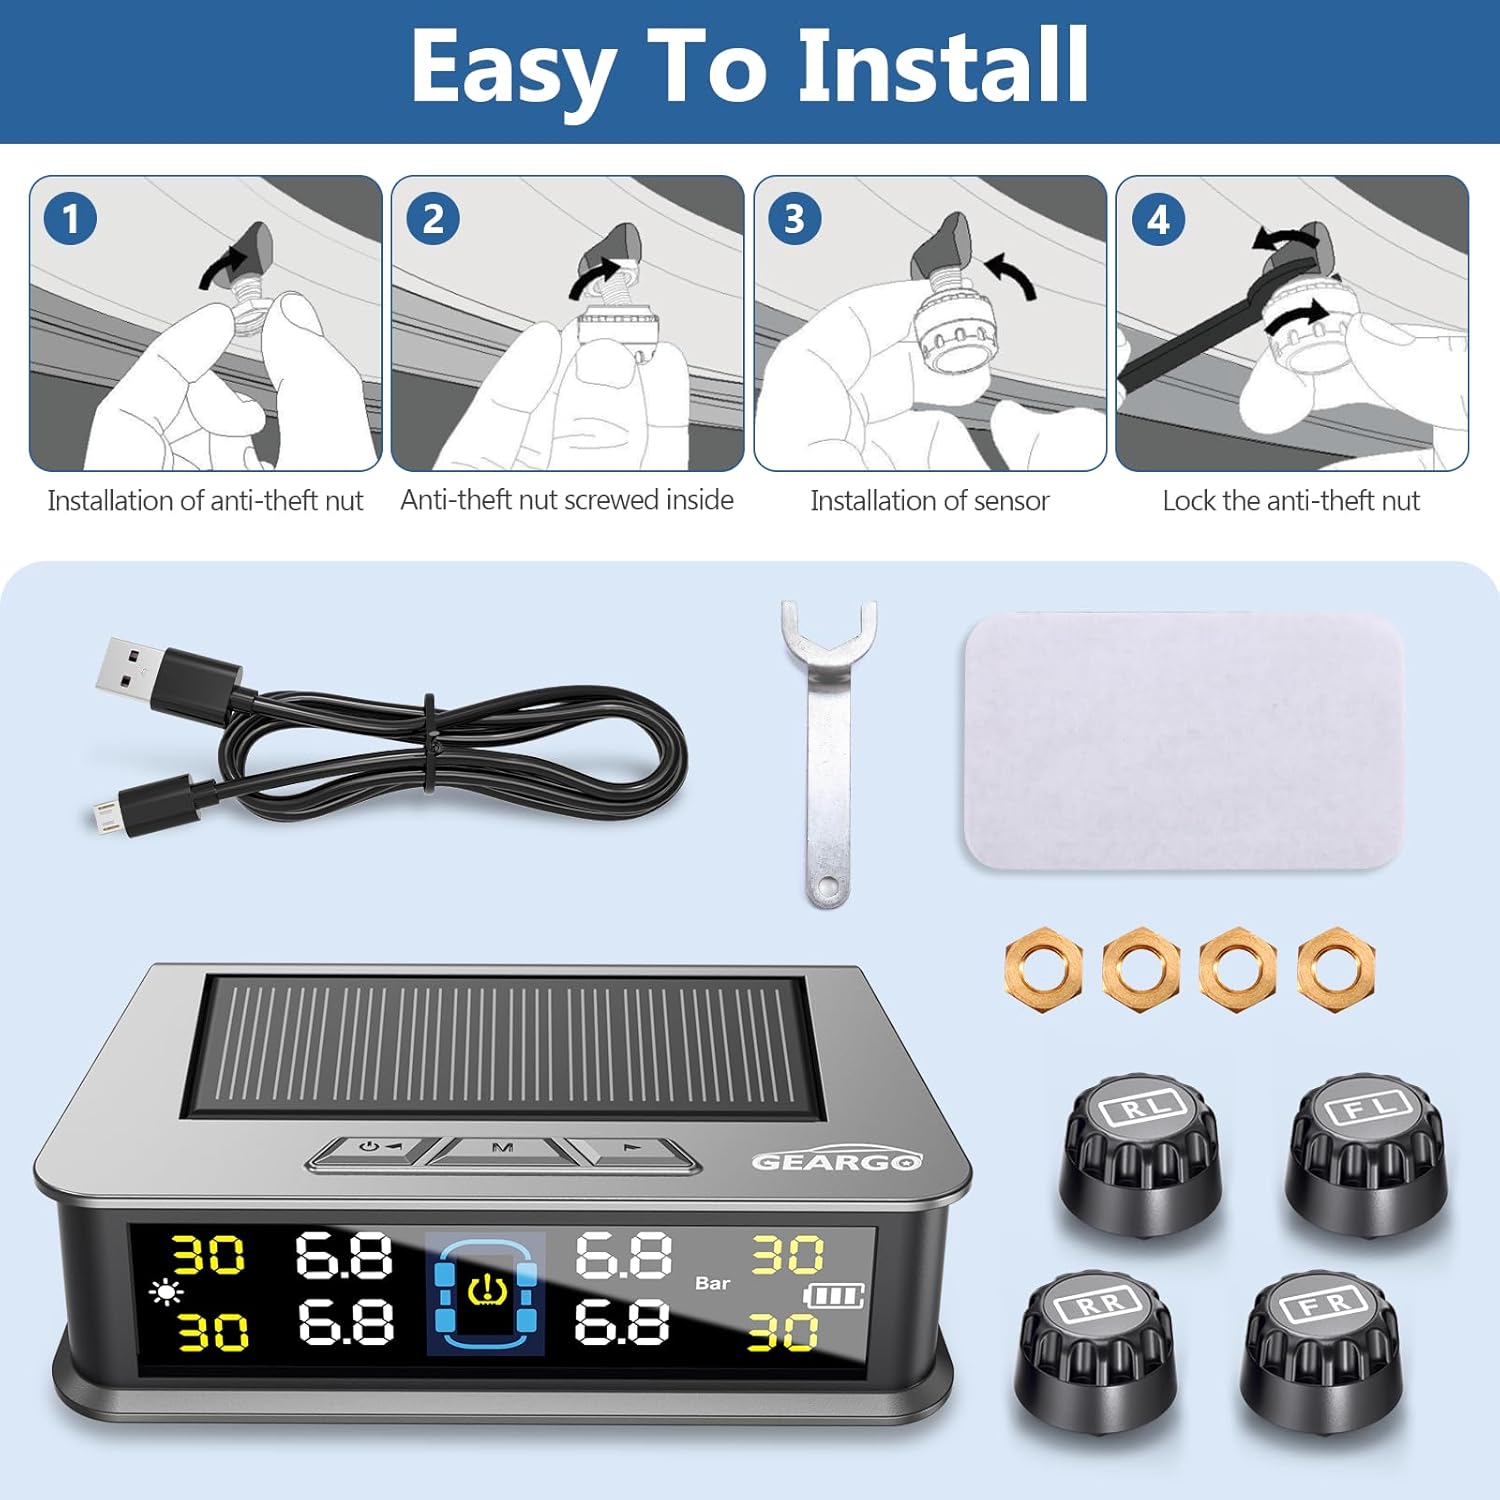
- 4 x External Tire Pressure Sensors (labeled FL, FR, RL, RR)
- 1 x USB Şarj Kablosu
- 1 x Anti-theft Nut Wrench
- 4 x Hırsızlığa Karşı Somun
- 1 x Adhesive Pad for Monitor Mounting
- 1 x Kullanım Kılavuzu
Kurulum ve Yükleme
1. Monitör Ünitesinin Şarj Edilmesi
The TPMS monitor unit can be charged via its integrated solar panel or through the provided USB cable. For initial use, it is recommended to fully charge the unit using the USB cable.
- Güneş Şarjı: Place the monitor on your dashboard where it can receive direct sunlight. The solar panel will continuously charge the internal battery.
- USB Şarj: Connect the supplied USB cable to the monitor's charging port and to a USB power source (e.g., car charger, computer USB port).

2. Installing the Sensors
The four external sensors are clearly labeled for their respective tire positions: FL (Front Left), FR (Front Right), RL (Rear Left), and RR (Rear Right). Follow these steps for installation:
- Lastik supap gövdesinden orijinal supap kapağını sökün.
- Screw an anti-theft nut (provided) onto the valve stem, traveling clockwise until it reaches the very bottom of the tire valve.
- Screw the corresponding sensor onto the valve stem quickly. It is normal to have a slight air leakage during this process. Continue screwing until the sensor is firmly seated.
- Using the anti-theft nut wrench, tighten the anti-theft nut counter-clockwise against the sensor to secure it. This prevents unauthorized removal and ensures no air leakage.
Önemli: Always turn on the main unit before installing the sensors. The system will automatically pair with the sensors once they are installed and the vehicle is in motion.
3. Mounting the Monitor Unit
Choose a flat, clean surface on your dashboard that allows for clear visibility of the display and exposure to sunlight for solar charging. Use the provided adhesive pad to secure the monitor unit.

Kullanım Talimatları
1. Güç Açma/Kapatma
- Manuel Açma/Kapama: Long press the "on/off" button for 3 seconds to turn the monitor on or off.
- Otomatik Açma/Kapama: The monitor features an intelligent auto on/off function. It will automatically turn on when the car is started and turn off within three minutes after the car is turned off.
2. Ekran Arayüzü Üzerindeview
The intelligent color LCD screen provides real-time data for all four tires. The display automatically adjusts its backlighting based on ambient light conditions for optimal visibility.

- Solar Şarj Göstergesi: Shows when the unit is charging via solar power.
- Lastik Konumu: Indicates which tire's data is being displayed (FL, FR, RL, RR).
- Tire Pressure Value: Real-time pressure reading for each tire (PSI or Bar).
- Tire Temperature Value: Real-time temperature reading for each tire (°C or °F).
- Pil Gücü: Indicates the monitor unit's battery level.
- Basınç Birimleri: Displays the current pressure unit (PSI or Bar).
- Sıcaklık Birimleri: Displays the current temperature unit (°C or °F).

3. Alarm Modes and Threshold Settings
The system provides 6 distinct alarm modes to alert you to potential tire issues. Upon initial pairing, the system uses the current pressure as a reference point, allowing for easy customization of alarm thresholds.
- Yüksek/Düşük Basınç Alarmı: Alerts when tire pressure exceeds or falls below set thresholds.
- Yüksek Sıcaklık Alarmı: Lastik sıcaklığı aşırı yükselirse uyarı verir.
- Bağlantı Kesilme Alarmı: Indicates a sensor has lost connection with the monitor.
- Düşük Pil Alarmı: Alerts when a sensor's battery is low.
- Sensör Arıza Alarmı: Notifies of a malfunction in a tire sensor.
- Hızlı Sızıntı Alarmı: Lastikten hızlı hava kaybını tespit eder.
The monitor is equipped with voice broadcasting for critical alerts, allowing drivers to quickly understand the problem without diverting attention from the road.

4. Anahtarlama Üniteleri
To switch between pressure units (PSI/Bar) or temperature units (°C/°F), refer to the detailed instructions in the included physical user manual. Typically, this involves pressing and holding specific buttons on the monitor for a few seconds.
Bakım
1. Sensör Pilinin Değiştirilmesi
The external sensors are designed for low power consumption and long lifespan. When a sensor's battery is low, the monitor will display a low battery alarm. To replace the battery:
- Unscrew the sensor from the tire valve stem.
- Using the anti-theft nut wrench, carefully unscrew the top cover of the sensor.
- Remove the old battery (CR1632 lithium battery) and insert a new one, ensuring correct positive and negative orientation.
- Screw the top cover back onto the sensor and re-install the sensor on the tire valve stem, securing it with the anti-theft nut.
It is recommended to replace batteries for all sensors at the same time to avoid frequent replacements.
2. Temizleme ve Saklama
- Monitörü ve sensörleri yumuşak, kuru bir bezle silin. Aşındırıcı temizleyiciler veya çözücüler kullanmaktan kaçının.
- Ensure the solar panel on the monitor is clean and unobstructed for efficient charging.
- When storing the system for extended periods, ensure the monitor battery is fully charged.
Sorun giderme
| Sorun | Olası Neden | Çözüm |
|---|---|---|
| Monitör açılmıyor. | Low battery; Auto-off activated. | Charge the monitor via USB. Start the vehicle to activate auto-on. |
| Lastik verileri görüntülenmiyor. | Sensors not installed; Sensors not paired; Sensor battery low. | Ensure sensors are correctly installed. Drive for a few minutes to allow pairing. Check and replace sensor batteries if needed. |
| Yanlış basınç ölçümleri. | Sensor not fully tightened; Sensor malfunction. | Re-tighten sensors with the wrench. If issue persists, contact customer support. |
| Alarm sık sık çalıyor. | Tire pressure/temperature outside set thresholds; Thresholds set too narrowly. | Check tire pressure/temperature. Adjust alarm thresholds if necessary (refer to manual for specific steps). |
Özellikler
| Özellik | Detay |
|---|---|
| Örnek | TPMS-A (for general model), TPMS-B-4 Sensors (specific variant) |
| Basınç İzleme Aralığı | 0-99 PSI (0-6.8 Bar) |
| Temperature Monitoring Range | -4°F to 176°F (-20°C to 80°C) for external sensors |
| Görüntü Türü | Color LCD with automatic brightness adjustment |
| Şarj Seçenekleri | Solar and USB (Type-C) |
| Alarm Modları | 6 (High/Low Pressure, High Temperature, Disconnection, Low Battery, Sensor Fault, Fast Leak) |
| Sesli komut | Yes, for critical alerts |
| Otomatik Açma/Kapama | Yes, with vehicle ignition |
| Ürün Ağırlığı | 7 ons (0.2 Kilogram) |
| Ürün Boyutları | 1 x 1 x 1 inç (yaklaşık, ana ünite için) |
Garanti ve Destek
GEARGO offers a warranty for this product. Customers can register for a 5-year warranty. For detailed warranty terms, technical support, or any inquiries regarding your TPMS, please refer to the contact information provided in the physical user manual or visit the official GEARGO webalan.
Müşteri Hizmetleri: For assistance, please contact GEARGO customer support. Contact details are typically found on the last page of your physical manual or on the product packaging.


