1. Giriş
Thank you for choosing the STRICH SDP-300W Digital Piano. This manual provides essential information for the proper setup, operation, and maintenance of your instrument. Please read it thoroughly to ensure optimal performance and longevity of your digital piano.

Figure 1: STRICH SDP-300W Digital Piano in Black with included headphones and music stand.
2. Paket İçeriği
Aşağıda listelenen tüm ürünlerin paketinizde mevcut olduğundan emin olun. Eksik veya hasarlı bir ürün varsa, lütfen müşteri hizmetleriyle iletişime geçin.
- STRICH SDP-300W Digital Piano Unit
- Furniture Stand Components
- Three-Pedal Unit
- Müzik Dinlenme
- Power Adapter (Input AC: 100V-240V, Output DC: 12V 3A)
- Kulaklıklar
- Assembly Hardware (screws, screwdriver)
- Kullanıcı Kılavuzu
3. Montaj Talimatları
Follow these steps to assemble your digital piano. It is recommended to have two people for assembly due to the weight of the main unit.
- Unpack all components and lay them out on a soft, flat surface to prevent scratches.
- Assemble the furniture stand using the provided screws and screwdriver. Ensure all connections are secure.
- Attach the three-pedal unit to the designated area on the assembled stand.
- Carefully place the digital piano unit onto the assembled stand, aligning the mounting holes. Secure the piano unit to the stand using the remaining screws.
- Insert the music rest into the slot on top of the piano unit.
- Connect the pedal cable from the three-pedal unit to the 'PEDAL' port on the back of the piano.
- Connect the power adapter to the 'POWER' port on the back of the piano and then to a wall outlet.
For a visual guide on assembly, please refer to the following video:
Video 1: Detaylı incelemeview of the STRICH SDP-300W, including assembly and key feel demonstration.
4. Kontroller ve Özelliklerview
Your STRICH SDP-300W Digital Piano is equipped with a range of controls and features designed to enhance your playing experience.
4.1. Klavye
- 88 Hammer-Action Weighted Keys: Provides a realistic piano feel with simulated ivory texture.
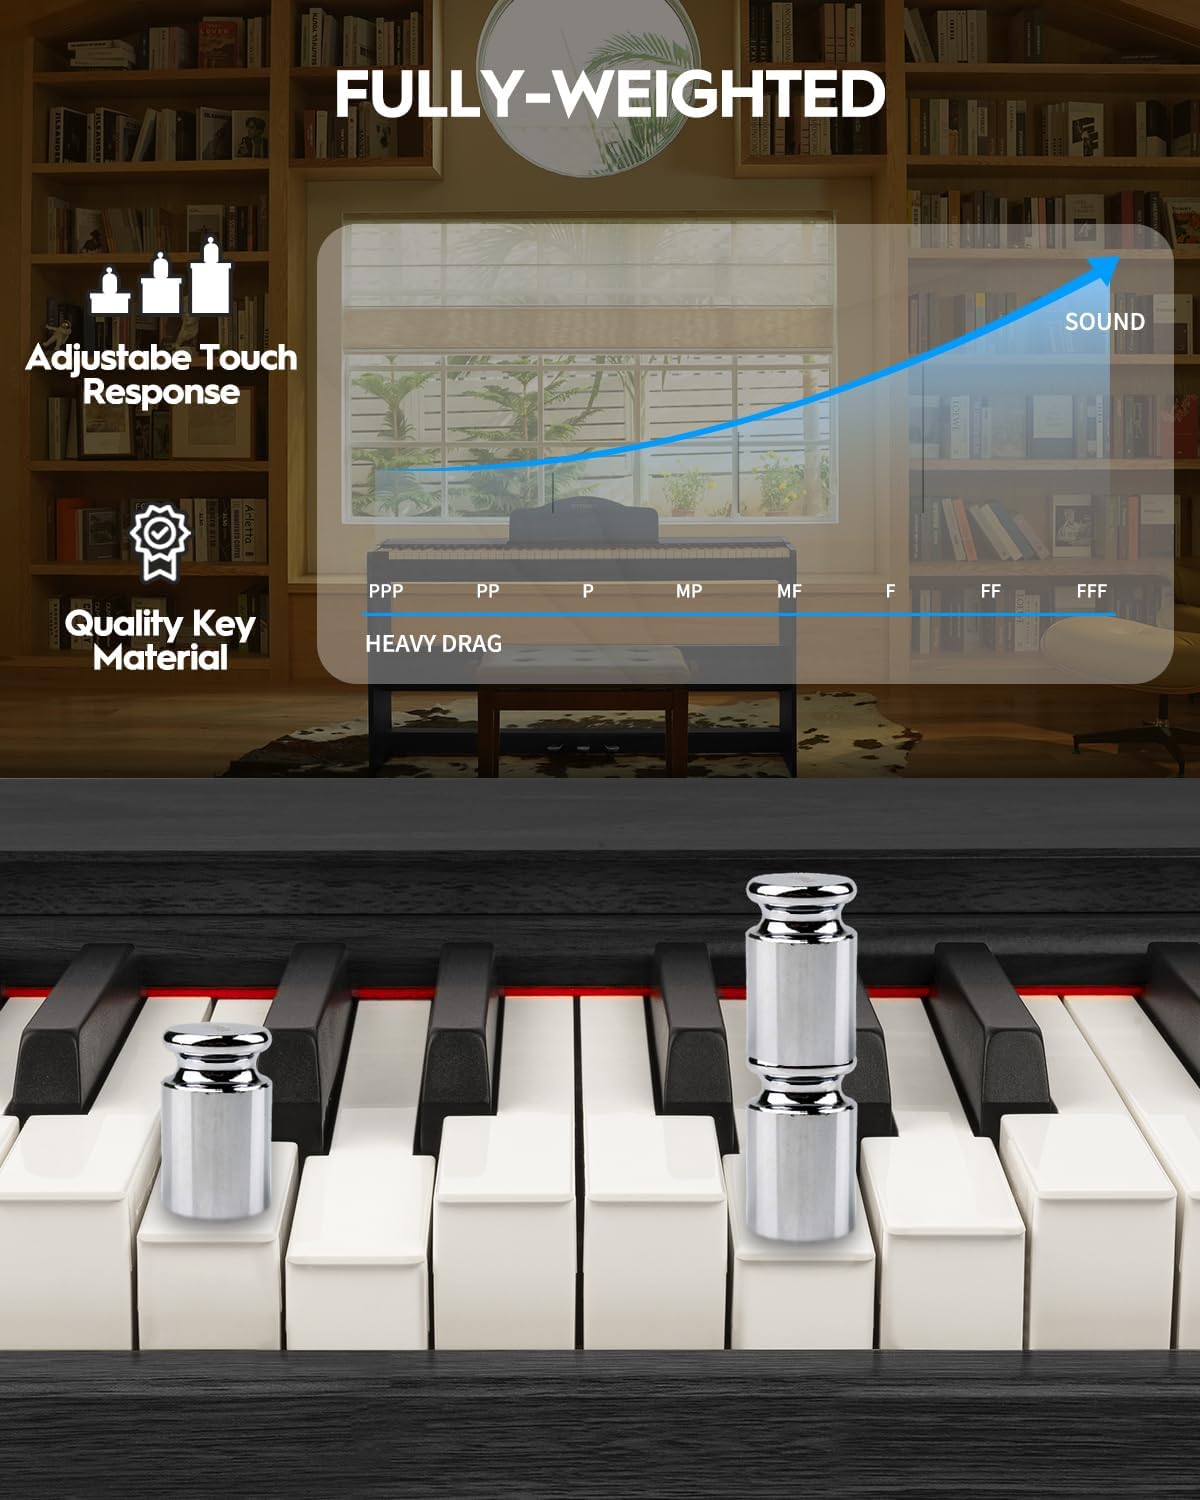
Figure 2: Detail of the fully-weighted, hammer-action keys with adjustable touch response.
4.2. Kontrol Paneli
The intuitive control panel allows easy access to various functions:
- Güç Düğmesi: Turns the piano on or off.
- Ses Kontrolü: Genel çıkış ses seviyesini ayarlar.
- Ton Seçimi: Choose from 128 preset timbres.
- Ritim Seçimi: Select from 200 drum rhythms.
- Demo Şarkılar: Access 110 built-in demonstration songs.
- Kayıt/Oynatma: Record and listen to your performances.
- Transpoze: Adjust the pitch of the keyboard in semitone steps.
- Layer/Split: Combine two voices or split the keyboard into two sections.
- Oktav Kayması: Shift the pitch of the keyboard up or down by octaves.
- Chorus Effects: Apply chorus effects to your sound.
- Smart Chord Function: Provides intelligent auto-chord accompaniment.

Şekil 3: Ayrıntılı view Çeşitli fonksiyon düğmelerine sahip kontrol paneli.
4.3. Pedallar
- Üç Pedallı Ünite: Includes Sustain, Sostenuto, and Soft pedals for expressive playing.
5. Çalıştırma Kılavuzu
5.1. Güç Açma/Kapatma ve Ses Ayarı
To power on the piano, press the 'POWER' button. Adjust the volume using the dedicated volume control knob or buttons on the control panel.
5.2. Selecting Tones and Rhythms
Use the 'TONE' and 'RHYTHM' buttons on the control panel to browse and select from the available 128 timbres and 200 drum rhythms. The display will show the selected number.

Figure 4: The digital piano offers a wide range of sounds and rhythms for musical exploration.
5.3. Kayıt ve Oynatma
Utilize the 'RECORD' and 'PLAYBACK' functions to capture your performances. This feature is ideal for self-assessment and practice.
5.4. Bağlantı Seçenekleri
The SDP-300W offers versatile connectivity:
- USB-MIDI: Connect to a computer or smart device for MIDI functionality, compatible with teaching apps.
- Kablosuz (Bluetooth): Connect wirelessly to teaching apps on iPad or phone for interactive learning and composition.
- Audio-in Port: Connect external audio sources to play through the piano's 25Wx2 speakers, allowing you to play along with your favorite tracks.
- Kulaklık Jakı (6.35 mm): For private practice without disturbing others.

Figure 5: Rear panel connections for power, MIDI, USB, headphones, audio input, and sustain pedal.
See the piano's connectivity in action:
Video 2: Demonstration of MIDI, Bluetooth, weighted keys, and pedals on the STRICH digital piano.
5.5. Silent Practice
Connect headphones to the 6.35mm headphone jack for silent practice sessions. The internal speakers will automatically mute when headphones are connected.

Figure 6: Enjoy private practice sessions using headphones.
6. Bakım
Proper care will ensure your digital piano remains in excellent condition.
- Temizlik: Piyanonun yüzeyini silmek için yumuşak ve kuru bir bez kullanın. İnatçı kirler için hafifçe silin.ampen the cloth with water and a mild soap, then wipe dry immediately. Avoid abrasive cleaners or solvents.
- Anahtar Bakım: Wipe the keys with a soft, slightly damp cloth. Do not use excessive moisture.
- Atama: Avoid placing the piano in direct sunlight, near heat sources, or in areas with extreme temperature fluctuations or high humidity.
7. Sorun Giderme
Herhangi bir sorunla karşılaşırsanız aşağıdaki yaygın sorunlara ve çözümlere bakın:
| Sorun | Olası Neden | Çözüm |
|---|---|---|
| Ses yok | Ses çok düşük; kulaklık bağlı; güç sorunu. | Sesi açın; kulaklığı çıkarın; güç bağlantısını kontrol edin. |
| Tuşlar yanıt vermiyor | Piano not powered on; internal malfunction. | Ensure piano is on; contact customer support if issue persists. |
| Connectivity issues (USB-MIDI/Bluetooth) | Incorrect connection; device not paired. | Ensure cables are correctly connected; follow device pairing instructions. |
8. Özellikler
- Model Adı: SDP-300W
- Anahtar Sayısı: 88
- Anahtar türü: Hammer-Action Weighted Keys with Simulated Ivory Texture
- Boyutlar: 12.4"D x 51.2"G x 27.8"Y
- Ürün Ağırlığı: 59.4 pound (27 Kilogram)
- Konuşmacılar: 25W x 2
- Tınılar: 128 ön ayar
- Ritimler: 200 drum rhythms
- Çokseslilik: 128 (en fazla)
- Bağlantı: USB-MIDI, Wireless (Bluetooth), Audio-in, 6.35mm Headphone Jack
- Güç Kaynağı: Corded Electric (Input AC: 100V-240V, Output DC: 12V 3A)
- Malzeme Türü: Wood (Casing), Plastic (Keys)
- Renk: Siyah
9. Garanti ve Destek
For warranty information, please refer to the documentation included with your purchase or contact STRICH customer support. For technical assistance or service inquiries, please visit the official STRICH websitesine bakın veya müşteri hizmetleri departmanıyla iletişime geçin.


