1. Giriş
This instruction manual provides essential information for the safe and efficient operation, maintenance, and troubleshooting of your 3i P10 Ultra Robot Vacuum and Mop Combo. Please read this manual thoroughly before using the product and retain it for future reference.
2. Güvenlik Bilgileri
Yangın, elektrik çarpması veya yaralanma riskini azaltmak için elektrikli cihazları kullanırken her zaman temel güvenlik önlemlerine uyun. Bu cihaz yalnızca ev kullanımı içindir.
- Çocukların robotu kullanmasına izin vermeyin. Robot çalışırken çocukları ve evcil hayvanları gözetim altında tutun.
- Güç hacmini sağlayıntage, şarj istasyonunun üzerindeki derecelendirme etiketiyle eşleşir.
- Robotu ıslak yüzeylerde veya su birikintisi olan alanlarda kullanmayın.
- Remove loose cables, small objects, and fragile items from the cleaning path before operation.
- Do not use the robot to pick up large or sharp objects, flammable materials, or liquids.
- Only use manufacturer-specified accessories and replacement parts.
- Güç kablosu hasarlıysa tehlikeleri önlemek için üretici veya yetkili servis tarafından değiştirilmelidir.
3. Ürün Bittiview
3.1 Dahil Bileşenler
Paketin içeriği şu şekildedir:
- 1 x Robot Süpürge
- 1 x Baz İstasyonu
- 2 x Paspas Pedi
- 2 x Yan Fırçalar
- 1 x 800ml Cleaning Solution
- 1 x Ayrılabilir Taban
- 1 x Güç Kablosu
- 1 x Kullanım Kılavuzu
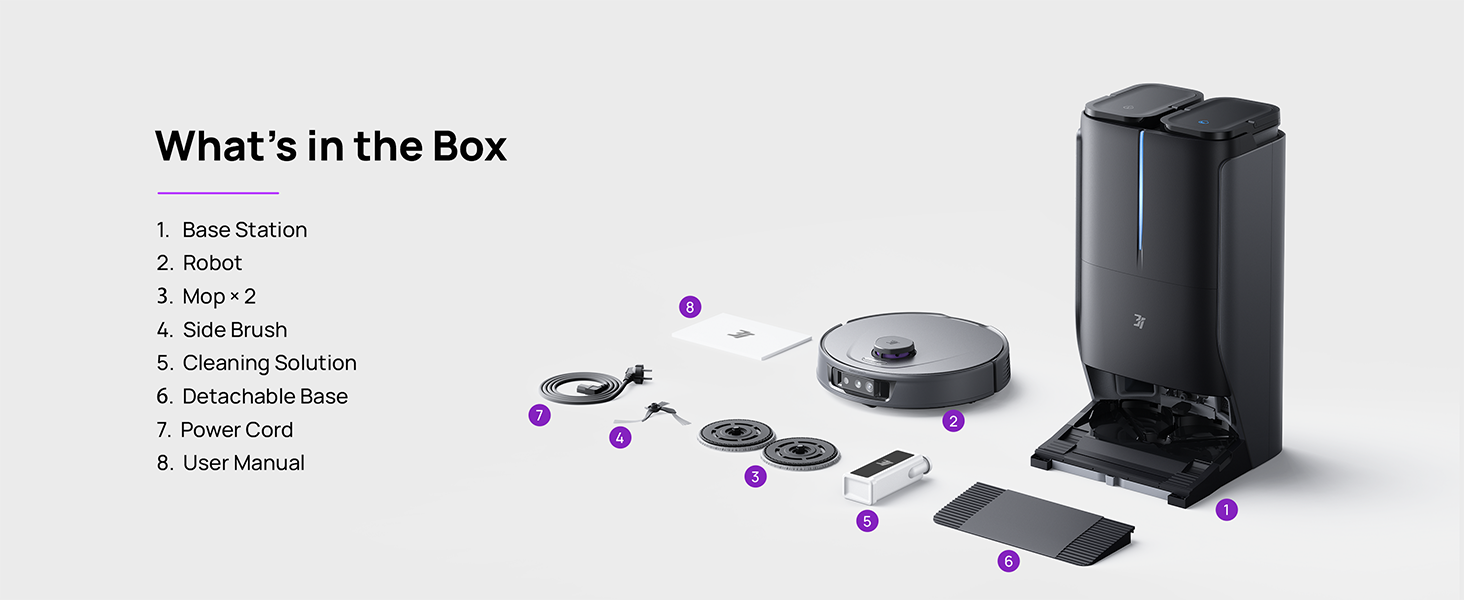
Figure 3.1: Contents of the 3i P10 Ultra package.
3.2 Robot Vacuum Features
- UltraReach Mop: The auto-extending mop system cleans edges and corners thoroughly. Dual mops spin at 220 RPM for effective stain removal.
- 18,000 Pa Emme Gücü: Provides powerful suction for deep cleaning on various floor types, including carpets and hard floors. Features smart carpet detection to boost suction and lift mops.
- All-in-One Automated Station: Offers automatic hot-water mop washing, hot air drying, solution adding, and hands-free dust collection for up to 70 days.
- Gelişmiş Gezinme: Utilizes LiDAR for 3D mapping, dual 3D structured light, and an AI camera for obstacle avoidance, threshold crossing, and collision resistance.
- AI-Powered DirtScan: Identifies over 100 household objects and messes, adapting cleaning methods for optimal results, even in low light conditions.
- Saç Yönetimi: Equipped with anti-tangle brushes and a TangleCut blade to prevent hair from wrapping around components.
- Smart Route Planning: Learns home layouts for efficient cleaning routes. Supports scheduled cleaning, no-go zones, and app control. Compatible with Alexa and Google Assistant.
- Wi-Fi Bağlantısı: Supports both 2.4G and 5G Wi-Fi networks.

Şekil 3.2: Üst view of the 3i P10 Ultra Robot Vacuum.

Figure 3.3: The 3i P10 Ultra Base Station.
4. Kurulum
4.1 Paketten Çıkarma ve Yerleştirme
- Tüm bileşenleri dikkatlice ambalajından çıkarın.
- Choose a suitable location for the base station. Ensure it is placed against a wall, on a hard, level surface, with at least 0.5 meters (1.6 feet) of clear space on both sides and 1.5 meters (4.9 feet) in front. Avoid areas with direct sunlight or strong Wi-Fi interference.
- Connect the power cord to the base station and plug it into a power outlet.
4.2 Robot Hazırlığı
- Install the side brushes by pressing them into their slots until they click.
- Attach the mop pads to the mop holders on the robot.
- Place the robot onto the base station to charge. Ensure the charging contacts align. The robot will announce its charging status.
4.3 Uygulama Kurulumu ve Bağlantısı
- Download the 3i app from your mobile device's app store (iOS or Android).
- Open the app and follow the on-screen instructions to create an account and add your 3i P10 Ultra robot.
- Ensure your phone is connected to a 2.4GHz or 5GHz Wi-Fi network during the pairing process.
5. Kullanım Talimatları
5.1 Initial Cleaning and Mapping
For the first use, allow the robot to complete a full cleaning cycle to create a map of your home. This map is crucial for advanced features.

Figure 5.1: Precision 3D Mapping in the 3i App.
5.2 Temizleme Döngüsünü Başlatma
- Robot aracılığıyla: Robot üzerindeki güç düğmesine bir kez basarak temizleme işlemini başlatın veya duraklatın.
- Uygulama aracılığıyla: Open the 3i app, select the desired cleaning mode (Vacuum, Mop, Vac & Mop, AI Auto, Custom), and tap 'Start'.
- Sesli Kontrol Aracılığıyla: Use compatible voice assistants (Alexa, Google Assistant) with commands like "Hey Google, start vacuuming."

Figure 5.2: Using voice control to operate the 3i P10 Ultra.
5.3 Uygulama Özellikleri
The 3i app provides extensive control and customization options:
- Temizleme Ayarları: Schedule cleaning, select rooms, set no-go zones, customize carpet cleaning.
- Harita Ayarları: View 3D maps, quick mapping, multi-floor maps, edit rooms and furniture.
- Station Settings: Customize dust collection, mop washing, auto-drying, and TangleCut.
- Diğer ayarlar: Do Not Disturb mode, Smart Route Planning, Pet Recognition, Child Lock.
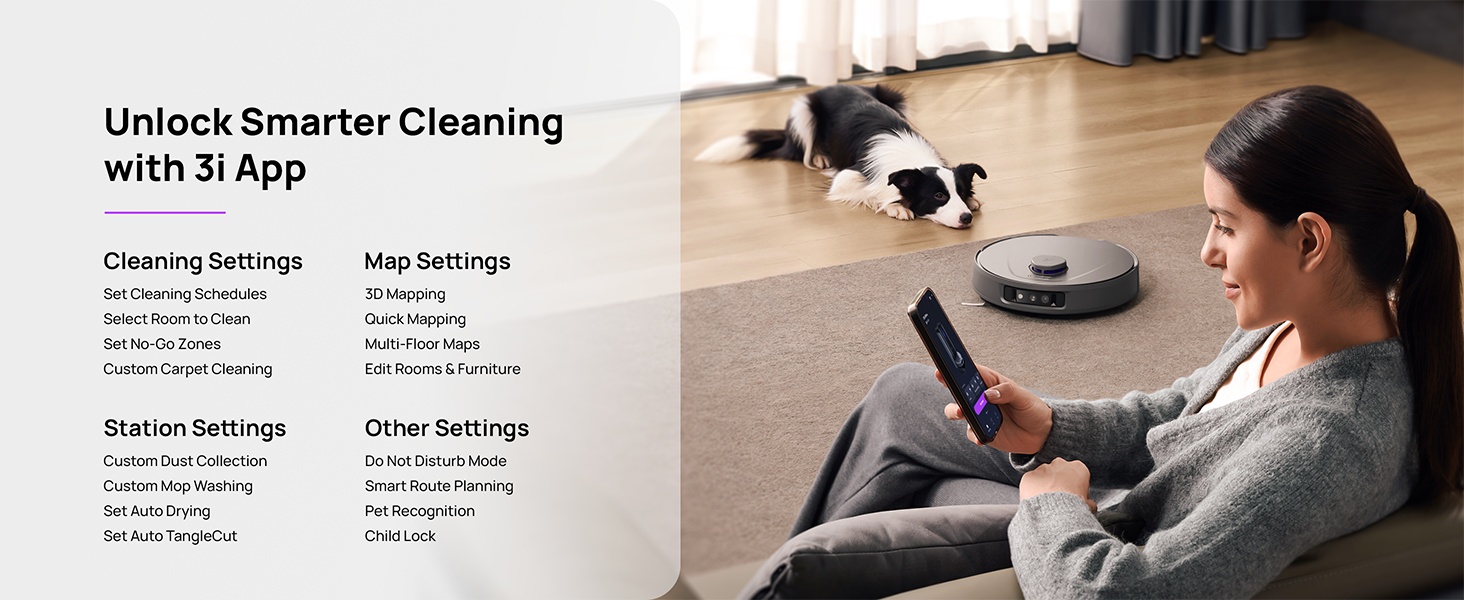
Figure 5.3: The 3i App interface for smart cleaning.
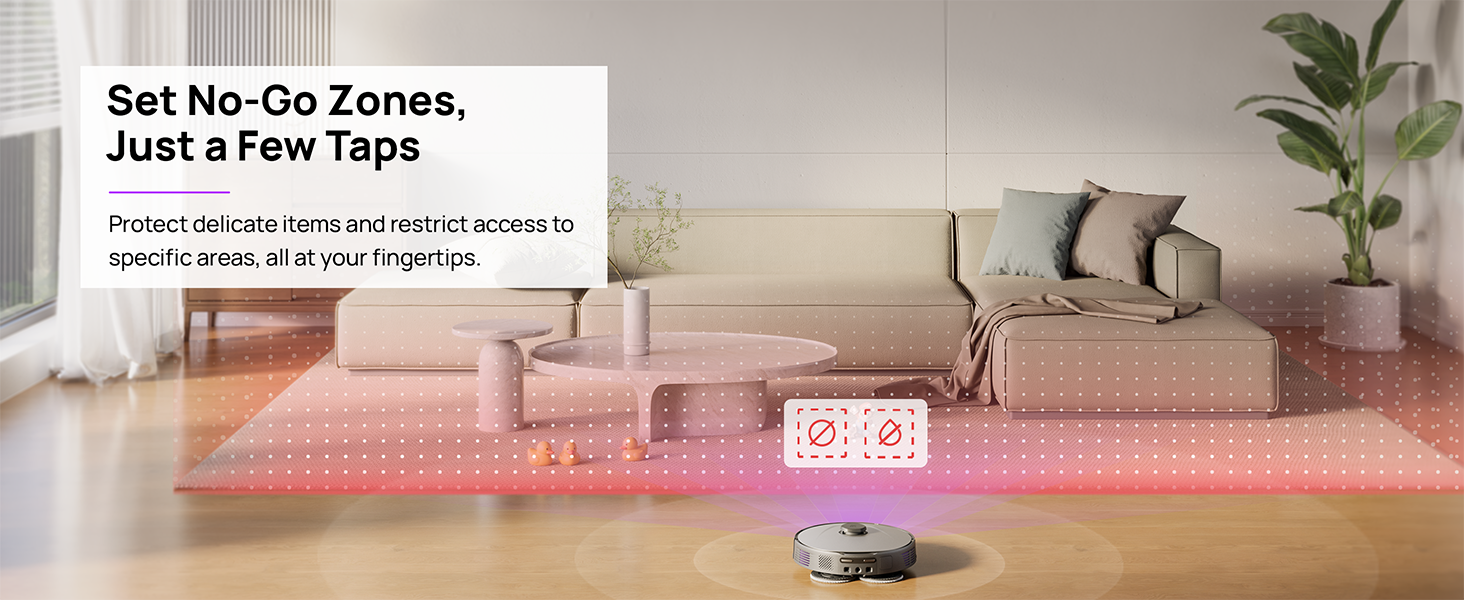
Figure 5.4: Setting No-Go Zones in the 3i App.
6. Bakım
Regular maintenance ensures optimal performance and extends the lifespan of your 3i P10 Ultra.
6.1 Baz İstasyonu Bakımı
- Çöp Kutusu Boşaltılması: The base station automatically empties the robot's dustbin into a 3L bag. Replace the dust bag approximately every 70 days, or as indicated by the app.
- Paspas Yıkama ve Kurutma: The base station automatically washes mop pads with 140°F / 60°C hot water and dries them with hot air (131°F / 55°C) after each cleaning cycle. Ensure the clean and dirty water tanks are properly installed.
- Water Tank Refilling: The extra-large 4L clean water tank automatically refills the robot. Refill the clean water tank as needed. The base station also collects dirty water into a separate wastewater tank. Empty the wastewater tank regularly.
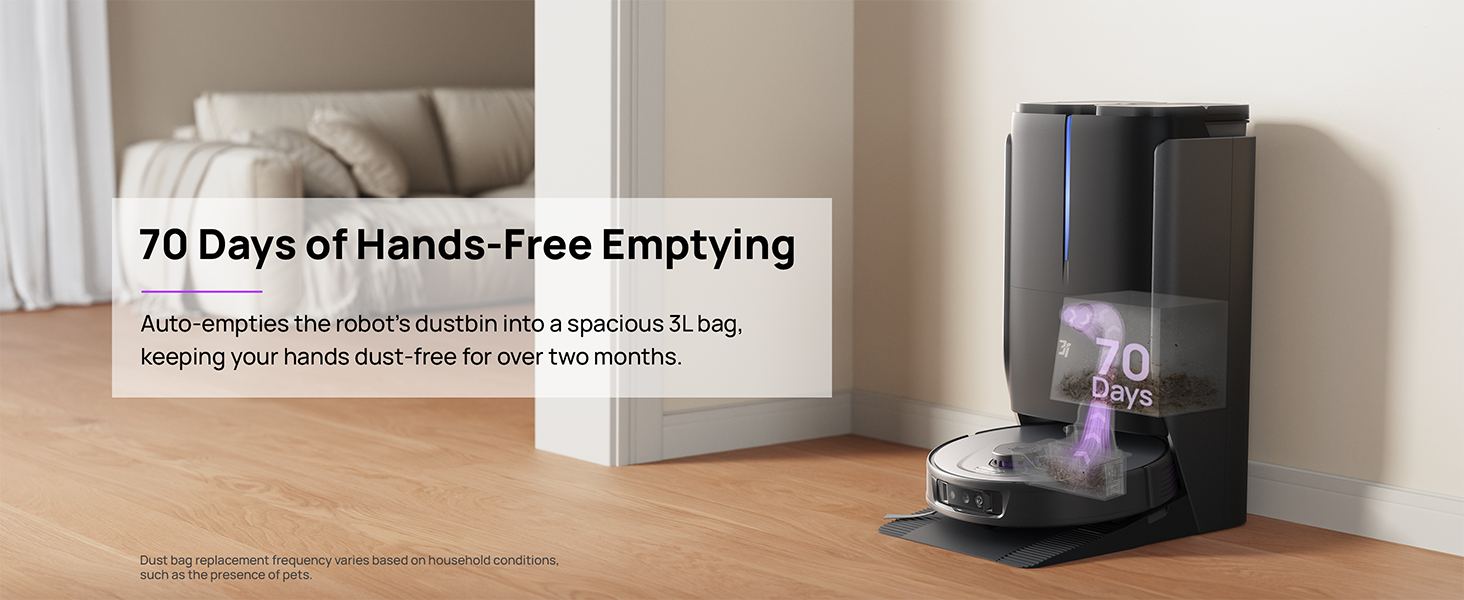
Figure 6.1: Automatic dustbin emptying at the base station.
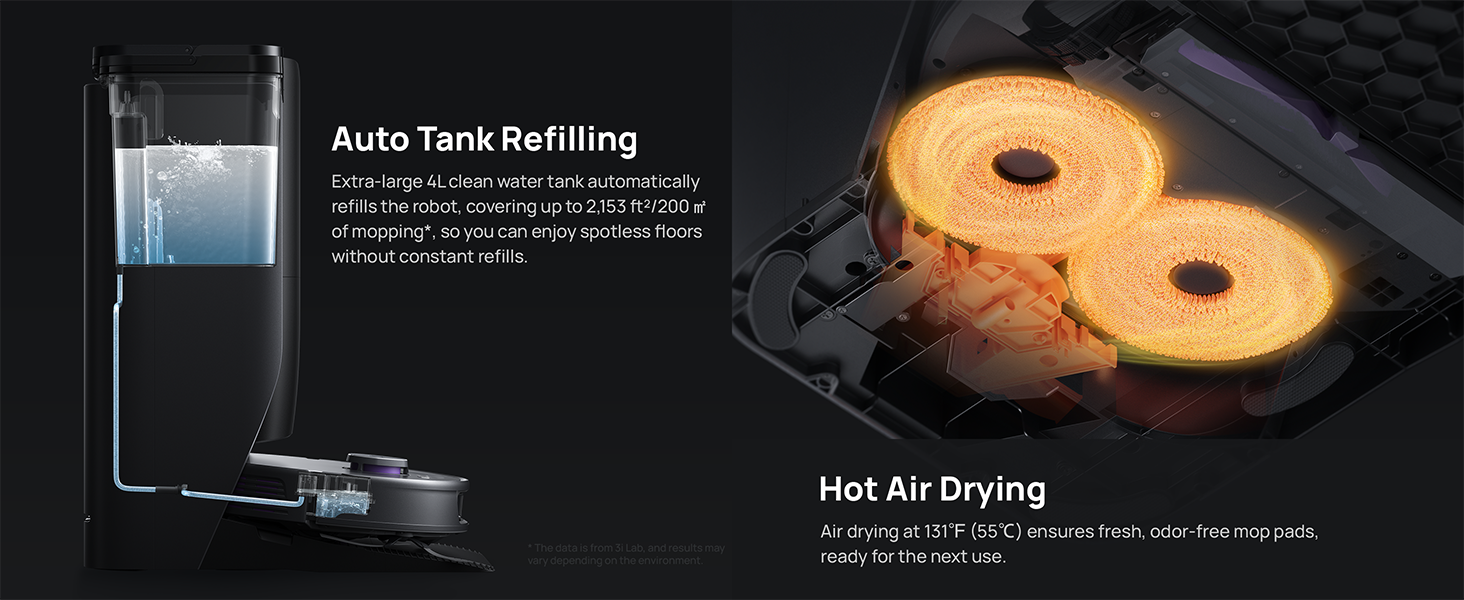
Figure 6.2: Auto tank refilling and hot air drying process.
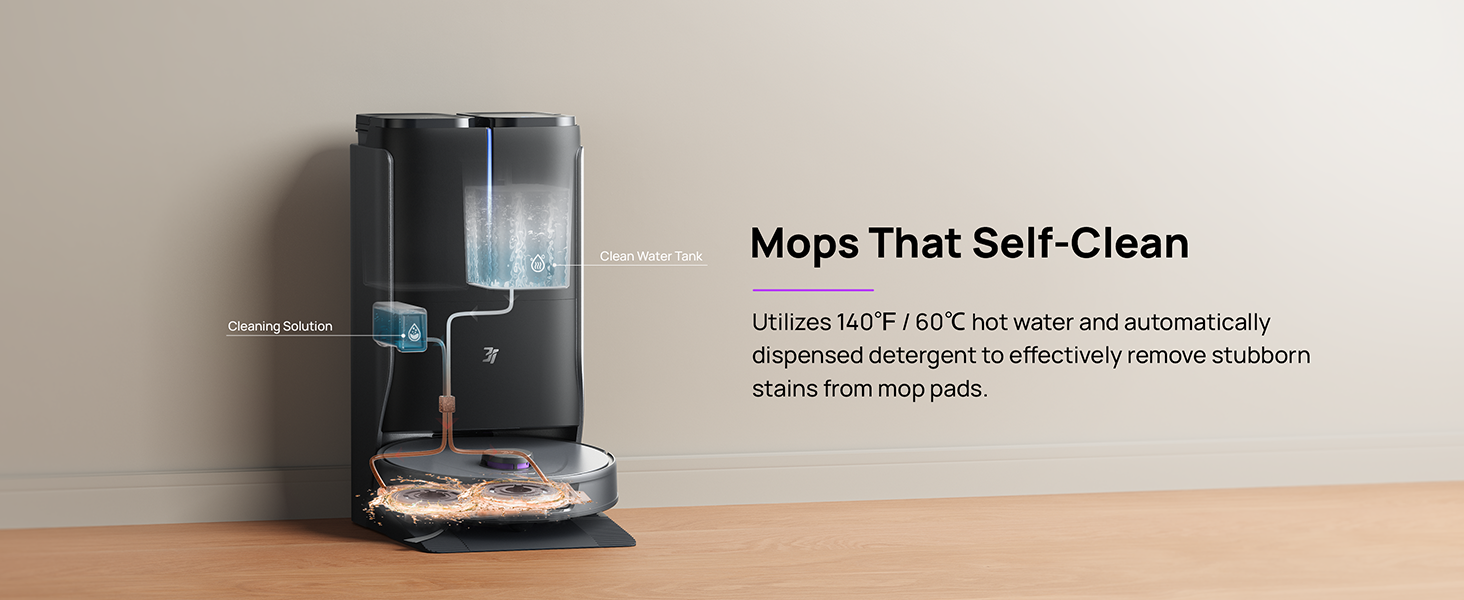
Figure 6.3: Mop self-cleaning function.
6.2 Robot Bileşen Bakımı
- Ana Fırça: Regularly check the main brush for tangled hair or debris. Use the cleaning tool provided to remove any obstructions. The TangleCut blade helps prevent excessive tangling.
- Yan Fırçalar: Inspect side brushes for wear or damage. Clean them periodically and replace if necessary.
- Paspas Pedleri: Although self-cleaned, inspect mop pads for excessive wear or stubborn stains. Replace them when their cleaning effectiveness diminishes.
- Filtre: The filter is washable. Remove and rinse it under running water. Allow it to air dry completely before reinstalling.
- Sensörler: Wipe all sensors (LDS, anti-drop, wall-following, charging contacts) with a clean, dry cloth to ensure proper function.
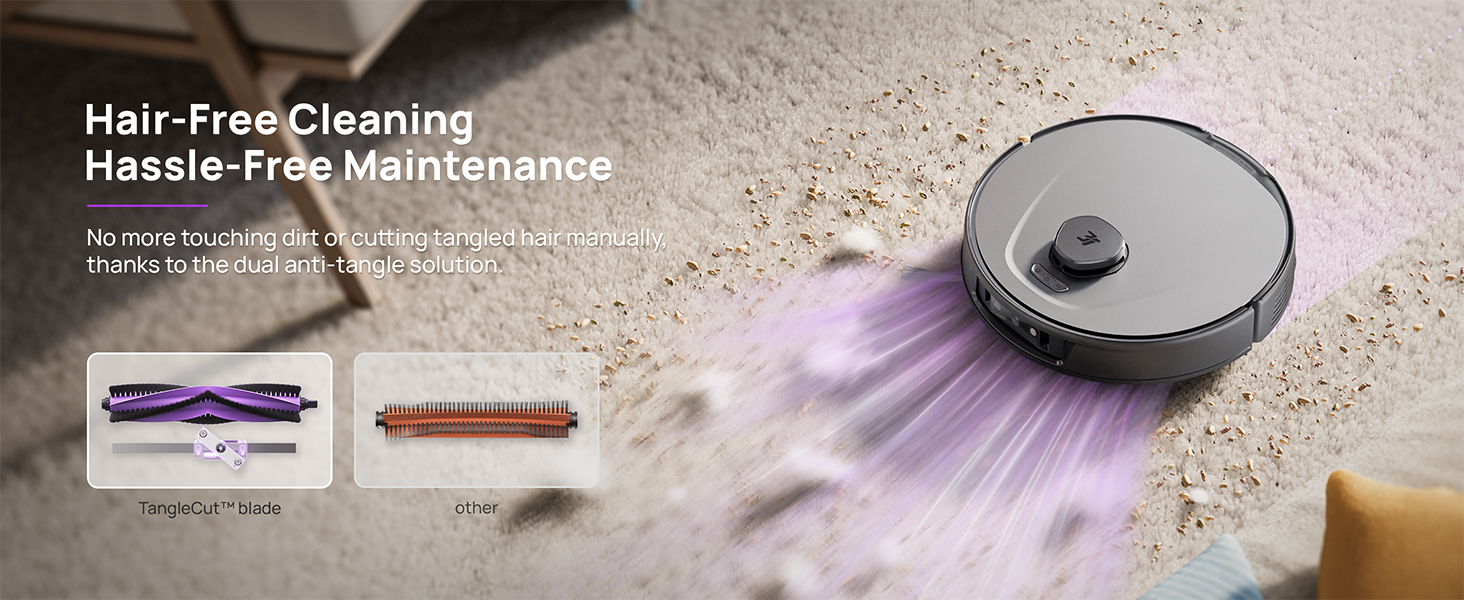
Figure 6.4: Hair-free cleaning with anti-tangle design.
7. Sorun Giderme
If you encounter issues with your 3i P10 Ultra, refer to the following common problems and solutions:
| Sorun | Olası Neden | Çözüm |
|---|---|---|
| Robot açılmıyor. | Pil zayıf; Güç düğmesine doğru basılmamış. | Place robot on charging dock; Press and hold power button for 3 seconds. |
| Robot şarj istasyonunu bulamıyor. | Dock is obstructed or too far; Poor Wi-Fi signal. | Ensure dock is in an open area; Check Wi-Fi connection. |
| Temizleme performansı zayıf. | Çöp kutusu dolu; Fırçalar karışmış; Filtre tıkalı; Paspas pedleri kirli. | Empty dustbin; Clean brushes; Clean/replace filter; Clean/replace mop pads. |
| Robot sık sık takılıyor. | Zeminde engeller var; Sensörler kirli. | Clear floor of obstacles; Clean all sensors. |
| Uygulama bağlantı sorunları. | Hatalı Wi-Fi şifresi; Yönlendirici sorunları; Robot çevrimdışı. | Verify Wi-Fi password; Restart router; Restart robot; Re-pair device in app. |
For further assistance, please refer to the 3i app's help section or contact customer support.
8. Özellikler
| Özellik | Detay |
|---|---|
| Marka | 3i |
| Model Adı | 3i P10 Ultra Robot Süpürge |
| Ürün Boyutları (Robot) | 13.78"U x 13.78"G x 3.94"Y |
| Ürün Boyutları (İstasyon) | 12.2"U x 18.43"G x 23.39"Y |
| Ürün Ağırlığı | 37.3 pound |
| Pil Ömrü | 180 dakikadır. |
| Filtre Türü | Yıkanabilir |
| Yüzey Önerisi | Halı, Mermer, Ahşap, Fayans |
| Emiş Gücü | 18,000 Pa |
| Navigasyon Sistemi | LDS LiDAR, Dual 3D Structured Light, AI Camera |
| Wi-Fi Desteği | 2.4G ve 5G |

Figure 8.1: Dimensions of the 3i P10 Ultra Robot and Base Station.
9. Garanti ve Destek
For warranty information, please refer to the warranty card included with your product or visit the official 3i website. For technical support, troubleshooting beyond this manual, or to inquire about replacement parts, please contact 3i customer service through the contact information provided on their official website or within the 3i app.