1. Giriş
This manual provides detailed instructions for the safe and effective operation, setup, and maintenance of your Orion Motor Tech Auto AC Vacuum Pump Kit and 220 lb High Precision Electronic Digital Refrigerant Charging Weight Scale. Please read this manual thoroughly before use to ensure proper function and to prevent damage to the equipment or injury.

Image 1.1: The Orion Motor Tech Auto AC Vacuum Pump and Digital Refrigerant Charging Scale, shown together as a complete bundle.
2. Güvenlik Bilgileri
Yaralanma veya ekipmana zarar gelme riskini azaltmak için her zaman aşağıdaki güvenlik önlemlerine uyun:
- Wear appropriate personal protective equipment (PPE), including safety glasses and gloves, when handling refrigerants or operating the vacuum pump.
- Soğutucu buharlarının birikmesini önlemek için çalışma alanının iyi havalandırıldığından emin olun.
- Do not operate the vacuum pump in wet conditions or expose it to rain.
- Herhangi bir bakım veya temizlik yapmadan önce elektrik bağlantısını kesin.
- Handle refrigerants according to local and national regulations.
- Çalışma sırasında çocukları ve yetkisiz kişileri cihazdan uzak tutun.
3. Ürün Bittiview
3.1. Auto AC Vacuum Pump
The vacuum pump is designed for efficient evacuation of HVAC systems, compatible with various refrigerants including R12, R22, R134a, R410a, and R1234yf. It features a robust motor and durable construction.

Resim 3.1: Ayrıntılı view of the Orion Motor Tech Auto AC Vacuum Pump, highlighting its compact design and connection ports.
Temel Bileşenler:
- Motor: 1/3 hp all-copper motor for reliable performance.
- Casing: Reinforced aluminum alloy for heat dissipation and corrosion resistance.
- Intake Filter & Trap: Protects the pump from contaminants.
- Sight Glass: Allows monitoring of oil level and condition.
- Yağ Kapağı: Multipurpose design with pores and filter to minimize noise and simplify oil charging.
- Taşınabilir Sap: Kolay taşıma için.
3.2. Digital Refrigerant Charging Weight Scale
The electronic digital scale provides high precision for refrigerant charging and recovery, ensuring accurate measurements for HVAC systems. It is designed for durability and portability.

Image 3.2: The Orion Motor Tech Digital Refrigerant Charging Weight Scale, shown within its protective carrying case.
Temel Özellikler:
- Yüksek Doğruluk: Provides precise measurements for refrigerant charging.
- Fast-Response Sensor: Ensures quick and reliable readings.
- Backlit LCD Controller: Çeşitli ışık koşullarında net görüş sağlamak için.
- Sezgisel Kontroller: Easy to operate with ON/OFF, Z/T (Zero/Tare), and UNIT buttons.
- Dayanıklı Yapı: Built from aluminum alloy, waterproof, and suitable for various temperatures.
- Taşınabilirlik: Compact, lightweight design with an included carrying case.
- Uzun Bekleme Modu: Up to 60 hours of standby time, retaining the last reading after power outage.
4. Özellikler
4.1. Auto AC Vacuum Pump Specifications
| Özellik | Şartname |
|---|---|
| Örnek | RS-1.5 |
| Akış Hızı (FAD) | 4 cfm (6.8 m³/saat) |
| Son Vakum | 37.5 Mikron (5 Pa) |
| Anma Gücü | 1/3 beygir gücü (248 W) |
| Cilttage | 110V/60Hz |
| Görev Döngüsü | 30 dk. |
| Yağ Kapasitesi | 0.24 qt. (225 mL) |
| Ağırlık | 10.8 lb. |
| Boyutlar (U x G x Y) | 10.8" x 4.3" x 8.5" |
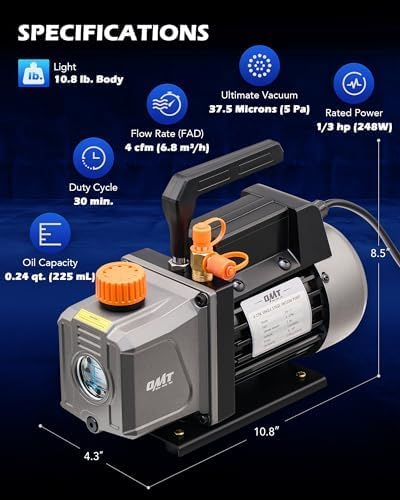
Image 4.1: Visual representation of the vacuum pump's key specifications and dimensions.
4.2. Digital Refrigerant Charging Weight Scale Specifications
| Özellik | Şartname |
|---|---|
| Menzil | 100 kg / 220 lb |
| Kesinlik | ±%0.05 |
| Çözünürlük | 5g / 0.01 lb |
| Tartı Vücut Ağırlığı | 4.32 kilo |
| Güç Kaynağı | 9V DC Battery (not included) |
| Çalışma Sıcaklığı | 0°C-50°C / 32°F-122°F |
| Bekleme Süresi | 60 saat |

Image 4.2: Illustration demonstrating the high accuracy of the digital refrigerant scale during an AC charging process.
5. Kurulum
5.1. Vacuum Pump Setup
- Atama: Vakum pompasını iyi havalandırılan bir alanda, sabit ve düz bir yüzeye yerleştirin.
- Yağ Doldurma: Unscrew the oil cap. Carefully pour vacuum pump oil into the oil inlet until the oil level is between the MIN and MAX marks on the sight glass. Do not overfill.
- Güç Bağlantısı: Connect the power cord to a grounded electrical outlet (110V/60Hz).
- İlk Kontrol: Briefly turn on the pump to ensure it operates smoothly, then turn it off.

Resim 5.1: Yakın çekim view of the vacuum pump's multipurpose oil cap and oil inlet, showing the process of refilling oil.
5.2. Digital Refrigerant Charging Weight Scale Setup
- Pil Montajı: Open the battery compartment on the back of the LCD controller and insert a 9V DC battery (not included), observing polarity.
- Atama: Tartım platformunu sağlam ve düz bir yüzeye yerleştirin.
- Denetleyici Bağlantısı: Ensure the coiled cable from the scale platform is securely connected to the LCD controller.
- Güç Açık: Press the 'ON/OFF' button on the LCD controller to power on the scale.
- Zero/Tare: Press the 'Z/T' button to zero the scale before placing any refrigerant tanks on it.
- Birim Seçimi: Press the 'UNIT' button to cycle through available units (kg, oz, lb).
6. Kullanım Talimatları
6.1. Vacuum Pump Operation (System Evacuation)
- Hortumları bağlayın: Connect the appropriate manifold gauge set hoses to the vacuum pump and the HVAC system service ports. Ensure all connections are tight.
- Vanaları Açın: Open the high and low side valves on the manifold gauge set.
- Pompayı Başlat: Turn on the vacuum pump. Monitor the manifold gauges to observe the vacuum level.
- Tahliye Süresi: Allow the pump to run until the desired vacuum level (e.g., 500 microns or lower) is achieved and held steady for a specified period (consult HVAC system manufacturer specifications). The pump has a 30-minute duty cycle.
- Vanaları Kapatın: Once evacuation is complete, close the manifold gauge set valves before turning off the vacuum pump.
- Bağlantıyı kes: Turn off the vacuum pump and disconnect the hoses.
6.2. Digital Refrigerant Charging Operation
- Prepare Scale: Power on the scale and ensure it is zeroed ('Z/T' button). Select the desired unit ('UNIT' button).
- Place Tank: Soğutucu gaz tankını dikkatlice tartım platformunun ortasına yerleştirin.
- Tara Ağırlığı: If the tank is not empty, press the 'Z/T' button to tare the weight of the tank, so the display shows 0.000. This allows you to measure the amount of refrigerant added or removed.
- Hortumları bağlayın: Connect the appropriate manifold gauge set hose from the refrigerant tank to the HVAC system.
- Charge/Recover: Open the tank valve and the manifold gauge valve to begin charging or recovering refrigerant. Monitor the weight displayed on the scale.
- İzleme: Stop the process once the desired amount of refrigerant has been transferred, as indicated by the scale reading.
- Close Valves & Disconnect: Close all valves and disconnect hoses.

Image 6.1: The digital refrigerant scale in operation, accurately measuring the weight of a refrigerant tank connected to an AC system.
7. Bakım
7.1. Vacuum Pump Maintenance
- Yağ Değişimi: Regularly check the oil level and condition via the sight glass. Change the vacuum pump oil after every 10-20 hours of operation or if it appears cloudy or discolored. To change oil, drain the old oil from the drain plug and refill with new vacuum pump oil to the correct level.
- Temizlik: Keep the pump exterior clean and free of debris.
- Depolamak: Store the pump in a dry, clean environment when not in use.
7.2. Digital Refrigerant Charging Weight Scale Maintenance
- Temizlik: Wipe the scale platform and controller with a damp bezle silin. Aşındırıcı temizleyiciler kullanmayın.
- Pil Değişimi: Replace the 9V battery when the low battery indicator appears on the LCD. Remove the battery if the scale will not be used for an extended period.
- Depolamak: Store the scale in its protective carrying case in a dry place to prevent damage.
8. Sorun Giderme
8.1. Vacuum Pump Troubleshooting
| Sorun | Olası Neden | Çözüm |
|---|---|---|
| Pompa çalışmıyor | No power; Motor issue | Check power connection; Consult qualified technician |
| Poor vacuum level | Low/dirty oil; Leaks in system/hoses; Clogged intake filter | Change oil; Check all connections for leaks; Clean/replace filter |
| Aşırı gürültü | Low oil level; Worn components | Check and refill oil; Consult qualified technician |
8.2. Digital Refrigerant Charging Weight Scale Troubleshooting
| Sorun | Olası Neden | Çözüm |
|---|---|---|
| Ölçek açılmıyor | Pil bitmiş; Pil bağlantısı gevşek | Replace 9V battery; Ensure battery is properly seated |
| Yanlış okumalar | Not zeroed; Uneven surface; Overload | Press 'Z/T' button; Place on level surface; Do not exceed 220 lb capacity |
| Ekran hatası | Sensor issue; Controller malfunction | Restart scale; Contact customer support |
9. Garanti ve Destek
Orion Motor Tech products are designed for reliability and performance. For warranty information, technical support, or service inquiries, please refer to the contact information provided with your product packaging or visit the official Orion Motor Tech webalan.
Garanti talepleri için lütfen satın alma belgenizi saklayın.


