giriiş
This manual provides comprehensive instructions for the assembly, operation, and maintenance of your Tecmojo 9U Network Rack. Designed for efficient organization of IT and A/V equipment, this compact mini server rack features a 10-inch width, 9U height, translucent side panels, and top handles, making it ideal for various setups including home labs and small offices.
Ürün Özellikleri
- Compact 10-Inch Width & 9U Height: This mini rack is designed for efficient equipment organization, featuring a space-saving 10-inch width and standard 9U height - ideal for desktops, home labs, small offices, or AV setups.
- Versatile Accessory Compatibility: Supports 10-inch rack-mountable equipment, including patch panels, network switches, cable organizers, and power strips, providing flexible solutions for networking and electronics projects.
- Durable Steel & Acrylic Construction: Constructed from high-strength steel with premium acrylic side panels, this rack offers outstanding durability and stability - perfect for NAS, custom clusters, and sensitive electronics.
- Open-Frame & Translucent Panel Design: The open-frame structure ensures superior airflow for optimal cooling, while translucent side panels offer dust protection and allow easy monitoring of device indicators—ideal for performance and ambient lighting enhancements.
- Complete Accessory Kit Included: Includes 2 blank panels, 2 rack shelf, 1 SBC shelf, 2 micro adapter boards, and all necessary mounting hardware - everything needed for a streamlined, customizable installation.
Ürün Bittiview
Tecmojo 9U Network Rack
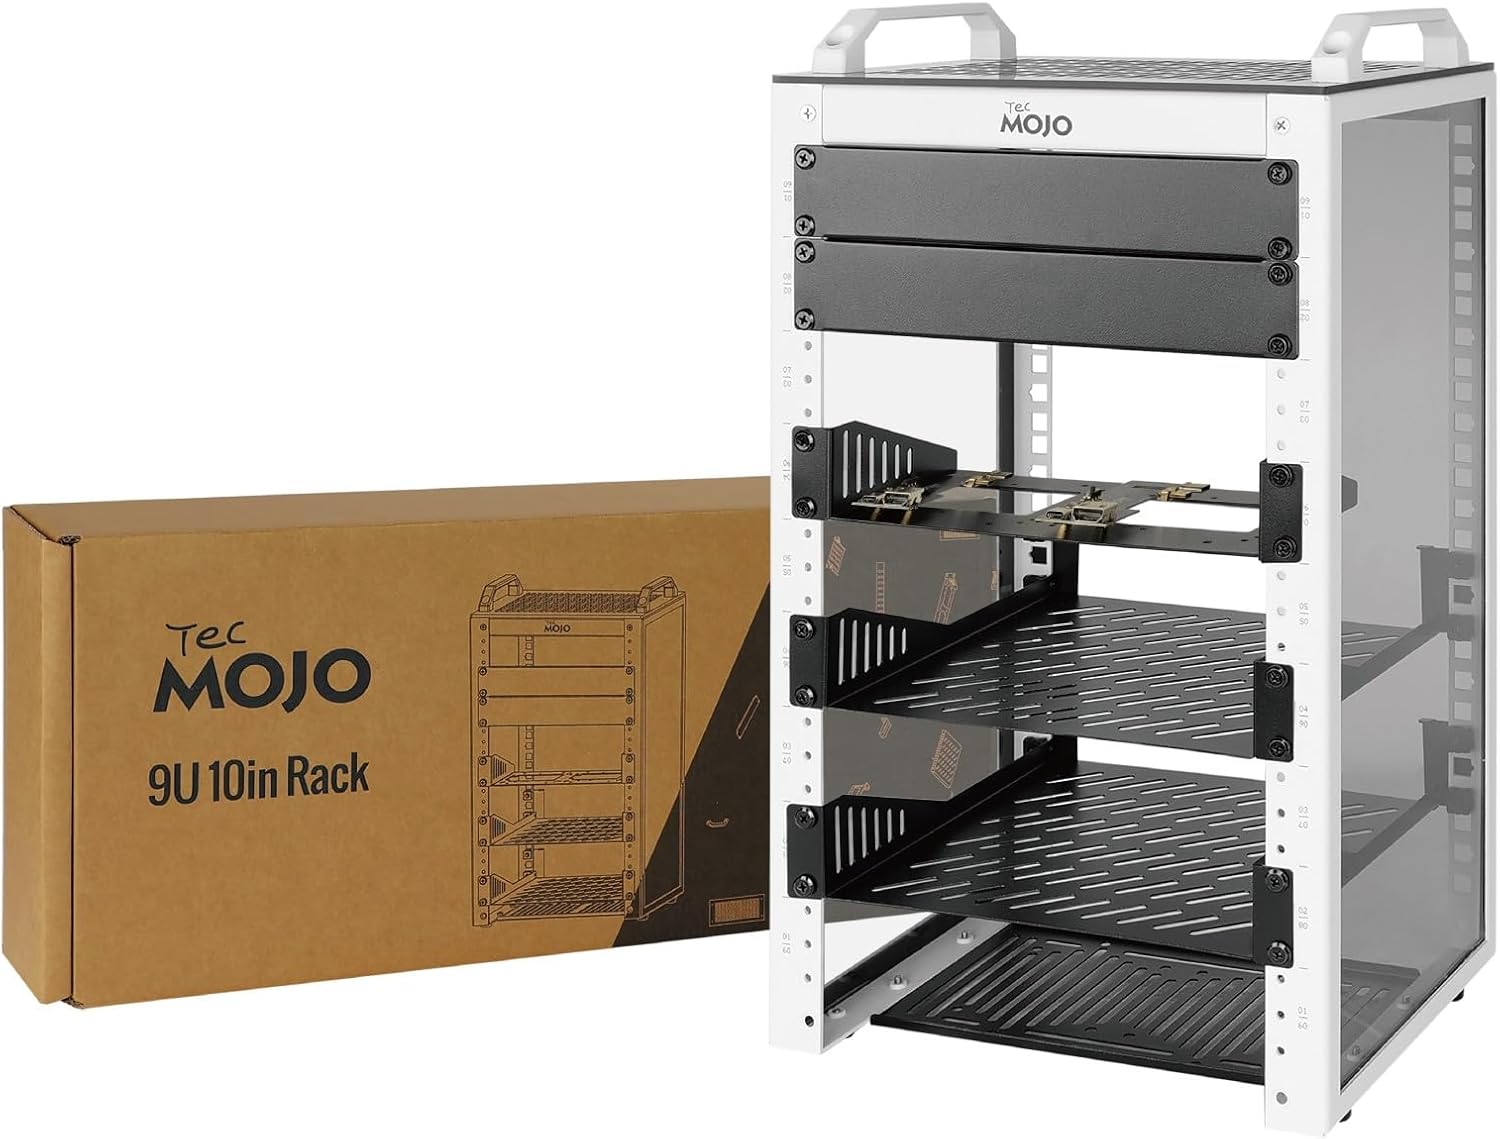
This image displays the Tecmojo 9U Network Rack alongside its packaging box, showcasing the product's compact design and the brand's presentation.
Key Features Highlighted
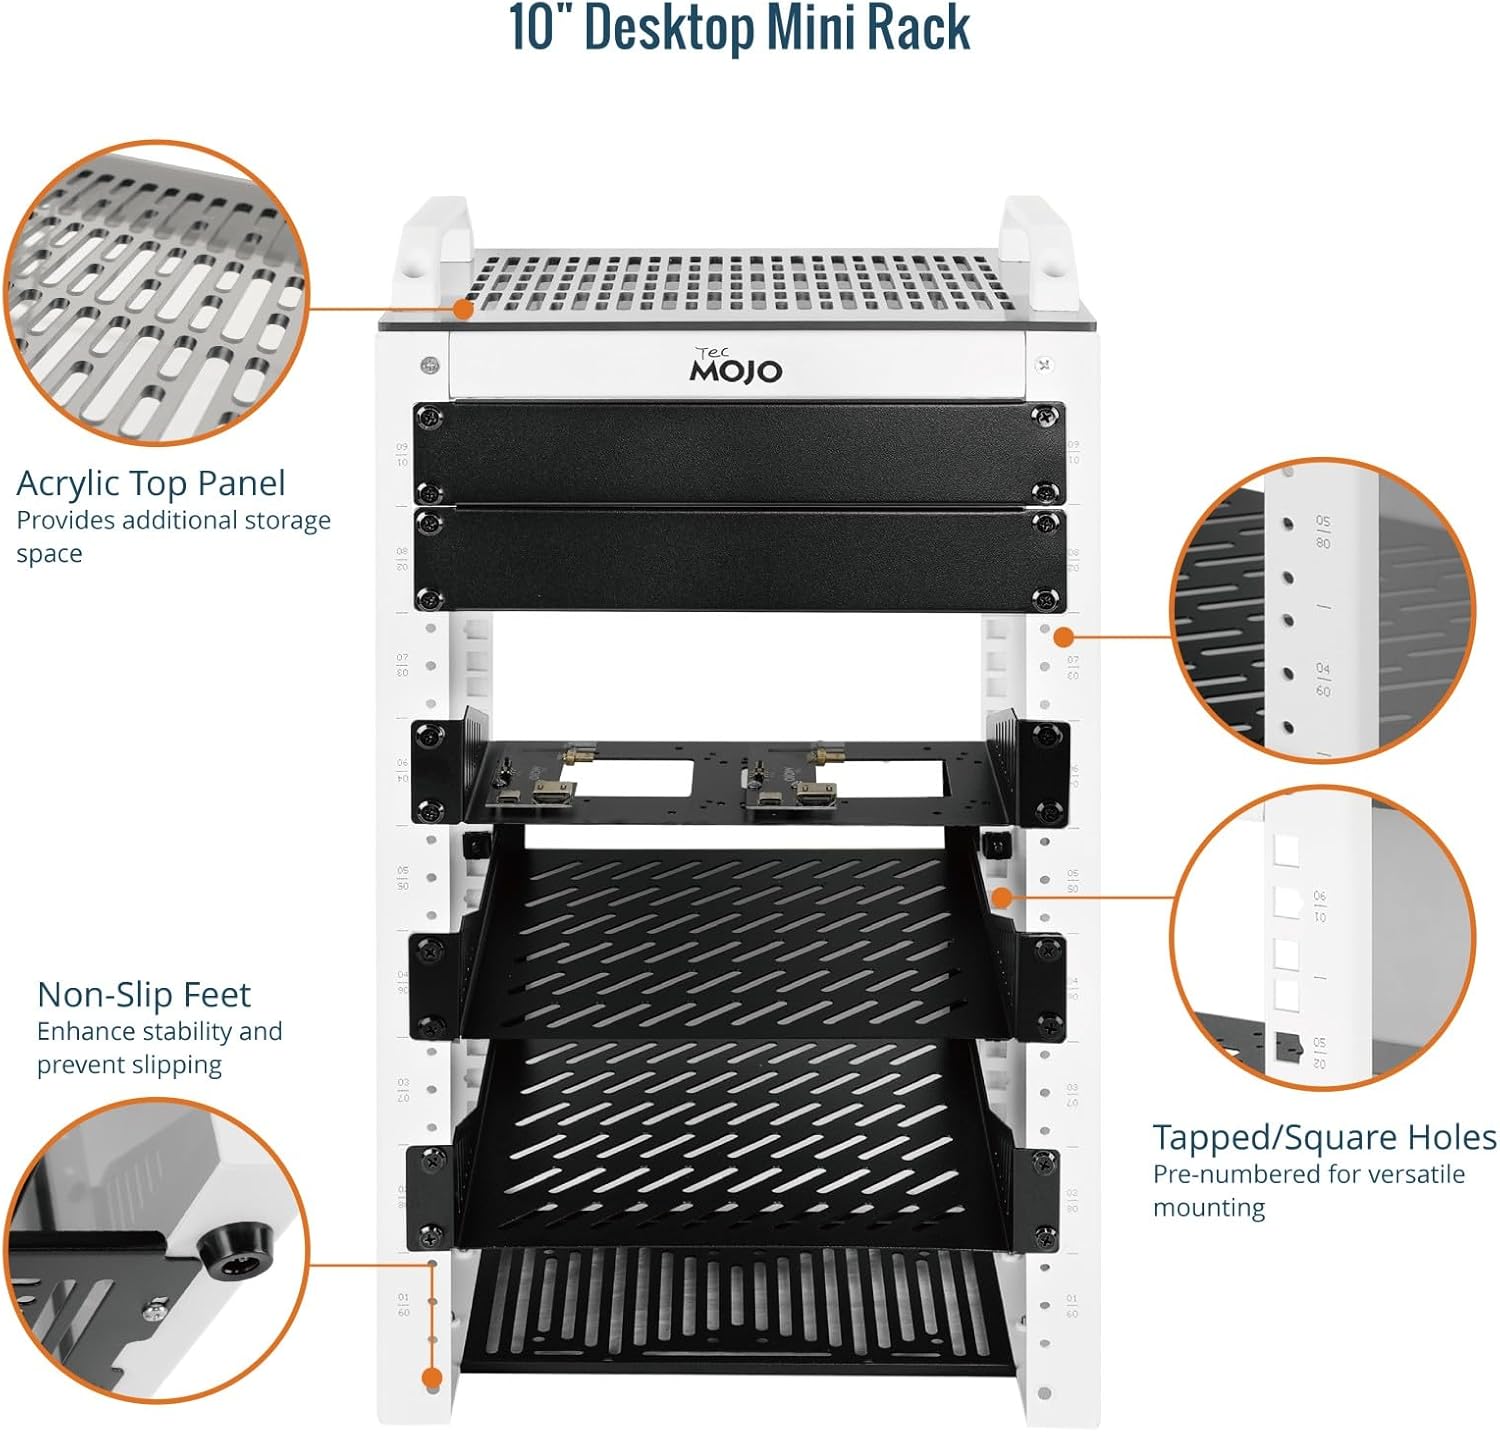
Ayrıntılı view highlighting the acrylic top panel for additional storage, non-slip feet for stability, and tapped/square holes for versatile mounting options.
SBC Shelf and Mounting Brackets
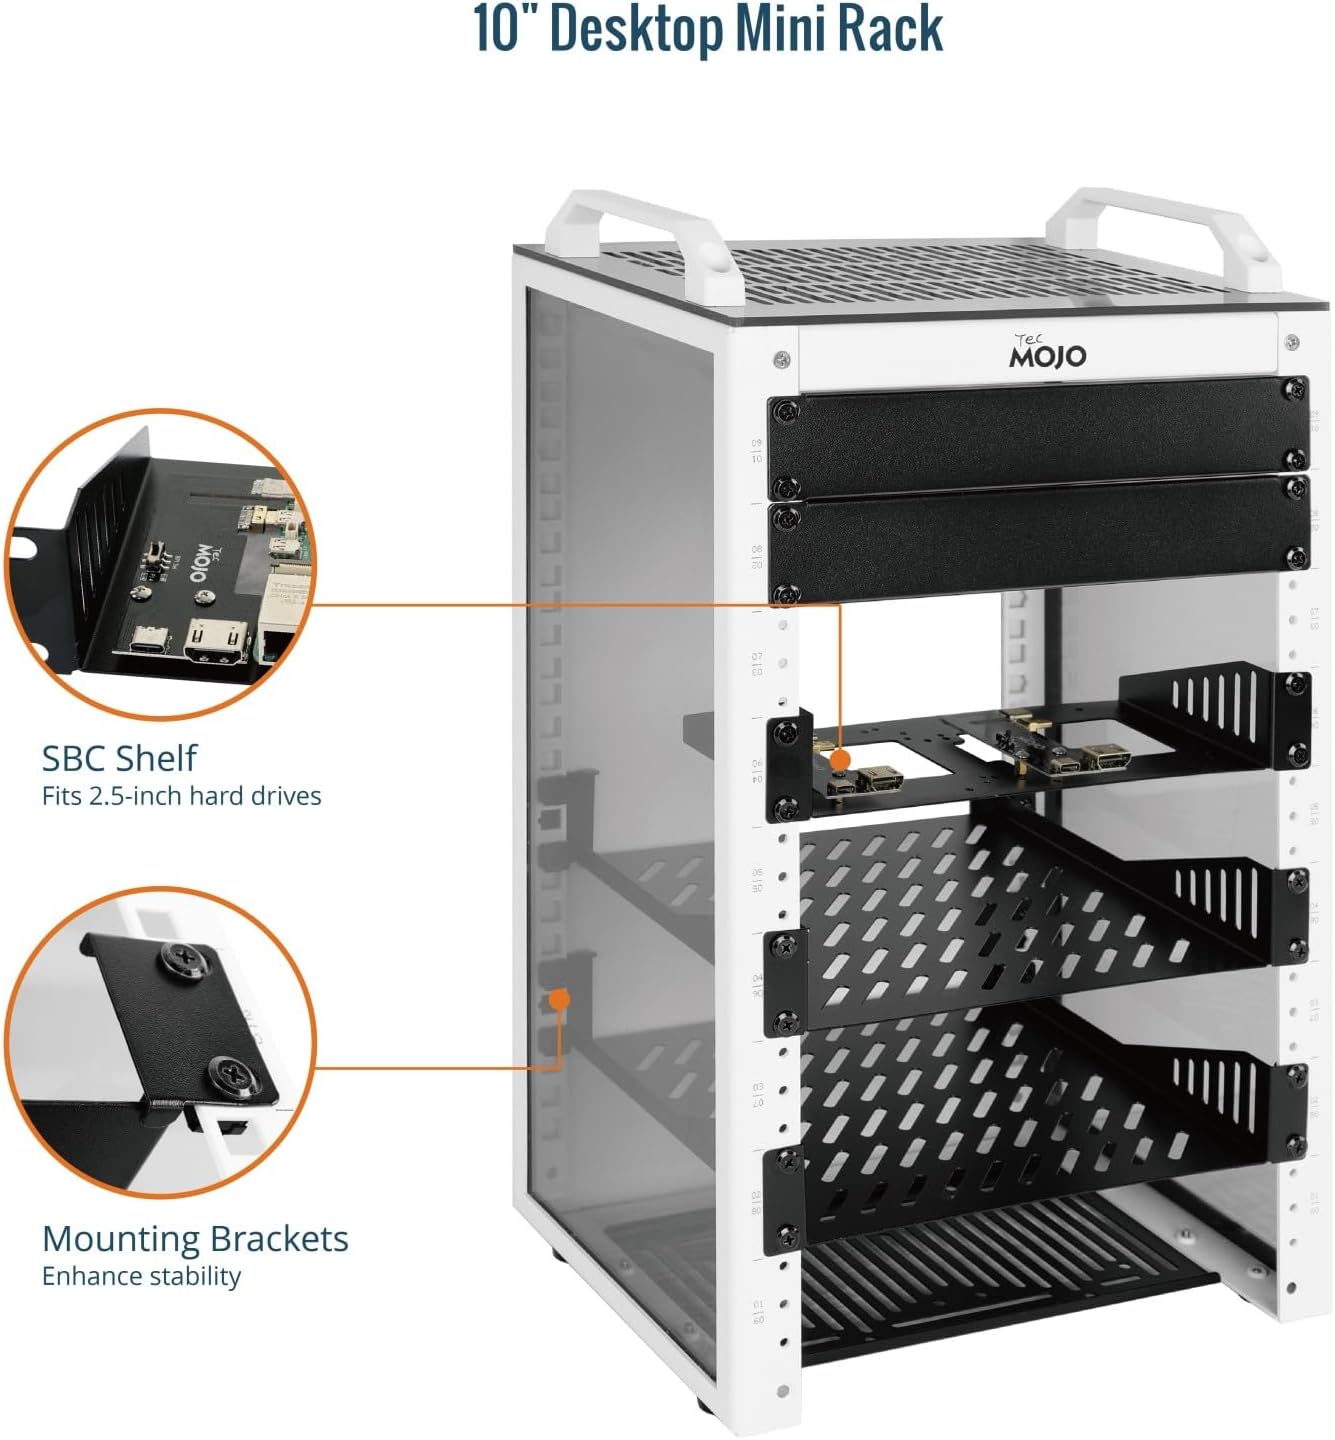
This image illustrates the included SBC shelf, designed to fit 2.5-inch hard drives, and the robust mounting brackets that enhance the rack's overall stability.
Dahil Aksesuarlar
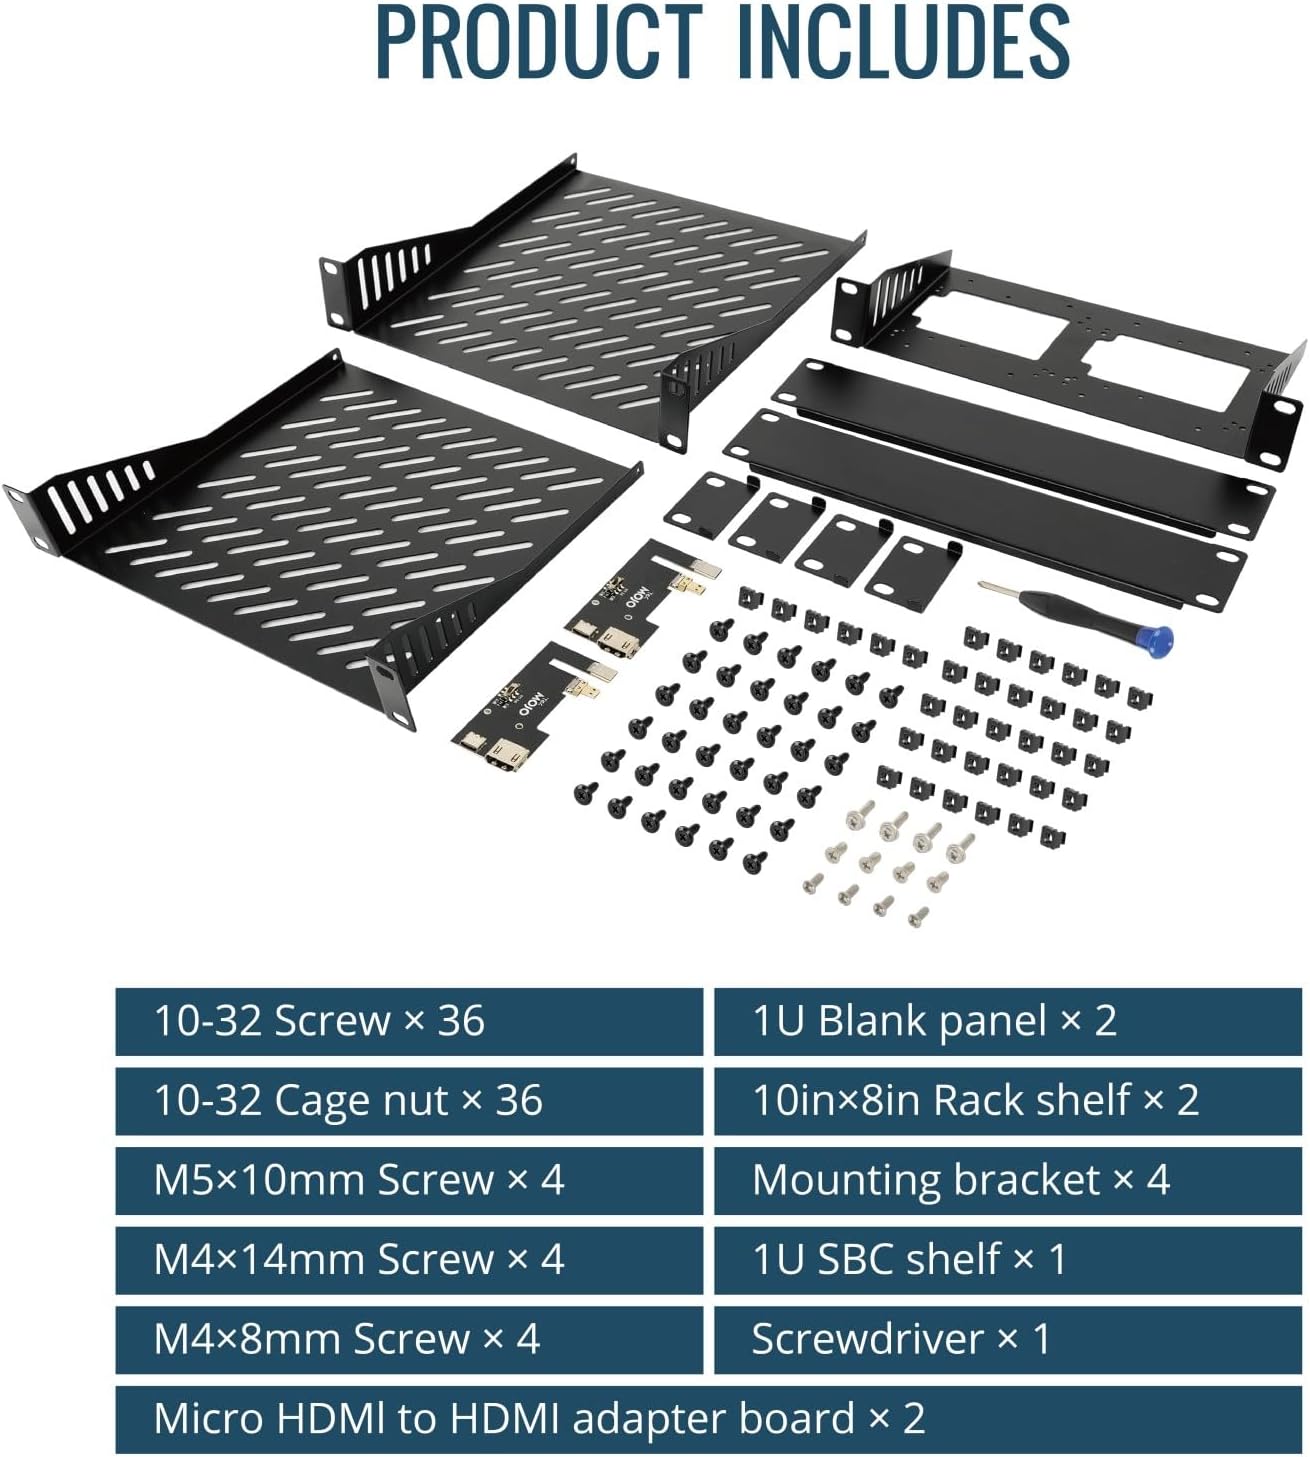
A comprehensive display of all components included in the accessory kit, such as screws, cage nuts, blank panels, rack shelves, SBC shelf, screwdriver, and micro HDMI to HDMI adapter boards.
Özellikler
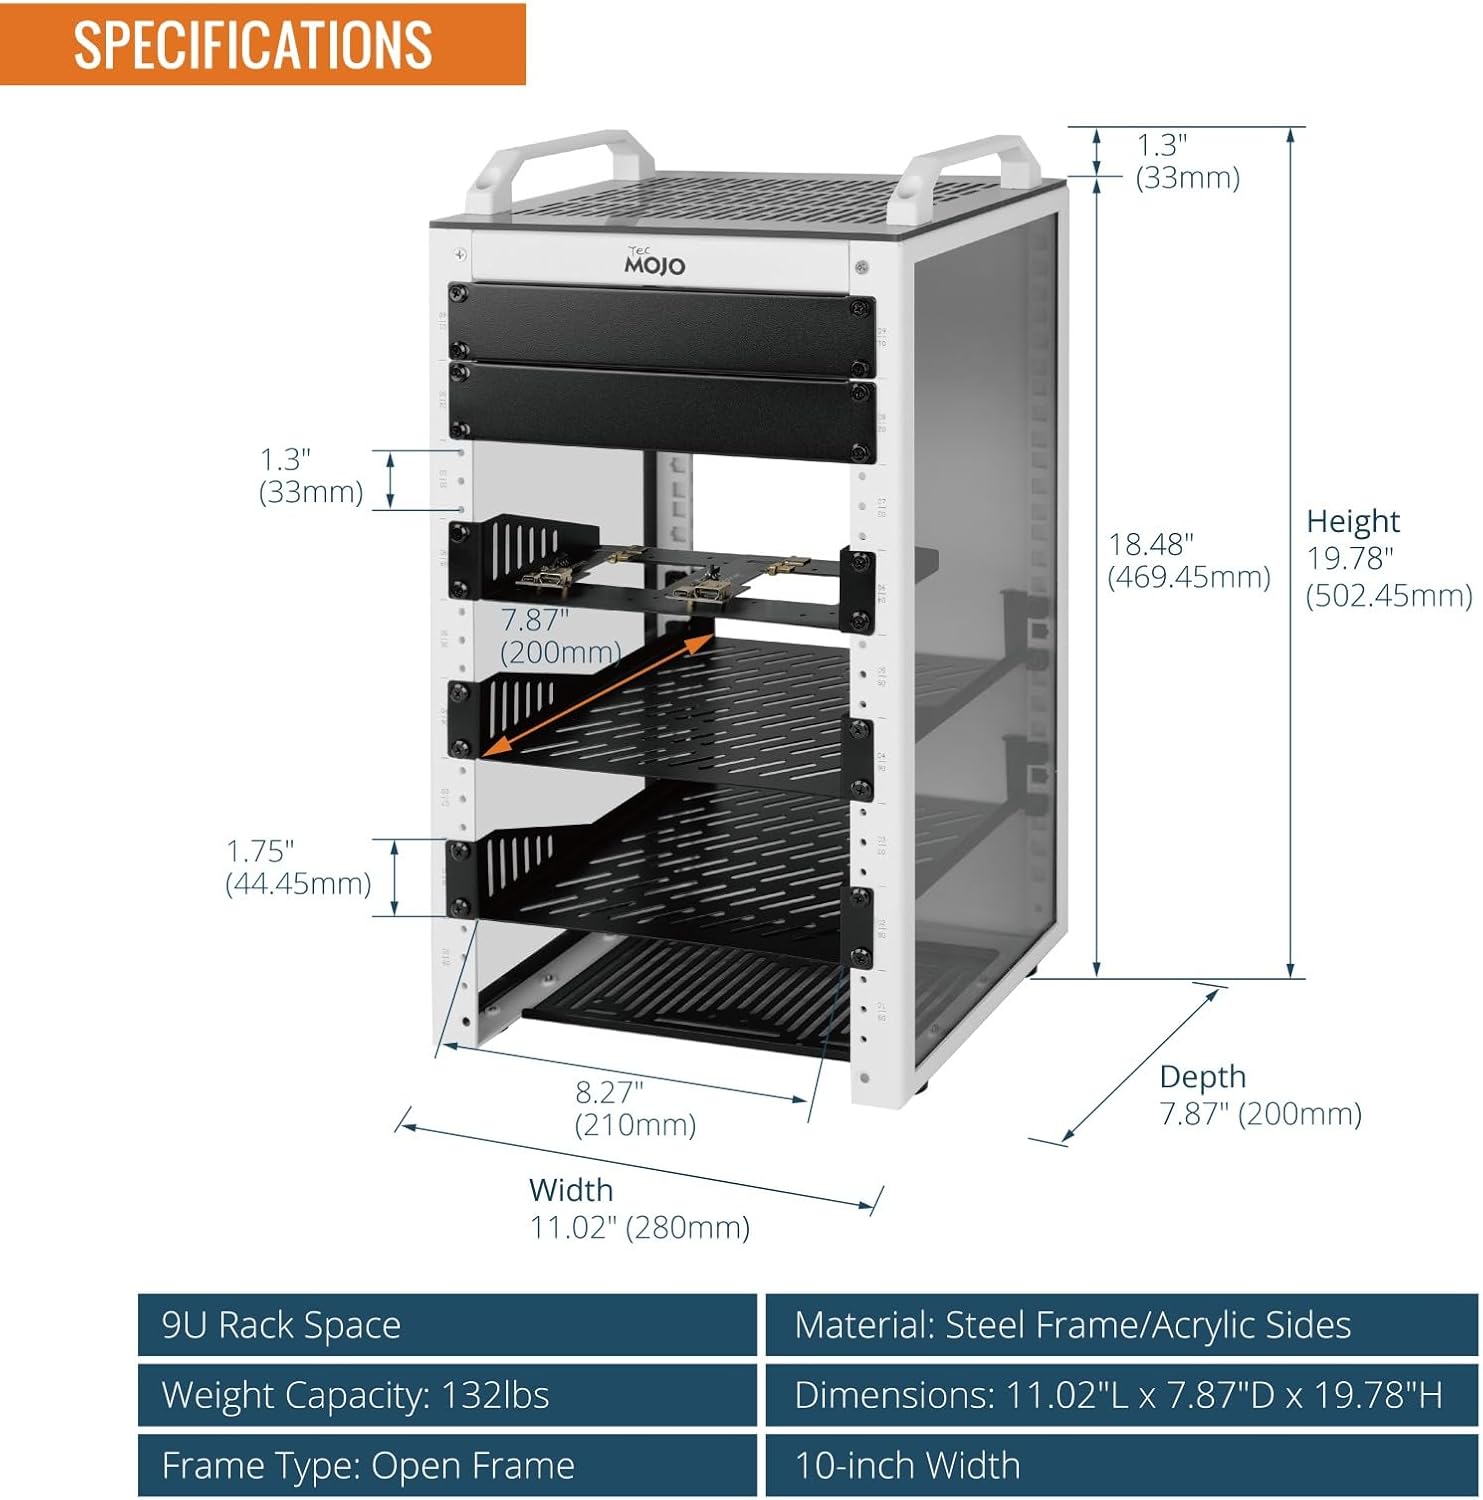
Visual representation of the rack's dimensions and key specifications.
| Bağlanmak | Değer |
|---|---|
| Ürün Boyutları | 7.87 x 11.02 x 19.78 inç (7.87"D x 11.02"G x 19.78"Y) |
| Ürün Ağırlığı | 11.8 pound |
| Üretici | Tecmojo |
| Marka | Tecmojo |
| Renk | Beyaz |
| Boyut | 9U |
| Malzeme | Alaşımlı Çelik |
Montaj Talimatları
Follow these steps to assemble your Tecmojo 9U Network Rack. For a visual guide, please refer to the assembly video below.
- Install Cross Beams & Side Panels: Begin by attaching the cross beams to the side panels. Ensure all screws are securely fastened.
- Alt Paneli Takın: Secure the bottom panel to the assembled frame.
- Place Top Cover & Secure: Position the top cover onto the frame and secure it with the provided screws.
- Attach Top Handles: Fasten the two top handles to the designated points on the top cover.
- Install Blank Panel: Install the blank panel at your desired location within the rack.
- Mount SBC Shelf: Secure the SBC shelf into the rack.
- Install 10" or 8" Rack Shelf: Place and secure the rack shelves as needed for your equipment.
- Fix Mounting Brackets: Attach any additional mounting brackets to enhance stability and support.
Montaj Video Kılavuzu
This video provides a step-by-step visual demonstration of how to assemble the Tecmojo 9U Network Rack, covering the installation of all major components.
Kullanım Talimatları
The Tecmojo 9U Network Rack is designed for passive operation, primarily serving as a structural support and organizational unit for your IT and A/V equipment. No active operational steps are required for the rack itself beyond proper equipment installation.
- Ekipman montajı: Once assembled, install your 10-inch rack-mountable equipment (e.g., patch panels, network switches, servers) into the rack using appropriate rack screws and cage nuts.
- Kablo yönetimi: Utilize the open-frame design and any additional cable management accessories to route and secure cables, ensuring optimal airflow and a tidy setup.
- İzleme: The translucent side panels allow for easy visual monitoring of equipment status indicators without needing to open or disassemble the rack.
- Havalandırma: The open-frame design promotes natural convection. Ensure adequate space around the rack for optimal airflow to prevent overheating of installed devices.
Bakım
Regular maintenance ensures the longevity and optimal performance of your Tecmojo 9U Network Rack.
- Temizlik: Periodically wipe down the steel frame and acrylic panels with a soft, damp cloth. Avoid abrasive cleaners that could scratch the surfaces.
- Vida Sıkılığı: Over time, screws may loosen. Periodically check all assembly screws and tighten them as necessary to maintain structural integrity.
- Hava Akışı Engellenmesi: Ensure that the perforated top and bottom panels, as well as the open sides, remain free from dust and debris to maintain proper airflow for your equipment.
- Panel Muayenesi: Inspect the acrylic side panels for any cracks or damage. While durable, impacts can cause damage.
Sorun giderme
Bu bölümde, montaj veya kullanım sırasında karşılaşabileceğiniz yaygın sorunlar ele alınmaktadır.
- Montaj Sırasında Deliklerin Hizalanmasında Zorluk:
If screw holes do not align perfectly, slightly loosen all screws on the partially assembled sections. This provides enough play to align the misaligned holes. Once aligned, tighten all screws firmly.
- Paint in Threaded Holes:
If paint obstructs threaded holes, carefully use a small, appropriate tool (e.g., a tap or a small screwdriver) to clear the paint from the threads. Do not force screws into obstructed holes as this can strip the threads.
- Rack Feels Unstable After Assembly:
Ensure all screws, especially those connecting the main frame components and mounting brackets, are fully tightened. Verify that the rack is placed on a flat, stable surface and that the non-slip feet are properly positioned.
- Equipment Not Fitting Properly:
Confirm that your equipment is 10-inch rack-mountable. Ensure you are using the correct screws and cage nuts for mounting. If using shelves, verify they are installed at the correct height and orientation.
Garanti ve Destek
Tecmojo products are manufactured to high-quality standards. For any issues, questions, or support needs, please contact Tecmojo customer service. While specific warranty details are not provided in this manual, general product support is available.
You can visit the official Tecmojo store for more information and support:


