1. Giriş
This manual provides detailed instructions for the installation, operation, and maintenance of your GIGABYTE GA-B760M D3HP WIFI6 motherboard. Designed for optimal performance and reliability, this motherboard supports Intel Core 14th, 13th, and 12th generation CPUs and features DDR5 memory support, PCIe 4.0 M.2 connectors, and Wi-Fi 6 connectivity. Please read this manual thoroughly before beginning installation to ensure proper setup and to maximize the lifespan of your product.
2. Temel Özellikler
- CPU Desteği: Compatible with Intel Core 14th, 13th, and 12th generation processors.
- Güç Tasarımı: Features a 4+1+1 phase hybrid digital VRM solution for stable power delivery.
- Hafıza: Supports Dual Channel DDR5 memory with 4 DIMM slots and XMP memory module support.
- Depolamak: Equipped with 2 PCIe 4.0 x4 M.2 connectors for high-speed storage.
- Ağ oluşturma: Includes GbE LAN and Wi-Fi 6 802.11ax for fast and reliable network connectivity.
3. Kurulum ve Kurulum
Before installing the motherboard, ensure your system is powered off and disconnected from the power source. Handle the motherboard by its edges to avoid static discharge.
3.1 Anakart Düzeni
Familiarize yourself with the layout of the motherboard components before proceeding with installation.

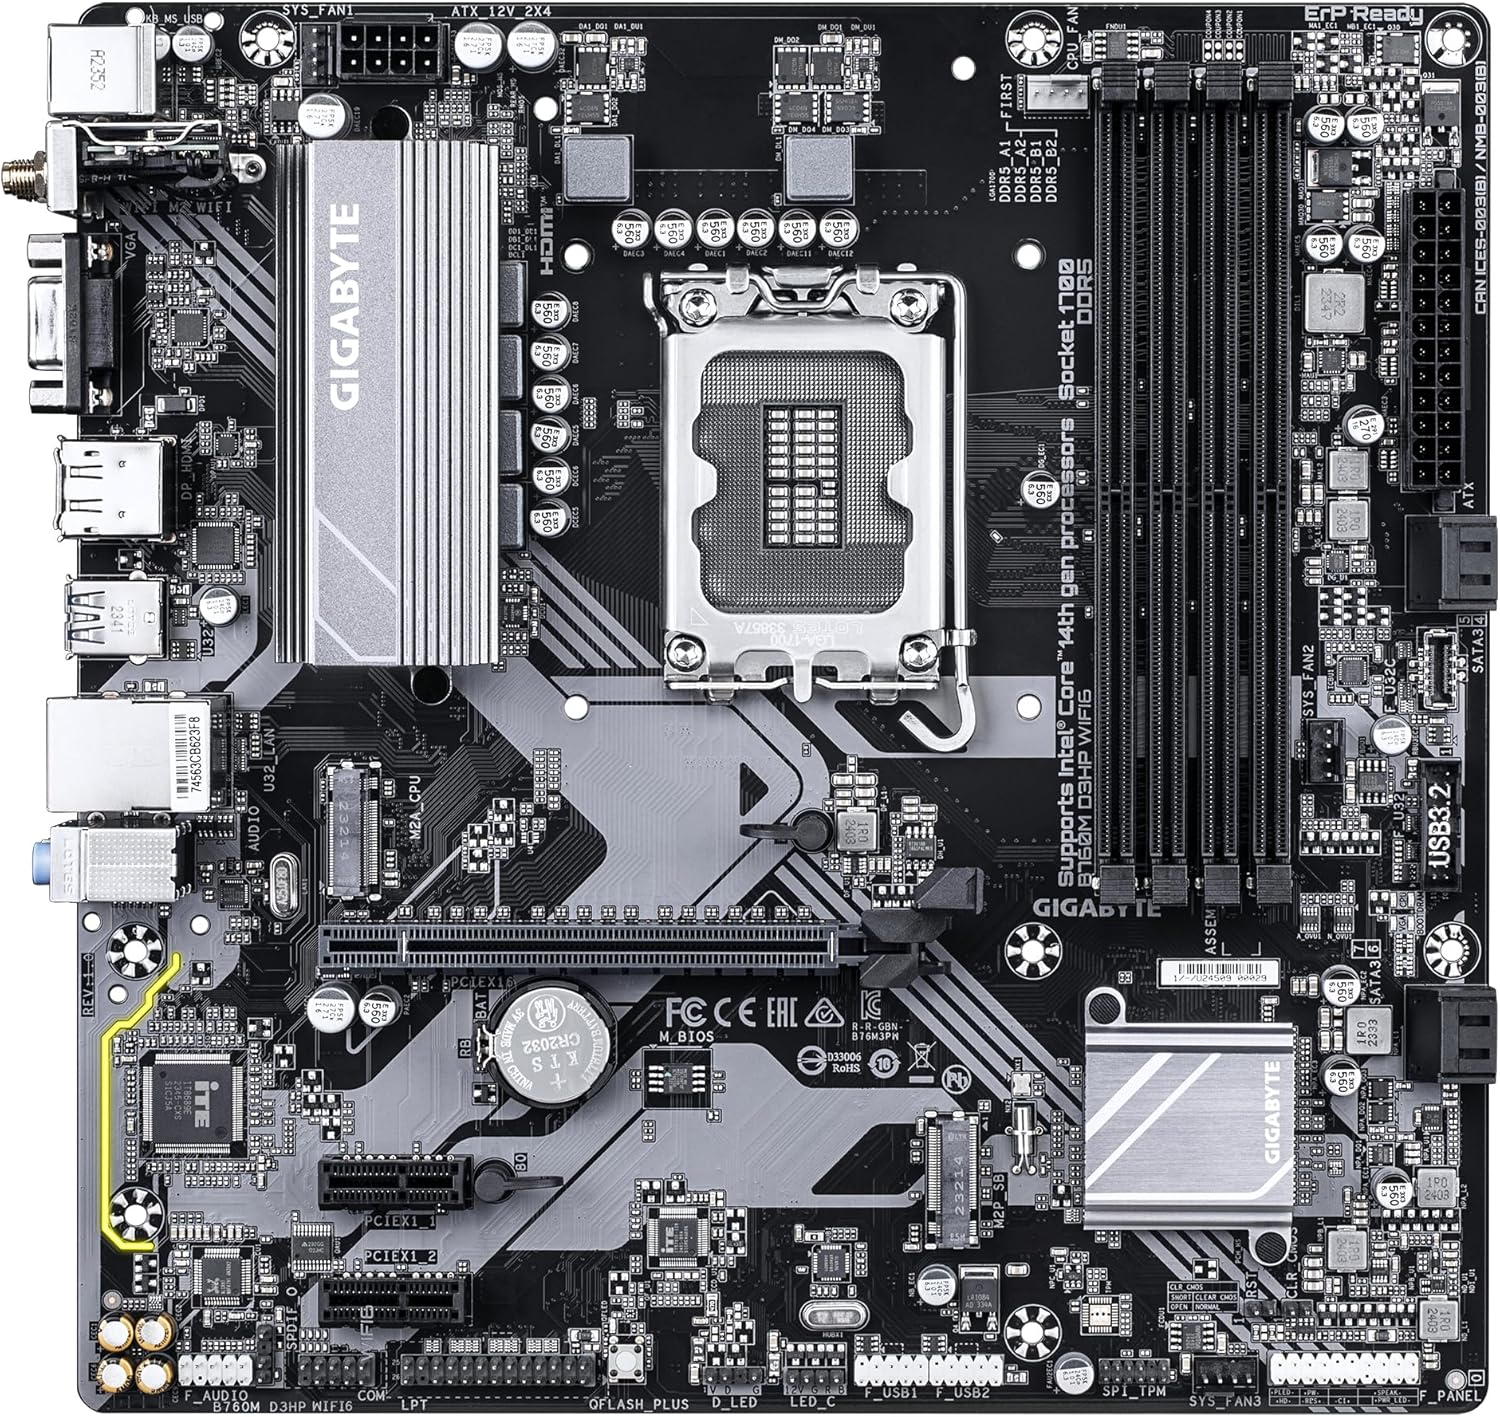
Şekil 1: Yukarıdan aşağıya view of the GIGABYTE GA-B760M D3HP WIFI6 motherboard, showing the CPU socket, DIMM slots, PCIe slots, and various headers.
Şekil 2: Açılı view of the GIGABYTE GA-B760M D3HP WIFI6 motherboard, highlighting the heatsinks and overall component placement.
3.2 CPU Kurulumu
- Anakart üzerinde LGA 1700 CPU soketini bulun.
- CPU soket kolunu açın ve yük plakasını kaldırın.
- CPU'yu sokete dikkatlice hizalayın ve CPU üzerindeki üçgen işaretin soket üzerindeki işaretle aynı olduğundan emin olun. CPU'yu sokete zorla sokmayın.
- Yük plakasını indirin ve kolla sabitleyin.
- İşlemciye termal macun uygulayın ve işlemci soğutucusunu üreticinin talimatlarına göre takın.
3.3 Bellek (RAM) Kurulumu
- Dört DDR5 DIMM yuvasını bulun.
- DIMM yuvasının her iki ucundaki klipsleri açın.
- DDR5 bellek modülündeki çentiği DIMM yuvasındaki anahtarla hizalayın.
- Hafıza modülünü, klipsler yerine oturana kadar yuvaya sıkıca yerleştirin. Her iki klipsin de kapalı olduğundan emin olun.
- For dual-channel configuration, refer to the motherboard's specific manual for recommended slot pairing.
3.4 Depolama Aygıtı Kurulumu (M.2 SSD'ler ve SATA Sürücüler)
- M.2 SSD: Locate the M.2 connectors. Remove the M.2 screw/standoff. Insert the M.2 SSD into the slot at a 30-degree angle. Push down the SSD and secure it with the screw/standoff.
- SATA Sürücüler: Sabit disklerinizden (HDD/SSD) gelen SATA veri kablolarını anakart üzerindeki SATA portlarına bağlayın. Güç kaynağınızdan gelen güç kablolarını disklere bağlayın.
3.5 Güç Bağlantıları
- Güç kaynağınızdaki 24 pinli ATX ana güç konektörünü anakart üzerindeki ilgili porta bağlayın.
- Connect the 8-pin ATX 12V CPU power connector to the port near the CPU socket.
3.6 Ön Panel ve Çevre Birimi Bağlantıları
Connect your case's front panel connectors (power button, reset button, USB ports, audio jacks, LED indicators) to the corresponding headers on the motherboard. Refer to the motherboard's detailed manual for exact pin layouts.

Şekil 3: Rear I/O panel of the GIGABYTE GA-B760M D3HP WIFI6 motherboard, showing USB ports, display outputs, audio jacks, Ethernet, and Wi-Fi antenna connectors.
4. Kullanım Talimatları
4.1 BIOS Kurulumu
Upon first boot, you may need to enter the BIOS (Basic Input/Output System) to configure settings such as boot order, date/time, and enable specific features. To enter BIOS, press the SİL key repeatedly during startup. The GIGABYTE UEFI BIOS provides an intuitive graphical interface for configuration.
4.2 Sürücü Kurulumu
After installing your operating system, install the necessary drivers for the motherboard's components (chipset, audio, LAN, Wi-Fi, etc.). These drivers are typically provided on a support DVD or can be downloaded from the official GIGABYTE webAnakart modelinize özel site.
5. Bakım
- Temizlik: Regularly clean dust from the motherboard and case fans using compressed air. Ensure the system is powered off and unplugged before cleaning.
- BIOS Güncellemeleri: GIGABYTE'ı periyodik olarak kontrol edin website for BIOS updates. BIOS updates can improve system stability, compatibility, and performance. Follow the instructions provided by GIGABYTE carefully when updating the BIOS.
- Sürücü Güncellemeleri: Yeni yazılım ve donanımlarla en iyi performansı ve uyumluluğu sağlamak için sürücülerinizi güncel tutun.
6. Sorun Giderme
- Güç Yok:
- Tüm güç bağlantılarını (24-pin ATX, 8-pin CPU) kontrol edin.
- Güç kaynağının açık olduğundan emin olun.
- Güç kaynağını başka bir sistemle veya bir güç kaynağı test cihazıyla test edin.
- Görüntü yok:
- Ensure the monitor is connected to the graphics card (or integrated graphics port if no discrete GPU is used).
- Grafik kartını ve bellek modüllerini yeniden yerleştirin.
- Sadece bir RAM çubuğuyla önyüklemeyi deneyin.
- Sistem Kararsızlığı/Çökmeler:
- CPU ve GPU sıcaklıklarını kontrol edin.
- Ensure all components are properly seated.
- RAM hatalarını kontrol etmek için bellek tanılama araçlarını çalıştırın.
- BIOS ve sürücüleri güncelleyin.
- Ağ Bağlantı Sorunları:
- For wired LAN, check the Ethernet cable and router connection.
- For Wi-Fi, ensure antennas are securely attached and drivers are installed.
- Verify network settings in the operating system.
7. Özellikler
| Özellik | Detay |
|---|---|
| Marka | GIGABYTE |
| Model Adı | B760M D3HP WİFİ6 |
| CPU Soketi | LGA1700 |
| Uyumlu İşlemciler | Intel Core 14th Gen, Intel Core 13th Gen, Intel Core 12th Gen |
| Yonga Seti Türü | Intel B760 |
| RAM Bellek Teknolojisi | DDR5 |
| Bellek Saat Hızı | 5600 MHz |
| Uyumlu Cihazlar | Personal Computer, Desktop Computer |
| Platform | , Windows 10 Windows 11 |
| Ürün Boyutları | 9.61 x 9.61 x 1.38 inç |
| Ürün Ağırlığı | 2.2 pound |
8. Garanti ve Destek
Garanti bilgileri ve teknik destek için lütfen resmi GIGABYTE web sitesine başvurun. webWeb sitesini ziyaret edin veya GIGABYTE müşteri hizmetleriyle iletişime geçin. Garanti talepleri için satın alma belgenizi saklayın.
GIGABYTE Resmi Webalan: www.gigabyte.com


