1. Giriş
This manual provides essential information for setting up, operating, maintaining, and troubleshooting your NIMO 15.6-inch FHD Business Laptop. Please read this guide thoroughly to ensure optimal performance and longevity of your device. Keep this manual for future reference.
2. Kutuda Neler Var?
Tüm öğelerin ambalajda mevcut olduğunu doğrulayın:
- 1 x Nimo N154 Dizüstü Bilgisayar
- 1 x Type-C 65W PD Hızlı Şarj Cihazı
- 1 x Kullanım Kılavuzu (bu belge)
- Windows 11 Home (önceden yüklenmiş)
3. Ürün Bittiview
Familiarize yourself with the components and ports of your NIMO laptop.
Resim: Ön view of the NIMO 15.6-inch FHD Business Laptop, showcasinEkran ve klavye.
3.1. Bağlantı Noktaları ve Konnektörler
The NIMO N154 laptop features a variety of ports for connecting peripherals and external devices.

Image: Diagram illustrating the various ports on the left and right sides of the NIMO laptop, including USB, HDMI, Type-C, and audio jack.
- Sol Taraf:
- Kensington Lock: For securing your laptop.
- Headphone Combo Jack: For audio output and microphone input.
- USB 3.0 Port (x2): For high-speed data transfer.
- USB 2.0 Port (x1): For connecting standard USB devices.
- Micro SD Card Reader: For expanding storage or transferring filehafıza kartlarından.
- Sağ Taraf:
- Type-C Port (Charge Only): For connecting the 65W PD charger.
- USB 3.0 Port (x1): For high-speed data transfer.
- HDMI Port: For connecting to external displays.
- Type-C Port (Multifunction): Supports data transfer and display output.
- Charge LED Indicator: Shows charging status.
4. Kurulum
4.1. İlk Güç Açma ve Şarj Etme
- Paketi aç: Dizüstü bilgisayarınızı ve tüm aksesuarlarını dikkatlice ambalajından çıkarın.
- Gücü bağlayın: Plug the 65W Type-C PD Fast Charger into a power outlet and then connect the Type-C connector to the designated "Charge Only" Type-C port on the laptop.
- Bataryayı Şarj Edin: Allow the laptop to charge for at least 30 minutes before initial use, or until the charge LED indicates a full charge.
- Güç Açık: Open the laptop lid and press the power button, typically located on the top right of the keyboard or side.

Image: The 65W Type-C PD Fast Charger, illustrating its compact design and universal compatibility.
4.2. Windows 11 Kurulumu
Follow the on-screen instructions to complete the Windows 11 initial setup:
- Bölgenizi ve klavye düzeninizi seçin.
- Bir Wi-Fi ağına bağlanın.
- Microsoft hesabınızla oturum açın veya yeni bir hesap oluşturun.
- Hızlı giriş için PIN belirleyin.
- Review ve gizlilik ayarlarını kabul edin.
5. Kullanım Talimatları
5.1. Parmak İzi Okuyucu
The integrated fingerprint sensor allows for secure and quick login without passwords.
- Kurmak: Navigate to Windows Settings > Accounts > Sign-in options > Fingerprint recognition (Windows Hello).
- Parmak İzi Kaydı: Follow the on-screen prompts to register your fingerprint. You may need to scan your finger multiple times from different angles.
- Kullanım: To log in, simply place your registered finger on the fingerprint sensor when prompted.

Image: Close-up of the laptop's touchpad area showing the fingerprint reader, and a separate image of the webGizlilik kalkanlı kamera.
5.2. Backlit Keyboard
The backlit keyboard enhances visibility in low-light conditions.
- Arka ışığı açıp kapatma: Use the dedicated function key (often Fn + Fx, where Fx is a key with a keyboard backlight icon) to cycle through backlight brightness levels or turn it off. Refer to your keyboard for the specific key combination.
5.3. Webkamera Gizlilik Kalkanı
The laptop includes a physical webcam privacy shield for enhanced security.
- Etkinleştir/Devre Dışı Bırak: Slide the physical switch located next to the webcam to cover or uncover the camera lens.
5.4. Harici Ekranların Bağlanması
You can extend your workspace by connecting an external monitor or projector.
- Kabloyu bağlayın: Use an HDMI cable to connect your external display to the laptop's HDMI port, or a compatible Type-C to DisplayPort/HDMI adapter for the multifunction Type-C port.
- Configure Display: Basmak Windows tuşu + P to open the Project menu. Select your preferred display mode (e.g., Duplicate, Extend, Second screen only).
6. Bakım
6.1. Dizüstü Bilgisayarınızı Temizleme
- Ekran: Hafifçe yumuşak, tüy bırakmayan bir bez kullanın.ampSu veya ekran temizleyici ile temizleyin. Sıvıyı doğrudan ekrana püskürtmeyin.
- Klavye ve Şasi: Yumuşak ve kuru bir bez kullanın. İnatçı kirler için hafifçe kurulayın.amp Sıvının açıklıklara girmemesine dikkat ederek, hafif sabunlu bir bez kullanılabilir.
- Limanlar: Basınçlı hava kullanarak portlardaki tozu nazikçe temizleyin.
6.2. Pil Bakımı
- Pilin sık sık tamamen boşaltılmasından kaçının.
- Uzun süre kullanılmayacaksa dizüstü bilgisayarınızı serin ve kuru bir yerde saklayın.
- Dizüstü bilgisayarınızı aşırı sıcaklıklara maruz bırakmayın.
6.3. Yazılım Güncellemeleri
- Sistem kararlılığını ve güvenliğini sağlamak için Windows güncellemelerini düzenli olarak kontrol edin ve yükleyin. Ayarlar > Windows Güncellemesi'ne gidin.
- Keep device drivers updated for optimal performance.
7. Sorun Giderme
Bu bölümde karşılaşabileceğiniz yaygın sorunlar ele alınmaktadır.
7.1. Dizüstü Bilgisayar Açılmıyor
- Şarj cihazının hem dizüstü bilgisayara hem de çalışan bir elektrik prizine güvenli bir şekilde bağlı olduğundan emin olun.
- Başka bir cihazı takarak elektrik prizinin çalışır durumda olduğunu doğrulayın.
- Allow the laptop to charge for at least 30 minutes if the battery is completely drained.
- Try a hard reset by holding the power button for 15-20 seconds.
7.2. Görüntü Sorunları (Görüntü Yok, Titreme)
- If an external monitor is connected, disconnect it to see if the laptop's screen works.
- İşlev tuşlarını kullanarak ekran parlaklığını ayarlayın (örneğin, Fn + F5/F6).
- Dizüstü bilgisayarı yeniden başlatın.
- If connected to an external display, ensure the cable is properly seated and try a different cable or port.
7.3. Wi-Fi Bağlantı Sorunları
- Ensure Wi-Fi is enabled in Windows Settings > Network & Internet > Wi-Fi.
- Yönlendiricinizi ve modeminizi yeniden başlatın.
- Ağı unutun ve yeniden bağlanın.
- Wi-Fi sürücülerinizi güncelleyin.
7.4. Yavaş Performans
- Arka planda çalışan gereksiz uygulamaları kapatın.
- Yüksek CPU, RAM veya disk kullanımı tüketen işlemleri görmek için Görev Yöneticisi'ni (Ctrl+Shift+Esc) kontrol edin.
- SSD'nizde yeterli boş alan olduğundan emin olun.
- Run a disk cleanup and defragmentation (for HDD, though this is SSD).
- Kötü amaçlı yazılım veya virüs taraması yapın.
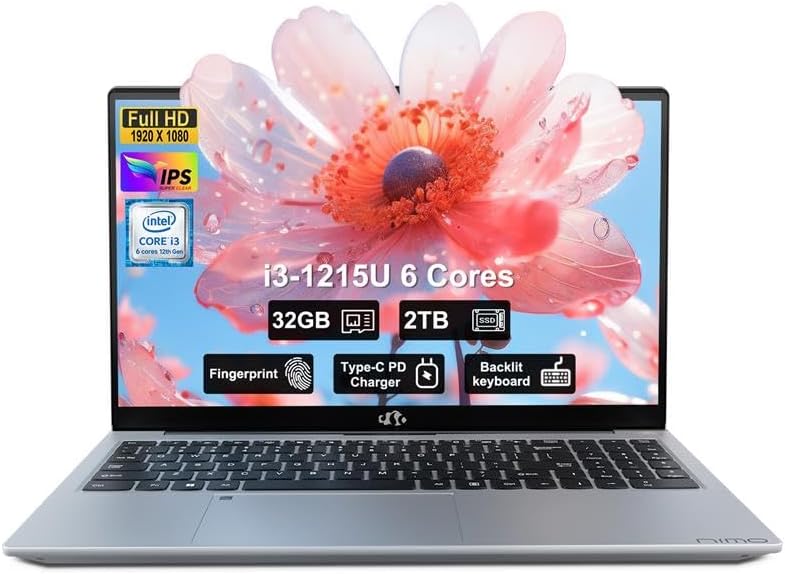
8. Özellikler
Detailed technical specifications for the NIMO N154 Laptop.

Image: Diagram illustrating the Intel Core i3-1215U processor with details on cores, threads, power consumption, and Turbo Boost frequency.

Image: Visual representation of 32GB DDR4 RAM and 2TB PCIe 4.0 SSD, highlighting dual RAM channel capability.
| Özellik | Şartname |
|---|---|
| Model Adı | NIMO N154 |
| Ekran Boyutu | 15.6 inç |
| Ekran Çözünürlüğü | 1920 x 1080 Piksel (FHD IPS) |
| İşlemci | Intel Core i3-1215U (6-core, 8-thread, up to 4.4GHz) |
| Veri deposu | 32 GB DDR4 (3200 MHz) |
| Depolamak | 2 TB PCIe SSD |
| Grafik Eş İşlemcisi | Tümleşik Intel Graphics |
| İşletim Sistemi | Windows 11 Ev |
| Kablosuz Tip | 802.11a/b/g/n/ac (Wi-Fi 6) |
| USB Bağlantı Noktaları | 2 adet USB 3.0, 1 adet USB 2.0, 2 adet Type-C (1 adet sadece şarj, 1 adet çok fonksiyonlu) |
| HDMI Bağlantı Noktası | 1x HDMI 2.1 |
| Özel Özellikler | Arkadan Aydınlatmalı Klavye, Parmak İzi Okuyucu, HD Ses, Hafıza Kartı Yuvası, Sayısal Tuş Takımı, Webkamera Gizlilik Kalkanı |
| Pil Ömrü (Ortalama) | 5 Saat |
| Ürün Ağırlığı | 3.8 pound |
| Ürün Boyutları (UxGxY) | 14.07 x 8.98 x 0.76 inç |
| Renk | Gümüş |
9. Garanti ve Destek
Nimo Direct Inc. is committed to customer satisfaction.
- Üretici Garantisi: Your NIMO laptop is covered by a comprehensive 2-Year Manufacturer's Warranty. This warranty covers defects in materials and workmanship under normal use.
- İade Politikası: We offer 90-Day Hassle-Free Returns. If you are not satisfied with your purchase, you may return it within 90 days of receipt.
- Müşteri Desteği: Our dedicated US support team is available to provide swift issue resolution or immediate replacements. For assistance, please refer to the contact information provided on the NIMO official website veya satın alma belgeleriniz.

Image: Illustration of NIMO's after-sales support, including partial US assembly, 90-day free returns, 2-year after-sales support, and 24/7 customer service.


