giriiş
Thank you for choosing the Topoak Galaxy Pro Pop-Up Rooftop Tent. This manual provides essential information for the safe and effective setup, operation, and maintenance of your new rooftop tent. Designed for 4-season camping, the Galaxy Pro offers superior durability, comfort, and convenience for your overland adventures.
Please read this manual thoroughly before using the tent to ensure proper installation and to maximize your campDeneyim.
Temel Özellikler
- Her Hava Koşuluna Dayanıklılık: Constructed with an aluminum hard shell and an 8000mm waterproof-rated rainfly, ensuring protection in diverse weather conditions. Features moisture-wicking inner fabric and a heater vent for year-round comfort.
- One-Touch Pop-Up & Expanded Interior: Hydraulic struts enable instant setup. The innovative U-Bar design increases interior space by 35% compared to standard triangular rooftop tents, providing more headroom without extra support poles.
- Superior Comfort & Ventilation: Equipped with a three-layer mattress system (high-density foam, quick-dry pad, moisture barrier) for maximum comfort. Multiple mesh windows, a roof vent, and a skylight ensure excellent airflow and reduce condensation.
- Integrated Power & Storage: Includes an Anderson power interface with USB-C and 12V output ports. Features a built-in LED lighting system with adjustable brightness and multiple storage pockets for organization.
Kurmak
The Galaxy Pro rooftop tent is designed for quick and effortless setup, typically within 30 seconds, thanks to its hydraulic strut system.
Initial Mounting
Before first use, the tent must be securely mounted to your vehicle's roof rack. Ensure your roof rack has adequate weight capacity for the tent (176 lbs) plus occupants and gear. Use the provided mounting hardware package for installation.

Figure 1: Tent Dimensions and Included Parts. This image illustrates the tent's open dimensions (83" length, 56" width, 58" height, 8" closed height) and displays all components included in the package, such as the mounting hardware, two shoe bags, a ladder bag, a support pole, and the ladder itself.
Refer to the mounting hardware instructions for detailed steps on attaching the tent to your vehicle. Ensure all bolts and clamps are tightened securely before travel.
Çadırın Açılması
- Aracınızı düz bir zemine park edin ve park frenini çekin.
- Unlatch the locking mechanisms on all sides of the tent.
- Gently push up on the tent shell. The hydraulic struts will assist in raising the tent to its fully open position.
- Extend and secure the ladder. Ensure the ladder is stable and at a safe angle for climbing.
- Deploy any additional support poles if necessary for the rainfly or extended sections.

Figure 2: Effortless Setup. This image depicts a person easily opening the tent, highlighting the quick 30-second setup time. Two smaller images show the tent in its compact, closed state and its initial pop-up phase.
Operasyon
Interior Space and Comfort
The Galaxy Pro features an innovative U-Bar design that significantly expands the interior living space, providing ample headroom and a comfortable environment.

Figure 3: U-Bar Space Expansion. This graphic demonstrates how the unique U-bar structure contributes to a 35% increase in the tent's internal volume, providing more comfortable living space.

Figure 4: Spacious Interior. A wide-angle view from inside the tent looking out at a mountain landscape, highlighting the generous internal dimensions and panoramic views.
The tent is equipped with a multi-layer mattress system for optimal sleep comfort:
- High-density foam for support.
- Quick-dry pad to manage moisture.
- Moisture barrier for dryness.
- Soft velvet plush top layer for comfort.
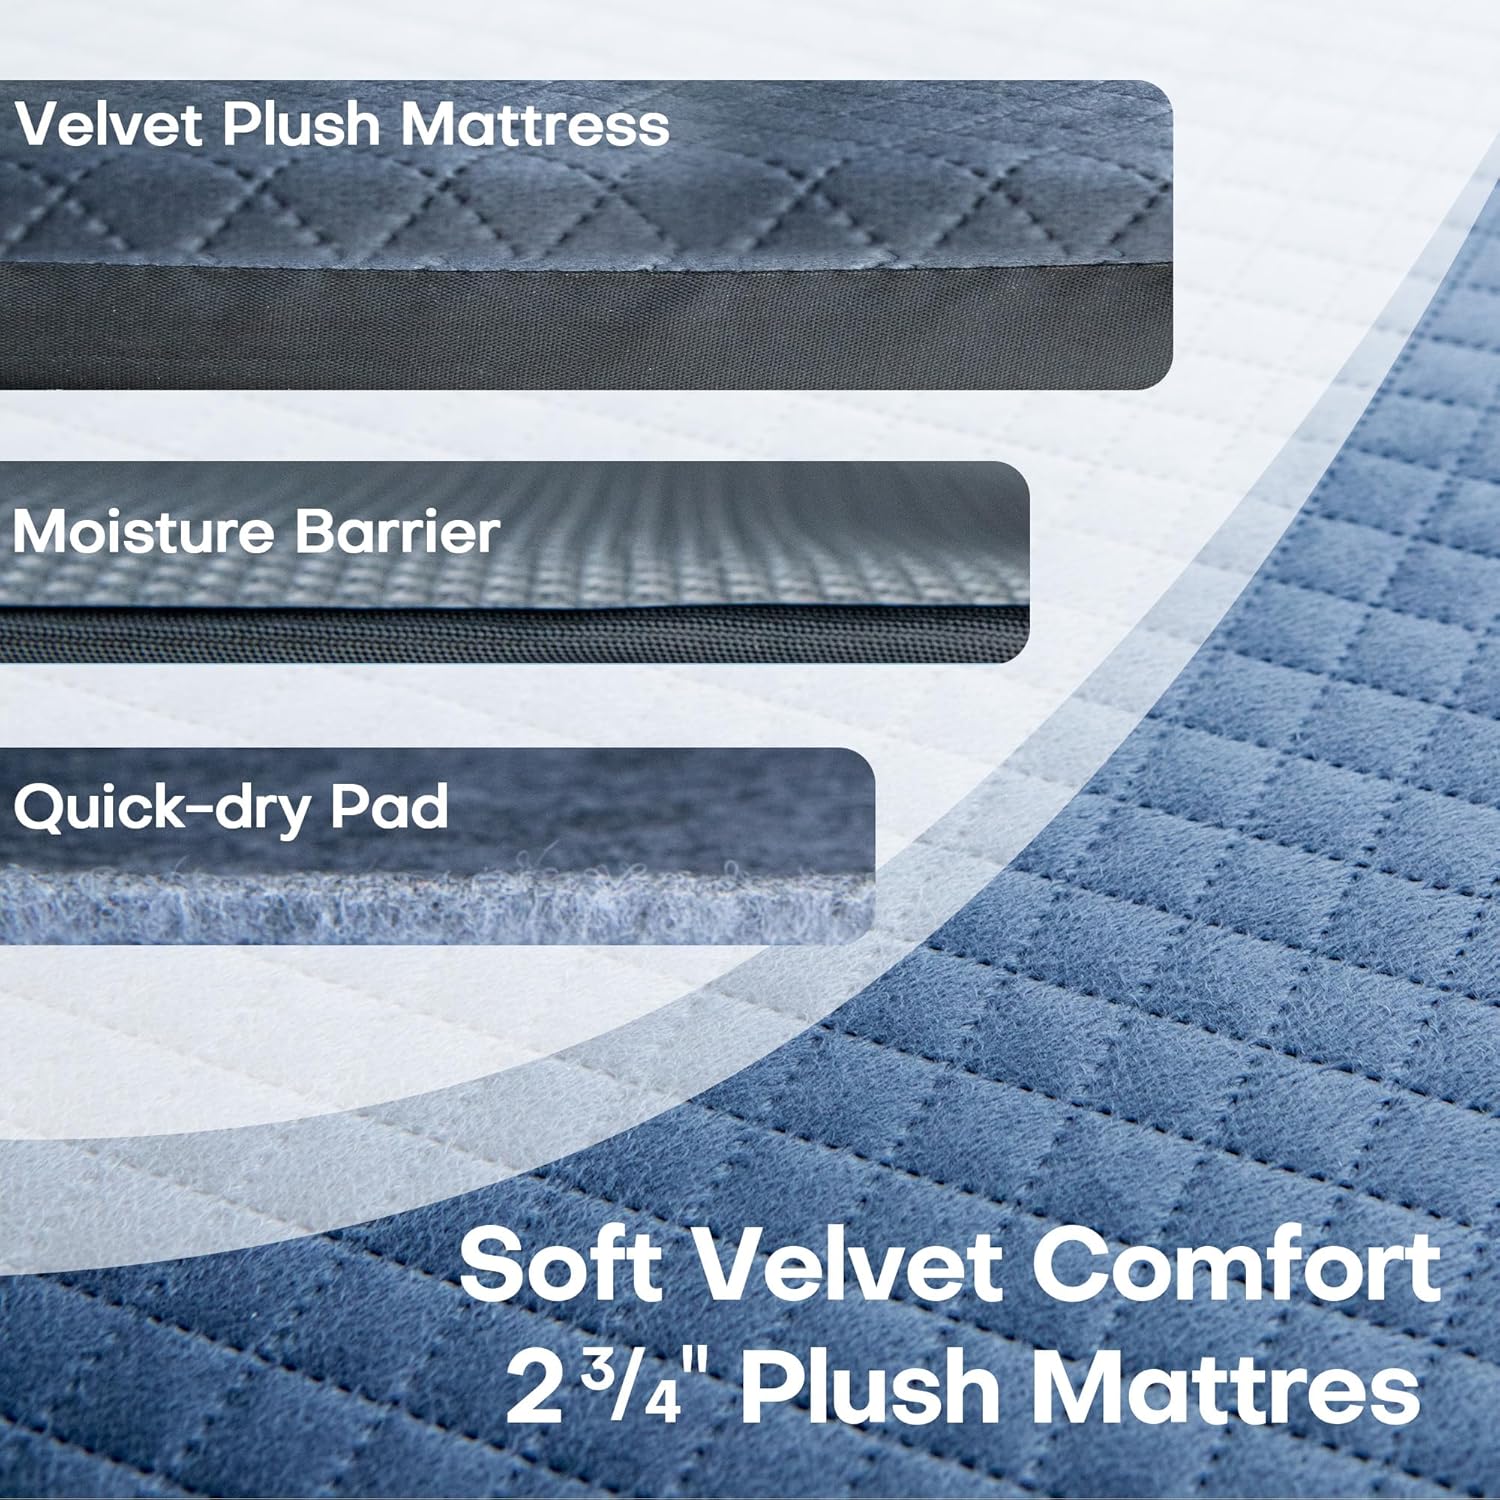
Figure 5: Multi-Layer Mattress System. This image breaks down the mattress composition, showing the top velvet plush layer, a moisture barrier, and a quick-dry pad, all contributing to a comfortable 2 3/4" thick sleeping surface.
For ventilation, utilize the multiple mesh windows, roof vent, and skylight. These features help reduce condensation and maintain fresh air circulation.
Power and Lighting
The Galaxy Pro includes an integrated power system for your convenience.

Figure 6: Integrated Power Interface. A detailed view of the tent's power hub, featuring an Anderson port for external power input, a USB-C port, and a 12V output port, allowing for convenient device charging and power supply.
Connect external power sources via the Anderson power interface. The tent provides three built-in output ports: USB-C and 12V connections, suitable for charging devices or powering small electronics.
The built-in LED lighting system offers adjustable brightness. Locate the control switch to cycle through brightness levels to suit your needs.

Figure 7: Detailed Features. This composite image highlights several key components: a practical shoe bag, the quality of waterproof tape on seams, the adjustable LED light strip for interior illumination, the secure lock mechanism, and a limiter for safe operation.
Depolama Çözümleri
Multiple storage pockets are integrated within the tent to help keep your gear organized and easily accessible. Utilize the provided shoe bags to keep your tent interior clean.
Çadırın Kapatılması
- Ensure all personal items are removed from the tent and stored securely.
- Collapse any deployed support poles and fold in the rainfly.
- Retract the ladder and secure it.
- Gently pull down on the tent shell. The hydraulic struts will compress, allowing the tent to close. Ensure fabric is tucked in to prevent pinching.
- Secure all locking mechanisms to keep the tent closed during travel.
Bakım
Regular maintenance will prolong the life of your Galaxy Pro rooftop tent.
- Temizlik: Clean the tent fabric with mild soap and water. Avoid harsh chemicals or abrasive cleaners. Ensure the tent is completely dry before packing away to prevent mold and mildew.
- Hard Shell: Wipe down the aluminum hard shell with a damp Kumaş.
- Fermuarlar: Fermuarların sorunsuz çalışmasını sağlamak için periyodik olarak silikon bazlı bir yağlayıcı ile yağlayın.
- Dikişler: Inspect waterproof tape on seams regularly for any signs of wear or damage.
- Donanım: Check all mounting hardware, bolts, and hinges periodically for tightness and signs of corrosion. Tighten as necessary.
- Depolamak: When not in use for extended periods, store the tent in a cool, dry place, ideally indoors, to protect it from extreme temperatures and UV exposure.
Sorun giderme
| Sorun | Olası Neden | Çözüm |
|---|---|---|
| Tent not opening smoothly. | Latches not fully disengaged; obstruction; hydraulic struts stiff. | Ensure all latches are released. Check for any items obstructing the opening mechanism. Apply silicone spray to hydraulic struts if stiff. |
| Su sızıntısı. | Tent not fully closed; damaged rainfly or seams; condensation. | Ensure all windows and doors are zipped shut. Inspect rainfly and seams for tears or damage; repair as needed. Ensure adequate ventilation to reduce condensation. |
| LED ışıklar çalışmıyor. | No power source connected; loose connection; faulty LED strip. | Ensure an external power source is connected to the Anderson port. Check all power connections. Contact customer support if the issue persists. |
| Difficulty closing tent. | Fabric caught in mechanism; items left inside; hydraulic struts stiff. | Ensure all fabric is tucked inside the shell. Remove all items from the tent. Apply silicone spray to hydraulic struts if stiff. |
Özellikler
| Marka | Topoak |
| Model Adı | Galaksi Pro |
| Malzeme | Aluminum (Hard Shell) |
| Renk | Siyah |
| Açık Boyutlar (Uzunluk x Genişlik x Yükseklik) | 83" x 56" x 58" (yaklaşık 210 cm x 142 cm x 147 cm) |
| Kapalı Yükseklik | 8" (approx. 20cm) |
| Ürün Ağırlığı | 176 Pound (yaklaşık 79.8 kg) |
| Su Geçirmezlik Derecesi | 8000mm (Yağmurluk) |
| Mattress Thickness | 2 3/4" (approx. 7cm) |
| Çalışma Modu | Manual (Pop-Up Assisted) |
| Montaj Gerekli | No (Mounting to vehicle required) |
Garanti ve Müşteri Desteği
Topoak offers a 3 yıllık garanti on the Galaxy Pro Pop-Up Rooftop Tent, ensuring peace of mind with your purchase.
Our dedicated 24/7 müşteri destek ekibi is available to assist you with any questions, concerns, or issues you may encounter. We guarantee a response within 24 hours.
For support, please refer to the contact information provided with your purchase documentation or visit the official Topoak webalan.


