1. Giriş
This manual provides instructions for the installation, operation, and maintenance of your SOUNDKITS Single Din Touchscreen Radio. This device integrates modern infotainment features such as Apple CarPlay, Android Auto, Bluetooth connectivity, and a 6.5-inch IPS display into a standard single DIN form factor, suitable for upgrading classic vehicles.

Image: The SOUNDKITS Single Din Touchscreen Radio unit, featuring a 6.5-inch IPS display showing the Apple CarPlay interface, accompanied by its infrared remote control.
2. Güvenlik Bilgileri
Read all instructions carefully before installation and operation. Failure to follow these instructions may result in injury or damage to the device or vehicle.
- Profesyonel Kurulum Önerilen: Due to the complexity of car audio systems, professional installation is advised.
- Güç Kaynağı: Üniteyi yalnızca negatif topraklı bir 12V DC güç kaynağına bağlayın.
- Kablolama: Ensure all wiring is correctly connected to prevent short circuits and damage. Insulate all exposed wires.
- Sürüş güvenliği: Üniteyi sürüş sırasında dikkatinizi dağıtacak şekilde kullanmayın. Yol güvenliğini her zaman ön planda tutun.
- Sıcaklık: Üniteyi uzun süre aşırı sıcaklıklara veya doğrudan güneş ışığına maruz bırakmaktan kaçının.
- Nem: Cihazı kuru tutun. Neme maruz kalmak arızaya veya elektrik çarpmasına neden olabilir.
3. Paket İçeriği
Paketin içinde tüm öğelerin mevcut olduğundan emin olun:
- Single Din CarPlay Stereo Unit
- Kablo demeti
- Montaj Kitleri
- IR Uzaktan Kumanda
- Kullanım Kılavuzu (bu belge)
4. Ürün Bittiview
4.1 Ön Panel Kontrolleri ve Bağlantı Noktaları
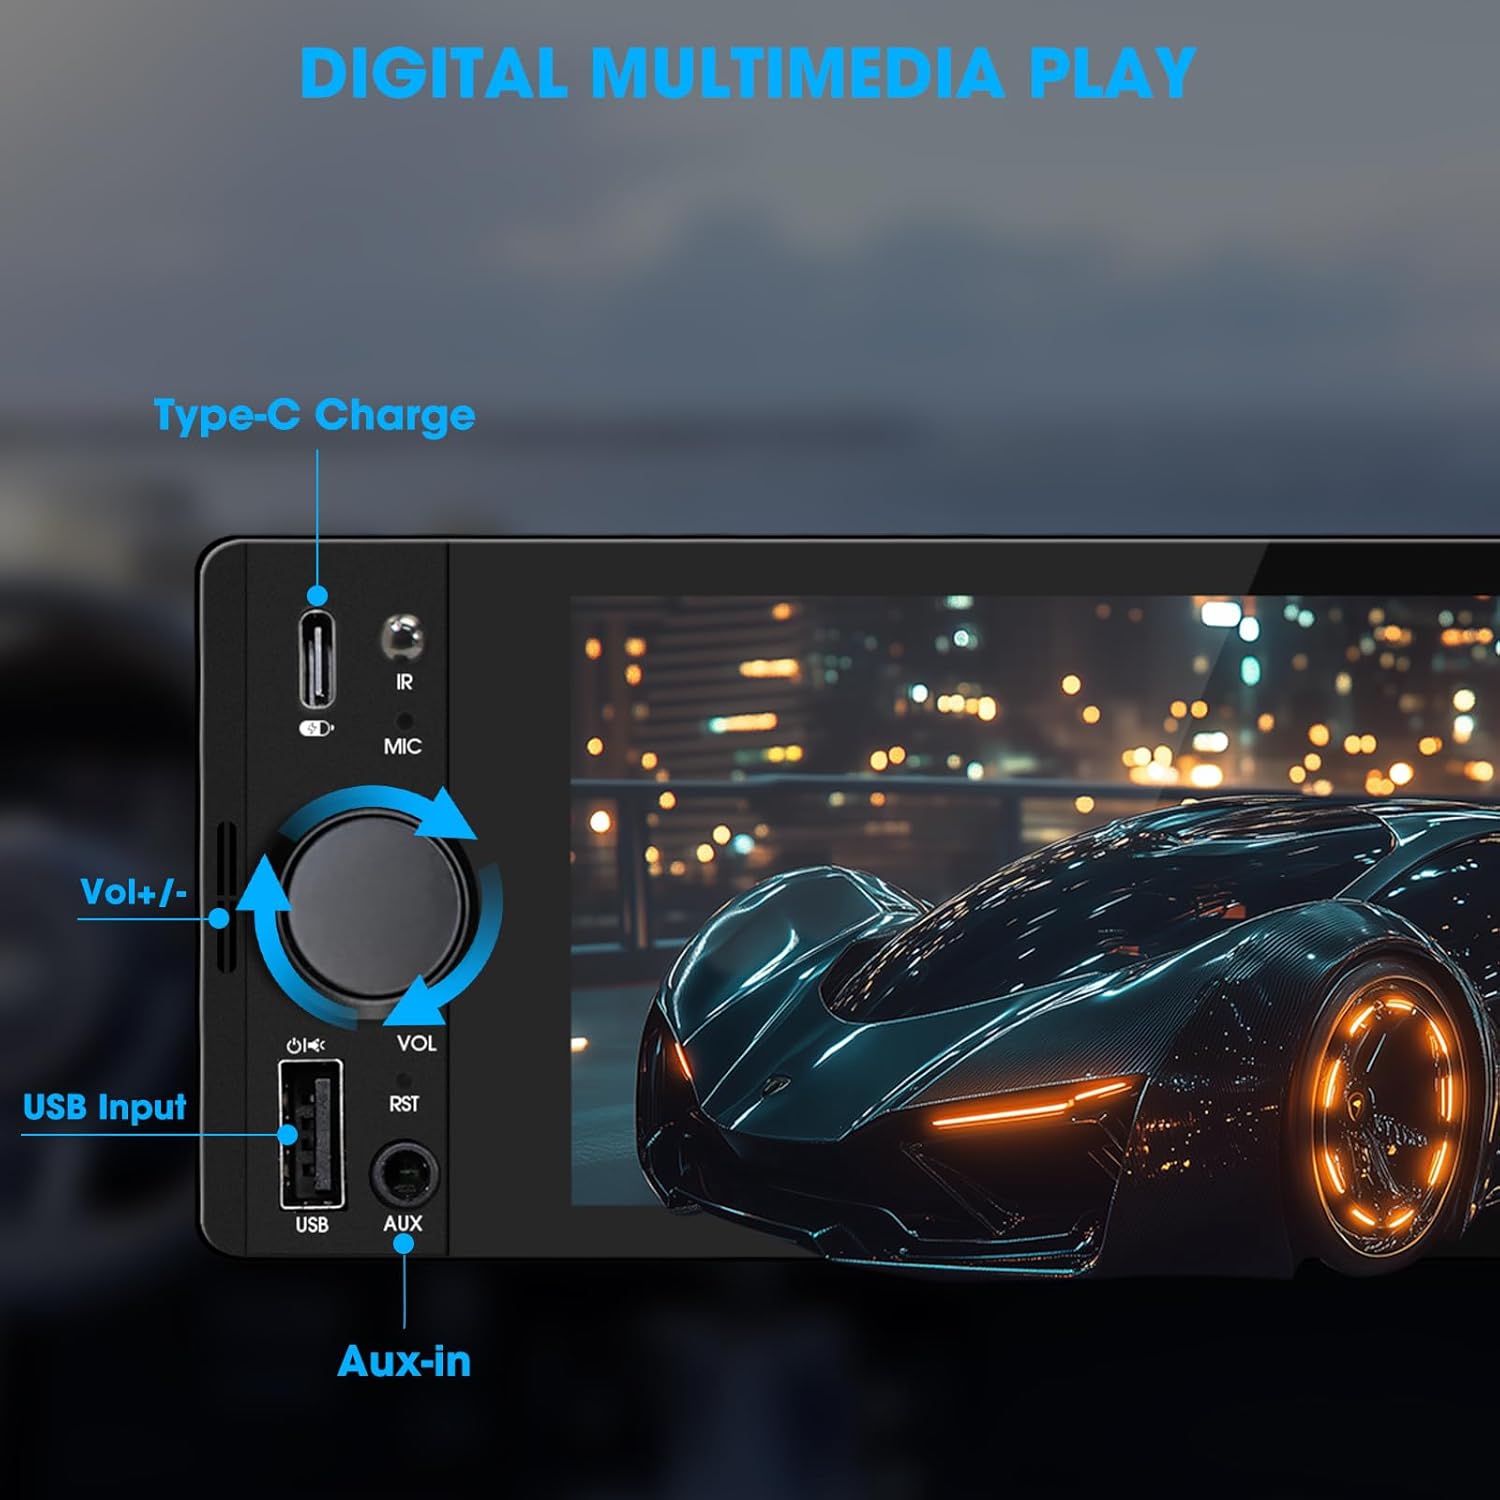
Image: Close-up of the radio's front panel, highlighting the Type-C charging port, IR receiver, microphone, volume knob, USB input, and AUX-in port.
- 6.5 inç IPS Dokunmatik Ekran: Main display for all functions and interfaces.
- Ses Seviyesi Düğmesi (VOL): Sesi ayarlamak için döndürün. Sesi kapatmak/açmak için basın.
- USB Girişi: For media playback, CarPlay/Android Auto connection, and phone mirroring.
- AUX girişi: 3.5mm audio input for external audio devices.
- Type-C Şarj Portu: Provides 2.1A quick charging for compatible devices.
- Mikrofon (MIC): Eller serbest görüşme ve sesli komutlar için dahili mikrofon.
- IR Alıcı: Uzaktan kumanda ile çalıştırma için.
- Sıfırlama Düğmesi (RST): Small button to reset the unit (requires a thin object like a paperclip).
4.2 Arka Panel Bağlantıları

Image: Diagram showing the rear connections of the radio, including the main wiring harness, RCA outputs, external microphone jack, and radio antenna input.
- Ana Kablo Demeti Konnektörü: Connects to the vehicle's power, speaker, and control wires.
- RCA Audio Outputs (L-OUT, R-OUT): Harici bağlantı için ampcankurtaranlar
- RCA Video Outputs (V-OUT1, V-OUT2): For connecting external monitors (e.g., headrest monitors).
- Arkaview Camera Input (CAMIN): Arka için RCA girişiview kamera.
- Harici Mikrofon Jakı: For connecting an optional external microphone.
- Radyo Anteni Girişi: Connects to the vehicle's AM/FM antenna.
5. Kurulum ve Yükleme
This section outlines the general steps for installing the SOUNDKITS Single Din Touchscreen Radio. Professional installation is recommended.
5.1 Kurulum Öncesi Kontrol Listesi
- Montaj işlemine başlamadan önce aracın aküsünün bağlantısının kesildiğinden emin olun.
- Confirm the vehicle has a standard single DIN slot.
- Gather necessary tools (wire strippers, crimpers, electrical tape, screwdriver).

Image: A visual comparison showing older car radios replaced by the modern SOUNDKITS Single Din Touchscreen Radio, demonstrating the aesthetic upgrade.
5.2 Kablo Bağlantıları
Refer to the provided wiring harness diagram for specific connections. The harness uses universal ISO interface and wire color coding.
| Tel Rengi | İşlev |
|---|---|
| Sarı | Sabit 12V (Pil) |
| Kırmızı | Accessory 12V (Ignition) |
| Siyah | Zemin (GND) |
| Mavi | Anten/Amplifier Uzaktan Açma |
| Turuncu | Illumination/Dimmer |
| Kahverengi | Direksiyon Kontrolü (SWC) |
| Yeşil/Beyaz | Arka Sol Hoparlör (+) |
| Yeşil/Siyah | Arka Sol Hoparlör (-) |
| Mor / Beyaz | Arka Sağ Hoparlör (+) |
| Mor/Siyah | Arka Sağ Hoparlör (-) |
| Beyaz beyaz | Ön Sol Hoparlör (+) |
| Beyaz/Siyah | Ön Sol Hoparlör (-) |
| Gri/Beyaz | Ön Sağ Hoparlör (+) |
| Gri/Siyah | Ön Sağ Hoparlör (-) |
| Reverse (often Pink/Brown) | Reverse Gear Signal (for rearview kamera) |
Not: Always cross-reference with your vehicle's specific wiring diagram and the diagram provided with the product's harness. Incorrect wiring can cause damage.
5.3 Ünitenin Montajı
- Secure the mounting sleeve into the vehicle's single DIN dash opening.
- Connect all necessary wiring harnesses, antenna, and any external accessories (e.g., rearview kamera, harici mikrofon).
- Carefully slide the head unit into the mounting sleeve until it locks into place.
- Aracın aküsünü tekrar bağlayın.
- Gösterge paneli kaplamasını yeniden monte etmeden önce tüm fonksiyonları test edin.
6. Kullanım Talimatları
6.1 Temel İşlemler
- Güç Açma/Kapatma: The unit powers on with the vehicle's ignition. Press and hold the volume knob to turn off/on the display.
- Ses Kontrolü: Rotate the volume knob clockwise to increase volume, counter-clockwise to decrease. Press the knob to mute/unmute.
- Dokunmatik Arayüz: Navigate menus and select options by tapping or swiping on the 6.5-inch IPS touchscreen.
6.2 Bluetooth Bağlantısı

Image: The radio's display showing a successful Bluetooth 5.3 connection to a smartphone, with music playback information visible.
- Ana menüden, Bluetooth simge.
- On your smartphone, search for available Bluetooth devices and select "SOUNDKITS" (or similar device name).
- İstenirse her iki cihazda da eşleştirme kodunu onaylayın.
- Once connected, you can make hands-free calls and stream audio.
6.3 Apple CarPlay ve Android Auto
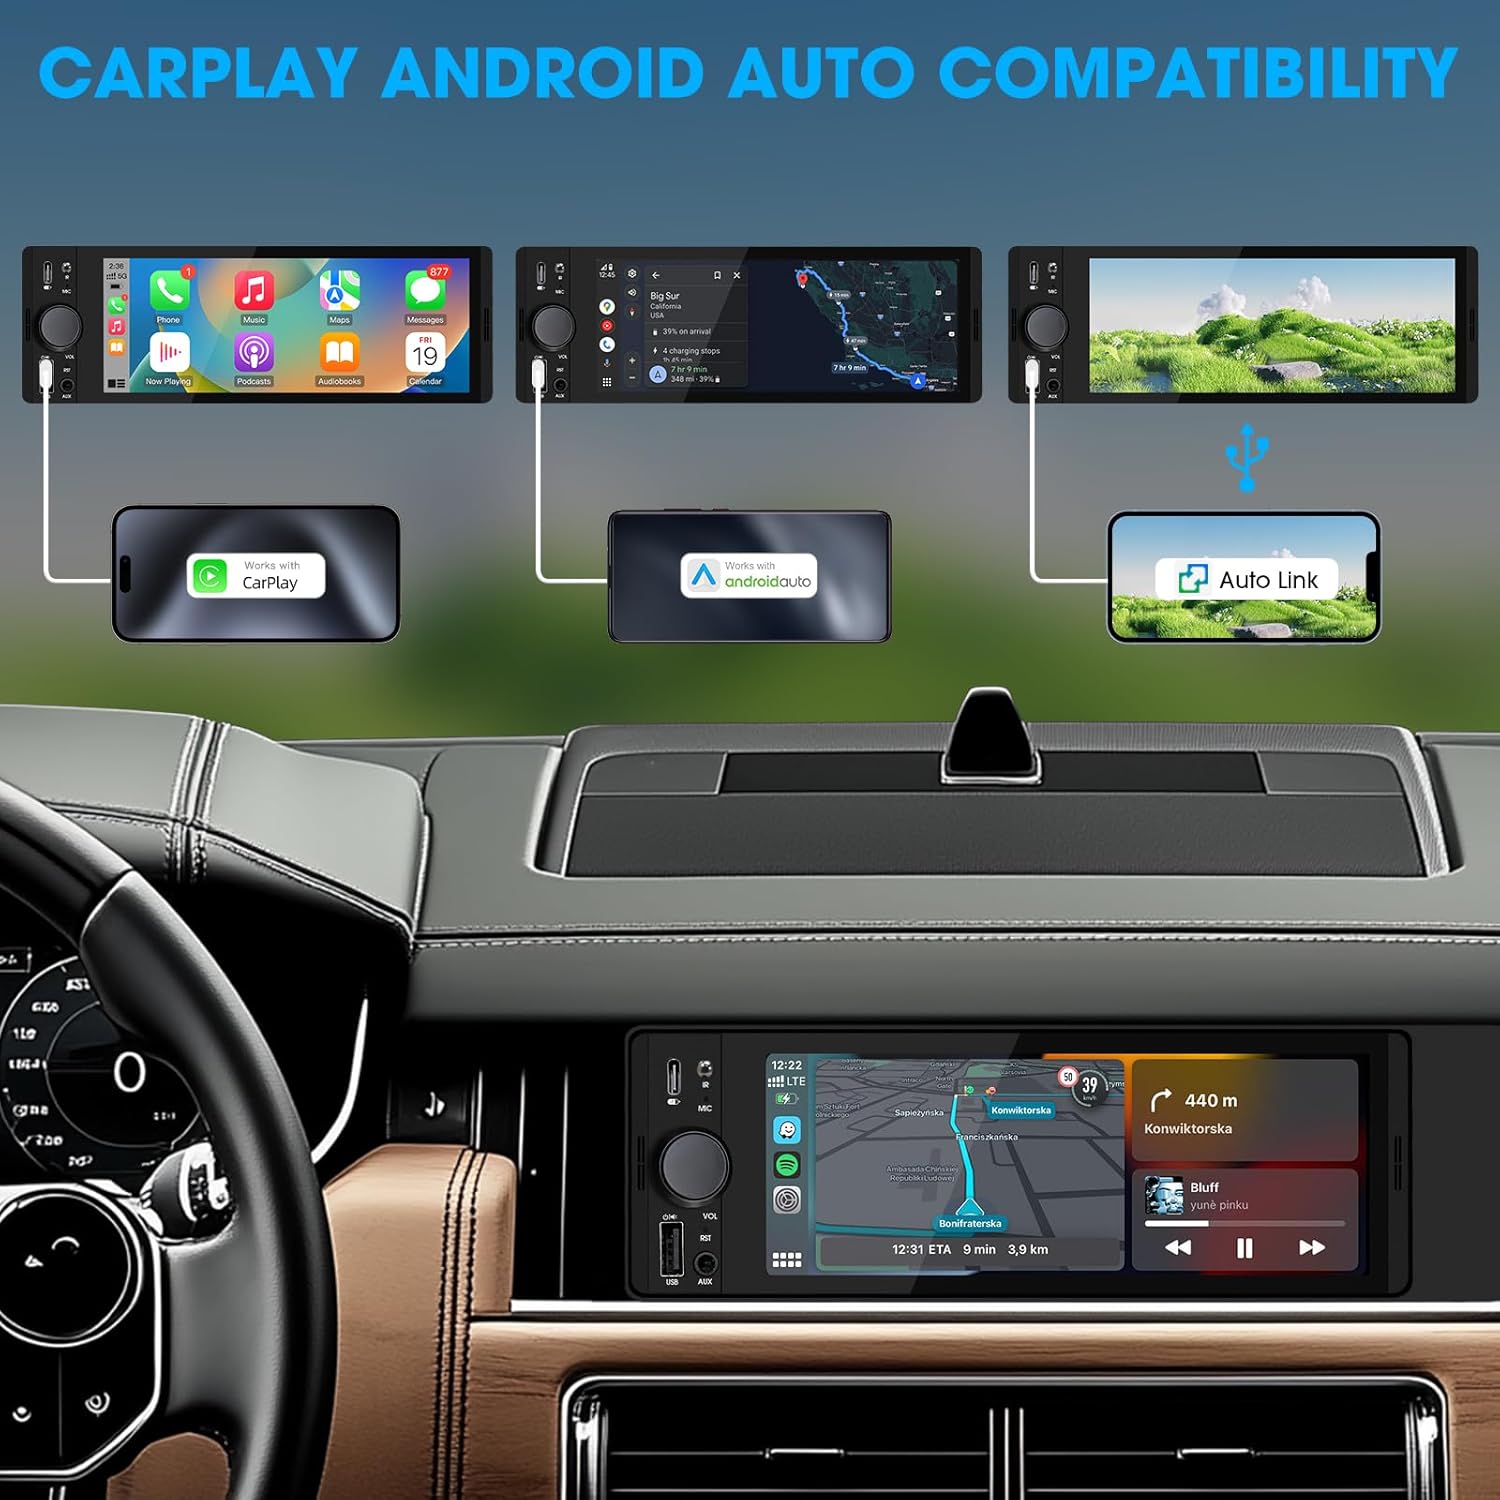
Image: An illustration demonstrating how to connect smartphones via USB for Apple CarPlay, Android Auto, and Auto Link functionality on the car stereo.
- Connect your iPhone (for CarPlay) or Android phone (for Android Auto) to the unit's USB port using a certified USB cable.
- The unit will automatically detect the connection and launch the respective interface.
- Follow any on-screen prompts on your phone or the unit to complete the setup.
- Access navigation, music, calls, and other compatible apps directly from the touchscreen.
6.4 USB Phone Mirroring
This feature allows you to display your smartphone's screen directly on the unit's display.
- Akıllı telefonunuzu cihazın USB portuna bağlayın.
- Select the "Phonelink" or "Mirrorlink" option from the main menu.
- Follow the on-screen instructions to establish the connection. This may require installing a specific app on your phone.
6.5 Radyo (AM/FM)

Image: The radio interface displaying AM and FM frequency ranges and signal strength, indicating available stations.
- Ana menüden, Radyo simge.
- Musluk AM or FM bantları değiştirmek için.
- Kullanın Aramak İstasyonları otomatik olarak aramak için düğmeler.
- Tap and hold a preset number to save the current station.
6.6 Media Playback (USB, AUX)
- USB BAĞLANTI: Insert a USB drive into the USB port. The unit will automatically detect and play compatible audio/video files. Gezin files using the on-screen interface.
- YARDIMCI: Connect an external audio device to the 3.5mm AUX-in port using an audio cable. Select the Yardımcı source from the main menu.
6.7 Ses Kontrolü

Image: A driver interacting with the car stereo using voice commands for Siri and Google Assistant, demonstrating hands-free operation.
When connected via CarPlay or Android Auto, you can activate your phone's voice assistant (Siri or Google Assistant) by pressing the voice control button on the unit (if available) or by using the voice command phrase (e.g., "Hey Siri" or "Ok Google").
6.8 Direksiyon Kontrolü (SWC)
Image: The steering wheel control configuration screen on the radio, showing options to program various buttons for functions like volume, track skip, and mode.
If your vehicle supports steering wheel controls, connect the SWC wire during installation. Access the Direksiyon Kontrolü settings in the unit's menu to program the buttons to control various functions (e.g., volume, track skip, mode).
6.9 Ekolayzır Ayarları

Image: The audio equalizer settings interface, showing adjustable frequency bands and preset options, alongside a diagram of RCA audio and video outputs.
Erişim Ses Ayarları or EQ menu to adjust audio parameters. The unit features a 10-band equalizer with preset options (e.g., Pop, Rock, Jazz) and custom settings to tailor the sound output to your preference.
6.10 Arkaview Kamera Girişi
Bir arka bağlayınview camera to the ŞÖMİNE RCA input. When the vehicle is shifted into reverse, the unit will automatically display the camera feed, enhancing parking safety.
7. Özellikler
| Özellik | Detay |
|---|---|
| Model Numarası | Single Din Touchscreen Radio |
| Görüntülemek | 6.5 Inch HD IPS Touch Screen (1024x600 resolution) |
| Bağlantı | Bluetooth 5.3, USB, Auxiliary, Type-C (charging) |
| Akıllı Telefon Entegrasyonu | Apple CarPlay (Wired), Android Auto (Wired), Screen Mirroring |
| Ses Çıkışı | 300W Peak Power, 4-CH RCA Out, 10-band EQ |
| Radyo Tuner | AM (530-1710KHz), FM (87.5-107.9MHz) |
| Video Oynatma | 1080p Video Playback, H.264, H.265/HEVC encoding |
| Kontrol Yöntemleri | Touchscreen, IR Remote Control, Steering Wheel Control, Voice Control |
| Boyutlar | 4.5 x 7.36 x 2.4 inç (Ürün) |
| Ağırlık | 2.03 pound |
| Güç Kaynağı | 12V DC (Negatif Toprak) |
8. Sorun Giderme
Yaygın sorunlar ve çözümleri için bu bölüme bakın.
8.1 Güç Yok
- Kablolamayı Kontrol Edin: Ensure the yellow (constant 12V), red (accessory 12V), and black (ground) wires are correctly connected and have proper voltage.
- Sigorta: Check the fuse on the unit's wiring harness and the vehicle's fuse box. Replace if blown.
- Pil: Ensure the vehicle's battery is charged and connected.
8.2 Ses Yok
- Ses Seviyesi: Increase the volume. Check if the unit is muted.
- Hoparlör Kablolaması: Verify all speaker wires are correctly connected and not short-circuited.
- Kaynak Seçimi: Ensure the correct audio source (e.g., Radio, USB, Bluetooth, AUX) is selected.
- Ampkaldırıcı: Eğer harici bir amplifier is used, ensure it is powered on and correctly wired.
8.3 CarPlay/Android Auto Bağlantısı Kurmuyor
- USB kablosu: Use a high-quality, certified USB data cable. Faulty cables can prevent connection.
- USB Bağlantı Noktası: Ensure the phone is connected to the correct USB port on the unit.
- Telefon ayarları: Telefonunuzun ayarlarını kontrol ederek CarPlay/Android Auto'nun etkinleştirildiğinden ve cihaza bağlanmasına izin verildiğinden emin olun.
- Yazılım Güncellemesi: Ensure your phone's operating system and any relevant apps (e.g., Android Auto app) are up to date.
8.4 Dokunmatik Ekran Tepkisiz
- Reset Unit: Use a thin object to press the RST button on the front panel to perform a soft reset.
- Güç Döngüsü: Turn off the vehicle's ignition, wait a few minutes, then restart.
9. Bakım
- Ekranın Temizlenmesi: Use a soft, lint-free cloth to gently wipe the touchscreen. For stubborn marks, slightly dampBezi su veya ekran temizleyicisiyle silin. Sert kimyasallardan kaçının.
- Genel Temizlik: Use a dry, soft cloth to wipe the unit's body. Do not use abrasive cleaners or solvents.
- Donanım Yazılımı Güncellemeleri: Üreticinin periyodik olarak kontrol edin webEn iyi performans ve uyumluluğu sağlamak için mevcut tüm yazılım güncellemelerine erişin.
10. Garanti ve Destek
SOUNDKITS provides the following support and warranty information:
- Garanti: The product comes with a 12-month responsibility for all products.
- Ücretsiz Değişim/Para İadesi: A 90-day free replacement or refund policy is available.
- Technical Guidance & Support: Lifetime technical guidance and support are provided.
- Müşteri Hizmetleri: Fast response within 24 hours for inquiries.
For further assistance, please contact SOUNDKITS customer support through the platform where the product was purchased or visit the official SOUNDKITS store page.
You can typically find contact information by navigating to the seller's profile on the purchase platform and selecting "Ask a question."

Image: A graphic detailing SOUNDKITS' customer service commitments: 24-hour fast response, 90-day free replacement or refund, 12-month product responsibility, and lifetime technical guidance & support.


