giriiş
Thank you for choosing the Epson EB-L210SF projector. This manual provides essential information for the safe and efficient use of your projector. Please read it thoroughly before operating the device and keep it for future reference.
The Epson EB-L210SF is a 3LCD Full-HD projector designed for clear and vibrant image projection. It features a laser light source for long-lasting performance.
Önemli Güvenlik Bilgileri
- Lazer Güvenliği: Lazer ışık kaynağı aktifken projektör merceğine doğrudan bakmayın. Lazer ışınına doğrudan göz temasından kaçının.
- Havalandırma: Ensure adequate ventilation around the projector. Do not block ventilation openings. Overheating can cause damage.
- Güç Kaynağı: Use only the power supply specified for this projector.
- İşleme: Projeksiyon cihazını dikkatli kullanın. Düşürmekten veya şiddetli darbelere maruz bırakmaktan kaçının.
- Temizlik: Temizlemeden önce güç kablosunu çıkarın. Yumuşak, kuru bir bez kullanın. Sıvı veya aerosol temizleyiciler kullanmayın.
Kurmak
1. Paketin Açılması ve Yerleştirilmesi
Carefully remove the projector and all accessories from the packaging. Place the projector on a stable, level surface. Ensure there is sufficient space around the projector for proper ventilation.

Şekil 1: Ön ve yan view of the Epson EB-L210SF projector, showing the lens and ventilation grilles.
2. Gücü Bağlama
- Ürünle birlikte verilen güç kablosunu projektörün AC girişine bağlayın.
- Güç kablosunun diğer ucunu topraklı bir elektrik prizine takın.
3. Giriş Kaynaklarının Bağlanması
The projector supports various input sources. Connect your device (computer, Blu-ray player, etc.) to the appropriate port on the projector's rear panel.

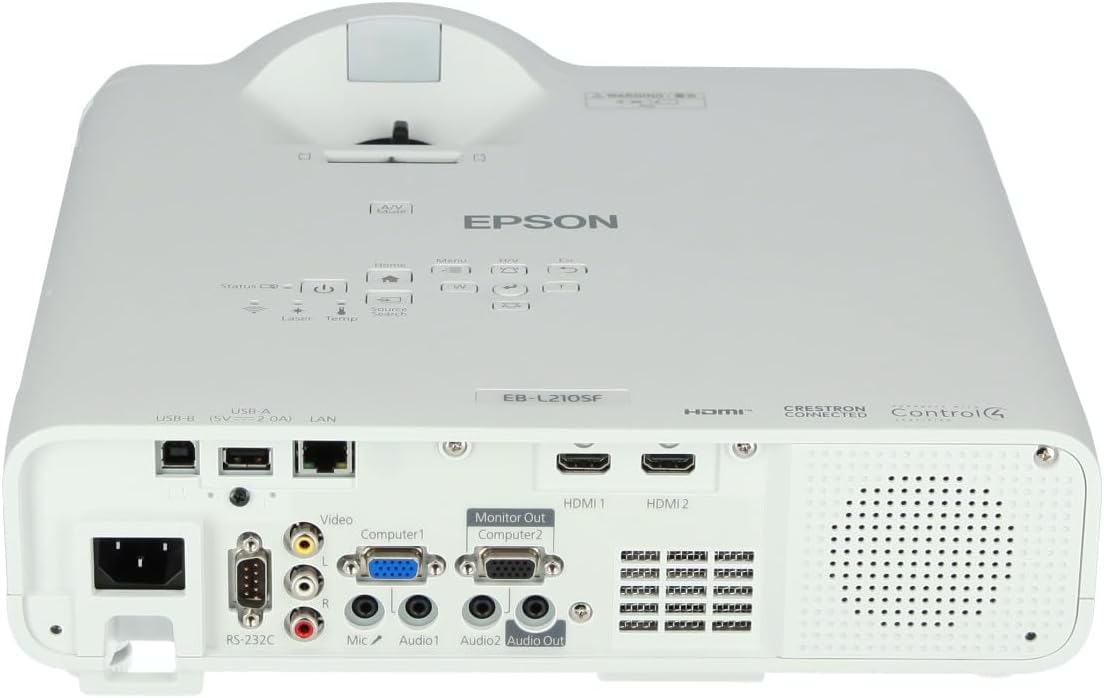
Figure 2: Rear panel of the projector, displaying various input and output ports including HDMI, Computer (VGA), Video, USB, and Audio connections.
- HDMI: Connect an HDMI cable from your device to one of the HDMI ports (HDMI 1 or HDMI 2).
- Bilgisayar (VGA): Connect a VGA cable from your computer to the Computer 1 or Computer 2 port. For audio, connect a separate audio cable to Audio 1 or Audio 2.
- Video: Connect composite video and audio cables to the Video and Audio (R/L) ports.
- USB BAĞLANTI: Use the USB-A port for connecting USB storage devices or the USB-B port for display over USB.
- LAN: Connect an Ethernet cable for network control and monitoring.
4. İlk Açılış ve Görüntü Ayarlaması
- Press the power button on the projector or remote control to turn on the device. The power indicator will illuminate.
- Ayarla odak halkası around the lens until the image is sharp and clear.
- Kullanın yakınlaştırma kolu (if available) to adjust the image size.
- Görüntü yamuk şeklinde görünüyorsa, şunu kullanın: kilit taşı düzeltmesi feature (manual or automatic) to square the image. Refer to the Operating section for details on menu navigation.
Projektörü Çalıştırma
1. Kontrol Paneli Üzerindeview
The control panel on top of the projector allows access to various functions and settings.
Şekil 3: Üst view of the projector, highlighting the control panel with buttons for power, menu, source selection, and navigation.
- Güç Düğmesi: Projektörü açar veya kapatır.
- Kaynak Arama: Mevcut girdi kaynakları arasında döngüsel olarak arama yapar.
- Menü Düğmesi: Opens the on-screen display (OSD) menu.
- Navigation Buttons (Arrow keys): Menü seçenekleri arasında gezinmek için kullanılır.
- Giriş Düğmesi: Menüdeki seçimleri onaylar.
- Esc Tuşu: Geçerli menüden çıkar veya önceki ekrana döner.
- Ana menü tuşu: Accesses the home screen or quick settings.
- A/V Sessiz: Temporarily mutes audio and blanks the screen.
2. Selecting an Input Source
Basın Kaynak Arama button on the control panel or remote control to cycle through the connected input sources (e.g., HDMI 1, HDMI 2, Computer 1, Video). The projector will automatically detect and display the active source.
3. Adjusting Image and Audio Settings
Basın Menü button to access the projector's on-screen display (OSD) menu. Use the navigation buttons to browse categories such as:
- Resim: Parlaklığı, kontrastı, rengi, tonu, keskinliği ve renk sıcaklığını ayarlayın.
- Sinyal: Configure input signal settings, aspect ratio, and overscan.
- Ayarlar: General projector settings like language, display options, and power management.
- Ses: Adjust volume, mute, and audio input selection.
Bir seçenek belirleyin ve tuşuna basın. Girmek to modify its value. Press Esc Menüden çıkmak için.
Bakım
1. Projektörün Temizlenmesi
- Dış: Wipe the projector's exterior with a soft, dry, lint-free cloth. For stubborn dirt, dampen the cloth slightly with water, then wipe dry.
- Mercek: Gently wipe the lens with a lens cleaning cloth or lens paper. Avoid using abrasive materials or excessive force.
- Hava Filtresi: Regularly check and clean the air filter to prevent dust buildup, which can affect performance and cause overheating. Refer to the projector's on-screen menu for filter maintenance reminders.
2. Laser Light Source
The Epson EB-L210SF uses a laser light source, which offers a long operational life and does not require lamp replacement. No user maintenance is typically required for the laser light source itself.
Sorun giderme
Projeksiyon cihazınızla ilgili sorunlarla karşılaşırsanız, aşağıdaki yaygın sorunlar ve çözümlerine göz atın:
| Sorun | Olası Neden / Çözüm |
|---|---|
| Görüntü yansıtılmıyor. |
|
| Görüntü bulanık veya odak dışı |
|
| Image is distorted (trapezoidal) |
|
| Ses yok |
|
| Projector is not wireless | The Epson EB-L210SF is not inherently a wireless projector. Wireless functionality typically requires an optional external wireless adapter, which is sold separately. Please consult Epson's official website or your retailer for compatible wireless adapters. |
| Overheating warning (Temp indicator) |
|
Özellikler
| Özellik | Detay |
|---|---|
| Model Numarası | V11HA75080 |
| Ekran Çözünürlüğü | 1920x1080 (Tam HD) |
| Bağlantı Teknolojisi | HDMI, VGA, USB, LAN |
| Ürün Boyutları | 11.81 x 11.81 x 11.81 inç |
| Ürün Ağırlığı | 10.14 pound |
| Işık kaynağı | Lazer |
| Üretici | Epson |
| Önerilen Kullanımlar | İzleme |
| Özel Özellik | Hafif |
| Piller Gerekli | 1 AAAA (for remote control, not included with projector unit) |
| İlk Mevcut Tarih | 14 Kasım 2023 |
Garanti ve Destek
For detailed warranty information, please refer to the warranty card included with your product or visit the official Epson webSite. Garanti şartları ve koşulları bölgeye göre değişiklik gösterebilir.
For technical support, product registration, or to download the latest drivers and software, please visit the official Epson support website or contact Epson customer service in your region. Contact information can typically be found on the Epson webalan.


