1. Giriş
Thank you for choosing the ATTACK SHARK X2 Wireless Gaming Mouse. This manual provides detailed instructions for setting up, operating, and maintaining your mouse to ensure optimal performance. The X2 mouse features a transparent shell, 3-mode connectivity (2.4GHz wireless, Bluetooth 5.0, USB-C wired), adjustable DPI, 3D RGB lighting, and a rechargeable battery.

Image 1.1: The ATTACK SHARK X2 Wireless Gaming Mouse, showcasing its transparent design and vibrant RGB lighting. A USB receiver is also visible.
2. Ürün Bittiview
2.1 Paket İçeriği
- ATTACK SHARK X2 Kablosuz Oyun Faresi
- USB-C Şarj Kablosu
- 2.4GHz USB Receiver (stored in the mouse)
- Kullanıcı Kılavuzu
2.2 Fare Bileşenleri

Resim 2.1: Alt view of the X2 mouse, highlighting the USB receiver slot, mode switch, and light effect switch.
- Sol Tıklama Düğmesi
- Sağ Tıklama Düğmesi
- Kaydırma Tekerleği (also functions as a button)
- DPI Düğmesi (below scroll wheel)
- İleri Düğmesi (Sol Taraf)
- Geri Düğmesi (Sol Taraf)
- Mod Anahtarı (bottom of mouse: OFF / 2.4G / Bluetooth)
- Işık Efekti Anahtarı (bottom of mouse)
- USB Alıcı Yuvası (bottom of mouse)
- USB-C Şarj Portu (front of mouse)
3. Kurulum ve Bağlantı
3.1 Fareyi Şarj Etme
The X2 mouse features an 800mAh rechargeable battery. Before first use, or when the battery is low, connect the mouse using the provided USB-C cable.
- Connect the USB-C end of the cable to the mouse's charging port.
- Connect the USB-A end to a power source (e.g., computer USB port, USB wall adapter).
- Tam şarj genellikle yaklaşık 4 saat sürer.
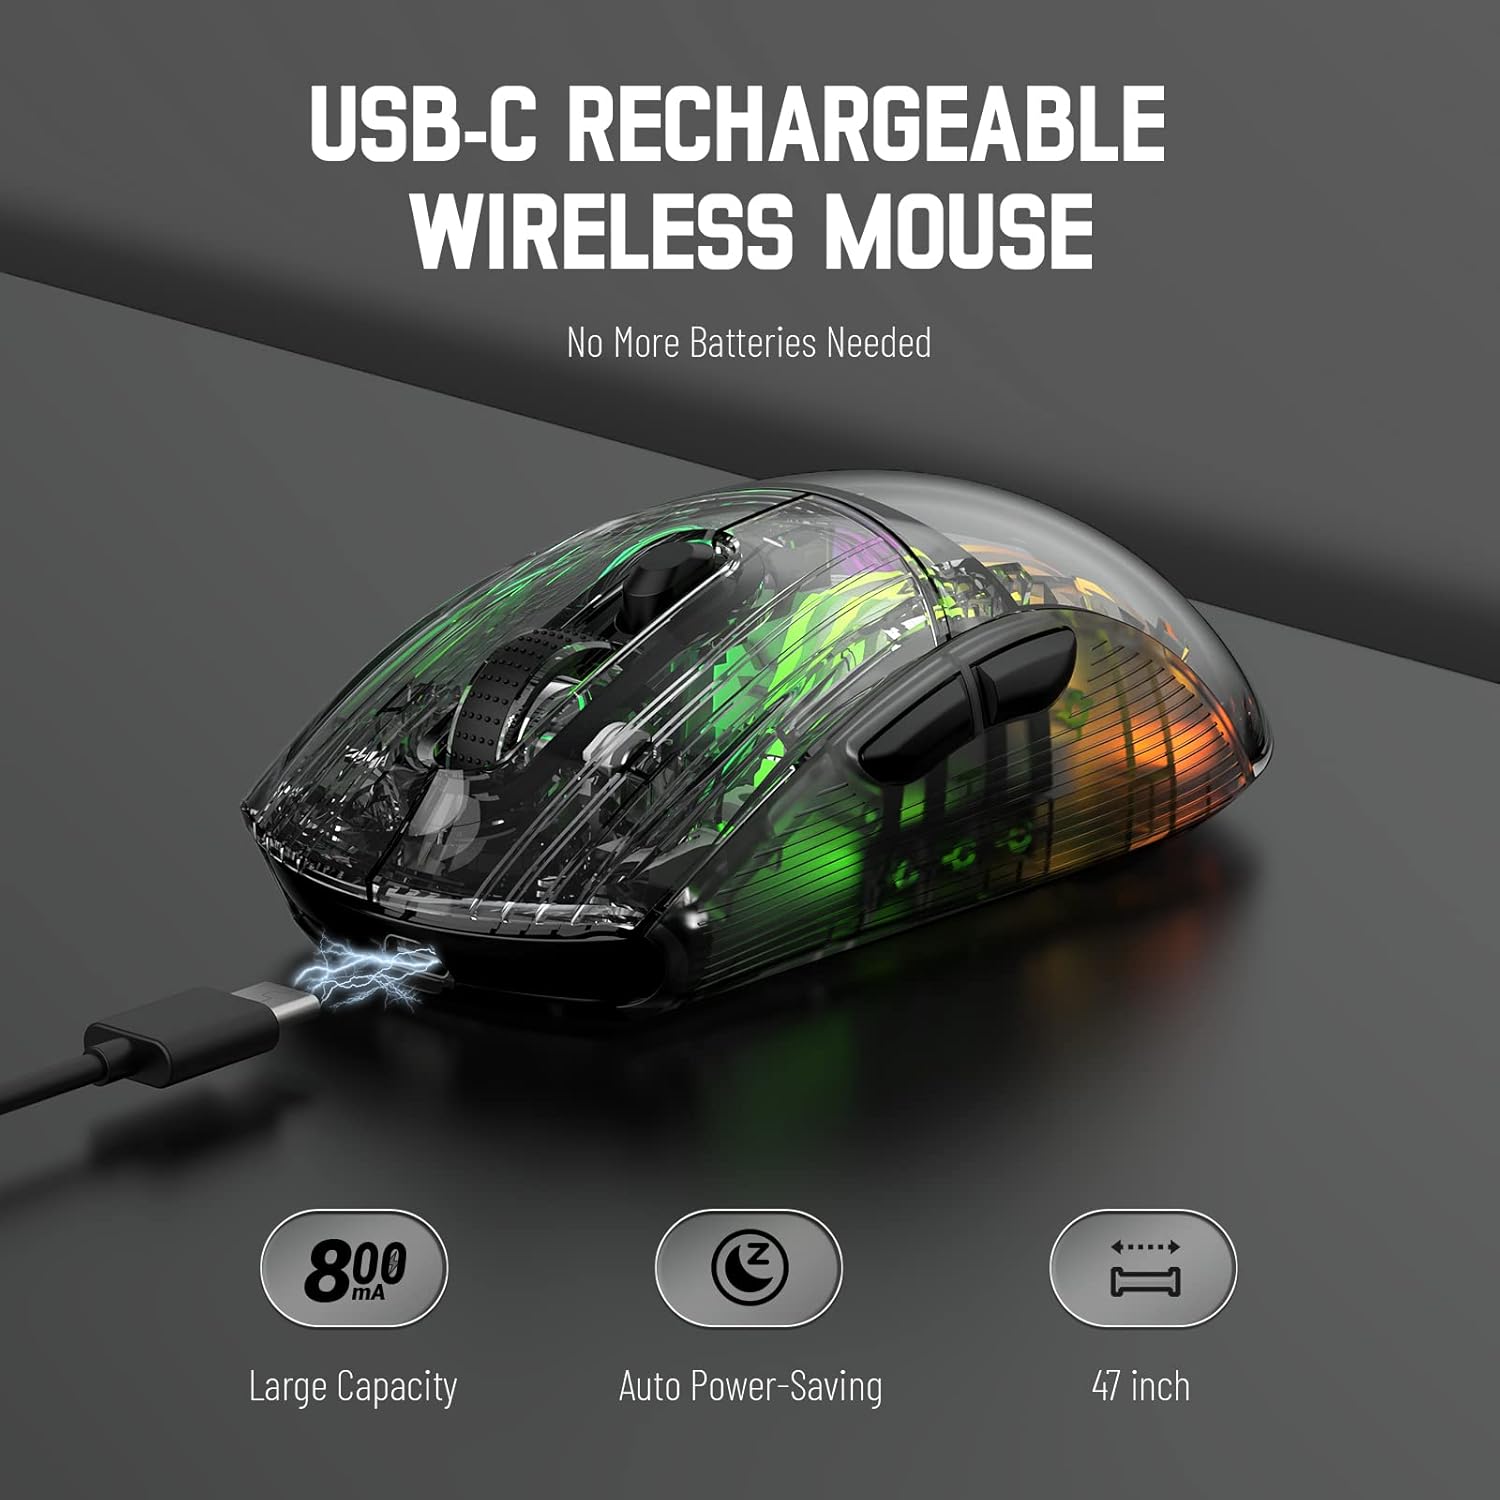
Image 3.1: The X2 mouse connected via its USB-C cable, illustrating the charging process.
3.2 2.4 GHz Kablosuz Bağlantı
For a stable and responsive wireless connection, use the 2.4GHz USB receiver.
- Locate the USB receiver stored in the slot on the bottom of the mouse.
- Push the mode switch on the bottom of the mouse to the "2.4G" position.
- USB alıcısını bilgisayarınızdaki veya cihazınızdaki boş bir USB portuna takın.
- The computer should automatically detect and install the necessary drivers. The mouse is ready for use once installation is complete (typically plug-and-play).
- If the mouse is unresponsive, try plugging the receiver into a different USB port.
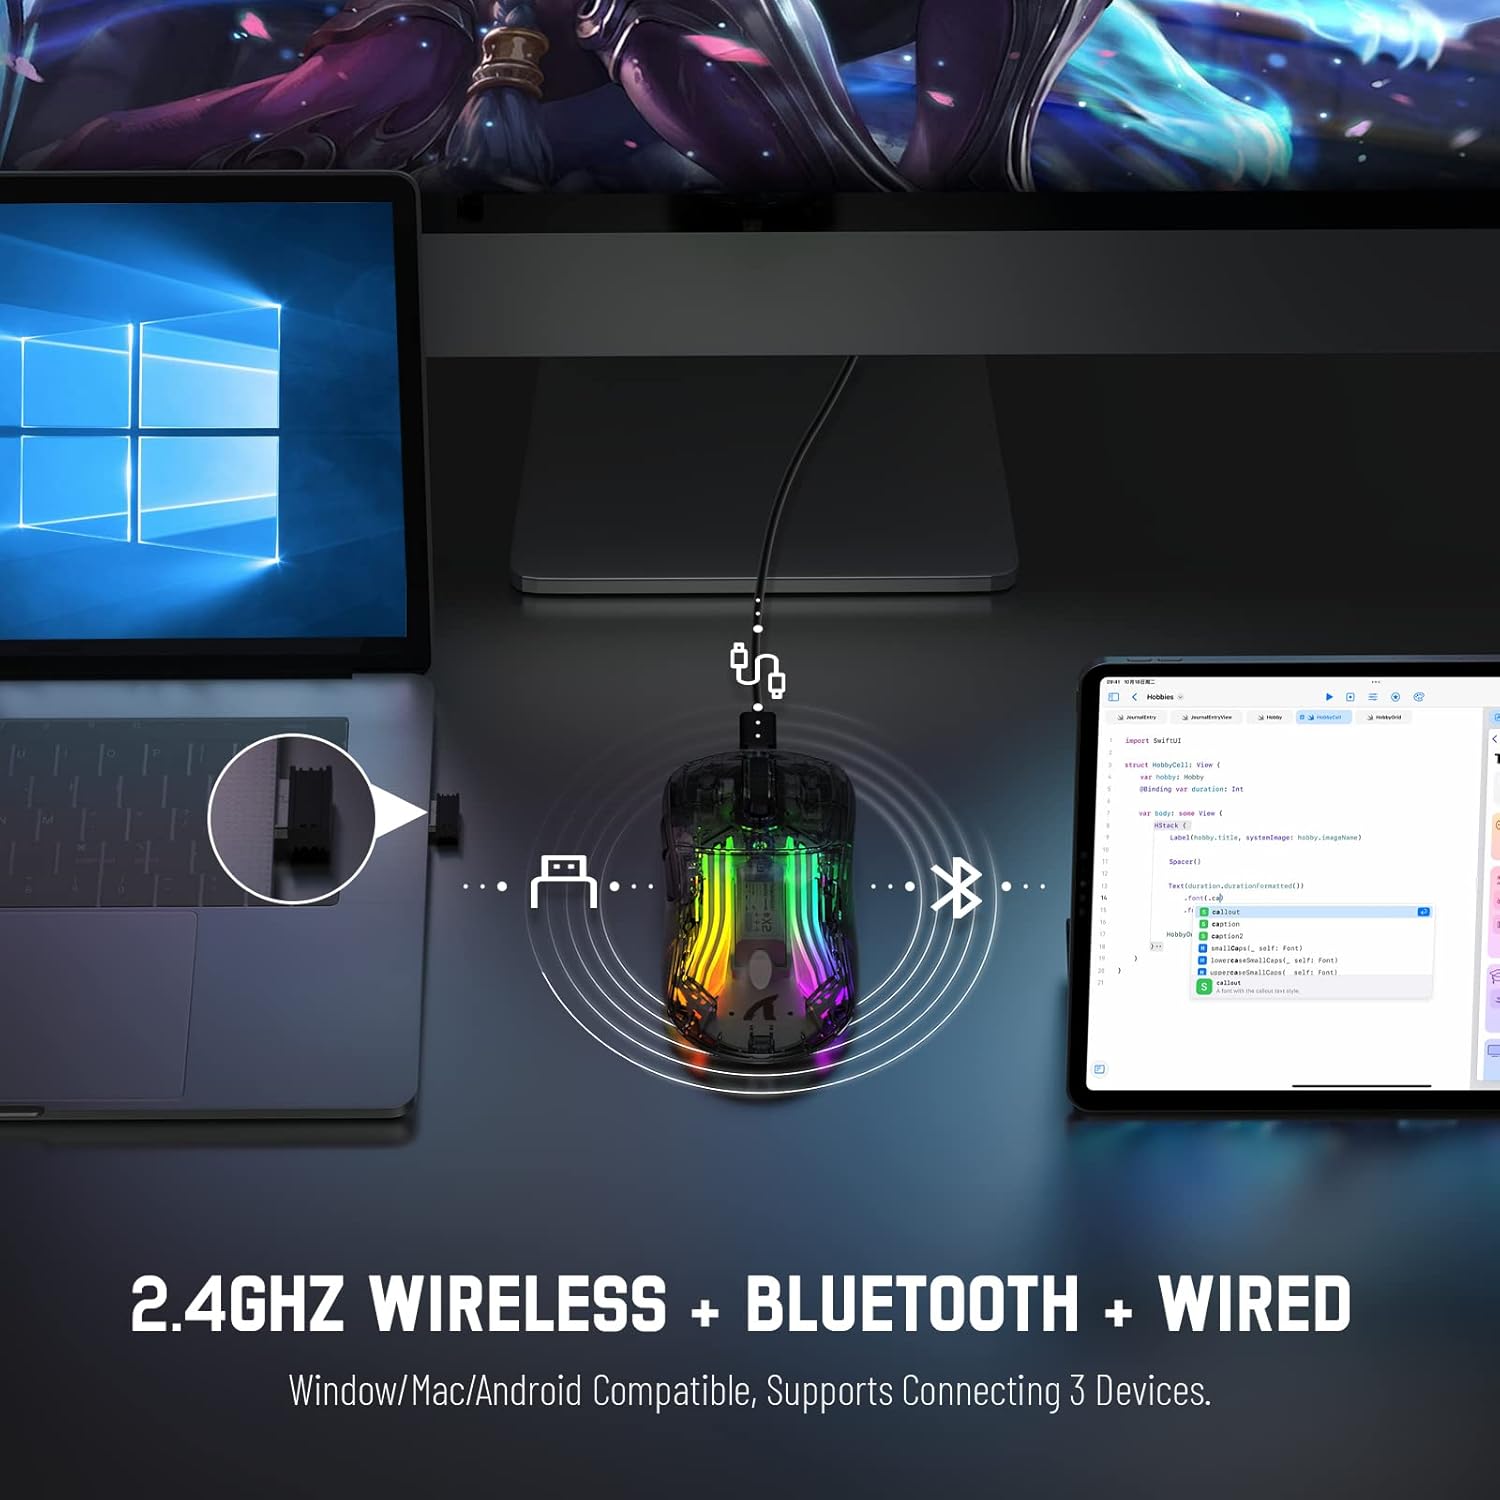
Image 3.2: Illustration of the 2.4GHz wireless connection, showing the USB receiver plugged into a laptop.
3.3 Bluetooth 5.0 Bağlantısı
Connect your X2 mouse via Bluetooth for devices that support it, such as laptops, tablets, or smartphones.
- Push the mode switch on the bottom of the mouse to the "Bluetooth" position.
- Basılı tutun Sol Tıklama Düğmesi + Kaydırma Tekerleği Düğmesi + Sağ Tıklama Düğmesi simultaneously for approximately 3-4 seconds. The blue light on the mouse will flash rapidly, indicating it is in pairing mode.
- Cihazınızda Bluetooth ayarlarına gidin ve Bluetooth'u etkinleştirin.
- Arama available devices. Select "X2 Mouse" from the list to connect.
- Once connected, the blue light will stop flashing and remain solid or turn off, depending on the lighting mode.
3.4 USB-C Kablolu Bağlantı
For a direct and reliable connection, use the USB-C cable in wired mode.
- Connect the USB-C end of the cable to the mouse's charging port.
- Connect the USB-A end to an available USB port on your computer or device.
- The mouse will function immediately as a wired mouse (plug-and-play).
4. Kullanım Talimatları
4.1 DPI Ayarı
The mouse features 5 adjustable DPI levels to suit various tasks and gaming preferences. The game chip used is PixArt 3212.
- Basın DPI Düğmesi (Kaydırma tekerleğinin altında yer alan) tuş, mevcut DPI ayarları arasında geçiş yapmak için kullanılır.
- Available DPI levels: 800 / 1200 / 1400 / 2000 / 2400.
4.2 RGB Aydınlatma Kontrolü
The X2 mouse features 3D RGB lighting with 11 different light colors and various effects.
- Basın Işık Efekti Anahtarı (located on the bottom of the mouse) to cycle through the different RGB lighting modes and colors.

Image 4.1: The X2 mouse displaying its 3D RGB lighting, complementing a gaming setup.
4.3 Güç Yönetimi
The mouse is designed with auto power-saving features to conserve battery life.
- The mouse will enter a sleep mode after a period of inactivity.
- Fareyi uyandırmak için, fareyi hareket ettirmeniz veya herhangi bir düğmeye tıklamanız yeterlidir.
- When the battery is low, the mouse's indicator light may flash red.
4.4 Sessiz Tıklamalar
The X2 mouse features silent click buttons, reducing noise during use.

Resim 4.2: Yan bir profesyonelfile of the X2 mouse, emphasizing its ergonomic shape and silent click functionality.
5. Bakım
5.1 Temizlik
- Disconnect the mouse from your device before cleaning.
- Fare yüzeyini silmek için yumuşak, kuru ve tüy bırakmayan bir bez kullanın.
- İnatçı kirler için hafifçeampBezi su veya hafif bir temizleme solüsyonuyla silin. Sert kimyasallardan kaçının.
- Farenin iç kısmına sıvı girmesine izin vermeyin.
5.2 Depolama
- Fareyi serin, kuru ve doğrudan güneş ışığından ve aşırı sıcaklıklardan uzak bir yerde saklayın.
- When not in use, ensure the mode switch is set to "OFF" to conserve battery life.
- Keep the USB receiver stored in its designated slot on the bottom of the mouse to prevent loss.
6. Sorun Giderme
6.1 Fare Yanıt Vermiyor
- Pili Kontrol Edin: Farenin şarjının dolu olduğundan emin olun. Şarj etmek için USB-C kablosuyla bağlayın.
- Mod Anahtarını Kontrol Edin: Verify the mode switch on the bottom of the mouse is set to the correct connection mode (2.4G, Bluetooth, or OFF for wired).
- 2.4 GHz Bağlantı: USB alıcısının çalışan bir USB portuna güvenli bir şekilde takıldığından emin olun. Farklı bir USB portu deneyin.
- Bluetooth Bağlantısı: Re-enter pairing mode (Left + Scroll + Right buttons for 3-4 seconds) and re-pair with your device. Ensure Bluetooth is enabled on your device.
- Kablolu Bağlantı: Ensure the USB-C cable is securely connected to both the mouse and the device.
6.2 Kesintili Bağlantı
- Mesafe: Ensure the mouse is within the effective range (up to 50ft for 2.4GHz).
- Parazit yapmak: Move the mouse and receiver away from other wireless devices or large metal objects that may cause interference.
- Pil Seviyesi: Low battery can affect connection stability. Charge the mouse.
6.3 RGB Işıklar Çalışmıyor
- Check Light Switch: Press the Light Effect Switch on the bottom of the mouse to cycle through modes or turn lights on.
- Pil Seviyesi: Ensure the mouse has sufficient charge, as low battery might disable lighting to conserve power.
7. Özellikler
| Özellik | Şartname |
|---|---|
| Örnek | X2 |
| Bağlantı | 2.4 GHz Kablosuz, Bluetooth 5.0, USB-C Kablolu |
| DPI Seviyeleri | 800 / 1200 / 1400 / 2000 / 2400 (PixArt 3212 Chip) |
| Düğmeler | 7 (Left, Right, Scroll Wheel, DPI, Forward, Backward, Light Effect Switch) |
| Aydınlatma | 3D RGB Lighting (11 light colors) |
| Pil | 800mAh Şarj Edilebilir |
| Şarj Süresi | Yaklaşık 4 saat |
| Çalışma Aralığı | Up to 50ft (2.4GHz) |
| Uyumluluk | Windows 7/8/10/XP, Vista 7/8, Mac OS, Linux (PC, Laptop, Tablet, PS4, PS5, Xbox One) |
| Ürün Ağırlığı | 6.4 ons |
| Boyutlar | 6.89 x 4.61 x 1.81 inç (Paket) |
8. Garanti ve Destek
ATTACK SHARK products are designed and manufactured to high-quality standards. For warranty information or technical support, please refer to the warranty card included with your product or contact the seller directly through your purchase platform. Please retain your proof of purchase for any warranty claims.
For further assistance, please visit the official ATTACK SHARK store on Amazon: ATTACK SHARK Mağazası


