1. Giriş
This manual provides detailed instructions for the installation, operation, and maintenance of the Supermicro X13SEI-F Server Motherboard. This motherboard is designed for high-performance server applications, supporting Intel Xeon processors with an LGA4677 socket and DDR5 memory.
Please read this manual thoroughly before attempting to install or operate the motherboard to ensure proper setup and to prevent damage to the components.
2. Güvenlik Bilgileri
Yaralanmaları ve ekipman hasarını önlemek için aşağıdaki güvenlik önlemlerine uyun:
- Always disconnect the power cord from the power supply before installing or removing any components.
- Wear an anti-static wrist strap when handling the motherboard and other components to prevent electrostatic discharge (ESD).
- Ensure the installation environment is dry and free from static electricity.
- Anakartı neme veya aşırı sıcaklıklara maruz bırakmayın.
- Hassas parçalara dokunmaktan kaçınmak için anakartı kenarlarından tutun.
- Refer to the power supply unit's manual for specific safety guidelines related to power connections.
3. Paket İçeriği
Tüm ürünlerin eksiksiz ve iyi durumda olduğundan emin olun. Herhangi bir ürün hasarlı veya eksikse, satıcınızla iletişime geçin.
- Supermicro X13SEI-F Server Motherboard
- I / O Kalkanı
- SATA Kabloları (miktar değişebilir)
- Quick Reference Guide / User Manual (this document)
- Driver CD/DVD or USB drive (or download instructions)
4. Ürün Bittiview
The Supermicro X13SEI-F is a high-performance server motherboard featuring the LGA4677 socket, designed to support Intel Xeon Scalable processors. It offers robust memory capabilities with 8 DDR5 DIMM slots, supporting up to 4800MHz memory speed. The board also includes multiple PCIe slots for expansion.
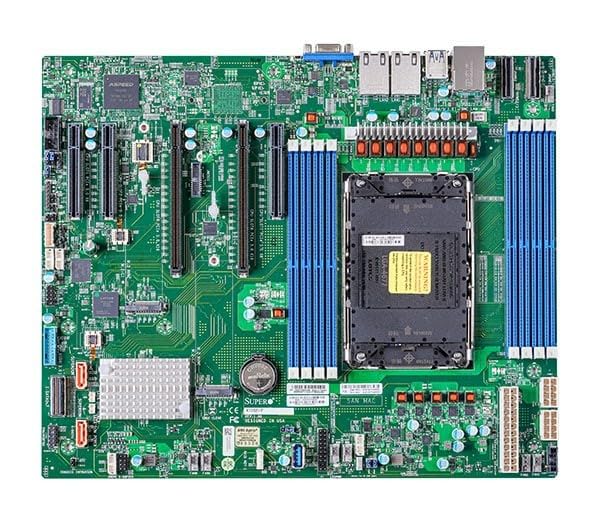
Figure 1: Supermicro X13SEI-F Server Motherboard. This image displays the overall layout of the motherboard, including the CPU socket, DIMM slots, and various connectors.
4.1 Temel Özellikler
- CPU Soketi: LGA4677 for Intel Xeon Scalable Processors
- Yonga seti: Intel C621
- Hafıza: 8x DDR5 DIMM slots, up to 4800MHz
- Genişleme Yuvaları: Multiple PCIe slots (specific configuration depends on model variant)
- Depolamak: Support for various storage interfaces (SATA, NVMe - specific details in specifications)
- Ağ oluşturma: Integrated LAN controllers
5. Kurulum ve Kurulum
Before beginning installation, ensure your system case is compatible with the motherboard's form factor and that you have all necessary components.
5.1 İşlemci Kurulumu (LGA4677)
- Anakart üzerindeki LGA4677 soketini bulun.
- Carefully open the CPU socket retention mechanism according to the instructions provided with your CPU or motherboard.
- Align the CPU with the socket, ensuring the triangular mark on the CPU matches the mark on the socket. Do not force the CPU into the socket.
- İşlemciyi yavaşça sokete yerleştirin.
- Close the CPU socket retention mechanism until it locks securely.
- CPU soğutucusunu üreticinin talimatlarına göre takın.
5.2 RAM Kurulumu (DDR5)
- Locate the 8 DDR5 DIMM slots on the motherboard.
- DIMM yuvasının her iki ucundaki sabitleme klipslerini açın.
- DDR5 bellek modülündeki çentiği DIMM yuvasındaki anahtarla hizalayın.
- Insert the memory module firmly into the slot until the retention clips snap into place. Ensure both clips are closed.
- For optimal performance, refer to the motherboard's manual for recommended memory population order.
5.3 PCIe Kart Kurulumu
- Identify the appropriate PCIe slot for your expansion card (e.g., GPU, RAID card).
- Kasanızdan ilgili genişleme yuvası kapağını çıkarın.
- Align the PCIe card with the slot and press down firmly until it is fully seated.
- Secure the card with a screw or retention clip to the chassis.
5.4 Depolama Aygıtı Kurulumu
- SATA Sürücüler: Connect SATA data cables from the motherboard's SATA ports to your SATA hard drives or SSDs. Connect power cables from the PSU to the drives.
- NVMe M.2 Drives: Locate the M.2 slots. Insert the M.2 drive at an angle, then push it down and secure it with the provided screw or retention mechanism.
5.5 Güç Bağlantıları
- Güç kaynağınızdaki 24 pinli ATX güç konektörünü anakart üzerindeki ana güç soketine bağlayın.
- Connect the 8-pin (or 4+4 pin) EPS 12V CPU power connector(s) to the corresponding sockets near the CPU.
- Tüm güç bağlantılarının güvenli olduğundan emin olun.
5.6 Ön Panel Bağlantıları
Connect the front panel cables (Power LED, HDD LED, Power Switch, Reset Switch, USB, Audio) from your chassis to the corresponding headers on the motherboard. Refer to the motherboard's silkscreen labels or the detailed manual for exact pin configurations.
6. Kullanım Talimatları
6.1 İlk Önyükleme
- After completing all hardware installations, connect the monitor, keyboard, and mouse.
- Connect the power cord to the power supply and turn on the power switch on the PSU.
- Kasanın üzerindeki güç düğmesine basın.
- The system should power on, and you should see the BIOS/UEFI POST screen.
6.2 BIOS/UEFI Kurulumu
BIOS/UEFI kurulum yardımcı programına girmek için tuşuna basın SİL or F2 key repeatedly during the POST process. Within the BIOS/UEFI, you can configure:
- Önyükleme sırası
- Sistem saati ve tarihi
- CPU and memory settings
- Storage configurations (RAID, AHCI)
- Fan hızı kontrolü
- Güvenlik ayarları
Save changes before exiting the BIOS/UEFI.
6.3 İşletim Sistemi Kurulumu
Insert your operating system installation media (USB drive or DVD) and set it as the primary boot device in the BIOS/UEFI. Follow the on-screen instructions to install your preferred operating system. After installation, install all necessary drivers from the Supermicro website or the provided driver media.
7. Bakım
7.1 Temizlik
- Regularly clean dust from the motherboard and system components using compressed air.
- Temizlemeden önce sistemin kapalı ve fişinin çekilmiş olduğundan emin olun.
- Sıvı temizleyicileri doğrudan bileşenler üzerinde kullanmaktan kaçının.
7.2 Firmware Güncellemesi
Supermicro'yu periyodik olarak kontrol edin. website for updated BIOS/UEFI firmware. Firmware updates can improve system stability, performance, and compatibility. Follow the specific instructions provided by Supermicro for updating the firmware to avoid system damage.
8. Sorun Giderme
Bu bölümde karşılaşabileceğiniz yaygın sorunlara çözümler sunulmaktadır.
8.1 Güç Yok / POST (Açılışta Kendi Kendini Test Etme) Yok
- Güç Bağlantılarını Kontrol Edin: Ensure the 24-pin ATX and 8-pin EPS 12V power connectors are securely seated.
- Güç kaynağını doğrulayın: Güç kaynağı ünitesini (PSU) başka bir sistemle veya bir PSU test cihazıyla test edin.
- Yeniden Yerleştirme Bileşenleri: Reseat the CPU, RAM modules, and any expansion cards.
- CMOS'u temizle: Refer to the motherboard manual for instructions on how to clear the CMOS (Complementary Metal-Oxide-Semiconductor) settings, which can resolve boot issues.
- Minimum Yapılandırma: Try booting with only the CPU, one RAM stick, and the necessary power connections.
8.2 Görüntü Çıkışı Yok
- Monitör Bağlantısı: Ensure the monitor is properly connected to the graphics output (either integrated or discrete GPU) and is powered on.
- Grafik Kartı: If using a discrete graphics card, ensure it is fully seated in its PCIe slot and has all necessary power connectors from the PSU.
- Entegre Grafikler: If your CPU supports integrated graphics, try connecting the monitor to the motherboard's video output to rule out a discrete GPU issue.
8.3 Operating System Not Booting
- Önyükleme Sırası: Check the BIOS/UEFI settings to ensure the correct boot device (e.g., SSD, HDD) is selected as the primary boot option.
- Drive Connections: Verify that your storage drives are properly connected (data and power).
- İşletim Sistemi Kurulumu: If the OS is newly installed, ensure the installation process completed successfully and all drivers are installed.
9. Özellikler
| Özellik | Detay |
|---|---|
| Marka | Süpermikro |
| Model Adı | MBD-X13SEI-F-B |
| CPU Soketi | LGA4677 |
| Uyumlu İşlemciler | Intel Xeon Scalable |
| Yonga Seti Türü | Intel C621 |
| RAM Bellek Teknolojisi | DDR5 |
| Bellek Hızı | 4800 MHz |
| RAM Yuvaları | 8x DDR5 DIMM slots |
| Ürün Boyutları (UxGxY) | 16 x 12 x 5 inç |
| Ürün Ağırlığı | 3.19 pound |
| İlk Mevcut Tarih | 20 Ocak 2023 |
Note: Specifications are subject to change without notice. For the most current information, please refer to the official Supermicro product page.
10. Garanti ve Teknik Destek
10.1 Garanti Bilgileri
Supermicro products are covered by a limited warranty. For detailed warranty terms and conditions, including duration and coverage, please visit the official Supermicro website or consult the warranty card included with your product. Keep your proof of purchase for warranty claims.
10.2 Teknik Destek
For technical assistance, driver downloads, BIOS updates, and further product information, please visit the official Supermicro support webalan:
https://www.supermicro.com/support
Before contacting support, please have your motherboard model number (MBD-X13SEI-F-B) and serial number ready.