1. Giriş
Welcome to the instruction manual for the Supermicro X13SEM-TF motherboard. This document provides essential information for the proper installation, configuration, and maintenance of your motherboard. Please read this manual thoroughly before proceeding with any installation or operation.
The Supermicro X13SEM-TF is designed to support Intel Xeon SPR-SP CPUs with up to 56 cores and 350W TDP, featuring EBGPCH and 8-channel DDR5 memory support.
2. Ürün Bittiview
Below is an image of the Supermicro X13SEM-TF motherboard, highlighting its key components.
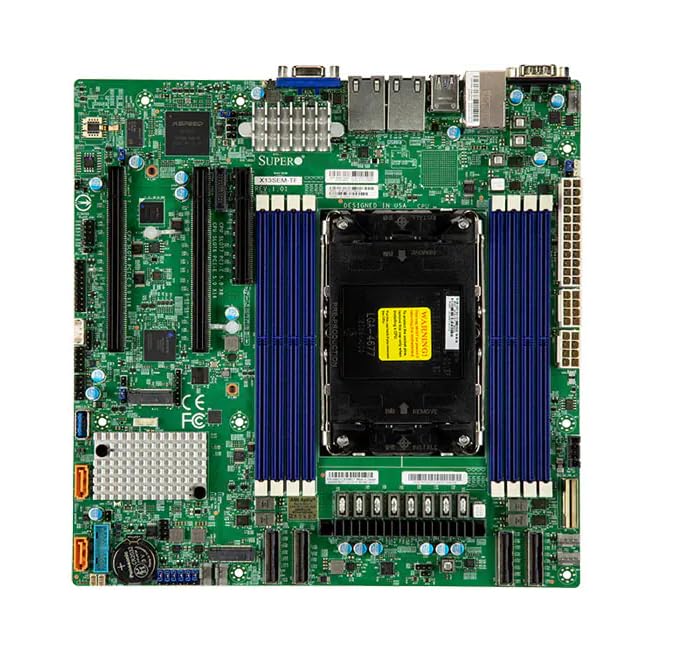
Image Description: This image displays the Supermicro X13SEM-TF motherboard. Key visible components include the large LGA 4677 CPU socket at the center, surrounded by eight DDR5 DIMM slots (blue). Various PCIe slots, SATA ports, USB headers, and power connectors are distributed across the green PCB. The rear I/O panel features USB ports, Ethernet ports, and a VGA port. Heatsinks are visible over the VRM and chipset areas.
3. Güvenlik Bilgileri
Always observe standard electrostatic discharge (ESD) precautions when handling the motherboard.
- Disconnect all power sources before installation or maintenance.
- Anti-statik bir bilek kayışı takın.
- Avoid touching components directly unless necessary.
- Ensure proper ventilation within the system chassis.
- Refer to professional assistance if unsure about any procedure.
4. Kurulum ve Kurulum
4.1. Paket İçeriği
Paketin tüm bileşenlerinin mevcut olduğunu doğrulayın:
- Supermicro X13SEM-TF Motherboard
- G/Ç Kalkanı (entegre değilse)
- SATA Kabloları
- Kullanım Kılavuzu (bu belge)
- Sürücü CD/USB (veya indirme talimatları)
4.2. Anakart Kurulumu
- Şasiyi Hazırlayın: Ensure the computer chassis is ready for motherboard installation. Install standoffs in the appropriate locations.
- G/Ç Kalkanını yükleyin: If provided separately, install the I/O shield into the chassis opening.
- Anakartı Monte Et: Carefully place the motherboard into the chassis, aligning it with the standoffs and I/O shield. Secure it with screws.
- CPU'yu takın:
- CPU soketinin kolunu açın.
- Align the CPU (Intel Xeon SPR-SP) with the socket, matching the triangular markers.
- CPU'yu sokete yavaşça yerleştirin. Zorlamayın.
- CPU'yu sabitlemek için soket kolunu kapatın.
- CPU Soğutucusunu Takın: Attach the compatible CPU cooler according to its manufacturer's instructions. Ensure proper thermal paste application.
- Belleği (RAM) Takın:
- DDR5 DIMM yuvalarındaki klipsleri açın.
- Align the memory modules with the slots, ensuring the notch matches.
- Press down firmly on both ends until the clips snap into place. Refer to the motherboard layout for optimal memory population.
- Gücü bağlayın:
- 24 pinli ATX ana güç konektörünü bağlayın.
- Connect the 8-pin (or 4+4-pin) CPU power connector(s).
- Depolama Aygıtlarını Bağlayın: Connect SATA data and power cables to your storage drives (HDDs/SSDs) and the motherboard's SATA ports.
- Ön Panel Başlıklarını Bağlayın: Connect the power switch, reset switch, HDD LED, power LED, and front panel USB/audio headers to their respective pins on the motherboard. Refer to the motherboard diagram for correct pin assignments.
- Genişletme Kartlarını Takın: Insert any necessary PCIe expansion cards (e.g., graphics cards, network cards) into the appropriate PCIe slots and secure them.
5. Kullanım Talimatları
5.1. İlk Güç Açma
After completing all connections, connect the power supply to an electrical outlet and power on the system.
The system should boot to the BIOS/UEFI interface or an installed operating system.
5.2. BIOS/UEFI Yapılandırması
To enter the BIOS/UEFI setup, press the designated key (usually SİL or F2) during startup.
Configure boot order, system time, and other necessary settings. Save changes before exiting.
5.3. Sürücü Kurulumu
Install all necessary drivers for the motherboard chipset, network, audio, and any other integrated components. Drivers can be found on the Supermicro website or the provided driver media.
6. Bakım
Düzenli bakım, anakartınızın optimum performansını ve uzun ömrünü sağlar.
- Toz Giderimi: Anakart ve bileşenlerin tozunu basınçlı hava kullanarak düzenli olarak temizleyin. Sistemin kapalı ve fişinin çekilmiş olduğundan emin olun.
- BIOS/UEFI Güncellemeleri: Supermicro'yu kontrol edin website for BIOS/UEFI updates. Update only if necessary and follow the provided instructions carefully.
- Sürücü Güncellemeleri: Keep drivers updated for optimal compatibility and performance.
- Fiziksel Muayene: Periodically inspect the motherboard for any signs of damage, loose connections, or bulging capacitors.
7. Sorun Giderme
7.1. Güç yok
- Tüm güç bağlantılarını (24-pin ATX, 8-pin CPU) kontrol edin.
- Güç kaynağının açık olduğundan emin olun.
- Güç kaynağını başka bir sistemle veya bir güç kaynağı test cihazıyla test edin.
- Ön panel güç anahtarı bağlantısını doğrulayın.
7.2. Ekran Yok
- Monitörün bağlı ve açık olduğundan emin olun.
- Check if the graphics card (if dedicated) is properly seated and powered.
- RAM modüllerini tekrar yerleştirmeyi deneyin.
- If using integrated graphics, ensure the CPU supports it and the display cable is connected to the motherboard's video output.
7.3. Sistem Kararsızlığı / Çökmeler
- CPU ve GPU sıcaklıklarını kontrol edin.
- Verify RAM is correctly installed and compatible.
- Bellek tanılama araçlarını çalıştırın.
- Tüm sürücülerin yüklü ve güncel olduğundan emin olun.
- Check for loose cables or components.
8. Özellikler
| Özellik | Detay |
|---|---|
| Örnek | Supermicro X13SEM-TF (MBD-X13SEM-TF-B) |
| CPU Desteği | Intel Xeon SPR-SP, up to 56 cores, 350W TDP |
| CPU Soketi | LGA4677 |
| Yonga seti | EBGPCH |
| Hafıza | 8-channel DDR5 DIMM slots |
| Boyutlar (UxGxY) | 16 x 12 x 5 inç |
| Ağırlık | 2.86 pound |
| Üretici | SuperMicro |
| İlk Mevcut Tarih | 20 Ocak 2023 |
9. Garanti ve Destek
9.1. Garanti Bilgileri
For detailed warranty information, please refer to the official Supermicro webSiteyi veya ürününüzle birlikte gelen garanti belgesini inceleyin.
9.2. Teknik Destek
If you encounter issues that cannot be resolved using this manual, please contact Supermicro technical support.
Visit the official Supermicro website for support resources, driver downloads, and contact information: www.supermicro.com/support


