giriiş
This manual provides detailed instructions for the setup, operation, and maintenance of your Gioteck SC3 Wireless Pro Controller. Designed for use with Nintendo Switch, PC, and mobile devices, this controller features programmable back buttons, customizable RGB lighting, and changeable magnetic thumb sticks for an enhanced gaming experience.
1. Kurulum
1.1 Paket İçeriği
- Gioteck SC3 Wireless Pro Controller
- USB Şarj Kablosu
- Additional Magnetic Thumb Sticks (if included)
- Kullanım Kılavuzu (bu belge)
1.2 Kontrol Ünitesinin Şarj Edilmesi
Before initial use, fully charge the controller. Connect the supplied USB charging cable to the controller's charging port and the other end to a USB power source (e.g., Nintendo Switch dock, PC USB port, or USB wall adapter).
- LED göstergesi şarj durumunu gösterecektir.
- Tam şarj genellikle yaklaşık 2-3 saat sürer.
Resim: Alt view of the Gioteck SC3 controller, highlighting the USB-C charging port located between the two textured grips.
1.3 Pairing with Nintendo Switch
- Nintendo Switch ANA Menüsünden şunu seçin: Kontrolörler, Daha sonra Tutma Yerini/Sırayı Değiştir.
- On the SC3 controller, press and hold the Eşleştirme Düğmesi (usually a small button on the top or back) for a few seconds until the LED indicators begin to flash rapidly.
- Once the controller is recognized by the Switch, the player LED(s) on the controller will illuminate solid, indicating successful pairing.
- Basın Bir düğme onaylamak için.
Note: For subsequent uses, the controller should automatically reconnect to the last paired Switch console when powered on.
1.4 Connecting to PC/Mobile (Bluetooth)
- Ensure Bluetooth is enabled on your PC or mobile device.
- On the SC3 controller, press and hold the Eşleştirme Düğmesi for a few seconds until the LED indicators flash rapidly.
- On your PC/mobile device, navigate to Bluetooth settings and search for new devices.
- Select "Gioteck SC3" or similar from the list of available devices to pair.
- The controller's LED will become solid upon successful connection.
1.5 Installing Magnetic Thumb Sticks
The SC3 controller features changeable magnetic thumb sticks. To replace them:
- Gently pull the existing thumb stick straight up to remove it.
- Align the desired magnetic thumb stick with the base and gently push it down until it snaps into place.

Resim: Ön view of the Gioteck SC3 controller, showcasing the magnetic thumb sticks and button layout.
2. Kullanım Talimatları
2.1 Düğme Düzeni
The SC3 controller features a traditional button layout. Refer to the image below for button identification.

Görüntü: Açılı ön view of the Gioteck SC3 controller, displaying the full button layout including face buttons, D-pad, analog sticks, and shoulder buttons.
- Sol/Sağ Analog Çubuklar: Hareket ve kamera kontrolü için.
- Yön Düğmesi: Yönlü giriş.
- A/B/X/Y Düğmeleri: Eylem düğmeleri.
- L/R/ZL/ZR Düğmeleri: Omuz ve tetik düğmeleri.
- +/- Düğmeleri: Start/Select equivalents.
- Ana menü tuşu: Returns to the console's home menu.
- Yakalama Düğmesi: Ekran görüntüleri alır.
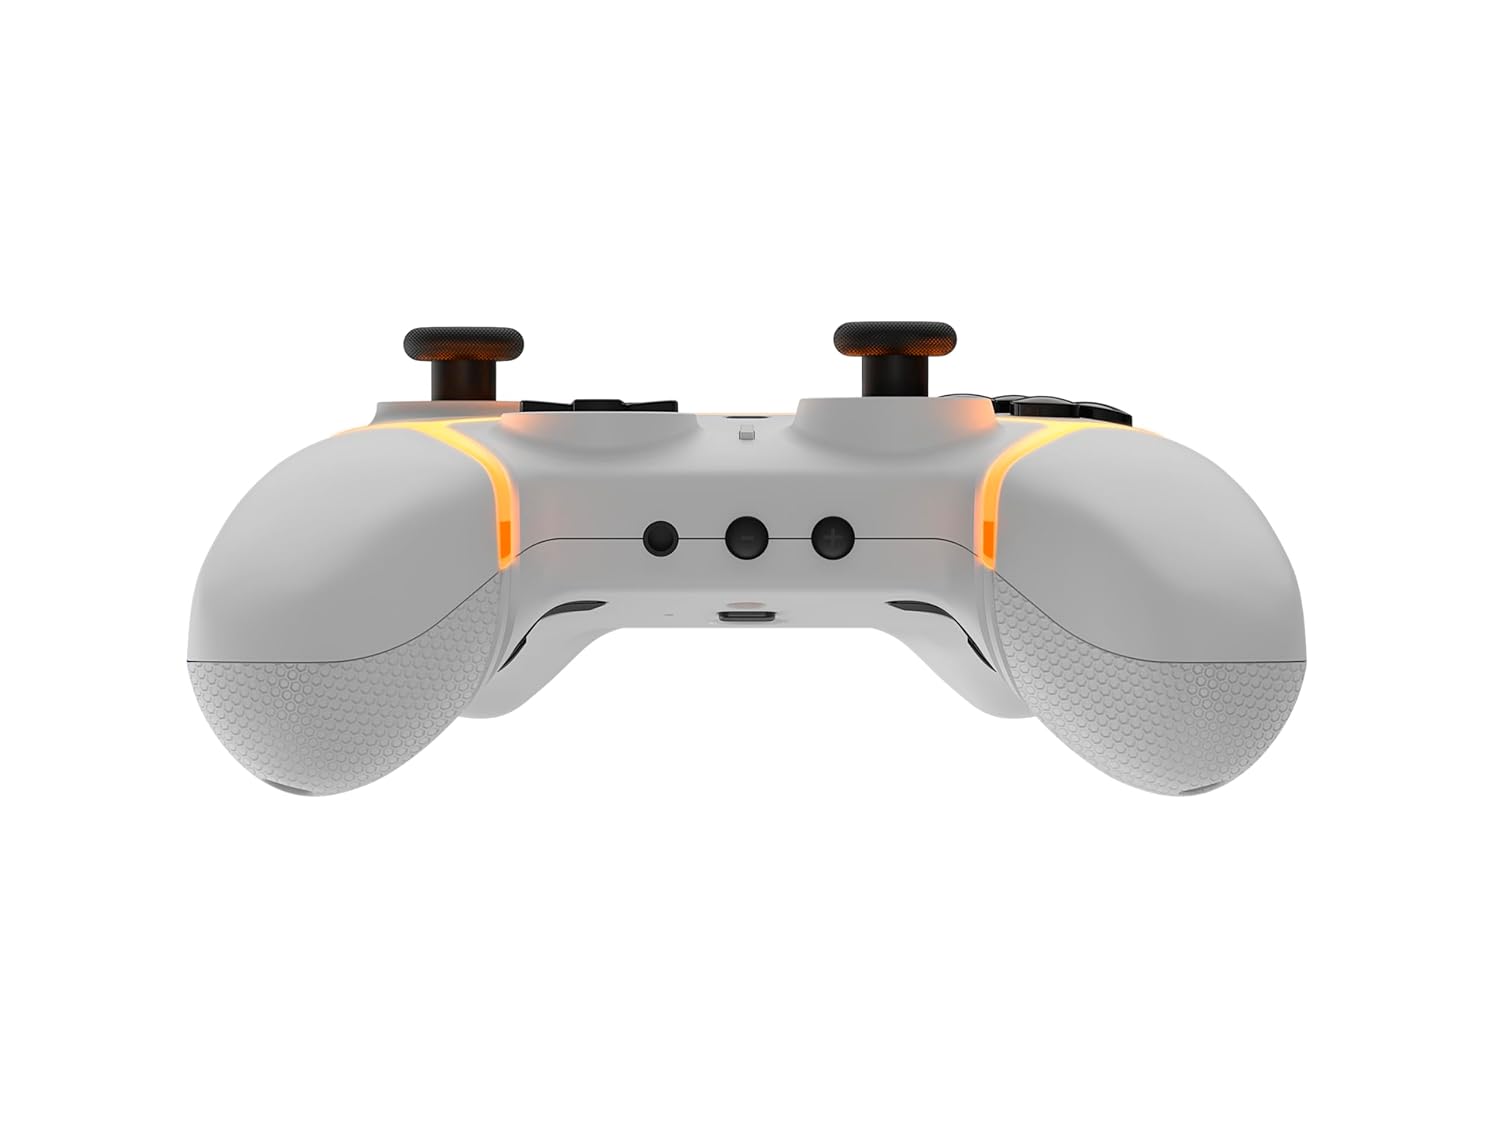
2.2 Programlanabilir Geri Düğmeleri
The SC3 controller includes programmable back buttons (M1, M2, M3, M4) for custom assignments.

Resim: Arka view of the Gioteck SC3 controller, clearly showing the four programmable back buttons (M1, M2, M3, M4) and textured grips.
Programlama Adımları:
- Basılı tutun Program Düğmesi (refer to diagram if available, usually a small button on the back) until the LED indicator flashes.
- Basın Geri Düğmesi (M1, M2, M3, or M4) you wish to program. The LED will flash slowly.
- Basın Giriş Düğmesi (e.g., A, B, X, Y, L, R, ZL, ZR, D-pad direction) you want to assign to the back button.
- Basın Program Düğmesi again to save the assignment. The LED will stop flashing.
- Repeat for other back buttons as desired.
To clear a programmed button, follow steps 1-2, then press the Program Button again without pressing an input button.
2.3 RGB Aydınlatma Özelleştirmesi
The controller features customizable RGB lighting. Specific instructions for changing colors or effects are typically found in the product's quick start guide or by pressing a dedicated button combination (e.g., Function + R3).
Consult the quick start guide included with your controller for precise button combinations to adjust RGB lighting.
2.4 Hareket Kontrolleri
The SC3 controller supports motion controls, allowing for immersive gameplay in compatible Nintendo Switch titles. No special setup is usually required; motion controls activate automatically when supported by the game.
2.5 Audio Headset Jack
A 3.5mm audio headset jack is located on the controller for connecting compatible headsets. It includes dedicated mute and volume control buttons.
- Sesi Aç/Kapat: Ses çıkışını ayarlayın.
- Sessiz tuşu: Mute/unmute microphone input.

Resim: Üst view of the Gioteck SC3 controller, highlighting the 3.5mm audio jack, volume controls, and mute button.
3. Bakım
3.1 Temizlik
Kontrol cihazınızı temizlemek için yumuşak ve kuru bir bez kullanın. İnatçı kirler için hafifçe kurulayın.ampBezi suyla nemlendirin. Sert kimyasallar, aşındırıcı temizleyiciler veya çözücüler kullanmaktan kaçının, çünkü bunlar kumandanın yüzeyine ve iç bileşenlerine zarar verebilir.
- Do not immerse the controller in water or any other liquid.
- Ensure all ports are dry before charging or connecting devices.
3.2 Depolama
Kumandayı serin, kuru bir yerde, doğrudan güneş ışığından ve aşırı sıcaklıklardan uzakta saklayın. Hasarı önlemek için kumandanın üzerine ağır nesneler koymaktan kaçının.
3.3 Pil Bakımı
The controller contains a rechargeable battery. To prolong battery life:
- Pilin sık sık tamamen boşaltılmasından kaçının.
- Kumanda cihazını, uzun süre kullanılmasa bile düzenli olarak şarj edin (örneğin, 3-6 ayda bir).
- Do not expose the controller to temperatures above 60°C (140°F).
4. Sorun Giderme
4.1 Denetleyici Bağlanmıyor/Eşleşmiyor
- Pili Kontrol Edin: Kontrol cihazının yeterli şarja sahip olduğundan emin olun.
- Tamirat: Follow the pairing instructions in Section 1.3 or 1.4.
- Parazit yapmak: Move closer to the console/device and away from potential sources of wireless interference (e.g., Wi-Fi routers, other Bluetooth devices).
- Kontrol Cihazını Sıfırla: Locate a small reset button (often a pinhole) on the back of the controller. Use a paperclip to press and hold it for a few seconds. Then attempt to re-pair.
- Update Console/Device Software: Ensure your Nintendo Switch, PC, or mobile device's operating system is up to date.
4.2 Buttons/Sticks Not Responding
- Re-sync: Kontrol cihazını çıkarıp tekrar bağlayın.
- Temiz: Düğmelerin veya çubukların etrafında herhangi bir kalıntının sıkışmadığından emin olun.
- Test in another game/menu: Determine if the issue is specific to a game or system-wide.
- Kontrol Cihazını Sıfırla: Yukarıda açıklandığı gibi donanımsal sıfırlama işlemi gerçekleştirin.
4.3 Motion Controls Not Working
- Oyun Uyumluluğu: Verify that the game you are playing supports motion controls.
- Yeniden kalibre edin: On Nintendo Switch, you can recalibrate motion controls in the system settings.
- Kontrol Cihazını Sıfırla: Sert sıfırlama yapın.
5. Özellikler
| Modeli: | Gioteck SC3 Wireless Pro Controller |
| Uyumluluk: | Nintendo Switch (Original, Lite, OLED), PC, Mobile Devices |
| Bağlantı: | Bluetooth Kablosuz |
| Boyutlar (yaklaşık): | 2.87 x 5.35 x 6.34 inç (7.29 x 13.59 x 16.1 cm) |
| Ağırlık (yaklaşık): | 10.6 ons (300 gram) |
| Ses jakı: | 3.5mm with mute and volume controls |
| Özel Özellikler: | Programmable back buttons, Magnetic thumb sticks, RGB lighting, Motion controls |
6. Garanti Bilgileri
The Gioteck SC3 Wireless Pro Controller comes with a manufacturer's warranty. For specific details regarding warranty coverage, duration, and claims process, please refer to the warranty card included with your product or visit the official Gioteck webalan.
Lütfen garanti amaçlı satın alma belgenizi saklayın.
7. Müşteri Desteği
If you encounter any issues or have questions not covered in this manual, please contact Gioteck customer support. Contact information can typically be found on the product packaging or the official Gioteck webalan.
Gioteck Official Webalan: www.gioteck.com


