1. Giriş
This manual provides essential information for the safe installation, operation, and maintenance of your Philips LED Slim Flood Light, model PTF150-NW-G1-Y-FL-8-BZ. Please read this manual thoroughly before installation and retain it for future reference.
The Philips LED Slim Flood Light is designed for outdoor applications such as sign lighting, building facades, security lighting, and general area illumination. Its robust construction and efficient LED technology ensure reliable performance.
2. Güvenlik Bilgileri
WARNING: Risk of electric shock. Installation should be performed by a qualified electrician or trained personnel in accordance with all applicable electrical codes.
- Kurulum veya bakım işlemlerinden önce devre kesiciden veya sigorta kutusundan elektriği kesin.
- Tedarik hacmini sağlayıntage, armatürün gereksinimleriyle uyumludur (120V AC).
- Hasarlı kablolama veya bileşenlerle aydınlatma armatürünü çalıştırmayın.
- Aydınlatma sırasında gözlerinizi doğrudan ışık kaynağına maruz bırakmaktan kaçının.
- The fixture's housing acts as a heat sink and may become hot during operation. Allow adequate cooling time before handling.
- Ensure all connections are secure and properly sealed, especially the IP66 liquid-tight connector for the power cord, to maintain water resistance.
- Aydınlatma armatüründe herhangi bir değişiklik yapmayın. Yapılacak her türlü değişiklik garantiyi geçersiz kılabilir ve güvenlik tehlikeleri oluşturabilir.
3. Paket İçeriği
Kuruluma başlamadan önce tüm bileşenlerin mevcut olduğundan emin olun:
- Philips LED Slim Flood Light (1 unit)
- Integrated Yoke Mount (pre-attached)
- Power Cord (3-foot, STW 16 gauge)
- IP66 Liquid Tight Connector (pre-attached to cord exit)

Resim 1: Philips LED Slim Flood Light. This image shows the front view of the flood light with its integrated yoke mount and power cord connection point.
4. Özellikler
| Şartname | Detay |
|---|---|
| Model Numarası | PTF150-NW-G1-Y-FL-8-BZ |
| Marka | Signify (Philips) |
| Netage | 150 Watt |
| Lümen Çıkışı | 18600 Lümen |
| Renk Sıcaklığı | 4000K Soğuk Beyaz |
| Yeterlik | Watt başına 124 lümen |
| Cilttage | 120 Volt (AC) |
| Montaj Tipi | Yoke Mount (Surface Mount) |
| Sona ermek | Bronz |
| Malzeme | Die-cast aluminum housing, tempered glass lens |
| Giriş Koruması (IP) Derecesi | IP65 (fixture), IP66 (connector) |
| Ürün Ağırlığı | 4 Pound |
| Boyutlar (Yaklaşık) | 16.93" H x 11.41" W x 2.36" D (430mm H x 289.8mm W x 59.9mm D) |
5. Kurulum ve Kurulum
The Philips LED Slim Flood Light is designed for surface mounting using its integrated yoke. Follow these steps for proper installation:
- Hazırlık: Ensure power is disconnected at the main circuit breaker. Gather necessary tools (drill, screwdriver, wire strippers, electrical tape, mounting hardware suitable for your surface).
- Montaj Yeri: Select a sturdy surface (wall, pole, ground) capable of supporting the fixture's weight and providing adequate clearance for light distribution.
- İşaretleme ve Delme: Use the yoke mount as a template to mark the drilling points on the mounting surface. Drill appropriate pilot holes for your chosen mounting hardware. Refer to the dimension diagram for precise measurements.
- Sabitlemeyi Sabitleyin: Attach the yoke mount securely to the prepared surface using appropriate screws or bolts (not included). Ensure the fixture is stable and cannot vibrate loose. The yoke includes a bolt to lock in the aiming angle after adjustment.
- Elektrik Bağlantısı:
- The fixture comes with a 3-foot watertight STW 16 gauge cord exiting the housing via an IP66 liquid-tight connector.
- Connect the fixture's power cord to your main power supply wiring. This connection must be made by a qualified electrician and comply with all local and national electrical codes.
- Ensure all wire connections are properly insulated and protected from moisture.
- Aiming Adjustment: Loosen the bolt on the yoke mount, adjust the flood light to the desired aiming angle, and then securely tighten the bolt to lock the position.
- Gücü Geri Yükle: Kurulum tamamlandıktan ve tüm bağlantılar güvenli hale getirildikten sonra devre kesicideki gücü geri yükleyin.
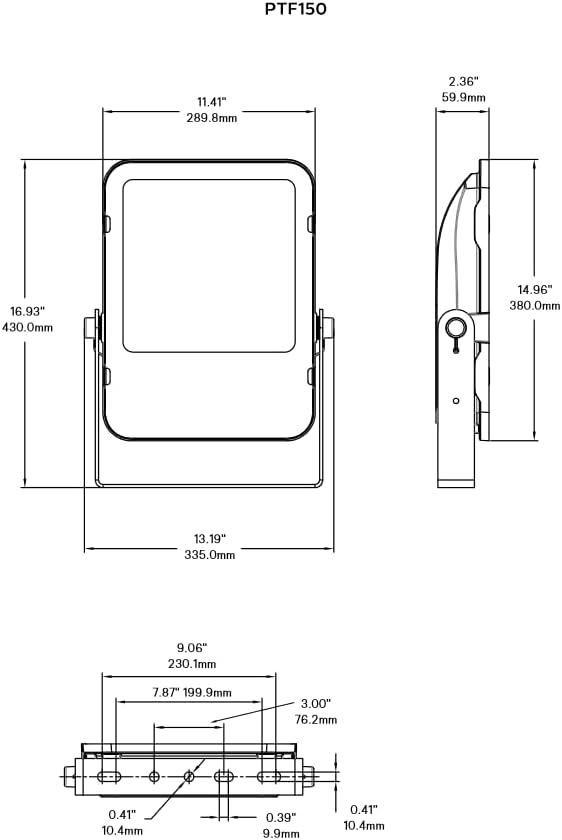
Resim 2: Philips LED Slim Flood Light Dimension Diagram. This diagram provides detailed measurements for the flood light, including height, width, depth, and mounting hole spacing, crucial for accurate installation.
6. Kullanım Talimatları
The Philips LED Slim Flood Light operates upon receiving power. There are no user-adjustable controls on the fixture itself.
- Güç Açma/Kapatma: Control the light by switching the connected power circuit on or off. This can be done via a wall switch, timer, or photocell (not included).
- Otomatik çalışma: For automated operation, connect the flood light to an external timer, motion sensor, or photocell switch (purchased separately) according to their respective installation instructions.
7. Bakım
The Philips LED Slim Flood Light is designed for minimal maintenance. Regular inspection and cleaning will ensure optimal performance and longevity.
- Temizlik: Periyodik olarak lensi ve gövdeyi yumuşak bir bezle temizleyin.amp cloth to remove dirt, dust, and debris. Do not use abrasive cleaners or solvents, as these can damage the finish or lens. Ensure power is off before cleaning.
- Denetleme: Annually inspect the fixture for any signs of damage, loose connections, or wear on the power cord. Address any issues promptly.
- Bileşen Değişimi: The LED light source is integrated and not user-replaceable. If the fixture malfunctions, contact customer support.
8. Sorun Giderme
If your Philips LED Slim Flood Light is not functioning as expected, refer to the following common issues and solutions:
| Sorun | Olası Neden | Çözüm |
|---|---|---|
| Işık açılmıyor. | Armatürde güç yok. Gevşek kablo bağlantısı. Faulty circuit breaker/fuse. | Güç kaynağını kontrol edin. Tüm kablo bağlantılarının sağlam olduğundan emin olun (yetkili bir elektrikçiye danışın). Sigortayı değiştirin veya sigortayı sıfırlayın. |
| Işık titriyor veya sönük. | Inconsistent power supply. Gevşek kablolama. Armatür hasarı. | Ensure stable power. Kablo bağlantılarını kontrol edin. Hasar şüphesi varsa, kullanımı durdurun ve destek ekibiyle iletişime geçin. |
| Water inside the fixture. | Improperly sealed connections. Damaged housing/lens. | Immediately disconnect power. Inspect and re-seal all connections, especially the IP66 connector. If housing or lens is damaged, the IP rating may be compromised; contact support. |
Sorun giderme adımları sorunu çözmezse, müşteri desteğiyle iletişime geçin.
9. Garanti ve Destek
For warranty information and technical support, please refer to the official Signify (Philips) webSite üzerinden veya müşteri hizmetleri departmanıyla iletişime geçin. Satın alma belgenizi saklayın.
Üretici: Anlamlandırmak
Model Numarası: PTF150-NW-G1-Y-FL-8-BZ
İletişim Bilgileri: Please visit the official Signify webEn güncel iletişim bilgileri ve destek kaynakları için siteyi ziyaret edin.


