1. Giriş
This manual provides detailed instructions for the installation, operation, and maintenance of your ASUS Prime B650M-A AX Micro-ATX Motherboard. Designed to support AMD Ryzen 7000 series processors, this motherboard offers robust performance, comprehensive cooling, and extensive connectivity options for daily users and PC builders.
Sisteminizin doğru şekilde kurulmasını sağlamak ve performansını ve ömrünü en üst düzeye çıkarmak için lütfen kurulum işlemine başlamadan önce bu kılavuzu dikkatlice okuyun.
2. Paket İçeriği
Aşağıda listelenen tüm parçaların anakart paketinizde mevcut olduğundan emin olun. Herhangi bir parça eksik veya hasarlıysa, satıcınızla iletişime geçin.
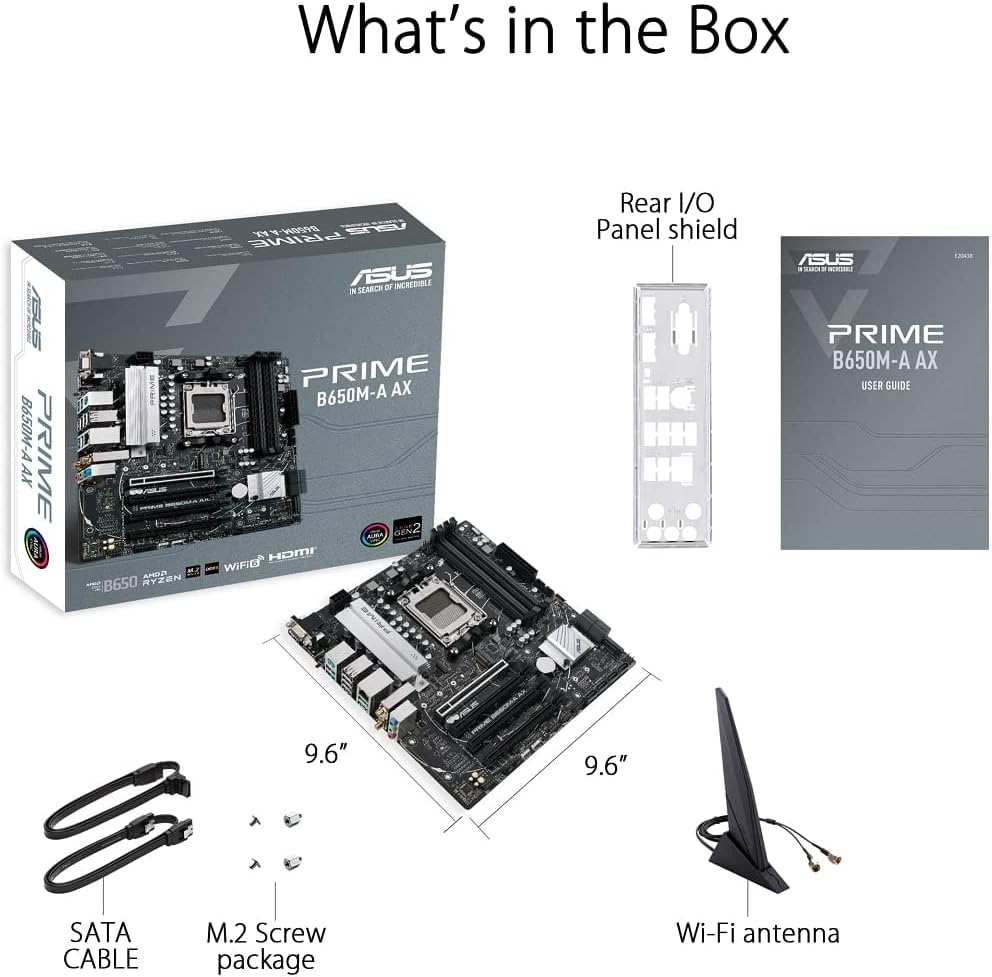
Figure 2.1: Contents of the ASUS Prime B650M-A AX Motherboard package.
- ASUS Prime B650M-A AX Motherboard
- Arka G/Ç Paneli Kalkanı
- User Guide (Printed Manual)
- SATA Cables (x2)
- M.2 Vida Paketi
- Wi-Fi Anteni
3. Ürün Bittiview ve Özellikler
The ASUS Prime B650M-A AX motherboard is designed to provide a stable and high-performance foundation for your PC build. Key features include:
3.1. Component Layout and Power Delivery

Figure 3.1: Motherboard layout highlighting power delivery and cooling components.
- AMD AM5 Soketi: AMD Ryzen 7000 Serisi Masaüstü İşlemcilere Hazır.
- Sağlam Güç Dağıtımı: Features a comprehensive VRM heatsink and thermal pads for stable power delivery to the CPU.
- Kapsamlı Soğutma: Includes VRM heatsink, PCH heatsink, hybrid fan headers, and Fan Xpert 2+ for efficient thermal management.
3.2. Bellek ve Depolama
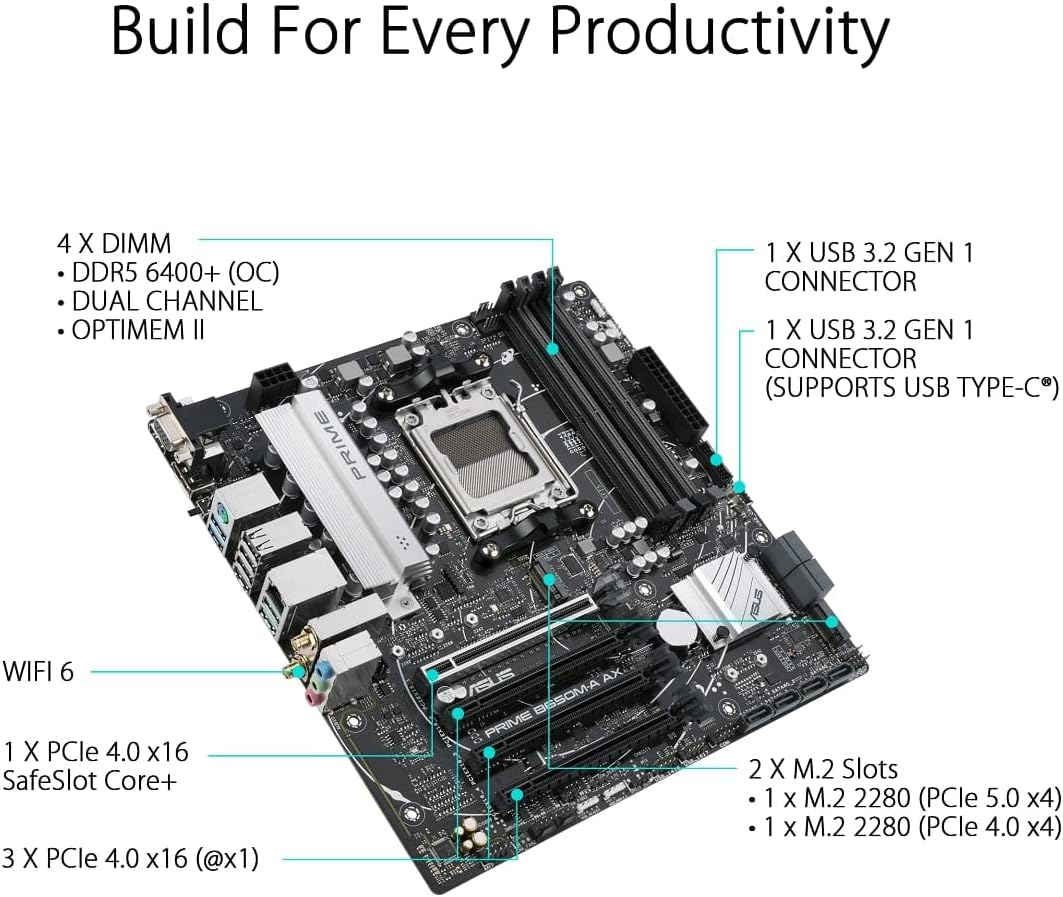
Figure 3.2: Motherboard layout highlighting memory and storage options.
- DDR5 Desteği: Four DIMM slots supporting DDR5 memory with ASUS OptiMem II for improved memory overclocking and signal integrity.
- PCIe 5.0 M.2: One PCIe 5.0 M.2 slot for ultra-fast storage, alongside another PCIe 4.0 M.2 slot.
- PCIe Genişlemesi: One PCIe 4.0 x16 SafeSlot Core+ and three PCIe 4.0 x1 slots for expansion cards.
3.3. Bağlantı

Figure 3.3: Rear I/O Panel connectivity options.
- Kablosuz 6: Integrated Wi-Fi 6 for high-speed wireless networking.
- 2.5Gb LAN: Realtek 2.5Gb Ethernet for fast wired network connections.
- USB Bağlantı Noktaları: Multiple USB 3.2 Gen 2 ports, USB 3.2 Gen 1 ports (including front USB 3.2 Gen 1 Type-C®), and USB 2.0 ports.
- Görüntü Çıkışları: DisplayPort, HDMI, and VGA for display connectivity.
- BIOS FlashBack™: Dedicated button for easy BIOS updates without a CPU or memory installed.
3.4. Personalization and Audio
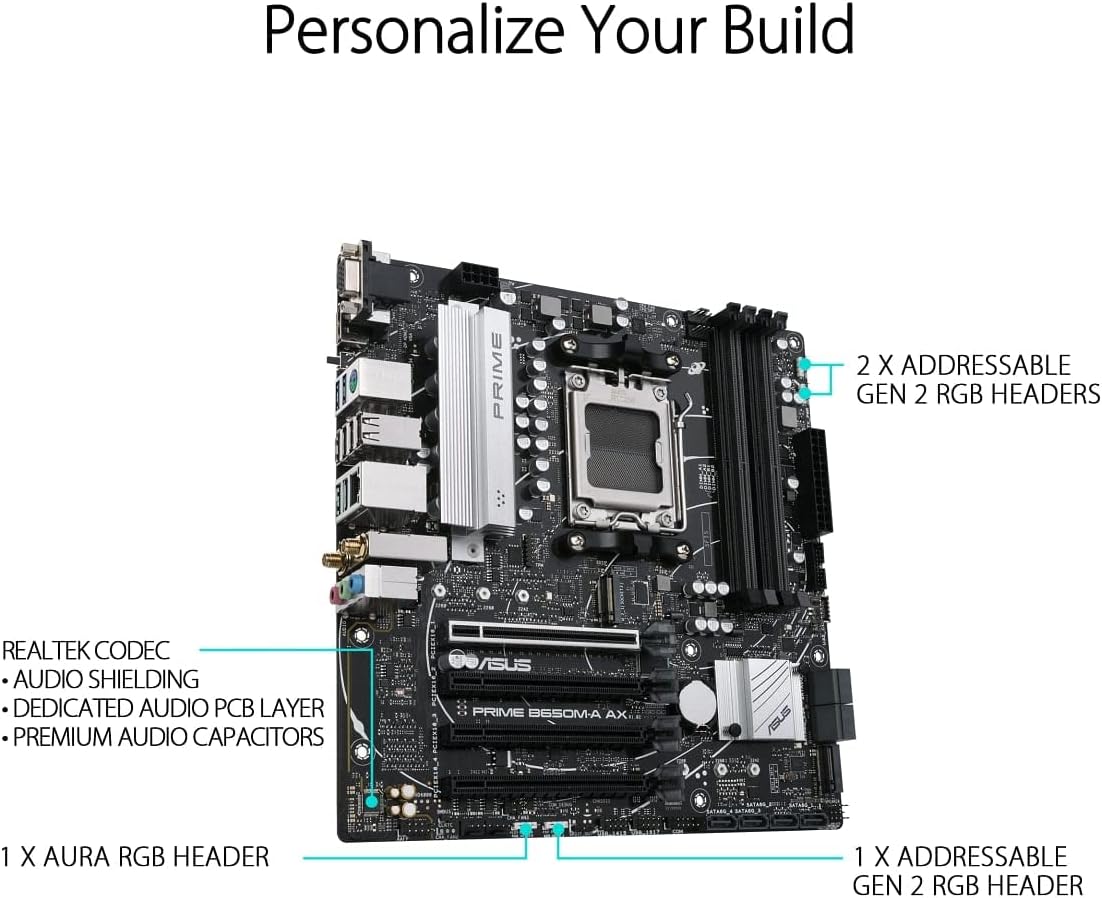
Figure 3.4: Motherboard layout highlighting audio and RGB features.
- Aura Sync RGB Aydınlatma: Onboard Addressable Gen 2 headers and an Aura RGB header for RGB LED strips, easily synced with Aura Sync-capable hardware.
- Gelişmiş Ses: Features Realtek Codec, audio shielding, a dedicated audio PCB layer, and premium audio capacitors for high-quality sound.
4. Kurulum ve Kurulum
Before you begin, ensure your system is powered off and unplugged from the wall outlet. Always handle the motherboard by its edges to prevent damage from static electricity.
- Şasiyi Hazırlayın: Install the I/O shield into your PC case. Ensure proper standoffs are installed in the chassis for the Micro-ATX form factor.
- Anakartı Takın: Carefully place the motherboard into the chassis, aligning the screw holes with the standoffs. Secure the motherboard with screws.
- CPU'yu takın: Open the CPU socket lever, align the CPU with the socket (triangle mark on CPU to triangle mark on socket), gently place the CPU, and close the lever to secure it.
- CPU Soğutucusunu Takın: Mount your CPU cooler according to its manufacturer's instructions. Ensure thermal paste is applied.
- Belleği (RAM) Takın: Open the clips on the DIMM slots. Align the memory module's notch with the slot's key. Press down firmly on both ends until the clips snap into place. For dual-channel operation, refer to your motherboard's specific manual for recommended slot configurations.
- M.2 SSD'leri takın: Insert the M.2 SSD into the M.2 slot at an angle, then gently push it down and secure it with the provided M.2 screw.
- Grafik Kartını Takın (İsteğe bağlı): Insert your graphics card into the PCIe 4.0 x16 slot (SafeSlot Core+). Ensure it clicks into place and secure it with a screw to the chassis.
- Güç Kablolarını Bağlayın: Güç kaynağınızdan gelen 24 pinli ATX güç konektörünü ve 8 pinli CPU güç konektörünü anakartınıza bağlayın.
- Ön Panel Kablolarını Bağlayın: Connect the power button, reset button, HDD LED, power LED, and front panel USB/audio cables to their respective headers on the motherboard. Refer to the motherboard manual for exact pin layouts.
- Depolama Sürücülerini Bağlayın: Connect SATA data cables from your SATA SSDs/HDDs to the SATA ports on the motherboard, and connect power cables from your power supply to the drives.
- Wi-Fi Antenini Bağlayın: Screw the included Wi-Fi antenna onto the rear I/O panel connectors.
5. Kullanım Talimatları
Tüm bileşenler kurulduktan ve bağlandıktan sonra sisteminizi açabilirsiniz.
- İlk Önyükleme: After powering on, the system will typically enter the BIOS/UEFI setup utility.
- BIOS/UEFI Kurulumu:
- Basmak SİL or F2 during POST (Power-On Self-Test) to enter the BIOS/UEFI setup.
- Configure boot order, enable XMP/EXPO for memory, and set other system parameters as needed.
- Save changes and exit BIOS to proceed with operating system installation.
- İşletim Sistemi Kurulumu: Insert your Windows or Linux installation media and follow the on-screen prompts to install your preferred operating system.
- Sürücü Kurulumu: After OS installation, install the latest drivers for your motherboard (chipset, LAN, Wi-Fi, audio, etc.) from the ASUS support websitenin optimum performans ve istikrarını sağlamak için.
6. Bakım
Düzenli bakım anakartınızın uzun ömürlü olmasını ve optimum performans göstermesini sağlar.
- Toz Giderimi: Anakart ve bileşenlerin tozunu basınçlı hava kullanarak düzenli olarak temizleyin. Temizlemeden önce sistemin kapalı ve fişinin çekilmiş olduğundan emin olun.
- BIOS Güncellemeleri: ASUS desteğini kontrol edin website for the latest BIOS updates. Updating the BIOS can improve compatibility, stability, and performance. Use the BIOS FlashBack™ feature for convenient updates.
- Sürücü Güncellemeleri: Yeni yazılım ve donanımlarla uyumluluğu garanti altına almak, performans iyileştirmelerinden ve hata düzeltmelerinden yararlanmak için anakart sürücülerinizi güncel tutun.
- Fiziksel Muayene: Anakartınızda gevşek bağlantılar, hasarlı bileşenler veya aşırı ısınma belirtileri olup olmadığını ara sıra kontrol edin.
7. Sorun Giderme
Bu bölümde karşılaşabileceğiniz yaygın sorunlar ele alınmaktadır.
| Sorun | Olası Neden | Çözüm |
|---|---|---|
| Sistem açılmıyor. | Gevşek güç kabloları, arızalı güç kaynağı, yanlış ön panel bağlantıları. | Check 24-pin ATX and 8-pin CPU power connections. Verify front panel power switch connection. Test power supply. |
| Monitörde görüntü yok. | Incorrect video cable connection, faulty graphics card/integrated graphics, loose RAM. | Ensure monitor cable is securely connected to the correct port. Reseat graphics card and RAM modules. Test with integrated graphics if available. |
| Sistem beklenmedik şekilde yeniden başlatılıyor. | Aşırı ısınma, kararsız güç, arızalı RAM, sürücü sorunları. | Check CPU/GPU temperatures. Ensure adequate cooling. Test RAM with diagnostic tools. Update drivers. |
| Wi-Fi/LAN çalışmıyor. | Missing drivers, antenna not connected (Wi-Fi), loose Ethernet cable (LAN). | Install/update Wi-Fi and LAN drivers from ASUS website. Ensure Wi-Fi antenna is securely attached. Check Ethernet cable connection. |
For more detailed troubleshooting, refer to the comprehensive user manual available on the ASUS support websiteye bakın veya danışın Kullanım Kılavuzu (PDF).
8. Özellikler
Below are the key technical specifications for the ASUS Prime B650M-A AX Motherboard:
| Özellik | Detay |
|---|---|
| Marka | ASUS |
| Model Adı | PRIME B650M-A BALTA |
| CPU Soketi | Soket AM5 |
| Uyumlu İşlemciler | AMD Ryzen 7000 serisi |
| Yonga Seti Türü | AMD B650 |
| RAM Bellek Teknolojisi | DDR5 |
| Bellek Hızı | 6400 MHz'e kadar (OC) |
| Bellek Depolama Kapasitesi (Maksimum) | 128 GB |
| Kablosuz Tip | 802.11ax (Wi-Fi 6) |
| Yerel Ağ | Realtek 2.5Gb Ethernet |
| Ürün Boyutları | 10.8 x 10.9 x 2.7 inç |
| Ürün Ağırlığı | 2.9 pound |
| Cilttage | 12 Volt |
| İlk Mevcut Tarih | 12 Ekim 2022 |
9. Garanti ve Destek
ASUS provides a limited warranty for its products. For specific warranty terms and conditions, please refer to the warranty card included with your product or visit the official ASUS support webalan.
Teknik destek, sürücü indirmeleri, BIOS güncellemeleri ve daha fazla belge için lütfen resmi ASUS destek sayfasını ziyaret edin webSiteye göz atabilirsiniz. Ayrıca kapsamlı bilgilere de ulaşabilirsiniz. Kullanım Kılavuzu (PDF) Detaylı bilgi için.
ASUS Desteği Webalan: https://www.asus.com/support/


