1. Giriş
This manual provides detailed instructions for the installation, operation, and maintenance of your GAMEMAX Master M905 ATX Full Tower Computer Case. Please read this manual thoroughly before beginning assembly to ensure proper setup and safe usage. This computer case is designed to accommodate ATX motherboards and offers ample space for high-performance components and advanced cooling solutions.
2. Güvenlik Bilgileri
- Always disconnect the power supply from the wall outlet before installing or removing any components to prevent electrical shock.
- Handle internal components with care. Avoid touching circuit boards directly; hold them by their edges.
- Wear an anti-static wrist strap when handling sensitive electronic components to prevent electrostatic discharge (ESD) damage.
- Küçük parçaları ve vidaları çocuklardan uzak tutun.
- Ensure proper ventilation around the computer case to prevent overheating.
3. Paket İçeriği
Aşağıda listelenen tüm öğelerin paketinizde mevcut olduğundan emin olun:
- GAMEMAX Master M905 ATX Full Tower Computer Case
- Accessory Box (containing screws, standoffs, cable ties, and user manual)
- Pre-installed cooling fans (quantity may vary by model variant)
4. Bileşen Tanımlaması
Familiarize yourself with the various parts of the GAMEMAX Master M905 case.

Şekil 4.1: Sol ön view of the GAMEMAX Master M905 case, showcasing the tempered glass side panel and the front mesh panel with two illuminated blue fans. The top panel features front I/O ports.

Şekil 4.2: Top-front perspective of the case, showing the top ventilation grille and the front I/O panel which includes USB 2.0 and USB 3.0 ports, audio jacks, and power/reset buttons.
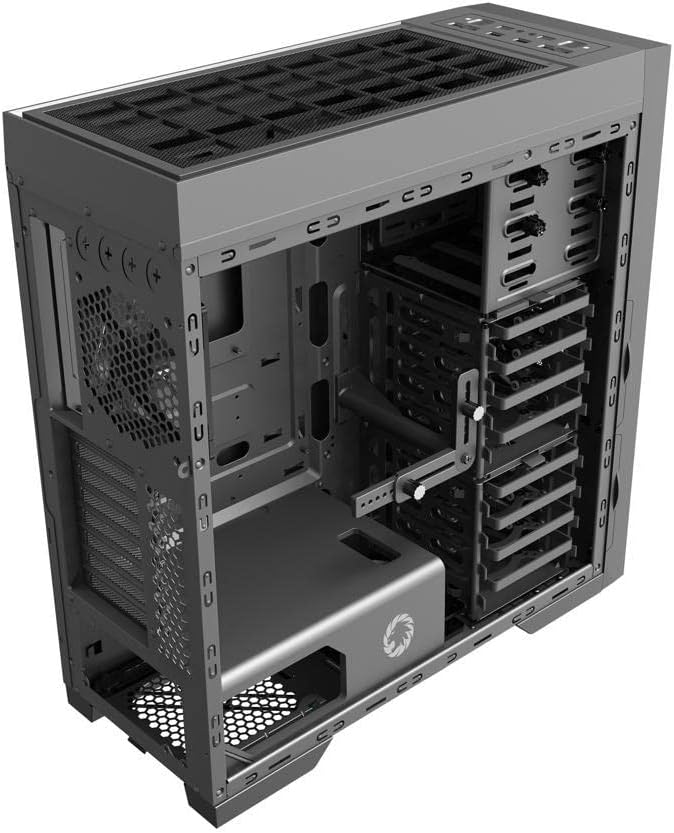
Şekil 4.3: Dahili view of the case, illustrating the spacious interior with multiple drive bays, the motherboard mounting area, and the dedicated power supply shroud at the bottom.
5. Kurulum Kılavuzu
5.1. Davayı Hazırlama
- Yan Panelleri Çıkarın: Locate the thumbscrews on the rear of the case. Unscrew them and carefully slide off the tempered glass side panel and the solid steel side panel. Set them aside on a soft, non-abrasive surface.
- Aksesuar Kutusu: Locate the accessory box inside the case, usually secured in a drive bay. This box contains all necessary screws, standoffs, and cable ties for installation.
5.2. Anakart Kurulumu
- Ara Parçaları Takın: Identify the correct standoff locations for your ATX motherboard. The Master M905 typically has pre-installed standoffs for ATX. If not, install them using the provided tool.
- G/Ç Kalkanını yükleyin: Snap your motherboard's I/O shield into the opening at the rear of the case from the inside. Ensure it is securely seated.
- Anakartı Monte Et: Carefully align your motherboard with the standoffs and the I/O shield. Gently lower the motherboard into place.
- Güvenli Anakart: Use the provided motherboard screws to secure the motherboard to the standoffs. Do not overtighten.
5.3. Güç Kaynağı Ünitesi (PSU) Kurulumu
- Pozisyon PSU: The Master M905 supports bottom-mounted PSUs. Slide your PSU into the designated compartment at the bottom rear of the case, ensuring the fan faces downwards (if the case has a bottom vent) or upwards.
- Güvenli Güç Kaynağı: Align the PSU with the screw holes at the rear of the case. Secure it with the provided PSU screws.
5.4. Depolama Sürücüsü Kurulumu (HDD/SSD)
The case supports various drive configurations. Refer to the internal layout for specific bay types.
- 3.5" HDD'ler: Typically installed in tool-less drive cages or trays. Slide the HDD into a tray and secure it with clips or screws.
- 2.5" SSD'ler: Can be mounted on dedicated SSD brackets behind the motherboard tray or in 3.5" drive trays using adapter screws.
5.5. Genişletme Kartı Kurulumu (PCIe)
- Yuva Kapaklarını Çıkarın: Unscrew or remove the necessary PCIe slot covers from the rear of the case corresponding to your motherboard's PCIe slots.
- Kartı Yükle: Carefully insert your expansion card (e.g., graphics card) into the appropriate PCIe slot on the motherboard until it clicks into place.
- Güvenli Kart: Secure the expansion card to the case with the provided screws.
5.6. Ön Panel Bağlantı Noktasının Takılması
Connect the front panel cables from the case to the corresponding headers on your motherboard. Consult your motherboard manual for exact header locations.
- USB2.0/3.0: USB kablolarını anakartın USB bağlantı noktalarına bağlayın.
- Ses: HD ses kablosunu anakartın ses girişine bağlayın.
- Güç/Sıfırlama/LED'ler: Connect the small individual cables (Power SW, Reset SW, HDD LED, Power LED) to the front panel header pins on your motherboard. Pay close attention to polarity for LEDs.
5.7. Kablo Yönetimi
Anakart tepsisinin arkasındaki kablo yönlendirme oyuklarını ve sabitleme noktalarını kullanarak kabloları düzenleyin. Bu, hava akışını iyileştirir ve estetiği artırır.
6. Operasyon
6.1. Açma
Once all components are installed and cables are connected, replace the side panels. Connect your monitor, keyboard, mouse, and power cable to the PSU. Press the power button on the front panel to start your system.
6.2. Ön G/Ç Bağlantı Noktaları
Ön panel aşağıdakilere kolay erişim sağlar:
- USB 2.0 Bağlantı Noktaları: For connecting peripherals like keyboards, mice, and older USB devices.
- USB 3.0 Bağlantı Noktaları: Uyumlu cihazlarla yüksek hızlı veri aktarımı için.
- Ses Jakları: Kulaklık ve mikrofon bağlamak için.
- Güç Düğmesi: Sistemi açmak/kapatmak için.
- Sıfırlama Düğmesi: Sistemi yeniden başlatmak için.
7. Bakım
7.1. Temizlik
Regular cleaning helps maintain optimal performance and extends the lifespan of your components.
- Dış: Dış yüzeyleri yumuşak, damp bez. Sert kimyasallardan kaçının.
- İç mekan: Use compressed air to remove dust from fans, heatsinks, and other components. Perform this outdoors or in a well-ventilated area.
7.2. Dust Filter Maintenance
The Master M905 case is equipped with dust filters to prevent dust buildup. Regularly clean these filters:
- Locate and remove the dust filters (e.g., front, top, bottom PSU intake).
- Rinse them under running water or use a soft brush to remove accumulated dust.
- Filtreleri yeniden takmadan önce tamamen kuruduklarından emin olun.
8. Sorun Giderme
Sorunlarla karşılaşırsanız aşağıdaki temel sorun giderme adımlarını göz önünde bulundurun:
- Sistem açılmıyor: Check all power connections, including the PSU to the wall, the 24-pin ATX connector, and the 8-pin CPU power connector to the motherboard. Ensure the front panel power switch cable is correctly connected to the motherboard.
- Dönmeyen fanlar: Verify that all fan cables are securely connected to the motherboard fan headers or a fan controller.
- USB bağlantı noktaları çalışmıyor: Ensure the front panel USB cables are correctly connected to the motherboard's USB headers.
- Görüntü çıkışı yok: Confirm that your graphics card is properly seated in its PCIe slot and that all necessary power cables are connected to it. Ensure your monitor cable is connected to the graphics card, not the motherboard's integrated graphics ports (unless you are using integrated graphics).
9. Özellikler
| Özellik | Şartname |
|---|---|
| Marka | OYUNMAKS |
| Örnek | Usta M905 |
| Dava Türü | Tam kule |
| Anakart Uyumluluğu | ATX |
| Malzeme | Çelik, Temperli Cam |
| Renk | Siyah |
| Ürün Boyutları (UxGxY) | 23.5 x 22.95 x 11.26 inç |
| Ön G / Ç Bağlantı Noktaları | 2 adet USB 2.0, 2 adet USB 3.0, Ses Girişi/Çıkışı |
| Genişleme Yuvaları | 8 |
| Soğutma Yöntemi | Hava, Su |
| Güç Kaynağı Montaj Tipi | Tower (Bottom-mounted) |
10. Garanti ve Destek
Garanti bilgileri ve teknik destek için lütfen resmi GAMEMAX web sitesine başvurun. webSatın alma belgenizi saklayın veya yerel perakendecinizle iletişime geçin. Garanti talepleriniz için satın alma belgenizi saklayın.


