1. Giriş
Thank you for choosing the FLYLINKTECH CF500 Jump Starter. This device is designed to safely and efficiently jump-start 12V vehicles, charge your electronic devices, and provide illumination. Please read this manual thoroughly before use to ensure proper operation and safety.

Image: The FLYLINKTECH CF500 Jump Starter unit with its attached smart jump cables, illustrating its capability to start various vehicle types including SUVs, trucks, cars, motorcycles, and boats.
2. Ürün Özellikleri
- Güçlü Akü Takviye Cihazı: 1500A peak current for starting 12V vehicles (up to 8L Gas or 6L Diesel engines). Capable of up to 40 jumps on a single charge.
- Yüksek Kapasiteli Power Bank: 18000mAh pil kapasitesi.
- 10W Kablosuz Şarj: Conveniently charge compatible smartphones.
- USB Fast Charging 3.0: Two USB output ports (USB1: 5V/3A, 9V/2A, 12V/1.5A; USB2: 5V/2.4A) and one USB-C input (5V/2A).
- 12VDC Çıkışı: EC-5 cigarette lighter adapter for powering 12V automotive devices like vacuum cleaners, air compressors, or car refrigerators.
- Entegre Aydınlatma: Features a round light with 3 modes (illumination, SOS, strobe) and a 180-degree rotatable strip light with a magnetic base for hands-free use.
- Çoklu Koruma Sistemleri: Aşırı gerilim içerirtage, short circuit, overheating, over-current, overcharge, reverse polarity, spark-proof, and overload protection. IP67 waterproof rating.
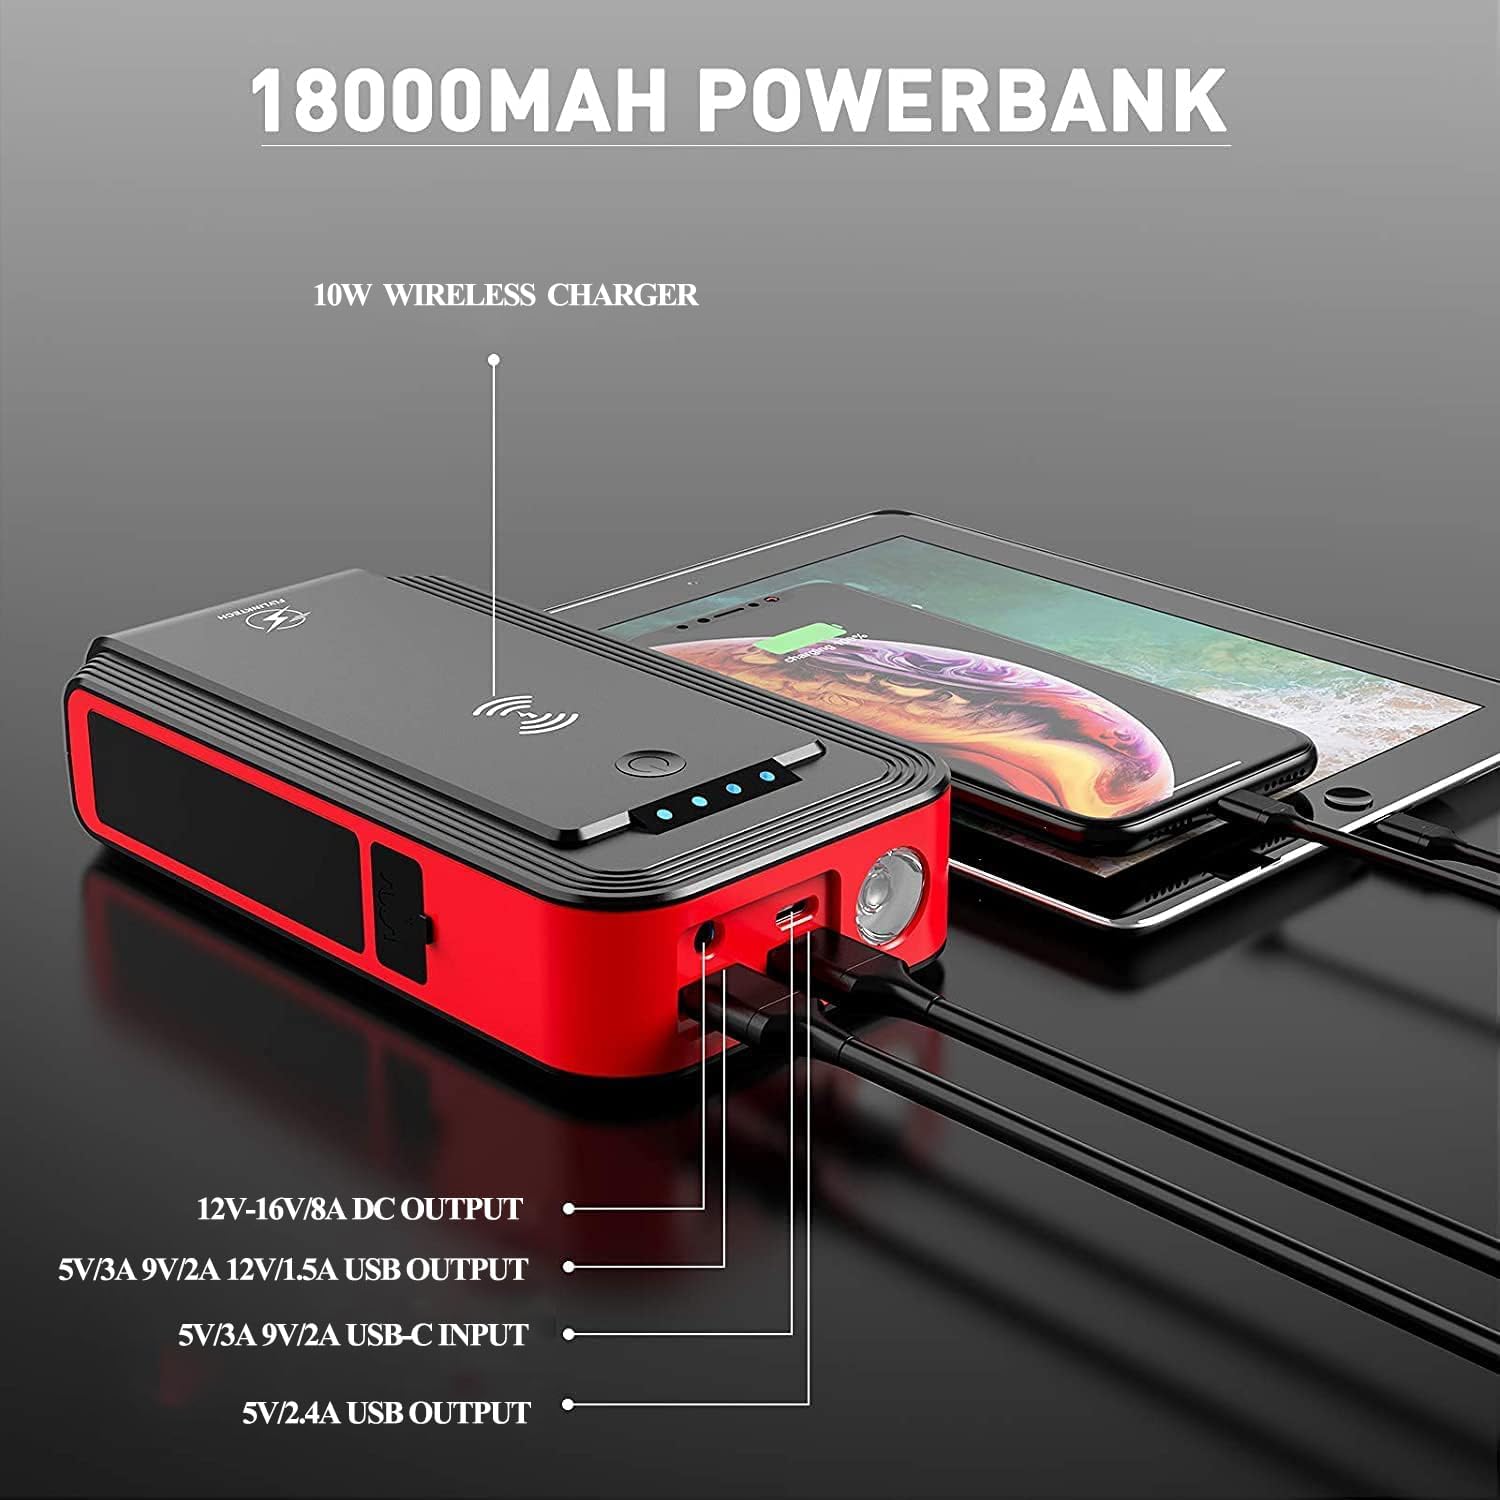
Image: The jump starter unit highlighting its 18000mAh power bank capabilities, with labels for 10W wireless charger, 12V-16V/8A DC output, USB outputs, and USB-C input ports.
3. Kutuda Neler Var?
Paketi açtığınızda lütfen aşağıdaki tüm öğelerin mevcut olduğundan emin olun:
- 1 x FLYLINKTECH CF500 Jump Starter Unit
- 1 x Akıllı Takviye Kablosu (Klimalı)amps
- 1 x USB-C Kablosu
- 1 x USB to 3-in-1 Port Cable
- 1 x EC-5 Cigarette Lighter Adapter
- 1 x Kullanım Kılavuzu (bu belge)
- 1 Depolama Kılıfı x
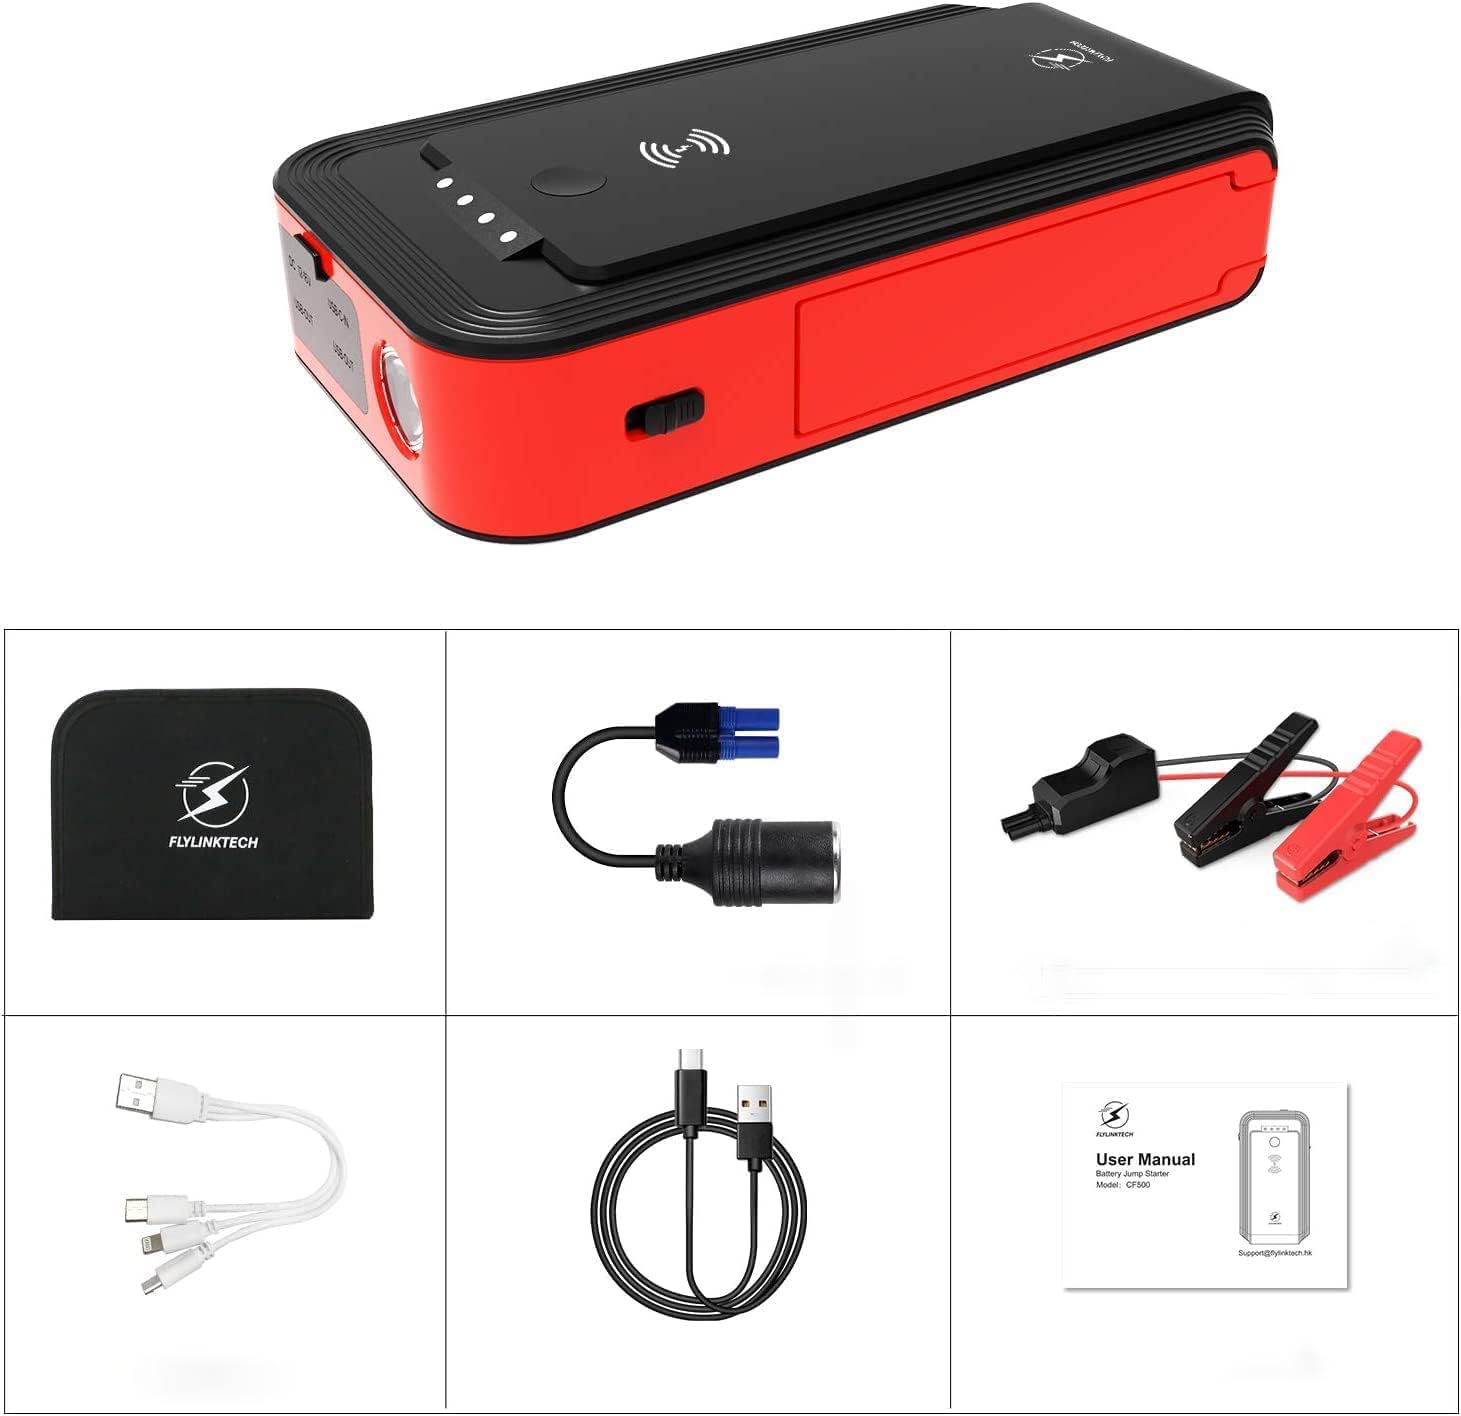
Image: A layout of all included accessories: the jump starter unit, smart jump cables, USB-C cable, multi-port USB cable, cigarette lighter adapter, user manual, and storage case.
4. Kurulum ve Şarj
4.1 İlk Ücretlendirme
Before first use, fully charge the jump starter. Connect the provided USB-C cable to the USB-C input port on the jump starter and to a suitable USB power adapter (not included). The LED indicator lights will show the charging progress. All four lights will be solid when fully charged.

Image: Close-up of the jump starter's LED indicator lights, showing different levels of charge (25%, 50%, 75%, 100%).
4.2 Pil Seviyesini Kontrol Etme
Press the power button briefly to check the current battery level indicated by the LED lights. Each light represents approximately 25% of the battery capacity.
5. Kullanım Talimatları
5.1 Aracın Takviyeyle Çalıştırılması
- Ensure the jump starter is at least 75% charged (three LED lights illuminated).
- Connect the smart jump cable to the jump starter's EC-5 port. Ensure a secure connection.
- Kırmızı (+) cl'yi takınamp Araç aküsünün pozitif (+) terminaline.
- Siyah (-) cl'yi takınamp aracın aküsünün negatif (-) terminaline.
- Bir kez clamps are correctly connected, the indicator on the smart cable will show a solid green light, indicating it's ready to jump. If it shows a red light or flashes, refer to the troubleshooting section.
- Aracınızın motorunu çalıştırın.
- Once the engine starts, immediately remove the smart jump cable from the vehicle battery terminals, then disconnect it from the jump starter.

Image: A visual guide showing the four steps for jump starting a vehicle: 1. Insert the smart cable into the jump starter. 2. Connect clamps to the car battery. 3. Start the engine. 4. Remove the clamps.
5.2 Elektronik Cihazların Şarj Edilmesi
The jump starter can act as a power bank for your electronic devices.
- Kablosuz Şarj: Place your Qi-compatible device on the wireless charging pad located on top of the jump starter. Ensure the device is centered for optimal charging.
- USB Şarj: Connect your device's USB charging cable to one of the USB output ports (USB1 or USB2) on the jump starter.
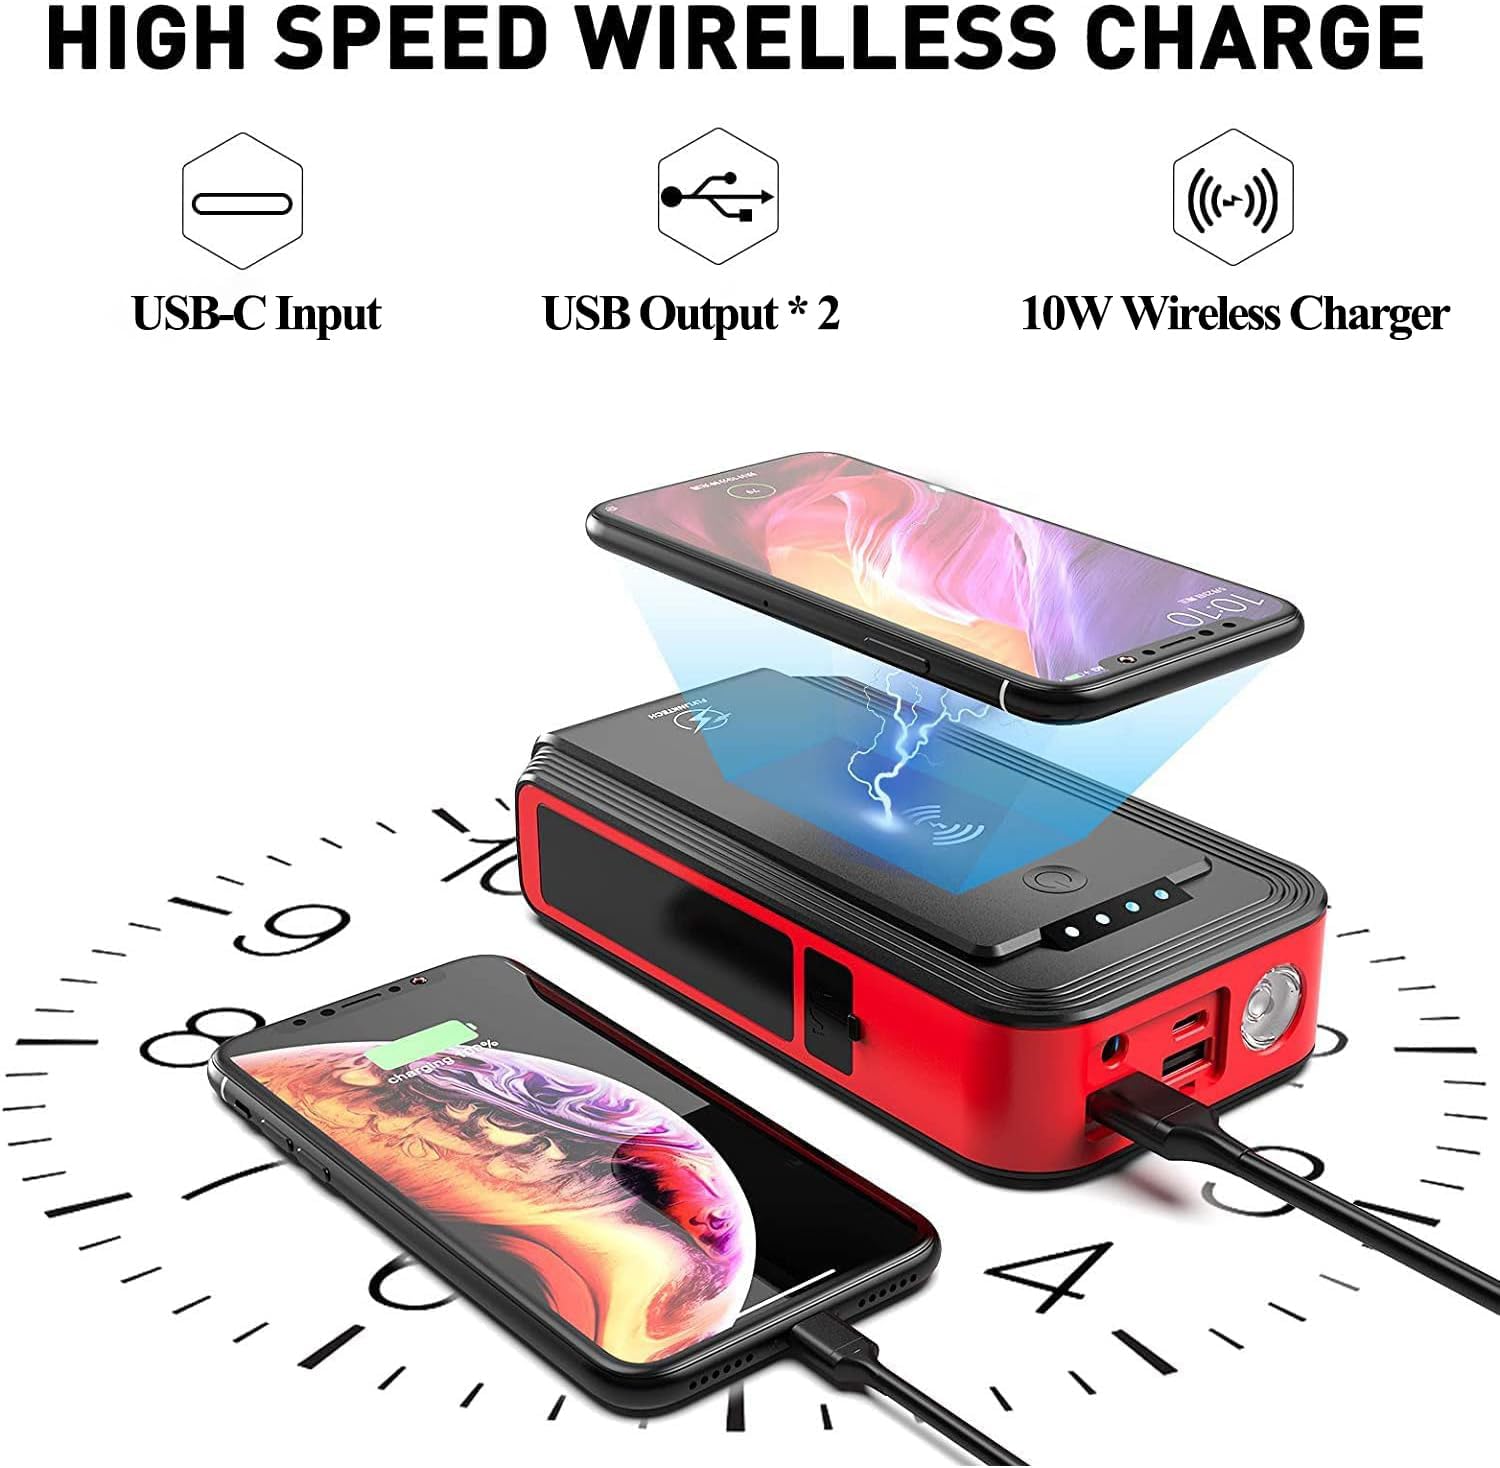
Image: The jump starter unit demonstrating its wireless charging capability for a smartphone and wired USB charging for another device, highlighting its power bank functionality.
5.3 LED Işıkların Kullanımı
The jump starter features two types of lights:
- Round Light: Press and hold the power button for 3 seconds to turn on the round light. Short press to cycle through modes: illumination (steady light), SOS (flashing Morse code), and strobe (rapid flashing). Press and hold again to turn off.
- Rotatable Strip Light: This light can be rotated 180 degrees and has a magnetic base for attaching to metallic surfaces, such as a car hood, for hands-free lighting. The strip light has adjustable brightness.

Image: The jump starter unit highlighting its three LED light modes: Strobe, SOS, and standard LED illumination.

Image: A person using the jump starter's rotatable strip light, which is magnetically attached to the underside of a car hood, providing illumination for car repairs.
5.4 12V Otomotiv Cihazlarının Çalıştırılması
Use the provided EC-5 cigarette lighter adapter to power 12V automotive accessories.
- Plug the EC-5 end of the adapter into the jump starter's EC-5 port.
- Plug your 12V device into the cigarette lighter socket of the adapter.
- Ensure the device's power consumption does not exceed the jump starter's output limits (12V-16V/8A).
6. Güvenlik Önlemleri
Always observe the following safety guidelines when using the jump starter:
- Do not attempt to jump-start a vehicle if the jump starter's battery level is below 75%.
- Kabloları bağlarken doğru kutuplara dikkat edin.amps (red to positive, black to negative). Incorrect connection can cause damage to the device, vehicle, or personal injury.
- kırmızı ve siyah cl dokunmayınampBirlikte.
- Do not expose the product to extreme temperatures (above 60°C/140°F or below -20°C/-4°F).
- Do not immerse the product in water, despite its IP67 rating, to prevent damage.
- Çocukların erişemeyeceği yerde saklayınız.
- If the jump starter becomes excessively hot during use, disconnect it immediately and allow it to cool down.
- Üniteyi sökmeye veya üzerinde değişiklik yapmaya çalışmayın.
- Motor çalıştıktan sonra 30 saniye içinde takviye aküsünü araç aküsünden çıkarın.

Image: Diagram illustrating the eight upgraded protection features of the jump starter: short circuit, reverse polarity, spark-proof, high-temperature, over-current, overcharge, over-voltage ve aşırı yük koruması.
7. Bakım
- Store the jump starter in its protective case in a cool, dry place when not in use.
- Recharge the unit every 3-6 months, even if not used, to maintain battery health and extend its lifespan.
- Dış yüzeyi yumuşak, damp bez. Sert kimyasallar veya aşındırıcı temizleyiciler kullanmayın.
- Bağlantı noktalarını toz ve kirden uzak tutun.

Image: The jump starter unit with a switch indicating "OFF" and "ON", emphasizing its long standby time of up to 12 months when fully charged.
8. Sorun Giderme
| Sorun | Olası Neden | Çözüm |
|---|---|---|
| Araç çalışmıyor. | Jump starter battery too low; incorrect clamp Bağlantı; araç aküsü tamamen boşalmış. | Ensure jump starter is at least 75% charged. Check clamp connections for correct polarity and secure contact. If vehicle battery is completely dead, it may require more time or professional assistance. |
| Smart cable indicator shows red light or flashes. | Reverse polarity connection; short circuit; over-current; over-temperature. | CL'nin bağlantısını kesamps and re-connect with correct polarity. Ensure clamps are not touching each other. Allow unit to cool down if it's hot. |
| Akü takviye cihazı şarj etmiyor. | Faulty USB-C cable or power adapter; loose connection. | Check all connections. Try a different USB-C cable or power adapter. |
| Kablosuz şarj çalışmıyor. | Device not Qi-compatible; device not properly aligned; phone case too thick. | Ensure your device supports Qi wireless charging. Re-position the device on the charging pad. Remove thick phone cases. |
| LED ışıklar çalışmıyor. | Battery too low; malfunction. | Charge the jump starter. If problem persists after charging, contact customer support. |
9. Özellikler
| Marka | UÇAK BAĞLANTI TEKNOLOJİSİ |
| Model Numarası | CF500 |
| Tepe Akımı | 1500 Amps |
| Pil Kapasitesi | 18000mAh |
| Kablosuz Şarj Çıkışı | 10W |
| USB1 Çıkışı | 5V/3A, 9V/2A, 12V/1.5A (Fast Charge 3.0) |
| USB2 Çıkışı | 5V/2.4A |
| USB-C Girişi | 5V/2A |
| DC Output (EC-5) | 12V-16V / 8A |
| Ürün Boyutları | 3.74"D x 6.89"G x 1.5"Y |
| Ürün Ağırlığı | 2.53 pound |
| Pil Türü | Lityum İyon |
| Çalışma Sıcaklığı | -20°C ila 60°C (-4°F ila 140°F) |
| Su Geçirmezlik Derecesi | IP67 |
| Sertifikalar | CE |
10. Garanti ve Destek
FLYLINKTECH provides comprehensive support for your product:
- Garanti: This product comes with a 24-month global warranty.
- Teknik Destek: 12 months of technical support is available.
- Müşteri Hizmetleri: After-sales customer service is available anytime.
For assistance, please contact FLYLINKTECH customer service through the retailer where you purchased the product or visit the official FLYLINKTECH webiletişim bilgileri için site.

Image: Graphic indicating 24-hour quick reply, 24-month global warranty, and lifetime after-sale service & technical support.


