1. Giriş
Thank you for choosing the Prechen 19.5-inch 1600x900 LED Monitor. This monitor is designed to provide a high-quality visual experience for various applications, including office work, multimedia, and gaming. Featuring a 1600x900 resolution TN panel, 60Hz refresh rate, and built-in speakers, it offers a versatile display solution. This manual provides detailed instructions for setup, operation, maintenance, and troubleshooting to ensure optimal performance and longevity of your device.

Şekil 1: Ön view of the Prechen 19.5-inch LED Monitor.
2. Önemli Güvenlik Bilgileri
Please read all safety warnings and instructions carefully before using this monitor to prevent damage or injury.
- Yangın veya elektrik çarpmasını önlemek için monitörü yağmur veya neme maruz bırakmayın.
- Monitörü açmayınasing. İçeride kullanıcı tarafından onarılabilecek hiçbir parça bulunmamaktadır. Tüm bakım ve onarım işlemlerini yetkili servis personeline yaptırın.
- Düşmesini önlemek için monitörü sabit ve düz bir yüzeye yerleştirin.
- Monitörün etrafında yeterli havalandırma olduğundan emin olun. Havalandırma açıklıklarını kapatmayın.
- Yalnızca monitörle birlikte verilen güç adaptörünü kullanın.
- Monitör uzun süre kullanılmayacaksa elektrik fişini prizden çekin.
- Avoid placing the monitor near heat sources such as radiators, heat registers, stoves, or other products (including amp(ısı üreten)
3. Paket İçeriği
Lütfen paket içeriğini kontrol ederek tüm ürünlerin eksiksiz ve hasarsız olduğundan emin olun:
- Prechen 19.5-inch LED Monitor
- Güç Adaptörü
- HDMI Kablosu
- Kullanıcı Kılavuzu

Figure 2: Included accessories: Monitor, Power Adapter, HDMI Cable, and User Manual.
4. Kurulum Kılavuzu
4.1 Standın Montajı
- Monitör ve stand bileşenlerini ambalajından dikkatlice çıkarın.
- Stand tabanını, birlikte verilen vidayı (varsa) kullanarak stand boynuna takın.
- Align the assembled stand with the mounting slot on the back of the monitor and gently push until it clicks into place or secure with screws as per the stand design.
4.2 Monitörü Bağlama
The monitor supports both HDMI and VGA connections.
- Güç Bağlantısı: Connect the power adapter to the monitor's DC IN port, then plug the adapter into a power outlet.
- Video Bağlantısı (HDMI): Connect one end of the HDMI cable to the HDMI port on your computer or device, and the other end to the HDMI port on the monitor.
- Video Bağlantısı (VGA): Connect one end of the VGA cable to the VGA port on your computer or device, and the other end to the VGA port on the monitor.
- Ses Bağlantısı: If using a VGA connection and external speakers, connect an audio cable from your computer's audio output to the monitor's audio input port. The built-in speakers will function automatically with HDMI.

Figure 3: Monitor back panel with input ports and control buttons.

Figure 4: Multiple connection options for the monitor.
5. Kullanım Talimatları
5.1 Açma/Kapatma
Monitörü açmak veya kapatmak için monitörün arkasında bulunan güç düğmesine basın. Monitör açık olduğunda güç gösterge ışığı yanacaktır.
5.2 OSD Menüsünü Kullanma
The On-Screen Display (OSD) menu allows you to adjust various monitor settings. The control buttons are located on the back of the monitor (refer to Figure 3).
- MENÜ: OSD menüsünü açmak için basın.
- UP/DOWN (Volume Up/Down): Use to navigate through menu options or adjust values.
- ENTER (Switch): Seçimi onaylamak veya alt menüye girmek için basın.
- EXIT (Return): Press to exit the current menu or return to the previous level.
5.3 Ekran Ayarlarını Düzenleme
Navigate the OSD menu to adjust settings such as:
- Parlaklık/Kontrast: Ekranın genel parlaklığını ve kontrastını ayarlayın.
- Renk ayarları: Renk sıcaklığını, RGB seviyelerini değiştirin veya önceden ayarlanmış renk modlarından birini seçin.
- Giriş Seçimi: HDMI ve VGA giriş kaynakları arasında manuel olarak geçiş yapın.
- En Boy Oranı: Choose between 16:9 (widescreen) or 4:3 (standard) display modes.
- Keskinlik: Adjust the clarity of the image.
5.4 Ses Ayarları
The monitor features two built-in speakers. You can adjust the volume using the OSD menu or the dedicated volume buttons on the back of the monitor.
6. Bakım ve Özen
Doğru bakım ve onarım, monitörünüzün ömrünü uzatacaktır.
- Ekranın Temizlenmesi: Ekranı yumuşak, tiftiksiz bir bezle nazikçe silin. İnatçı lekeler için,ampen the cloth slightly with water or a non-ammonia, non-alcohol based screen cleaner. Never spray cleaner directly onto the screen.
- C'yi Temizlemeasing: Monitörü silmek için yumuşak, kuru bir bez kullanın.asing. Aşındırıcı temizleyiciler veya çözücüler kullanmaktan kaçının.
- Depolamak: Monitörü uzun süre saklayacaksanız, güç kaynağından ayırın ve serin, kuru bir yerde, tercihen orijinal ambalajında saklayın.
7. Sorun Giderme
If you encounter problems with your monitor, please refer to the following table for common issues and solutions.
| Sorun | Olası Neden | Çözüm |
|---|---|---|
| Güç yok | Güç kablosu bağlı değil; Elektrik prizi arızalı; Monitör kapalı. | Ensure power cable is securely connected. Try a different power outlet. Press the power button on the monitor. |
| Sinyal yok | Video kablosu bağlı değil; Yanlış giriş kaynağı seçildi; Bilgisayar sinyal çıkışı vermiyor. | Check HDMI/VGA cable connection. Select the correct input source via the OSD menu. Ensure your computer is on and outputting video. |
| Dahili hoparlörlerden ses gelmiyor | Volume too low/muted; Incorrect audio output selected on PC; Audio cable not connected (for VGA). | Increase monitor volume. Check PC audio settings to ensure monitor is selected as output. For VGA, ensure audio cable is connected. |
| Görüntü bulanık veya bozuk | Hatalı çözünürlük; Kablo sorunu. | Set your computer's display resolution to 1600x900. Try a different video cable. |
8. Ürün Özellikleri
| Özellik | Şartname |
|---|---|
| Marka | Öngörü |
| Ekran Boyutu | 19.5 inç |
| Görüntü Türü | NEDEN OLMUŞ |
| Maksimum Ekran Çözünürlüğü | 1600x900 |
| Yenileme Hızı | 60 Hz |
| Tepki Süresi | 5 Milisaniye |
| En Boy Oranı | 16:9 |
| Bağlantı Teknolojisi | HDMI, VGA |
| Özel Özellikler | Dahili Hoparlörler |
| VESA Montaj Uyumluluğu | 100x100 mm |
9. VESA Montajı
The Prechen monitor supports VESA standard mounting (100 x 100 mm), allowing you to mount it on a wall or an articulating arm for flexible viewing options. This feature makes the monitor lightweight and easy to install in various setups.
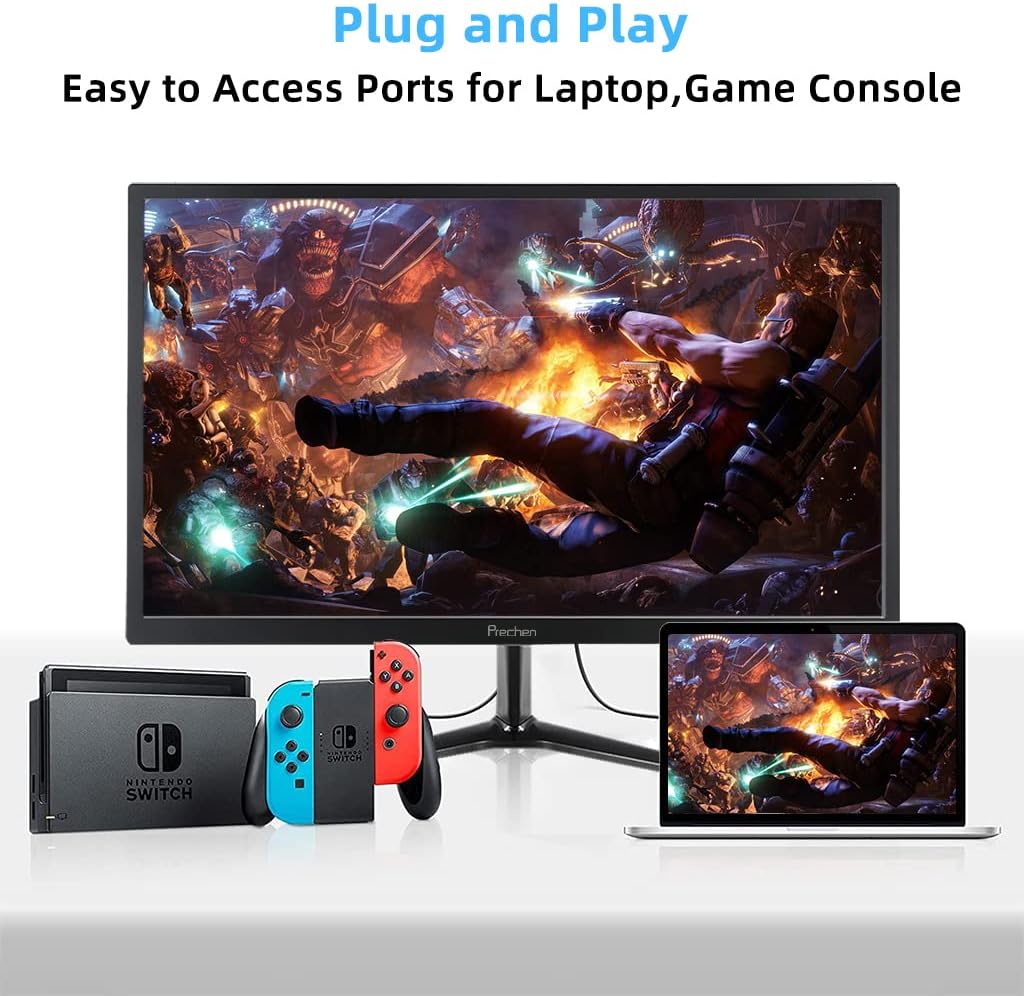
Figure 5: VESA mount dimensions on the monitor back.

Şekil 6: Ör.ample of VESA mounting with an articulating arm.
10. Garanti ve Destek
Each Prechen product is covered by a one-year warranty from the date of purchase, which includes a one-month refund and exchange policy. This warranty covers manufacturing defects and issues arising from normal use.
For any questions, technical support, or warranty claims, please contact Prechen customer service. Please have your product model and purchase information ready when contacting support.
Contact information for customer service can typically be found on the product packaging or the official Prechen webalan.


