1. Giriş
Satın aldığınız için teşekkür ederizasing the DOOMAY Digital Alarm Clock. This compact and versatile alarm clock is designed for convenience and readability, featuring an adjustable LCD display, snooze function, weekend mode, and temperature display. This manual will guide you through the setup, operation, and maintenance of your new alarm clock to ensure optimal performance.
2. Güvenlik Bilgileri
- Cihazı sudan ve yüksek nemli ortamlardan uzak tutun.
- Avoid exposing the clock to direct sunlight or extreme temperatures.
- Cihazı kendiniz sökmeye veya onarmaya çalışmayın. Servis için yetkili personele başvurun.
- Yalnızca belirtilen pil türünü kullanın (2 adet AAA pil).
- Cihazınızı uzun süre kullanmayacaksanız pil sızıntısını önlemek için pilleri çıkarın.
- Pilleri çocukların erişemeyeceği yerlerde saklayın.
3. Paket İçeriği
- DOOMAY Digital Alarm Clock (1 unit)
- AAA Piller (2 adet)
- Kullanım Kılavuzu (bu belge)
4. Ürün Bittiview
Familiarize yourself with the components and controls of your DOOMAY Digital Alarm Clock.
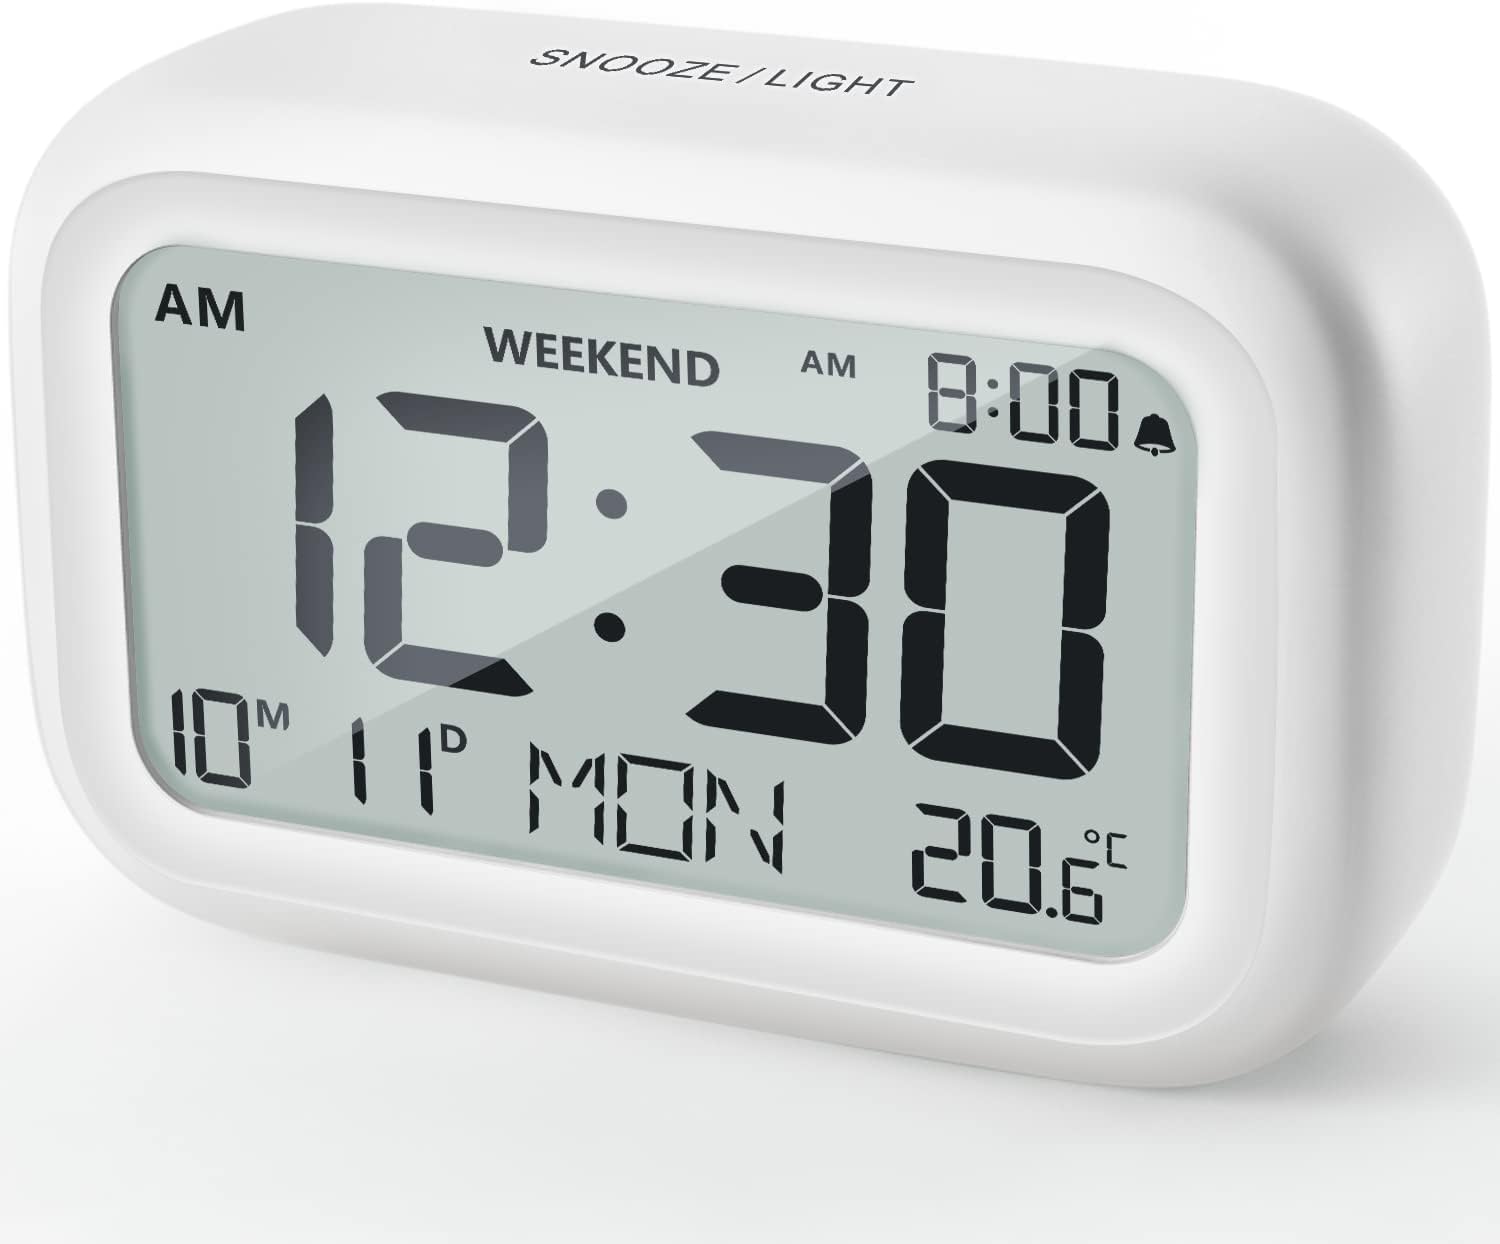
Şekil 4.1: Ön View of the Alarm Clock
This image displays the front of the DOOMAY Digital Alarm Clock, highlighting its large, clear LCD screen. The screen shows the current time (12:30), AM indicator, day of the week (MON), date (10th month, 11th day), and indoor temperature (20.6°C). The top of the clock has a "SNOOZE/LIGHT" button.

Şekil 4.2: Başlıca Özelliklerview
This diagram illustrates the main functionalities of the alarm clock: 12/24H time display, calendar, alarm setting, adjustable volume, snooze function, backlight, weekend mode, and temperature display. The clock itself is shown on a wooden table, displaying 7:00 AM, Friday, and 28.8 degrees.

Figure 4.3: Back Panel Controls
This image shows the rear of the alarm clock, detailing the various control buttons and the battery compartment. Buttons are clearly labeled for: 12/24H time format, Alarm setting, Weekend mode, Date setting, Minus (-) for decreasing values, Plus (+) for increasing values, and °C/°F for temperature unit selection. The battery compartment is visible, designed for two AAA batteries.
Kontroller ve Ekran:
- LCD Ekran: Shows time, date, day of week, AM/PM indicator, alarm status, and temperature.
- Erteleme/Işık Düğmesi (Üst): Activates snooze function during alarm; illuminates backlight for 5 seconds.
- 12/24H Button (Back): 12 saatlik ve 24 saatlik zaman formatları arasında geçiş yapar.
- ALARM Button (Back): Alarm ayar moduna girer.
- WEEKEND Button (Back): Activates/deactivates weekend mode.
- DATE Button (Back): Enters date setting mode.
- MINUS (-) Button (Back): Decreases values during setting; adjusts alarm volume.
- PLUS (+) Button (Back): Increases values during setting; adjusts alarm volume.
- °C/°F Button (Back): Santigrat ve Fahrenheit sıcaklık birimleri arasında geçiş yapar.
5. Kurulum
5.1 Pil Kurulumu
- Saatin arkasında bulunan pil bölmesi kapağını açın.
- İki (2) adet AAA pili, doğru kutuplara (+ ve -) dikkat ederek takın.
- Pil bölmesi kapağını sıkıca kapatın.
- The display will light up, and the clock will be ready for initial setup. A low battery symbol will appear when batteries need replacement. If the display shows "8888" flashing, it's also an indication to change batteries.
5.2 İlk Saat ve Tarih Ayarı
- Zaman Ayarı:
- Basın 12/24H button to switch between 12-hour (with AM/PM) and 24-hour formats.
- Basılı tutun 12/24H Zaman ayarı moduna girmek için düğmeye 3 saniye basılı tutun. Saat rakamları yanıp sönecektir.
- Kullanın + or - Saati ayarlamak için düğmeler.
- Basın 12/24H Saati onaylamak ve dakika ayarına geçmek için düğmeye tekrar basın. Dakika rakamları yanıp sönecektir.
- Kullanın + or - Dakikayı ayarlamak için düğmeler.
- Basın 12/24H button one more time to exit time setting.
- Tarih ayarla:
- Basılı tutun TARİH button for 3 seconds to enter date setting mode. The year digits will flash.
- Kullanın + or - yıl ayarlamak için düğmeler.
- Basın TARİH button again to confirm the year and move to month setting.
- Ayı aşağıdaki yöntemle ayarlayın + or -.
- Basmak TARİH again to move to day setting.
- Günü şu şekilde ayarlayın: + or -.
- Basmak TARİH one more time to exit date setting. The day of the week will automatically adjust.
6. Kullanım Talimatları
6.1 Alarmı Ayarlama
- Basılı tutun ALARM button for 3 seconds. The alarm hour digits will flash.
- Kullanın + or - İstediğiniz alarm saatini ayarlamak için butonlara basın.
- Basın ALARM Saati onaylamak ve dakika ayarına geçmek için düğmeye tekrar basın. Alarm dakika rakamları yanıp sönecektir.
- Kullanın + or - İstenilen alarm dakikasını ayarlamak için düğmeler.
- Basın ALARM button one more time to exit alarm setting. The alarm icon (bell symbol) will appear on the display, indicating the alarm is active.
- To turn the alarm ON/OFF, simply press the ALARM button once. The bell icon will appear/disappear.
6.2 Erteleme İşlevi
When the alarm sounds, gently tap the large ERTELEME / IŞIK button on the top of the clock. The alarm will pause for 9 minutes and then sound again. This can be repeated multiple times.

Figure 6.1: Activating Snooze
This image demonstrates how to activate the snooze function by touching the top of the alarm clock. The text highlights that this action provides an additional 9 minutes of sleep after the alarm sounds.
To completely turn off the alarm after it sounds (without snoozing), press any button on the back of the clock.
6.3 Weekend Mode
The weekend mode allows the alarm to sound only from Monday to Friday, preventing it from ringing on Saturday and Sunday.

Figure 6.2: Weekend Mode Activated
This image shows the alarm clock display with the "WEEKEND" indicator prominently displayed, signifying that the weekend mode is active. The accompanying text clarifies that in this mode, the alarm will only sound from Monday to Friday, ensuring undisturbed weekends.
- To activate Weekend Mode, press the HAFTA SONU button once. The "WEEKEND" indicator will appear on the display.
- To deactivate Weekend Mode, press the HAFTA SONU button again. The "WEEKEND" indicator will disappear.
6.4 Ayarlanabilir Alarm Sesi Seviyesi
The alarm clock offers two volume levels: Low (70 dB) and High (85 dB).

Figure 6.3: Alarm Volume Levels
This image visually represents the two available alarm volume settings: L01 (85 dB) for a louder alarm and L02 (70 dB) for a softer alarm. The alarm clock is shown in a bedroom setting, emphasizing its use as a bedside device.
- Normal zaman görüntüleme modundayken, tuşuna basın. + or - buttons to cycle between the two alarm volume levels. The current volume level will be briefly displayed.
6.5 Arka Aydınlatma Fonksiyonu
To illuminate the display in low light conditions, simply tap the ERTELEME / IŞIK button on the top of the clock. The backlight will activate for approximately 5 seconds, providing clear visibility of the time and other information.
Figure 6.4: Backlight in Action
This image provides a side-by-side comparison of the alarm clock's display. On the left, the clock is shown in a well-lit environment. On the right, the same clock is shown in a dark setting with its 5-second backlight activated, demonstrating how the display becomes clearly visible at night.
6.6 Sıcaklık Ekranı
The clock displays the indoor temperature. You can switch between Celsius (°C) and Fahrenheit (°F) units.
- To change the temperature unit, press the °C/°F saatin arkasındaki düğme.
7. Bakım
7.1 Temizlik
Saati yumuşak, kuru bir bezle silin. Yüzeye zarar verebileceğinden aşındırıcı temizleyiciler veya çözücüler kullanmayın.
7.2 Pil Değişimi
When the low battery indicator appears on the display, or if the display shows "8888" flashing, it is time to replace the batteries. Follow the steps in Section 5.1 Battery Installation to replace the two AAA batteries.
8. Sorun Giderme
| Sorun | Olası Neden | Çözüm |
|---|---|---|
| Ekran boş veya karanlık. | Piller bitmiş veya yanlış takılmış. | Pilleri yeni AAA pillerle değiştirin ve kutupların doğru olmasına dikkat edin. |
| Alarm çalmıyor. | Alarm is not activated, or Weekend Mode is ON. | Ensure the alarm icon is displayed. Check if Weekend Mode is active and deactivate if necessary. |
| Erteleme fonksiyonu çalışmıyor. | Not tapping the SNOOZE/LIGHT button correctly. | Ensure a firm, brief tap on the top SNOOZE/LIGHT button when the alarm is sounding. |
| Saat/Tarih yanlış. | Not set correctly or batteries were removed. | Refer to Section 5.2 Initial Time and Date Setting to re-set. |
9. Özellikler
| Özellik | Detay |
|---|---|
| Model Numarası | 5293İngiltere |
| Marka | kıyamet |
| Boyutlar (U x G x Y) | 10.9 x 3.81 x 6.9 cm (4.29 x 1.5 x 2.72 inç) |
| Ağırlık | 127.01 gram (0.28 lb) |
| Malzeme | Akrilonitril Bütadien Stiren (ABS) |
| Güç Kaynağı | 2 x AAA Pil (dahil) |
| Görüntü Türü | Dijital lcd |
| Alarm Ses Seviyeleri | Low (70 dB), High (85 dB) |
| Erteleme süresi | 9 dakikadır. |
| Arka Işık Süresi | 5 saniye |
| Sıcaklık Birimleri | Celsius (°C) / Fahrenheit (°F) |
10. Garanti ve Destek
DOOMAY products are designed for reliability and performance. For any questions, technical support, or warranty claims, please contact your retailer or visit the official DOOMAY website for assistance. Please retain your proof of purchase for warranty purposes.
For further information, you may visit the brand's Amazon store page: DOOMAY Store on Amazon


