1. Giriş
Thank you for choosing the Xigmatek Lux M Micro-ATX Mini Tower PC Case. This manual provides detailed instructions for the installation, operation, and maintenance of your new PC chassis. Please read this manual carefully before beginning the assembly process to ensure proper installation and to maximize the performance and longevity of your system.
The Lux M case is designed to offer a robust and aesthetically pleasing housing for your computer components, featuring a tempered glass side panel, a metallic front panel with a unique cut-out pattern, and pre-installed fixed RGB fans for optimal cooling and visual appeal. It supports Micro-ATX and Mini-ITX motherboards and is compatible with various cooling solutions, including water cooling.
2. Güvenlik Bilgileri
Kurulum ve çalıştırma sırasında lütfen aşağıdaki güvenlik önlemlerine uyun:
- Elektrik çarpmasını önlemek için herhangi bir parçayı takmadan veya çıkarmadan önce daima güç kaynağını duvar prizinden ayırın.
- Handle all components with care. Avoid touching circuit boards directly; hold them by their edges.
- Wear an anti-static wrist strap when handling sensitive electronic components to prevent electrostatic discharge (ESD) damage.
- Keep the case and components away from liquids, excessive heat, and direct sunlight.
- Aşırı ısınmayı önlemek için bilgisayar kasasının etrafında yeterli havalandırma olduğundan emin olun.
- Keep small parts and screws out of reach of children.
3. Paket İçeriği
Paketinizdeki tüm ürünlerin eksiksiz olduğundan emin olun. Herhangi bir ürün eksik veya hasarlıysa, lütfen satıcınızla iletişime geçin.
- Xigmatek Lux M Micro-ATX Mini Tower PC Case
- Aksesuar kutusu (vidalar, ara parçalar, kablo bağları vb. içerir)
- Kullanım Kılavuzu (bu belge)
4. Ürün Bittiview
Familiarize yourself with the various parts of your Xigmatek Lux M PC case.
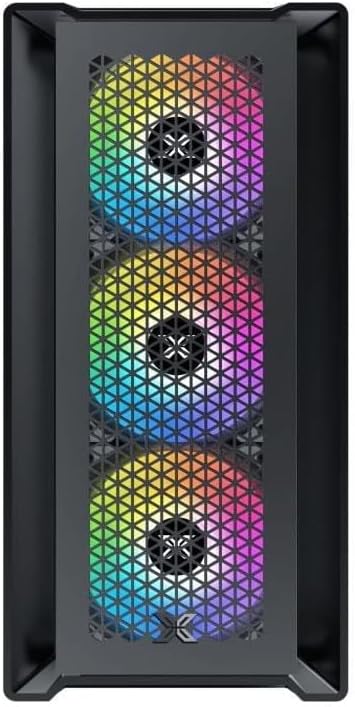
Şekil 4.1: Ön View. This image displays the front of the Xigmatek Lux M case, highlighting the metallic mesh panel with a triangular design and the three pre-installed 120mm fixed RGB fans.

Figure 4.2: Angled Top-Front View. This perspective shows the tempered glass side panel, offering a clear view of the interior, and the top panel with its I/O ports (USB, audio) and power button.
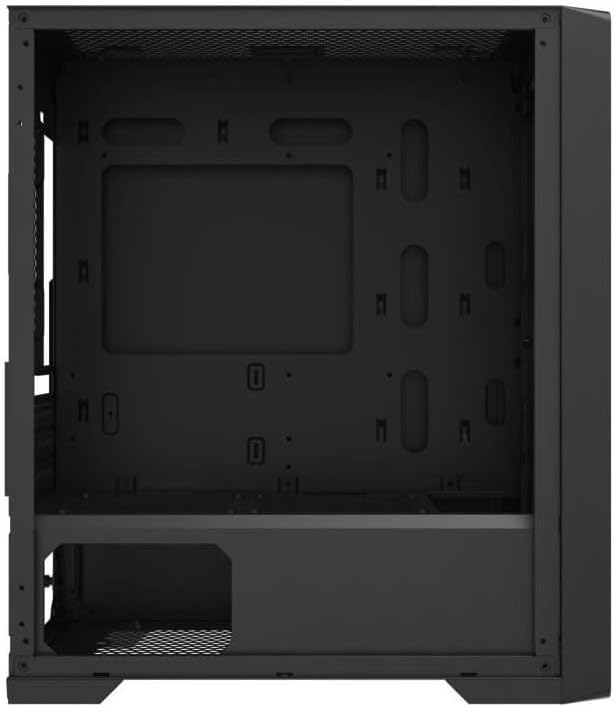
Şekil 4.3: İç Mekan Düzeni. The internal structure of the case, featuring the motherboard mounting tray, cutouts for cable management, and the power supply shroud at the bottom.
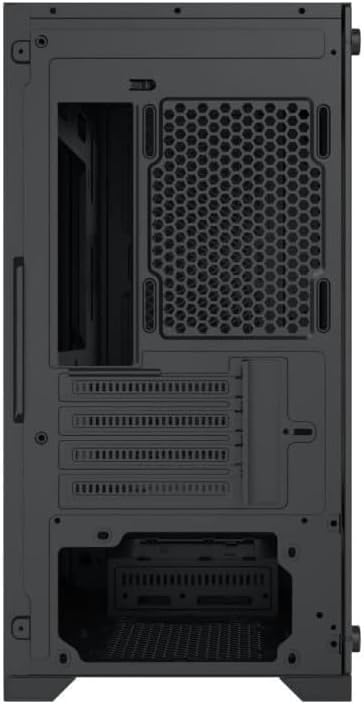
Şekil 4.4: Arka View. This image illustrates the rear of the case, including the expansion slots for graphics cards and other add-in cards, the rear fan mounting area, and the power supply mounting bracket.
5. Kurulum ve Kurulum
Follow these steps to install your computer components into the Xigmatek Lux M case.
5.1. Davayı Hazırlama
- Kılıfı düz ve sağlam bir yüzeye yerleştirin.
- Remove the tempered glass side panel by unscrewing the thumb screws and carefully lifting it off. Set it aside on a soft, non-abrasive surface.
- Remove the opposite steel side panel by unscrewing the thumb screws and sliding it backward.
5.2. Anakart Kurulumu
The Lux M supports Micro-ATX and Mini-ITX motherboards.
- Install the I/O shield (if not pre-installed on your motherboard) into the rear opening of the case.
- Align the motherboard with the pre-installed standoffs. Ensure all screw holes on the motherboard match the standoffs.
- Anakartı, kutuda bulunan anakart vidalarını kullanarak sabitleyin. Çok fazla sıkmayın.
5.3. Güç Kaynağı Ünitesi (PSU) Kurulumu
The PSU mounts at the rear bottom of the case.
- Güç kaynağını kasanın arka tarafından belirlenmiş bölmesine kaydırın.
- Align the PSU's screw holes with the holes on the case's rear panel.
- Verilen vidalarla güç kaynağını sabitleyin.
5.4. Storage Drive Installation (2.5"/3.5" Drives)
The case supports 2x 2.5"/3.5" storage drives.
- Locate the drive cage beneath the PSU shroud or dedicated 2.5" mounting points behind the motherboard tray.
- For 3.5" HDDs, slide the drive into a drive tray (if applicable) and secure it with screws.
- For 2.5" SSDs, secure them directly to the mounting points using the provided screws.
5.5. Graphics Card (VGA) and Expansion Card Installation
Kasa 320 mm uzunluğa kadar ekran kartlarını destekliyor.
- Kasanın arka tarafındaki gerekli genişletme yuvası kapaklarını çıkarın.
- Ekran kartınızı veya diğer genişletme kartınızı anakartınızdaki uygun PCIe yuvasına takın.
- Secure the card to the case using the expansion slot screws.
5.6. Cooling System Installation (Optional)
The Lux M comes with 4x 120mm X24F fixed RGB fans. It supports additional cooling options.
- CPU Soğutucu: Max height of 160mm. Install your CPU cooler according to its manufacturer's instructions.
- Radyatör Desteği: The case supports radiators of 360mm, 240mm, or 120mm. Refer to your radiator's manual for installation. Common mounting locations include the front and top panels.
5.7. Kablo Yönetimi
Anakart tepsisinin arkasındaki kablo yönlendirme oyuklarını ve sabitleme noktalarını kullanarak kabloları düzenleyin. Bu, hava akışını iyileştirir ve estetiği artırır.
5.8. Son Montaj
- Once all components are installed and cables are managed, reattach the steel side panel and secure it with thumb screws.
- Carefully reattach the tempered glass side panel and secure it with thumb screws.
6. Kullanım Talimatları
After completing the installation, connect your peripherals (monitor, keyboard, mouse) and power cable to the PC. Press the power button located on the top panel of the case to start your system.
The pre-installed X24F RGB fans feature fixed RGB lighting, which will illuminate automatically upon system power-on. No additional software or controller is required for their basic operation.
Ensure that the case's ventilation is not obstructed to maintain optimal airflow and cooling performance.
7. Bakım
Düzenli bakım, bilgisayar bileşenlerinizin uzun ömürlü olmasını ve en iyi performansı göstermesini sağlamaya yardımcı olur.
- Toz Temizleme: Periodically clean dust filters (if present) and the interior of the case using compressed air or a soft brush. Dust accumulation can hinder airflow and lead to overheating.
- Dış Temizlik: Dış yüzeyleri yumuşak, damp cloth. Avoid harsh chemicals that may damage the finish or tempered glass.
- Temperli Cam: Clean the tempered glass panel with a glass cleaner and a microfiber cloth to avoid scratches and streaks.
8. Sorun Giderme
Kurulum sırasında veya sonrasında sorunlarla karşılaşırsanız, aşağıdaki yaygın sorun giderme adımlarını göz önünde bulundurun:
- Güç Yok:
- Güç kablosunun hem PSU'ya hem de duvar prizine güvenli bir şekilde bağlandığından emin olun.
- Güç kaynağı anahtarının 'AÇIK' konumda olduğundan emin olun.
- Ön panel güç anahtarı kablosunun anakartın ön panel başlığına doğru şekilde bağlı olduğundan emin olun.
- Fans Not Spinning / RGB Not Lighting:
- Ensure all fan power cables are securely connected to the motherboard or a fan controller.
- For RGB, confirm that any necessary RGB headers are connected to the motherboard (though the included fans are fixed RGB and should light up with power).
- Görüntü Çıkışı Yok:
- Verify that your monitor cable is connected to the graphics card (if installed) and not the motherboard's integrated graphics port.
- Ekran kartını PCIe yuvasına tekrar yerleştirin.
- Aşırı Isınma:
- Ensure all case fans are spinning and oriented correctly for optimal airflow (intake/exhaust).
- Toz filtrelerini ve iç bileşenleri temizleyin.
- İşlemci soğutucusunun düzgün bir şekilde yerleştirildiğinden ve işlemciyle iyi temas ettiğinden emin olun.
For more complex issues, consult your component manuals or seek assistance from Xigmatek support or a qualified technician.
9. Özellikler
| Özellik | Şartname |
|---|---|
| Marka | Xigmatek |
| Model Adı | Lux M |
| Model Numarası | EN48540 |
| Dava Türü | Mini Kule |
| Anakart Uyumluluğu | Mikro-ATX, Mini-ITX |
| Malzeme | Tempered Glass (side panel), Metal (front panel) |
| Renk | Siyah |
| Önceden yüklenmiş Fanlar | 4 x 120mm X24F Fixed RGB Fans |
| Radyatör Desteği | 360mm, 240mm, 120mm |
| Maksimum CPU Soğutucu Yüksekliği | 160mm |
| Maksimum VGA Uzunluğu | 320mm |
| Maksimum PSU Uzunluğu | 165mm |
| Depolama Bölmeleri | 2x 2.5"/3.5" |
| Özel Özellikler | RGB Lighting, Triangular Mesh Front Design |
10. Garanti ve Destek
Xigmatek products are manufactured to the highest quality standards. For warranty information and technical support, please refer to the warranty card included with your product or visit the official Xigmatek webLütfen garanti talepleriniz için satın alma belgenizi saklayın.
For further assistance, you may contact Xigmatek customer support through their official channels.


