1. Ürün Bittiview
The TECHTONICS Solar Charge Controller 10A is an intelligent battery charger designed for solar power systems. It supports both 12V and 24V battery systems, automatically detecting the battery voltage. This controller efficiently regulates current from solar panels to prevent overcharging and extend battery life. It is equipped with a USB port for charging external devices and an LCD display for monitoring system parameters.
Key features include built-in protections against short circuits, open circuits, reverse voltage, and overload, making it a reliable component for various solar applications.

Şekil 1: Ön view of the TECHTONICS Solar Charge Controller 10A, showing the LCD screen, control buttons, and dual USB charging ports.
2. Özellikler
- Çift Hacimtage Uyumluluk: Automatically detects and works with 12V or 24V battery systems.
- 10A Charging Capacity: Capable of handling up to 10 Amperes of charging current, suitable for moderate-sized solar installations.
- Çok Yönlü Pil Uyumluluğu: Supports various battery types including Lead-Acid (B1), Li-ion (B2), and LiFePO4 (B3). Ensure correct battery type selection for optimal charging.
- Akıllı Şarj: Optimizes power conversion, monitors voltage, and adjusts charging parameters to safeguard against overcharging and extend battery lifespan.
- Kapsamlı Koruma: Features built-in short circuit protection, open-circuit protection, reverse voltage-koruma ve aşırı yük koruması.
- Çift USB Bağlantı Noktaları: Integrated 5V USB ports for convenient charging of external devices.
- LCD Ekran: Provides real-time monitoring of charging status, battery voltage, and other system parameters.
- Özelleştirilebilir Ayarlar: Allows adjustment of work mode, float voltage, discharge reconnect, and discharge stop parameters.

Şekil 2: Üzeriview of the six intelligent security protection features: Short-circuit protection, Overload protection, Over Current protection, Overcharge protection, Under-voltage protection, and Over-voltage koruma.
3. Kurulum ve Kurulum
Proper connection order is crucial for the correct functioning and safety of the solar charge controller. Follow these steps carefully:
- Pili bağlayın: First, connect the battery to the charge controller. Ensure correct polarity (positive to positive, negative to negative). The controller will automatically detect the battery voltage (12V veya 24V).
- Güneş panellerini bağlayın: Next, connect the solar panels to the charge controller. Again, observe correct polarity.
- DC Yükünü Bağlayın (İsteğe bağlı): Finally, connect any DC loads (e.g., lights, fans) to the load terminals of the controller.
Önemli Not: The controller will not function if connections are made in an incorrect order. Only 12V batteries will power a 12V panel, and a 24V panel requires a 24V battery for proper operation.

Figure 3: Connection diagram illustrating the proper sequence for connecting the battery, solar panels, and optional loads to the solar charge controller.
4. Kullanım Talimatları
The LCD display provides essential information about your solar power system. Use the control buttons to navigate through the display modes and adjust settings.
4.1. LCD Ekran Bilgileri
The LCD screen cycles through various parameters, providing real-time data. The image below illustrates the typical display sequence and what each reading represents:

Figure 4: Explanation of the LCD display sequence, including Main Display (current voltage), Float Voltage, Discharge Reconnect voltage, Discharge Stop voltage, Work Mode, and Battery Type.
- Ana Ekran: Mevcut pil voltajını gösterir.tage.
- Şamandıra Hacmitage: cilttage at which the battery is maintained after being fully charged.
- Deşarj Yeniden Bağlanma: cilttage at which the load will be reconnected after being disconnected due to low battery.
- Tahliye Durdurma: cilttage at which the load will be disconnected to protect the battery from over-discharge.
- Çalışma Modu: Configures the load output mode (e.g., 24 hours, dusk to dawn, timed).
- Pil Tipi: Indicates the selected battery chemistry.
4.2. Pil Tipi Seçimi
It is essential to select the correct battery type for optimal charging and battery longevity. The controller supports the following types:
- B1: For Lead-Acid batteries.
- B2: For Li-ion batteries.
- B3: LiFePO4 piller için.
Refer to your battery's specifications to determine the correct type and set it accordingly on the controller.
4.3. Customizing Parameters
The controller allows customization of various parameters to suit your specific needs. These include:
- Çalışma Modu
- Şamandıra Hacmitage
- Deşarj Yeniden Bağlantı Voltajıtage
- Deşarj Durdurma Voltajıtage
Consult the detailed instructions provided with the controller for specific steps on how to enter programming mode and adjust these settings.
5. Bakım
To ensure optimal performance and longevity of your TECHTONICS Solar Charge Controller, follow these maintenance guidelines:
- Düzenli Temizlik: Keep the controller clean and free from dust and debris. Use a soft, dry cloth for cleaning. Do not use liquid cleaners.
- Bağlantıları Kontrol Edin: Tüm kablo bağlantılarını periyodik olarak kontrol ederek sağlam olduklarından ve korozyondan arınmış olduklarından emin olun. Gevşek bağlantılar düşük performansa veya hasara yol açabilir.
- Havalandırma: Ensure the controller is installed in a well-ventilated area to prevent overheating. Do not block ventilation openings.
- Çevresel Koşullar: Avoid exposing the controller to extreme temperatures, direct sunlight, or excessive moisture.
6. Sorun Giderme
Bu bölümde, güneş enerjisi şarj kontrol cihazınızla karşılaşabileceğiniz yaygın sorunlar ele alınmaktadır.
| Sorun | Olası Neden | Çözüm |
|---|---|---|
| Controller not powering on / LCD off | Incorrect battery connection polarity; Battery voltage değeri çok düşük; Pil bağlantısı gevşek. | Verify battery polarity (+ to +, - to -); Check battery voltage (must be above minimum operating voltage); Secure battery connections. |
| Güneş panellerinden şarj yok. | Incorrect solar panel connection polarity; Solar panel voltage too low; Shading on panels; Faulty panel. | Verify solar panel polarity; Ensure sufficient sunlight; Check panel voltage; Inspect panels for damage. |
| Yükleme çalışmıyor. | pil hacmitage too low (discharge stop activated); Overload protection activated; Incorrect load connection. | Charge battery; Reduce load; Check load connections and ensure load current is within controller's limits. |
| Overcharge protection active | Battery is fully charged; Incorrect float voltage ayarı. | This is normal operation when battery is full; Verify float voltage setting is appropriate for your battery type. |
| Short circuit or reverse polarity error | Wiring error (short circuit or reversed connections). | Immediately disconnect all power sources. Carefully re-check all wiring for shorts and correct polarity before reconnecting. |
7. Özellikler
| Parametre | Değer |
|---|---|
| Marka | TECHTONICS |
| Model Numarası | tech1101-000 |
| Anma Şarj Akımı | 10A |
| Sistem Hacmitage | 12V/24V Auto-detect |
| Görüntü Türü | LCD |
| USB Çıkışı | Dual 5V USB ports |
| Ürün Ağırlığı | 100 gr |
| Paket Boyutları | 12x8x4 cm |
| Menşei ülke | Çin |
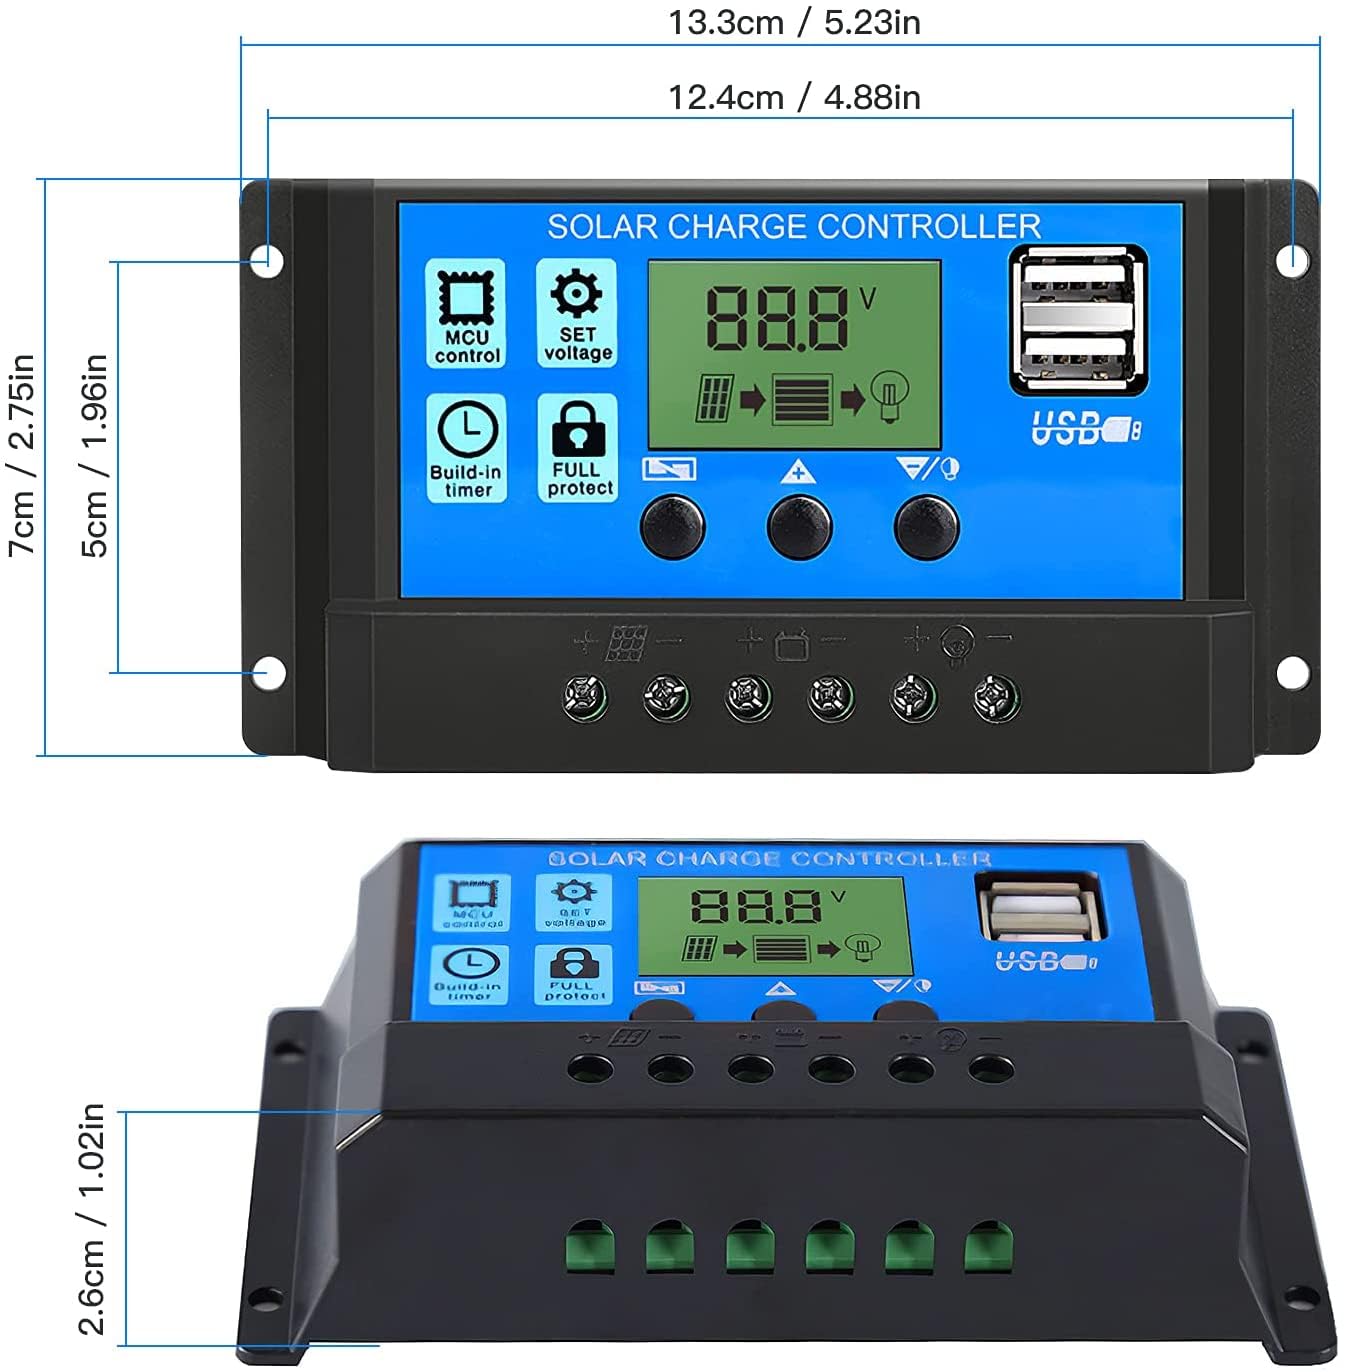
Figure 5: Physical dimensions of the solar charge controller, approximately 13.3 cm (5.23 in) wide, 7 cm (2.75 in) high, and 2.6 cm (1.02 in) deep.
8. Garanti ve Destek
TECHTONICS offers a risk-free replacement policy for this product. If you encounter any issues related to the product, you can raise a 7-day replacement request to ensure a direct replacement.
For further assistance or technical support, please refer to the contact information provided with your purchase or visit the official TECHTONICS webalan.


