1. Önemli Güvenlik Talimatları
Read and understand all safety warnings and instructions before operating this welding machine. Failure to follow these instructions may result in electric shock, fire, serious injury, or death.
- Elektrik şoku: Welding current can cause fatal electric shock. Do not touch live electrical parts. Wear dry, insulating gloves and protective clothing.
- Dumanlar ve Gazlar: Welding produces fumes and gases hazardous to health. Work in a well-ventilated area. Use an exhaust fan or fume extractor.
- Ark Işınları: Arc rays can burn eyes and skin. Wear a welding helmet with appropriate shade filter and protective clothing.
- Yangın ve Patlama: Welding sparks and hot metal can cause fire or explosion. Keep flammable materials away from the welding area. Have a fire extinguisher readily available.
- Sıcak Parçalar: Welded parts and equipment can be hot. Allow them to cool before handling.
- Kalp pilleri: Persons with pacemakers should consult their doctor before welding.
- Bakım: Only qualified personnel should perform maintenance and repairs. Disconnect power before servicing.
2. Ürün Bittiview
The Yamato MIG 140S is an inverter welding machine designed for MIG/MAG welding processes. It offers compact design and efficient performance for various welding tasks.
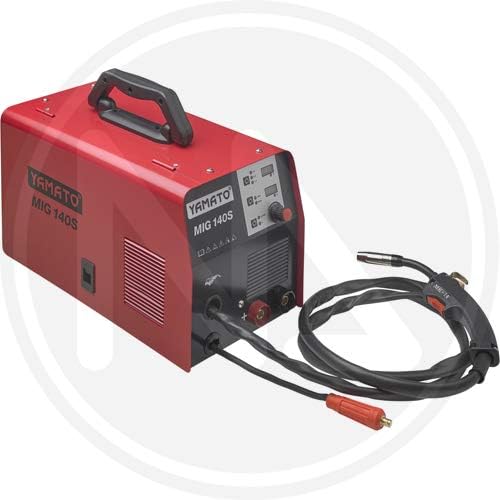
Şekil 2.1: Ön view of the Yamato MIG 140S Inverter Welding Machine. The red main unit features a top handle for portability, ventilation grilles on the side, and a control panel on the front. The control panel includes indicator lights and adjustment knobs. Connected to the unit are the MIG torch with its cable and a separate cable for the ground clamp.
2.1 Bileşenler ve Kontroller
- Ana Ünite: The compact red housing containing the inverter power source.
- Halletmek: Integrated on top for easy transport.
- Kontrol Paneli: Located on the front, includes:
- Güç gösterge ışığı: Makine açıldığında yanar.
- Aşırı Yük Gösterge Lambası: Illuminates if the machine overheats or is overloaded.
- Cilttage/Current Adjustment Knob: Controls the welding output.
- Wire Feed Speed Adjustment Knob: Kaynak telinin beslenme hızını kontrol eder.
- MIG Meşalesi: Used to deliver welding wire, shielding gas, and welding current to the workpiece.
- zemin Clamp: Connects to the workpiece to complete the welding circuit.
- Gaz girişi: Connection point for the shielding gas cylinder (typically on the rear, not visible in image).
- Tel Besleyici: Internal mechanism for feeding welding wire (accessed via a side panel, not visible in image).
3. Kurulum
Before operating the welding machine, ensure proper setup to guarantee safety and optimal performance.
- Atama: Place the welding machine on a stable, level surface in a well-ventilated area, away from flammable materials. Ensure adequate space around the machine for airflow.
- Güç Bağlantısı: Connect the machine's power cord to a suitable electrical outlet. Verify that the power supply matches the machine's requirements (voltagve ampöfke).
- zemin Clamp Bağlantı: Zemin cl'sini güvenli bir şekilde sabitleyinamp to a clean, bare metal section of the workpiece. Ensure good electrical contact.
- MIG Kaynak Torcu Bağlantısı: Ensure the MIG torch is properly connected to the machine's front panel.
- Shielding Gas Connection (if applicable):
- Connect the gas hose from the machine's gas inlet to a suitable shielding gas cylinder (e.g., Argon/CO2 mix for MIG, or CO2 for MAG).
- Install a gas regulator onto the cylinder and set the gas flow rate according to your welding application (typically 10-15 liters/minute).
- Welding Wire Installation:
- Open the wire feeder compartment (usually a side panel).
- Mount the welding wire spool onto the spindle, ensuring it rotates freely.
- Thread the wire through the guide tube and feed rollers. Adjust the tension on the feed rollers to prevent slipping or crushing the wire.
- Feed the wire through the torch liner until it emerges from the contact tip. Ensure the contact tip matches the wire diameter.
4. Kullanım Talimatları
Follow these steps for safe and effective operation of your Yamato MIG 140S welding machine.
- Kişisel Koruyucu Donanım (KKD): Always wear appropriate PPE, including a welding helmet, welding gloves, flame-resistant clothing, and safety shoes.
- Güç Açık: Turn on the main power switch of the welding machine. The power indicator light should illuminate.
- Parametreleri Ayarlayın:
- Ayarla Cilttage/Current Adjustment Knob to the desired setting based on the material thickness and type of welding wire.
- Ayarla Wire Feed Speed Adjustment Knob. The wire feed speed should generally correspond to the voltage setting for a stable arc.
- Test Weld: Before welding on your actual workpiece, perform a test weld on a scrap piece of the same material to fine-tune your settings.
- Welding Technique:
- Hold the MIG torch at a consistent angle (typically 10-15 degrees from vertical in the direction of travel).
- Maintain a consistent stick-out (the length of wire extending from the contact tip).
- Press the trigger on the torch to initiate the arc and wire feed.
- Move the torch steadily along the joint, creating a consistent weld bead.
- Kaynaklamayı durdurmak için tetiği bırakın.
- Sakin ol: Allow the machine to cool down after extended use. The fan will continue to run to dissipate heat.
- Kapat: Once finished, turn off the main power switch and disconnect the machine from the power supply. Close the gas cylinder valve.
5. Bakım
Düzenli bakım, kaynak makinenizin uzun ömürlü ve güvenli çalışmasını sağlar.
- Günlük/Kullanımdan Önce:
- Inspect all cables for damage (cuts, fraying). Replace damaged cables immediately.
- Check the MIG torch nozzle and contact tip for spatter buildup. Clean or replace as necessary.
- zemin cl sağlamakamp makes good contact and is free of corrosion.
- Weekly/After Use:
- Clean the exterior of the machine with a dry, soft cloth.
- Use compressed air to blow out dust and debris from the ventilation grilles. Ensure power is disconnected before doing so.
- Check the wire feed rollers for wear and cleanliness. Clean any wire residue.
- Periyodik olarak:
- Inspect the torch liner for blockages or wear. Replace if wire feeding becomes inconsistent.
- Tüm elektrik bağlantılarının sıkılığını kontrol edin.
- Depolamak: Store the machine in a clean, dry environment, protected from dust and moisture.
6. Sorun Giderme
This section provides solutions to common issues you might encounter during operation.
| Sorun | Olası Neden | Çözüm |
|---|---|---|
| Makine açılmıyor. | Güç kaynağı yok; güç kablosu arızalı; dahili sigorta atmış. | Check power outlet and circuit breaker. Inspect power cord. Contact service if fuse is suspected. |
| No arc when trigger is pressed. | Poor ground connection; no welding wire; incorrect settings; faulty torch. | Zemin temizliğini sağlayın.amp is clean and secure. Check wire spool and feed. Verify voltage/current settings. Inspect torch for damage. |
| Wire feed is inconsistent or stops. | Wire spool tangled; feed roller tension incorrect; dirty/worn torch liner; wrong contact tip size. | Untangle wire. Adjust feed roller tension. Clean or replace torch liner. Ensure contact tip matches wire diameter. |
| Poor weld quality (porosity, spatter). | Insufficient shielding gas; incorrect voltage/wire speed; dirty workpiece; wrong wire type. | Check gas cylinder and flow rate. Adjust welding parameters. Clean workpiece thoroughly. Use appropriate welding wire. |
| Overload indicator light is on. | Machine overheated due to extended use or insufficient ventilation. | Stop welding and allow the machine to cool down. Ensure ventilation grilles are clear. Reduce duty cycle. |
7. Özellikler
Technical specifications for the Yamato MIG 140S Inverter Welding Machine.
- Modeli: MIG 140S
- Üretici: Yamato
- Model Numarası: 8000071806091
- Ürün Ölçüleri (U x G x Y): 29 x 13 x 24 cm (yaklaşık 11.4 x 5.1 x 9.4 inç)
- Ağırlık: 542.06 grams (approximately 1.2 lbs) - Note: This weight appears unusually low for a welding machine. Please verify with product packaging or official documentation.
- Güç Türü: Kablolu elektrik
- Renk: Red (as depicted in product images)
- ASIN: B08NP8BG5F
8. Destek ve İletişim Bilgileri
For technical assistance, spare parts, or warranty inquiries, please contact your retailer or the manufacturer's customer service department. Keep your purchase receipt and model number handy when contacting support.
Manufacturer: Yamato
Model Numarası: 8000071806091


