1. Giriş
This manual provides detailed instructions for the installation, operation, and maintenance of the SINOTIMER TM919A-2 LCD Digital Programmable Timer Switch. This device is designed for automatic control of electrical appliances based on programmed time schedules, offering daily and weekly programming options.
2. Ürün Özellikleri
- Weekly 7-day programmable digital time switch.
- çoklu cilttage options (5V, 12V, 24V, 110V, 220V, 85-265V). This specific model is 220V.
- Detachable battery design for backup power.
- 35mm DIN rail mounting for easy installation.
- LCD display for clear time and program viewIng.
- 16 ON/OFF programs per day or week.
- Manuel geçersiz kılma fonksiyonu.
- High capacity 16A switching contact.
3. Güvenlik Bilgileri
UYARI: Elektrik çarpması riski vardır. Kurulum yalnızca yetkili bir elektrikçi veya uzman kişi tarafından yapılmalıdır.
- Kurulum veya bakım öncesinde elektrik bağlantısının kesildiğinden emin olun.
- Do not exceed the maximum load capacity of 16A.
- Doğru hacmi doğrulayıntage supply for the specific model (220V for TM919A-2).
- Cihazınızı nemden ve aşırı sıcaklıklardan uzak tutunuz.
4. Ürün Bittiview ve Bileşenler
The SINOTIMER TM919A-2 features an LCD display, control buttons, and wiring terminals for power input and load control.

Şekil 4.1: Ön view of the SINOTIMER TM919A-2 Digital Timer Switch, showing the LCD display, control buttons (P, D+, H+, M+, RESET, MANUAL), and wiring terminals.

Şekil 4.2: The timer switch with its transparent protective cover opened, revealing the control buttons for programming and manual operation.
Kontrol Düğmeleri:
- P (Program): Program ayarları moduna girer.
- D+ (Day): Adjusts day of the week or program day.
- H+ (Hour): Adjusts hour or program hour.
- M+ (Minute): Adjusts minute or program minute.
- SIFIRLA: Tüm ayarları fabrika varsayılanlarına sıfırlar.
- KULLANIM KILAVUZU: Toggles output ON/AUTO/OFF.
5. Kurulum ve Kurulum
5.1 Kablolama Şeması
Refer to the wiring diagram on the side of the device and the illustration below for correct connection. Ensure all connections are secure.

Şekil 5.1: Taraf view of the timer switch displaying the wiring diagram. Terminals 1 and 2 are for power input (L and N). Terminals 3, 4, and 5 are for the relay output (Common, Normally Open, Normally Closed).
- Terminaller 1 ve 2 (L, N): Connect to the main power supply (220V AC for this model).
- Terminal 3 (NO - Normally Open): Connects to the load when the timer is ON.
- Terminal 4 (COM - Ortak): Connects to one side of the load and the power supply.
- Terminal 5 (NC - Normally Closed): Connects to the load when the timer is OFF (less common for typical applications).
5.2 Initial Power-up and Reset
Upon first power-up or after a long period without power, the LCD display may be blank. The internal battery provides backup for settings. If the display is unresponsive or shows garbled characters, press the SIFIRLAMA button using a pointed object (e.g., a pen tip). This will clear all settings and restore the timer to its default state.
5.3 Geçerli Saati ve Günü Ayarlamak
- Basın P button once. The display will show the current time setting.
- Basmak D+ Haftanın geçerli gününü ayarlamak için.
- Basmak H+ Geçerli saati ayarlamak için
- Basmak M+ Geçerli dakikayı ayarlamak için
- Basın P button again to exit time setting mode and return to normal operation.
6. Kullanım Talimatları
6.1 Açma/Kapama Döngülerinin Programlanması
The timer supports up to 16 ON/OFF programs. Each program consists of an ON time and an OFF time.
- Basın P button repeatedly until "1 ON" appears on the display. This is the first ON program.
- Basmak D+ to select the day(s) for this program. Options include individual days, weekdays, weekends, or all 7 days.
- Basmak H+ to set the desired hour for the "ON" event.
- Basmak M+ to set the desired minute for the "ON" event.
- Basmak P again. "1 OFF" will appear. This is the first OFF program.
- Repeat steps 2-4 to set the day(s), hour, and minute for the "OFF" event.
- Basmaya devam et P to cycle through "2 ON", "2 OFF", up to "16 ON", "16 OFF". If you do not need all 16 programs, simply press P until the display returns to the current time.
- To save and exit programming mode, press the P button until the current time is displayed.
6.2 Manuel Geçersiz Kılma
The KILAVUZ button allows you to override the programmed settings temporarily or permanently.
- Basmak KILAVUZ once: Toggles between ON/AUTO/OFF modes.
- AÇIK: Çıkış sürekli olarak açık kalır ve programları dikkate almaz.
- KAPALI: Çıkış sürekli olarak KAPALI durumdadır ve programları dikkate almaz.
- OTO: The timer operates according to the programmed ON/OFF cycles. This is the standard operating mode.
7. Bakım
7.1 Pil Değişimi
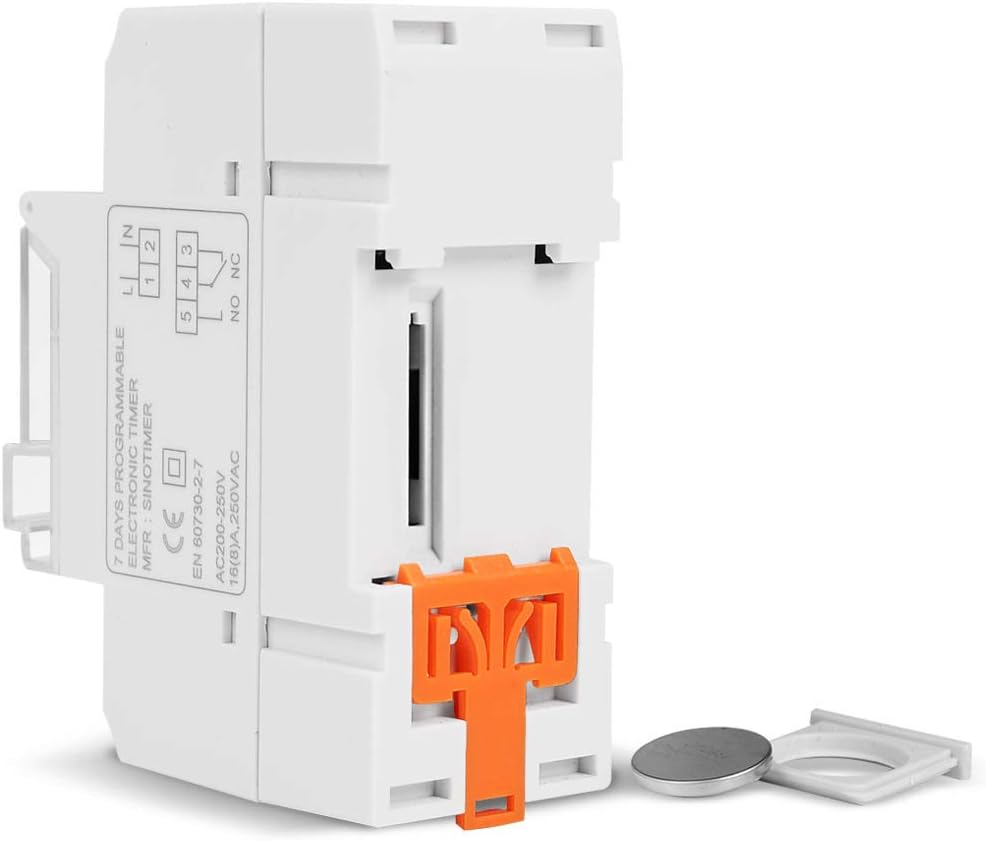
The timer includes a detachable CR2032 lithium battery to maintain time and program settings during power outages. If the display becomes dim or resets frequently, the battery may need replacement.

Şekil 7.1: The timer switch shown with its battery compartment open and a CR2032 lithium battery, indicating the detachable battery design.
- Disconnect power to the timer before attempting battery replacement.
- Locate the battery compartment, typically on the side or back of the unit.
- Eski CR2032 pili dikkatlice çıkarın.
- Yeni bir CR2032 pil takın ve doğru kutupluluğa (+ taraf yukarı) dikkat edin.
- Pil bölmesini kapatın.
- Reconnect power and reset the current time and day if necessary.
8. Sorun Giderme
- Ekran boş:
- Check power supply connections (Terminals 1 & 2).
- Ensure the internal battery is charged or replaced if old.
- Basın SIFIRLAMA düğme.
- Programs are not running:
- Zamanlayıcının açık olduğundan emin olun. OTOMATİK mode (check the display for "AUTO"). Press KILAVUZ döngü modları için.
- Saatin ve günün doğru ayarlanmış olduğundan emin olun.
- Check that the ON/OFF programs are correctly entered and enabled for the desired days.
- Confirm wiring to the load (Terminals 3, 4, 5) is correct.
- Zamanlayıcı beklenmedik şekilde sıfırlandı:
- The internal battery may be low or depleted. Replace the CR2032 battery.
- Cihazın sürekli güç kaynağına sahip olduğundan emin olun.
9. Özellikler
| Özellik | Şartname |
|---|---|
| Örnek | TM919A-2 |
| Güç Kaynağı | 220V AC (as per model) |
| Güç Tüketimi | 4.5 VA (MAKS.) |
| Sıcaklık Aralığı | -20°C ile +50°C arası |
| Görüntülemek | LCD |
| Switching Contact | 1 adet geçiş anahtarı |
| Programlar | 16 ON/OFF per day or week |
| Histerezis | 2 sec/day (at 25°C) |
| Kapasite | 16A |
| Zamanlayıcı Aralığı | 1 dakikadan 168 saate kadar |
| Minimum Aralık | 1 dakika |
| Black-out Memory | 60 days (with internal battery) |
| Ürün Ağırlığı | 0.15 kg (5.3 ons) |
| Montaj | 35mm DIN Ray |
| Ekran Boyutu | 1.2 inç |
Şekil 9.1: Dimensional drawing of the SINOTIMER TM919A-2, showing measurements in centimeters for height, width, and depth.
10. Garanti ve Destek
Specific warranty information for the SINOTIMER TM919A-2 is not provided in the product details. For warranty claims or technical support, please contact your retailer or the manufacturer directly. Keep your purchase receipt as proof of purchase.