1. Giriş
This manual provides detailed instructions for installing, configuring, and operating your TP-Link AC1900 Smart WiFi Router, model Archer A8. Please read this guide thoroughly to ensure proper setup and optimal performance of your device.
2. Paket İçeriği
Paketinizde tüm öğelerin mevcut olduğundan emin olun:
- TP-Link AC1900 Smart WiFi Router (Archer A8)
- Güç Adaptörü
- RJ45 Ethernet Kablosu
- Hızlı Kurulum Kılavuzu
3. Fiziksel Aşırıview
Familiarize yourself with the router's components and indicators.
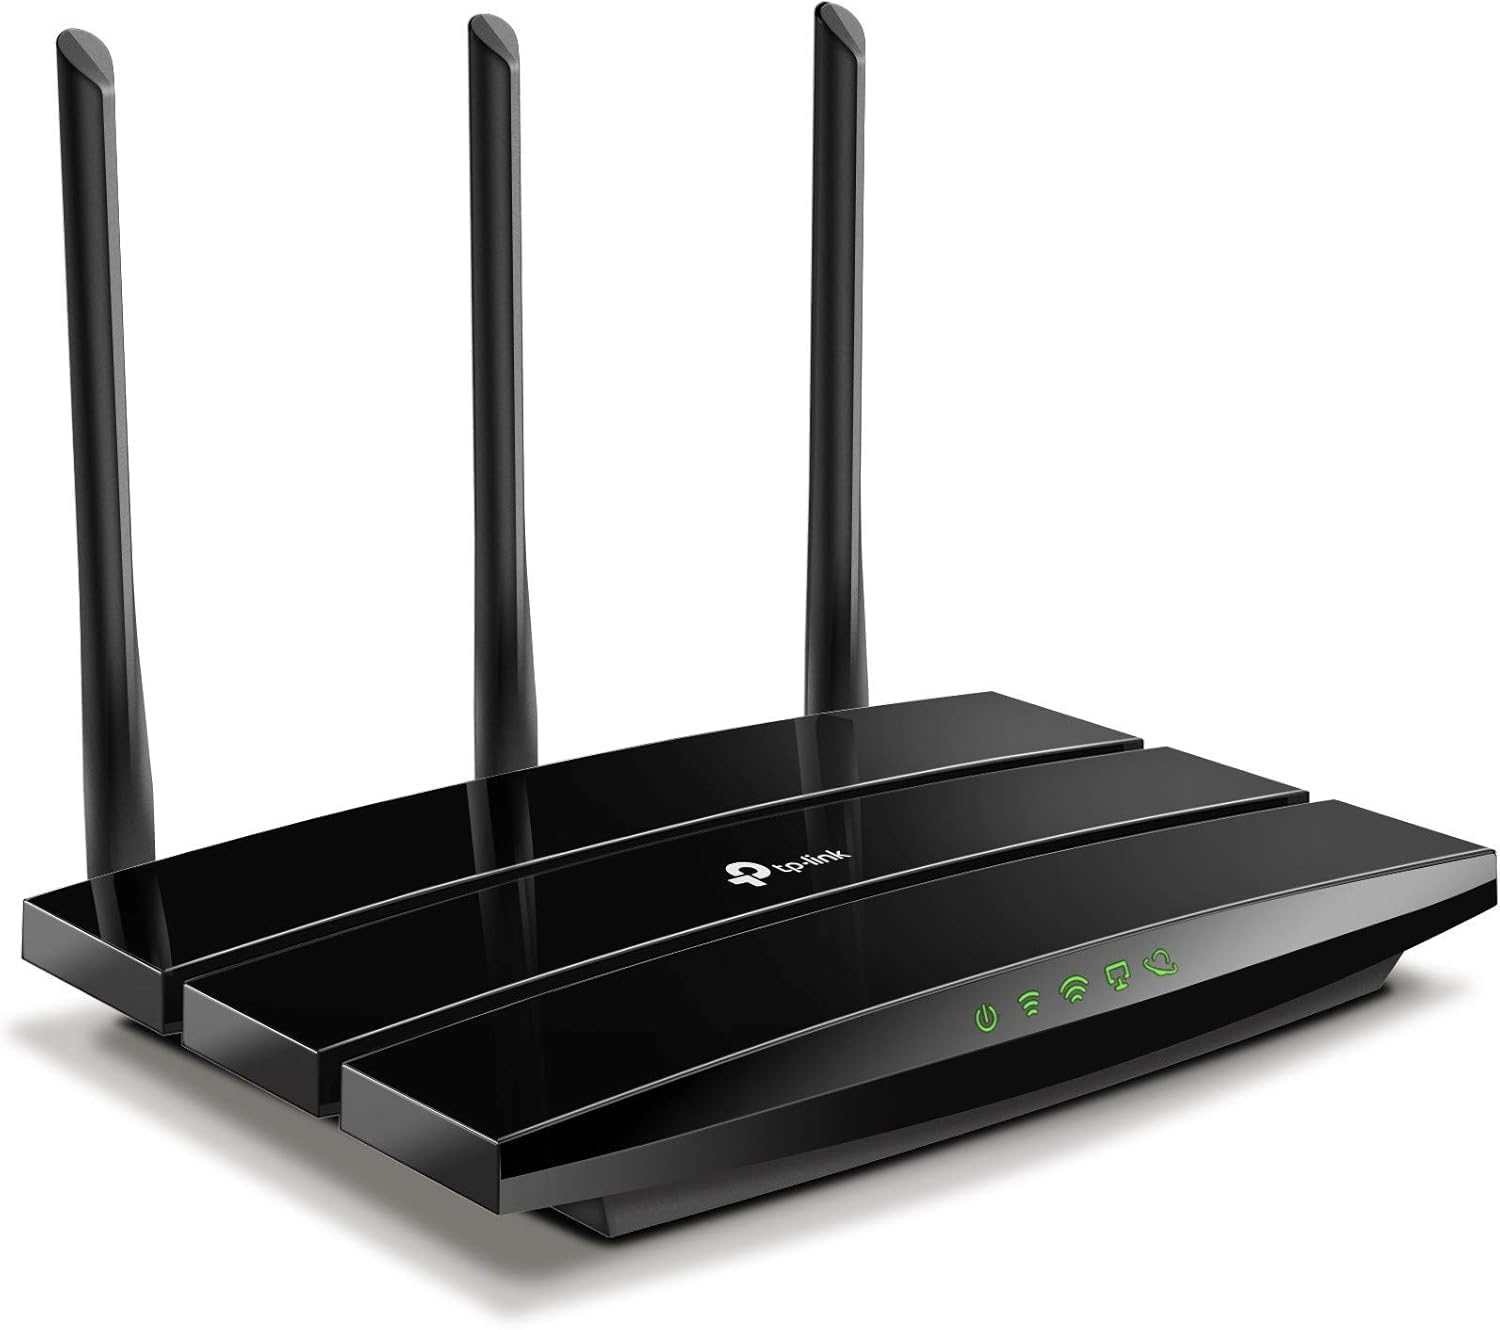
Şekil 3.1: Ön View of TP-Link Archer A8 Router. Bu görüntü yukarıdan aşağıya doğru bir görünümü sergiliyor. view of the TP-Link Archer A8 router, featuring its sleek black design and three external antennas. The front panel includes LED indicators for power, internet connectivity, Wi-Fi status, and Ethernet port activity.
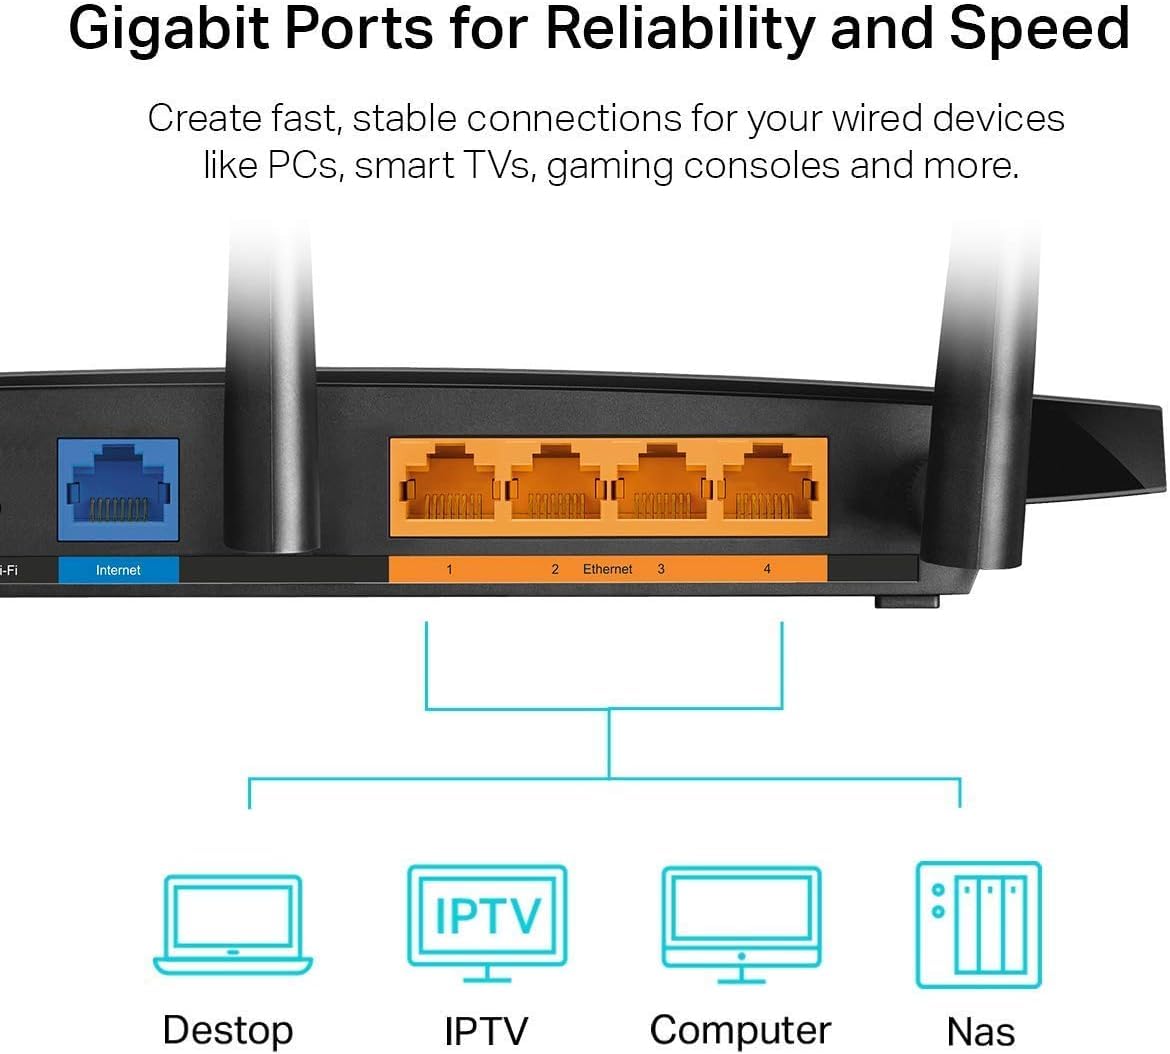
Figure 3.2: Rear Panel of TP-Link Archer A8 Router. This image shows the rear panel of the router, highlighting the Gigabit WAN port (blue) and four Gigabit LAN ports (orange). These ports are used for wired connections to your modem and other network devices.
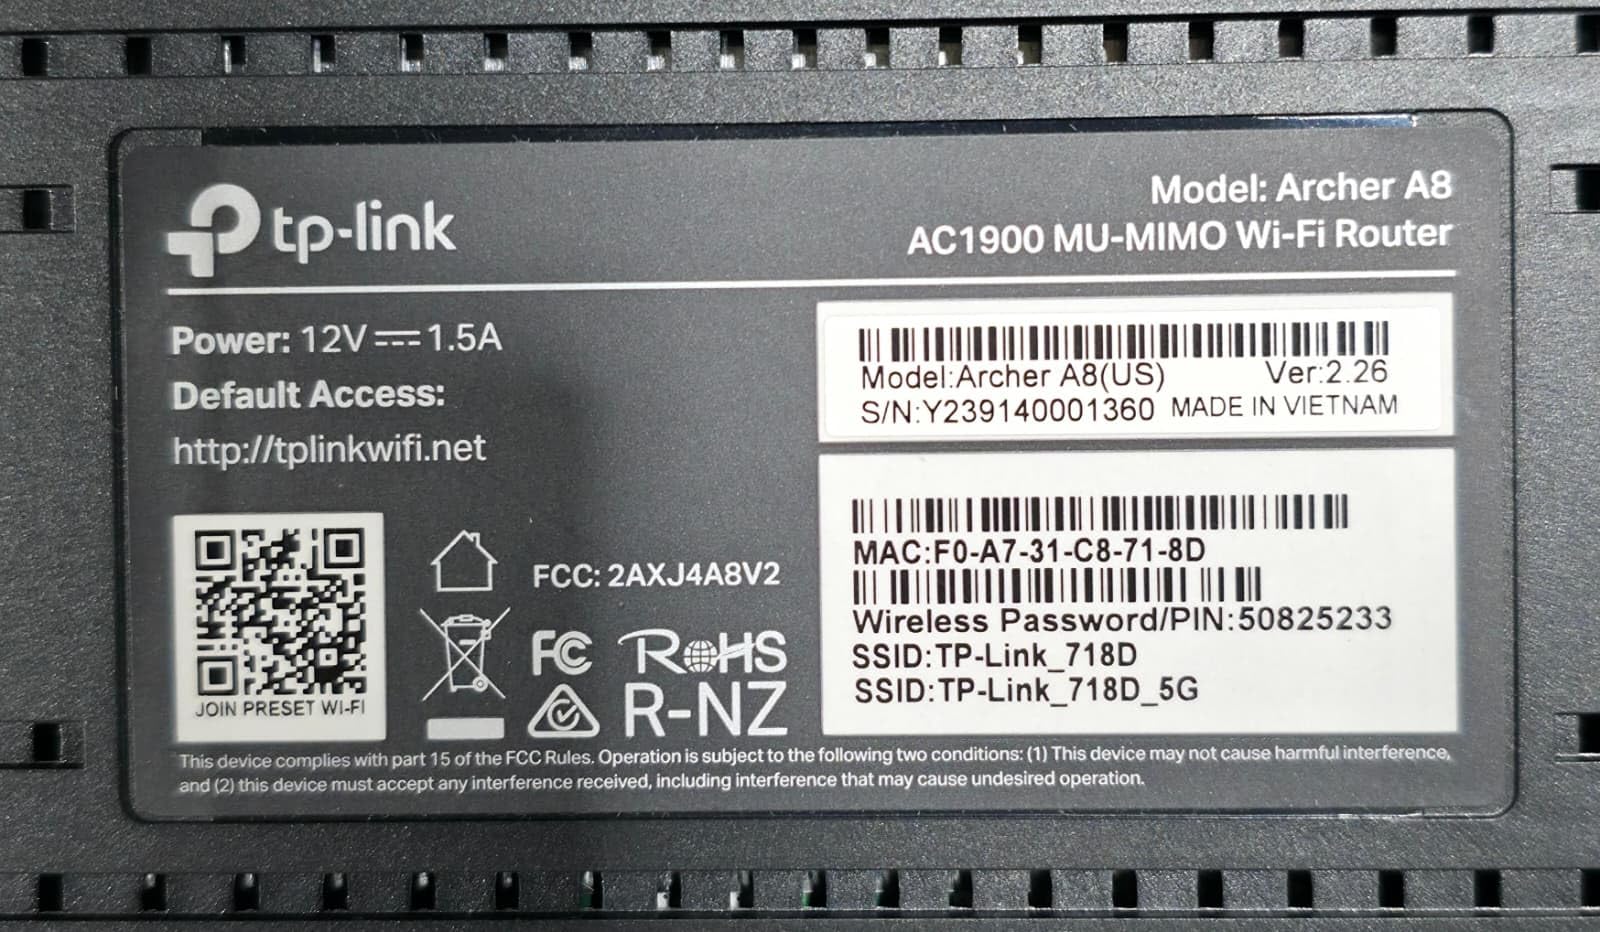
Figure 3.3: Router Bottom Label. This label provides essential information including the model (Archer A8, AC1900 MU-MIMO Wi-Fi Router), power specifications (12V===1.5A), default access URL (http://tplinkwifi.net), MAC address (F0:A7:31:C8:71:8D), serial number (Y239140001360), and default Wi-Fi network names (SSID: TP-Link_718D, TP-Link_718D_5G) with the default wireless password (50825233). It also includes FCC and RoHS compliance marks.
4. Kurulum Talimatları
- Modeminizi kapatın: Disconnect the power from your existing modem.
- Yönlendiriciyi bağlayın:
- Modeminizin Ethernet kablosunu şuraya bağlayın: WAN portu (blue) on the Archer A8 router.
- Güç adaptörünü yönlendiriciye bağlayın ve elektrik prizine takın.
- Power on your modem, then power on the router. Wait for the LED indicators to stabilize.
- Yönlendiriciye bağlanın:
- Kablosuz Bağlantı: Connect your computer or mobile device to the router's default Wi-Fi network. The default SSIDs (e.g., TP-Link_718D, TP-Link_718D_5G) and Wireless Password (e.g., 50825233) are printed on the router's bottom label (refer to Figure 3.3).
- Kablolu Bağlantı: Connect your computer to one of the router's LAN bağlantı noktaları (orange) using an Ethernet cable.
- Yönlendiriciyi Yapılandırın:
- Bir tane aç web browser and enter the default access URL: http://tplinkwifi.net.
- Follow the on-screen instructions in the Quick Setup wizard to configure your internet connection and Wi-Fi settings. You will be prompted to create a new login password for the router.
- Alternatively, use the TP-Link Tether App for mobile-based setup.
5. Kullanım Talimatları
5.1. Cihazları Bağlama
Once the router is set up, you can connect your devices:
- Kablosuz cihazlar: Arama your Wi-Fi network name (SSID) on your device and enter the password you configured during setup.
- Kablolu Cihazlar: Connect devices like PCs, Smart TVs, or gaming consoles to the router's Gigabit LAN ports using Ethernet cables.
5.2. Çift Bantlı Wi-Fi
The Archer A8 operates on two frequency bands:
- 2.4GHz Bandı: Provides wider coverage and better penetration through walls, ideal for general internet use and older devices. Offers speeds up to 600Mbps.
- 5GHz Bandı: Offers faster speeds (up to 1300Mbps) and lower latency, suitable for bandwidth-intensive activities like 4K streaming and online gaming. Has a shorter range and is more susceptible to obstacles.
The router supports Smart Connect, which automatically assigns devices to the best available band for optimal performance.
5.3. MU-MIMO Teknolojisi
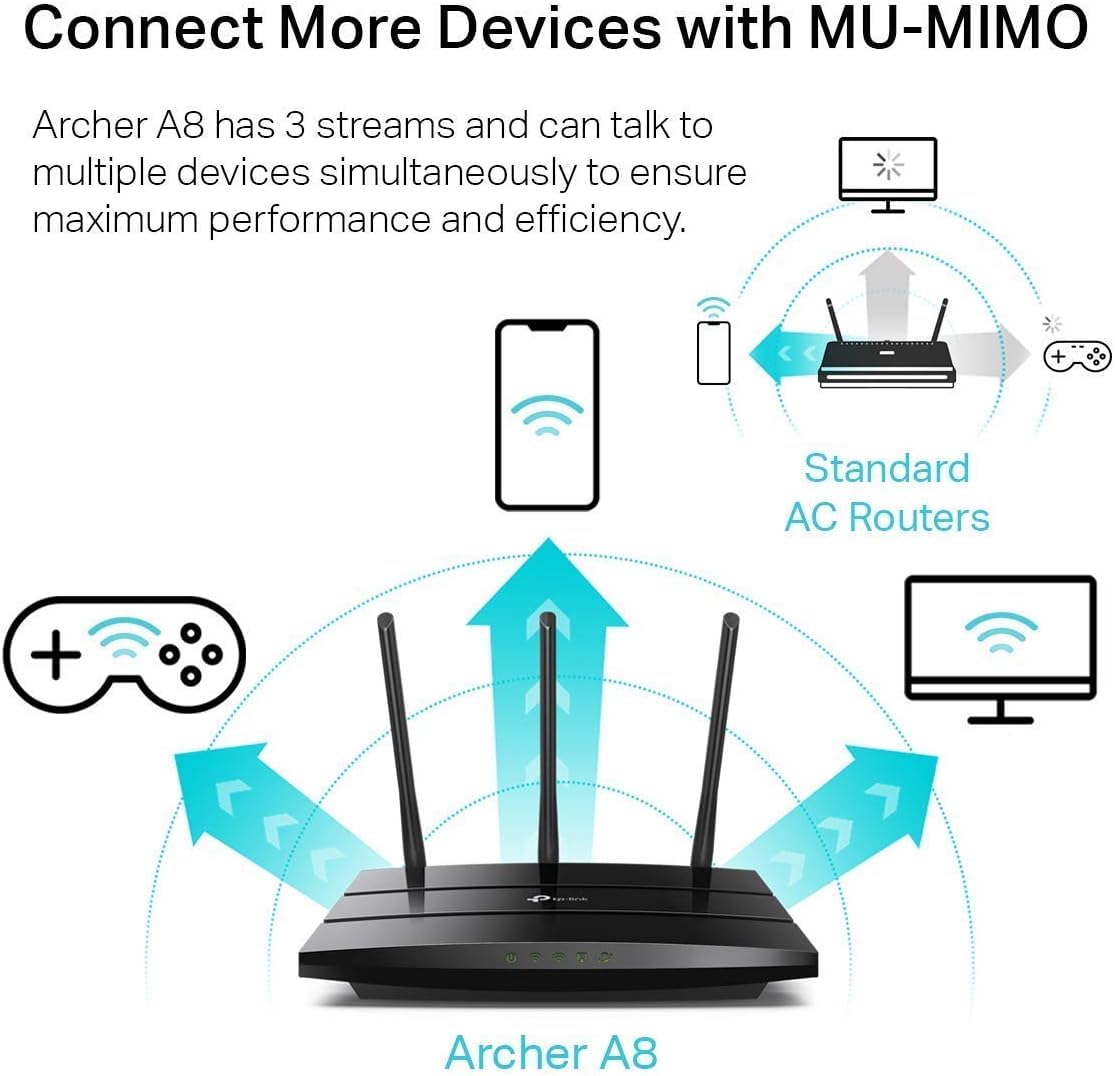
Figure 5.1: MU-MIMO Operation. This diagram illustrates how the Archer A8 router, equipped with MU-MIMO technology, can communicate with multiple devices simultaneously, unlike standard AC routers that communicate with one device at a time. This improves network efficiency and performance for all connected devices.
MU-MIMO (Multi-User, Multiple-Input, Multiple-Output) allows the Archer A8 to communicate with multiple devices simultaneously, rather than sequentially. This significantly improves network efficiency and throughput, especially in environments with many connected devices. For MU-MIMO to function, client devices must also support MU-MIMO.
5.4. Işın Şekillendirme Teknolojisi
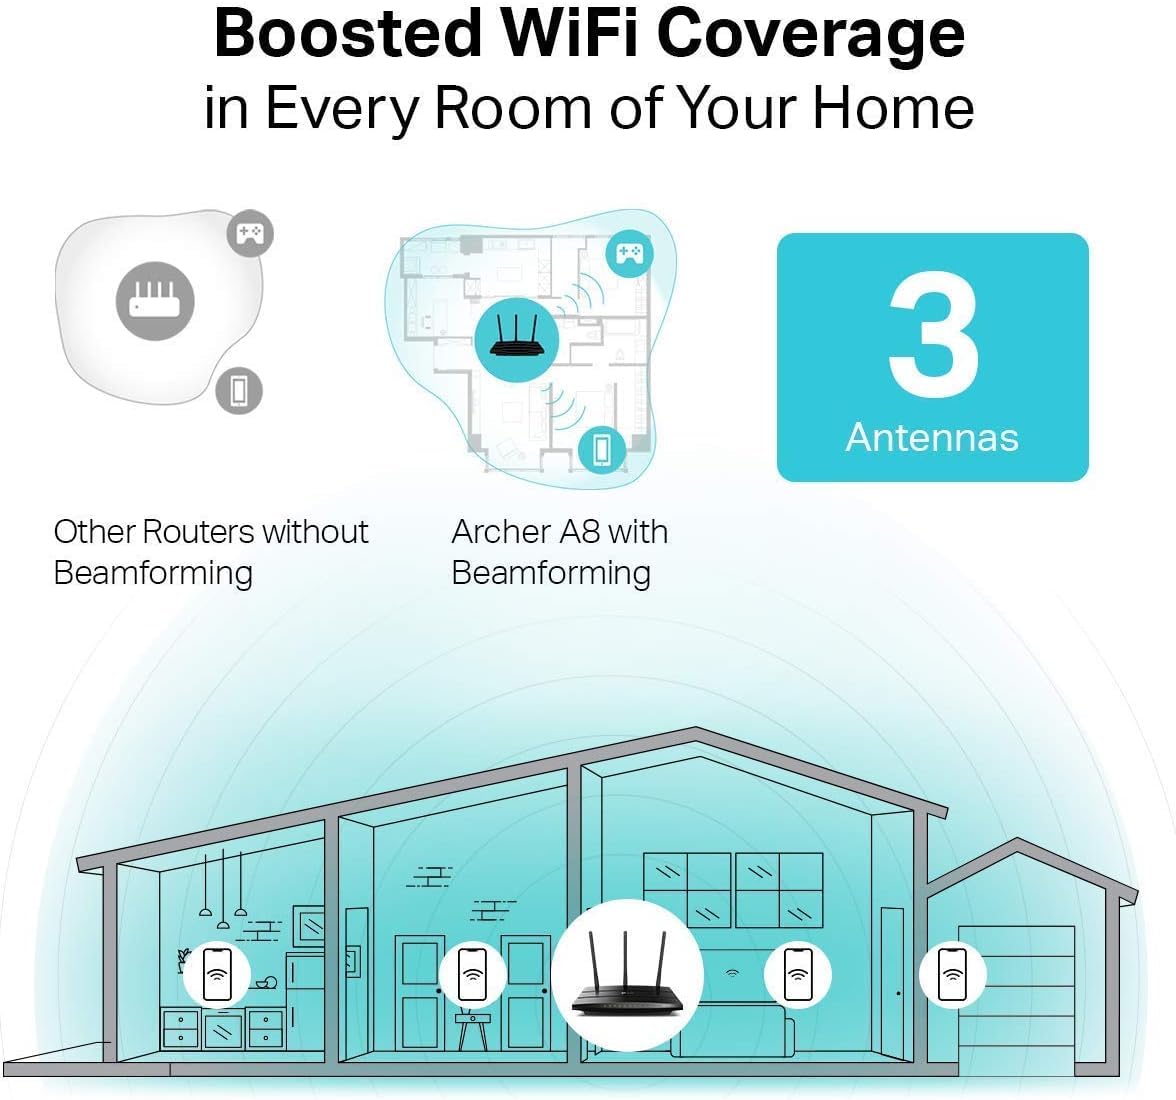
Figure 5.2: Beamforming Coverage. This image compares Wi-Fi coverage between a router without Beamforming and the Archer A8 with Beamforming. The Archer A8 directs stronger, more focused Wi-Fi signals towards connected devices, extending coverage and improving signal strength throughout your home.
Beamforming technology detects the location of your connected devices and concentrates the Wi-Fi signal directly towards them. This results in a more efficient and stronger wireless connection, extending Wi-Fi coverage and improving reliability, particularly for long-range connections.
5.5. Guest Wi-Fi Network
The router allows you to create a separate guest network, providing internet access to visitors without granting them access to your main network resources. This enhances security for your primary network.
5.6. Ebeveyn Denetimleri
Utilize the Parental Controls feature to manage internet access for children. You can block inappropriate content and set daily time limits for online activity.
6. Bakım
- Donanım Yazılımı Güncellemeleri: Yönlendiricinin yazılımı aracılığıyla düzenli olarak aygıt yazılımı güncellemelerini kontrol edin ve yükleyin web management interface or the TP-Link Tether App. Updates often include performance improvements, security patches, and new features.
- Yönlendirici Yerleşimi: Place the router in a central location, away from obstructions and devices that emit electromagnetic interference (e.g., microwaves, cordless phones) to maximize Wi-Fi coverage.
- Yeniden başlatılıyor: Zaman zaman yönlendiricinizi yeniden başlatın (güç adaptörünü çıkarıp tekrar takın), bu işlem belleğini temizleyerek ağ bağlantılarını yeniler ve küçük performans sorunlarını çözebilir.
- Güvenlik: Use strong, unique passwords for your Wi-Fi network and router administration. Enable WPA2/WPA3 encryption for your wireless network.
7. Sorun Giderme
If you encounter issues with your router, consider the following steps:
- İnternet erişimi yok:
- Modeminizin düzgün çalışıp çalışmadığını kontrol edin.
- Ensure all cables are securely connected to the correct ports (WAN port to modem, LAN ports to devices).
- Hem modeminizi hem de yönlendiricinizi yeniden başlatın.
- Yönlendiricinizdeki internet ayarlarınızı doğrulayın. web yönetim arayüzü.
- Weak Wi-Fi Signal or Dropouts:
- Relocate the router to a more central position, away from obstacles and interference sources.
- En uygun sinyal yönü için yönlendiricinin antenlerini ayarlayın.
- Consider using a Wi-Fi analyzer app to identify channel interference and switch to a less congested channel.
- Yönlendirici Yönetim Sayfasına Erişilemiyor:
- Cihazınızın yönlendiricinin ağına (kablolu veya kablosuz) bağlı olduğundan emin olun.
- Verify you are using the correct access URL (http://tplinkwifi.net) or IP address.
- Tarayıcınızın önbelleğini temizleyin veya farklı bir tarayıcı deneyin.
- Yönlendirici Giriş Şifresini Unuttunuz mu?
- Perform a factory reset on the router. This will revert all settings to default, including the login password (which you will then set up again via the Quick Setup wizard). To factory reset, press and hold the reset button on the router (usually a small pinhole button) for about 10 seconds while the router is powered on.
8. Özellikler
| Özellik | Detay |
|---|---|
| Model Adı | TP-Link AC1900 (Archer A8) |
| kablosuz standardı | IEEE 802.11ac/n/a 5 GHz, IEEE 802.11n/b/g 2.4 GHz |
| Wi-Fi Hızları | AC1900 (5 GHz'de 1300 Mbps, 2.4 GHz'de 600 Mbps) |
| Antenler | 3 Fixed External Antennas |
| Ethernet Bağlantı Noktaları | 1 adet Gigabit WAN bağlantı noktası, 4 adet Gigabit LAN bağlantı noktası |
| Özel Özellikler | MU-MIMO, Beamforming, Smart Connect, Guest Wi-Fi, Parental Controls, WPS |
| Boyutlar (G x D x Y) | 9.57 x 6.32 x 1.28 inç |
| Ürün Ağırlığı | 14.6 ons |
| Güç Girişi | 12V===1.5A |
| Uyumlu Cihazlar | Oyun Konsolu, Kişisel Bilgisayar, Akıllı Televizyon |
Not: Maximum wireless transmission rates are physical rates derived from IEEE 802.11 specifications. Actual wireless data throughput and wireless coverage are not guaranteed and will vary due to network conditions, environmental factors, and client limitations. Use of MU-MIMO requires client devices to also support MU-MIMO.
9. Garanti ve Destek
TP-Link provides an industry-leading 2-year warranty for this product. For technical assistance, please contact TP-Link's 24/7 technical support.
For the most up-to-date information, support resources, and contact details, please visit the official TP-Link webalan.
Yasal Uyarı:
1. Maximum wireless transmission rates are the physical rates derived from IEEE Standard 802.11 specifications. Range and coverage specifications are based upon test results under normal usage conditions. Actual wireless transmission rate and wireless coverage are not guaranteed and will vary as a result of 1) environmental factors, including building materials, physical objects, and obstacles, 2) network conditions, including local interference, volume and density of traffic, product location, network complexity, and network overhead and 3) client limitations, including rated performance, location, connection quality, and client condition. 2. Use of MU-MIMO requires clients to also support MU-MIMO.


