1. Giriş
The DFROBOT Gravity: I2C Electrochemical Oxygen Sensor is a high-accuracy module designed for precise measurement of ambient oxygen concentration. Utilizing advanced electrochemical principles, this sensor offers exceptional anti-interference capabilities, high stability, and superior sensitivity. It is an ideal solution for a wide range of applications including portable devices, air quality monitoring systems, and industrial environments such as mines, warehouses, and other spaces where air circulation may be limited.
This compact sensor provides an I2C output, allowing for seamless integration with popular microcontrollers like Arduino Uno, ESP32, and Raspberry Pi. Its plug-and-play design, coupled with readily available sample code, simplifies development and deployment, making it suitable for both educational and professional projects.
2. Ürün Bittiview
2.1 Temel Özellikler
- High-Accuracy Oxygen Detection: Measures O₂ concentration from 0% to 25% Vol with a resolution of 0.15% Vol.
- High Precision & Anti-Interference: Features excellent sensitivity (0.10±0.05 mA in air), repeatability (<2%), and long-term stability (<2%/month).
- Hızlı Yanıt Süresi: Provides reliable readings with a response time of ≤15 seconds.
- Geniş Uyumluluk: Operates with 3.3V to 5.5V DC input and outputs via I2C, compatible with Arduino, ESP32, and Raspberry Pi.
- Tak ve Çalıştır: Includes Gravity interface and sample code for quick setup and calibration.
- Dayanıklı ve Güvenilir: Designed for industrial-grade reliability with a 2-year lifespan in air and robust performance in harsh conditions (-20~50°C, 0~99%RH non-condensing).
2.2 Bileşenler
The Gravity: I2C Electrochemical Oxygen Sensor package includes the following components:
- Gravity: I2C Electrochemical Oxygen Sensor Module (SEN0322)
- Gravity-4P I2C/UART Sensor Cable
- Montaj Vidaları

Figure 2.2.1: Gravity: I2C Electrochemical Oxygen Sensor module with connecting cable and mounting screws.
2.3 Sensor Layout

Şekil 2.3.1: Üst view of the sensor module, showing the oxygen sensing element.

Şekil 2.3.2: Alt view of the sensor module, displaying the Gravity interface and I2C pins.
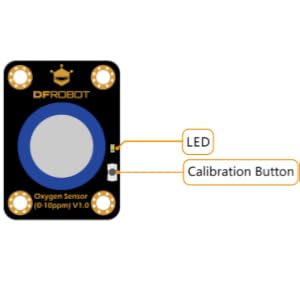
Figure 2.3.3: Diagram illustrating the LED indicator and Calibration Button on the sensor module.
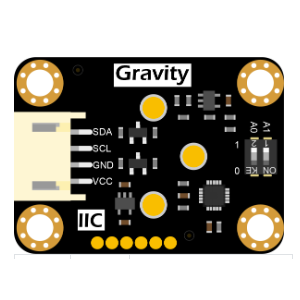
Figure 2.3.4: Diagram showing the I2C communication pins (SDA, SCL, GND, VCC) and address selection switch.
3. Kurulum
3.1 Donanım Bağlantısı
The Gravity: I2C Electrochemical Oxygen Sensor connects to your microcontroller via the I2C interface. Use the provided Gravity-4P I2C/UART Sensor Cable for connection.
- Connect the 4-pin Gravity cable to the sensor module's connector.
- Connect the other end of the Gravity cable to the I2C port on your Arduino, ESP32, or Raspberry Pi board. Ensure the pins are matched correctly:
- SDA (Data Line) to SDA pin on microcontroller
- SCL (Clock Line) to SCL pin on microcontroller
- VCC (Power) to 3.3V or 5V (compatible with 3.3V-5.5V)
- Yeraltı (Ground) to GND pin on microcontroller
- Optionally, adjust the I2C address using the switch on the back of the sensor if multiple I2C devices are used and address conflicts arise. Refer to the sensor's datasheet for default and alternative addresses.

Şekil 3.1.1: Ör.ample hardware connection of the oxygen sensor to an Arduino board.
3.2 Yazılım Kurulumu
To interface with the sensor, you will need to use the appropriate library for your chosen microcontroller platform. DFROBOT provides sample code and libraries for Arduino, ESP32, and Raspberry Pi, which can typically be found on their official product page or GitHub repository.
- Download and install the necessary library for the Gravity: I2C Electrochemical Oxygen Sensor (e.g., `DFRobot_OxygenSensor` for Arduino IDE).
- Eskiyi açample sketch provided with the library. This sketch typically includes basic code for initializing the sensor, performing calibration, and reading oxygen concentration.
- Upload the code to your microcontroller.
4. Kullanım Talimatları
4.1 Kalibrasyon
The sensor can be calibrated in the air, which is typically assumed to have an oxygen concentration of 20.9% Vol. Follow these steps for calibration:
- Ensure the sensor is connected and powered on.
- Place the sensor in a well-ventilated area with normal atmospheric air.
- Press and hold the calibration button on the sensor module for approximately 3-5 seconds until the LED indicator changes state (e.g., blinks or changes color), indicating calibration mode.
- Release the button. The sensor will perform an automatic calibration based on the ambient oxygen level. The LED will typically return to its normal operating state once calibration is complete.
- Alternatively, some libraries may allow software-based calibration. Refer to the specific library documentation for details.
4.2 Reading Oxygen Data
After successful setup and calibration, you can read the oxygen concentration data from the sensor. The provided sample code will typically demonstrate how to do this.
- Initialize the sensor object in your code.
- Use the appropriate function (e.g., `getOxygenData()` or `readOxygenConcentration()`) from the sensor library to retrieve the current oxygen level.
- The data will be returned as a floating-point number representing the oxygen concentration in percentage by volume (% Vol).
- You can then display this data on a serial monitor, LCD, or integrate it into your application logic.
5. Bakım
5.1 Temizlik
The sensor module generally requires minimal cleaning. If dust or debris accumulates on the sensor surface, gently wipe it with a soft, dry, lint-free cloth. Avoid using liquid cleaners or abrasive materials, as these can damage the sensing element.
5.2 Depolama
When not in use, store the sensor in a cool, dry environment, away from direct sunlight and extreme temperatures. Keep it in its original packaging or an anti-static bag to protect it from physical damage and electrostatic discharge.
5.3 Sensor Lifetime
The electrochemical sensing element has a typical lifespan of 2 years when exposed to air. The sensor's performance may degrade over time, and recalibration or replacement may be necessary to maintain accuracy.
6. Sorun Giderme
| Sorun | Olası Neden | Çözüm |
|---|---|---|
| No data output / Sensor not detected | Yanlış kablolama Incorrect I2C address Güç kaynağı sorunu Library not installed or incorrect code | Verify all connections (SDA, SCL, VCC, GND). Check the I2C address switch setting and ensure it matches the code. Confirm power supply is within 3.3V-5.5V. Ensure the correct library is installed and the sample code is uploaded correctly. |
| Yanlış okumalar | Sensör kalibre edilmedi Çevresel müdahale Sensor aging | Perform air calibration as described in Section 4.1. Ensure the sensor is in a stable environment during measurement. Consider sensor replacement if it's past its expected lifespan or consistently provides erratic readings after recalibration. |
| Kalibrasyon başarısız oldu. | Incorrect calibration procedure Sensor not in fresh air Arızalı sensör | Review calibration steps carefully. Ensure the sensor is in an open area with normal atmospheric oxygen (approx. 20.9% Vol) during calibration. If issues persist, the sensor may be faulty. |
7. Özellikler
| Parametre | Değer |
|---|---|
| Algılama Aralığı | 0 ~ 25% Vol |
| Çözünürlük | % 0.15 Hacim |
| Kesinlik | ±1.5% Vol (typical) |
| Tepki Süresi (T90) | ≤15 saniye |
| Çalışma Hacmitage | 3.3V ~ 5.5VDC |
| Çıkış Arayüzü | I2C |
| Çalışma Sıcaklığı | -20°C ~ 50°C |
| Çalışma Nemi | %0 ~ 99 RH (yoğuşmasız) |
| Sensör Ömrü | 2 yıl (havada) |
| Boyutlar (Modül) | Yaklaşık. 2.48 x 2.2 x 1.14 inç (63 x 56 x 29 mm) |
| Ağırlık | 37 gram (1.31 ons) |
| Malzeme | Naylon |
8. Garanti ve Destek
DFROBOT products are designed for reliability and performance. For specific warranty information, technical support, or further assistance, please refer to the official DFROBOT website or contact their customer service directly. You can often find detailed datasheets, application notes, and community forums on their support pages.
DFROBOT Official Webalan: https://www.dfrobot.com/


