1. Giriş
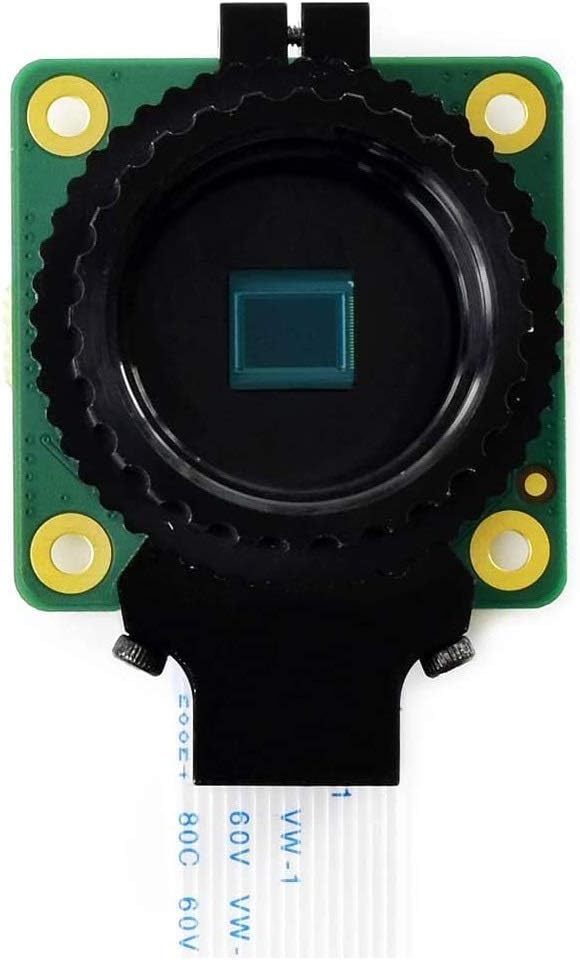
The waveshare Raspberry Pi HQ Camera Module (RP-00261) is a high-quality imaging solution designed for Raspberry Pi boards. It features a 12.3-megapixel Sony IMX477 sensor, offering significantly higher resolution and improved low-light performance compared to previous Raspberry Pi camera modules. This module supports interchangeable C-mount and CS-mount lenses, providing flexibility for various photographic and video applications. It is compatible with Raspberry Pi 4, 3 Model B, and other models, enabling users to integrate advanced imaging capabilities into their projects.

Figure 1: Raspberry Pi HQ Camera Module with a lens attached.
2. Paket İçeriği
Aşağıda listelenen tüm öğelerin paketinizde bulunduğunu doğrulayın:
- Kamera Gövdesi
- C-CS Adapter Ring
- Toz Kapağı
- FPC Cable (for connecting to Raspberry Pi)
- Tornavida

Figure 2: Contents of the Raspberry Pi HQ Camera Module package.
3. Donanım Bittiview
The Raspberry Pi HQ Camera Module consists of several key components:
- Ana Devre Kartı: Houses the IMX477 sensor and processing components.
- Main Housing and Sensor: The core camera unit.
- Back Focus Adjustment Ring: Used to fine-tune the focus for different lenses.
- Back Focus Lock Screw: Secures the back focus adjustment ring.
- Optional C-CS Adapter: Allows compatibility with CS-mount lenses.
- Toz Kapağı: Protects the sensor when no lens is attached.
- Ribbon to Raspberry Pi: Flexible cable for data transfer and power.
- Montaj delikleri: For securing the camera module.
- Optional Tripod Mount: For stable positioning.

Şekil 3: Patlatılmış view of the Raspberry Pi HQ Camera Module components.
Şekil 4: Ön view of the camera module.

Şekil 5: Geri view of the camera module.
4. Kurulum
4.1 Raspberry Pi'ye Bağlanma
To connect the HQ Camera Module to your Raspberry Pi, follow these steps:
- Locate the CSI (Camera Serial Interface) port on your Raspberry Pi board. This is typically labeled "CAMERA".
- Gently pull up the plastic clip on the CSI connector.
- Insert the FPC (Flexible Printed Circuit) cable from the camera module into the CSI port, ensuring the silver contacts on the cable face the silver contacts in the connector.
- Push the plastic clip back down to secure the cable.
- For Raspberry Pi Zero models, an additional Raspberry Pi Zero v1.3 Camera Cable may be required (sold separately).

Figure 6: Raspberry Pi HQ Camera Module connected to different Raspberry Pi models.
4.2 Lenslerin Takılması
The HQ Camera Module supports C-mount and CS-mount lenses. Use the included C-CS adapter ring for CS-mount lenses. Screw the desired lens onto the camera module's lens mount. Adjust the back focus ring as needed for optimal image clarity.
5. Kullanım Talimatları
After connecting the camera module, you will need to enable it in your Raspberry Pi's software settings. Refer to the official Raspberry Pi documentation for specific software configuration steps.
5.1 Camera Functionalities Demonstration
The following video demonstrates general camera functionalities such as autofocus, manual focus, and digital zooming. Please note that this video features a different camera module (Arducam 64MP Autofocus Raspberry Pi Camera Module B0399) but the principles of operation for these features are broadly applicable to the Raspberry Pi HQ Camera Module.
Video 1: Demonstration of camera focus and zoom features. This video is for the Arducam 64MP Autofocus Raspberry Pi Camera Module B0399 and is provided by the seller to illustrate general camera functionalities. Specific performance may vary with the waveshare Raspberry Pi HQ Camera Module.
6. Özellikler
Key technical specifications of the Raspberry Pi HQ Camera Module:

Figure 7: Detailed specifications of the camera module.
- Sensör: Sony IMX477R, 12.3MP, 4056 (H) x 3040 (V)
- CMOS Diagonal Size: 7.9mm
- Piksel Boyutu: 1.55µm (H) x 1.55µm (V)
- Çıktı: RAW12 / 10 / 8, COMP8
- Geri Odak: Adjustable (12.5mm-22.4mm)
- Lens Support: C-mount / CS-mount (C-CS adapter included)
- IR Kesim Filtresi: Entegre
- Tripod Dağı: 1/4"-20
- Uyumluluk: FCC 47 CFR Part 15, Subpart B, Class B Digital Device; Electromagnetic Compatibility Directive (EMC) 2014/30/EU; Restriction of Hazardous Substances (RoHS) Directive 2011/65/EU
- Ürün Ağırlığı: 1.44 ons
- Paket Boyutları: 3.74 x 1.65 x 1.46 inç
- Ürün Model Numarası: RP-00261
7. Anahat Boyutları
The physical dimensions of the Raspberry Pi HQ Camera Module are provided below for integration into custom enclosures or projects.

Figure 8: Outline dimensions of the camera module (all measurements in millimeters).
8. Higher Resolution and Imaging Effect
The Raspberry Pi HQ Camera Module offers a significant upgrade in resolution and sensitivity. With 12.3 megapixels, it provides nearly 50% greater area per pixel compared to the 8-megapixel Camera Module V2, resulting in improved low-light performance and sharper imaging effects.

Figure 9: Visual comparison of imaging quality between an 8MP camera and the 12.3MP HQ Camera.
9. Bakım
- Keep the camera module and lenses clean and free from dust. Use a soft, lint-free cloth for cleaning.
- Avoid touching the sensor directly. Always use the dust cap when no lens is attached.
- Store the module in a dry, cool environment away from direct sunlight and extreme temperatures.
- İşlemden önce tüm bağlantıların güvenli olduğundan emin olun.
10. Sorun Giderme
- Kamera algılanmadı:
- Check if the FPC cable is correctly inserted and secured in both the camera module and the Raspberry Pi's CSI port.
- Ensure the camera is enabled in your Raspberry Pi's software configuration (e.g., via
raspi-config). - Verify that your Raspberry Pi operating system is up to date.
- Poor image quality/focus:
- Adjust the back focus adjustment ring on the camera module.
- Lensin temiz ve lekesiz, tozdan arındırılmış olduğundan emin olun.
- Check lens compatibility and ensure it is securely attached.
- Modül aşırı ısınıyor:
- Ensure adequate ventilation around the Raspberry Pi and camera module.
- Consider using a heatsink or fan for prolonged high-load operations.
11. Garanti ve Destek
Garanti bilgileri ve teknik destek için lütfen resmi waveshare sitesine bakın. website or contact their customer service directly. Specific warranty terms may vary based on region and retailer.
For additional resources and community support, visit the official Raspberry Pi forums and documentation.


