1. Giriş ve Üzeriview
This manual provides detailed instructions for the installation, operation, maintenance, and troubleshooting of the ASRock 760GM-HDV Rev: 1.01 Desktop Motherboard. This motherboard is designed for AMD AM3/AM3+ processors and supports DDR3 memory, offering a reliable foundation for personal computer systems.
Key features include an AMD 760G/SB710 chipset, support for up to 32GB DDR3 RAM, and integrated graphics with HDMI, VGA, and DVI outputs. It also provides USB and SATA 3GB/s connectivity.
2. Kurulum ve Kurulum
Before beginning installation, ensure your workspace is clean, well-lit, and static-free. Always handle the motherboard by its edges and use an anti-static wrist strap to prevent electrostatic discharge (ESD) damage.
2.1 Anakart Düzeni
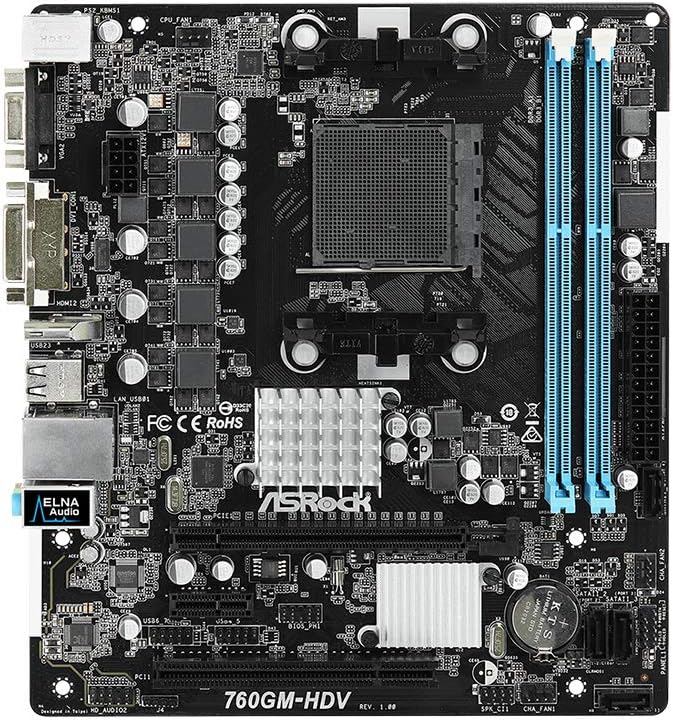
Şekil 1: Tepe view of the ASRock 760GM-HDV motherboard, showing the CPU socket, RAM slots, PCIe slots, and various connectors.
2.2 Bileşen Kurulum Adımları
- Davayı Hazırlayın: Install the I/O shield into the rear opening of your computer case. Ensure standoffs are correctly aligned and installed for the Micro ATX form factor.
- CPU'yu takın: Open the CPU socket lever. Carefully align your AMD AM3/AM3+ processor with the socket, ensuring the golden triangle on the CPU matches the triangle on the socket. Gently place the CPU into the socket without force. Close the lever to secure the CPU.
- CPU Soğutucusunu Takın: Apply thermal paste to the CPU (if not pre-applied on the cooler). Mount the CPU cooler according to its manufacturer's instructions, ensuring it is securely fastened and the fan cable is connected to the CPU_FAN header on the motherboard.
- RAM'i takın: Open the clips on both ends of the DDR3 DIMM slots. Align the memory module's notch with the slot's key. Press down firmly on both ends of the module until the clips snap into place. This motherboard supports dual-channel DDR3 memory.
- Anakartı Monte Edin: Anakartı dikkatlice kasaya yerleştirin ve vida deliklerini destek ayaklarıyla hizalayın. Anakartı vidalarla sabitleyin.
- Güç Kaynağını Bağlayın: Güç kaynağınızdan gelen 24 pinli ATX güç konektörünü ve 4 pinli ATX 12V güç konektörünü anakart üzerindeki ilgili portlara bağlayın.
- Depolama Aygıtlarını Bağlayın: Connect SATA data cables from your hard drives or SSDs to the SATA 3GB/s ports on the motherboard. Connect power cables from the power supply to your storage devices.
- Ön Panel Kablolarını Bağlayın: Connect the power button, reset button, HDD LED, power LED, and front USB/audio headers from your case to the corresponding pins on the motherboard. Refer to the motherboard's silkscreen labels for correct orientation.
- Genişletme Kartlarını Takın: If using a dedicated graphics card or other PCIe expansion cards, insert them into the appropriate PCIe slots and secure them with the case's retention mechanism.
3. Kullanım Talimatları
3.1 Initial Power-On and BIOS Access
- After all components are installed and connected, connect your monitor, keyboard, and mouse to the appropriate ports.
- Power on your system. During the boot process, repeatedly press the SİL or F2 BIOS/UEFI kurulum yardımcı programına girmek için tuşa basın.
- In the BIOS, you can configure boot order, system time, and various hardware settings. Save changes before exiting.
3.2 Çevre Birimlerini Bağlama
The ASRock 760GM-HDV motherboard offers a range of rear I/O ports for connecting external devices:

Şekil 2: Rear I/O panel of the ASRock 760GM-HDV motherboard, showing PS/2, VGA, DVI, HDMI, USB, LAN, and audio ports.
- PS/2 Bağlantı Noktaları: For connecting legacy PS/2 keyboards and mice.
- VGA, DVI, HDMI Ports: For connecting displays. Use one port at a time for integrated graphics output.
- USB Bağlantı Noktaları: For connecting USB devices such as keyboards, mice, external drives, and printers.
- LAN Bağlantı Noktası: For connecting to a wired network using an Ethernet cable.
- Ses Jakları: Hoparlör, kulaklık ve mikrofon bağlamak için.
3.3 Sürücü Kurulumu
After installing your operating system, install the necessary drivers for the motherboard's chipset, integrated graphics, audio, and LAN. These drivers are typically provided on a support CD or can be downloaded from the ASRock official webBelirli modeliniz için site.
4. Bakım
- Toz Temizleme: Regularly clean dust from inside your computer case, especially around the CPU cooler, chipset heatsink, and fan vents. Use compressed air and ensure the system is powered off and unplugged.
- BIOS Güncellemeleri: ASRock'ı periyodik olarak kontrol edin. website for BIOS updates. BIOS updates can improve system stability, compatibility, and performance. Follow the update instructions carefully to avoid system damage.
- Bileşen Kontrolleri: Ensure all cables are securely connected and no components are loose. Check for any signs of physical damage or overheating.
5. Sorun Giderme
- Güç Yok/POST Yok:
- Verify all power cables (24-pin ATX, 4-pin 12V) are securely connected.
- CPU ve RAM'in doğru şekilde takıldığından emin olun.
- Yalnızca gerekli bileşenlerle (CPU, bir RAM çubuğu, entegre grafik kartı yoksa GPU) önyükleme yapmayı deneyin.
- Clear CMOS by removing the CMOS battery for a few minutes or using the clear CMOS jumper.
- Görüntü yok:
- Ensure the monitor is connected to the correct video output (motherboard's integrated graphics or a dedicated graphics card).
- Check monitor power and input selection.
- If using a dedicated graphics card, ensure it is properly seated and has power.
- İşletim Sistemi Başlatılmıyor:
- Check boot order in BIOS to ensure the correct drive is selected.
- Verify SATA data and power connections to the boot drive.
- Depolama sürücüsünde bir tanılama kontrolü çalıştırın.
6. Özellikler
| Özellik | Şartname |
|---|---|
| Üretici | ASR kaya |
| Model Numarası | 760GM-HDV |
| Yonga Seti Türü | AMD 760G / SB710 |
| CPU Soketi | AM3 / AM3+ |
| Uyumlu İşlemciler | AMD Athlon, AMD Sempron (AM3/AM3+ series) |
| RAM Bellek Teknolojisi | DDR3 |
| RAM Bellek Maksimum Boyutu | 32 GB |
| Bellek Saat Hızı | 3400 MHz'e kadar (OC) |
| Entegre Grafikler | AMD Radeon HD 3000 (on 760G chipset) |
| Video Çıkış Portları | VGA, DVI, HDMI |
| SATA Bağlantı Noktaları | SATA 3GB/s |
| USB Bağlantı Noktaları | USB 2.0 (rear and internal headers) |
| Yerel Ağ | Gigabit LAN |
| Form Faktörü | Mikro ATX |
| Ana Güç Konektörü | 24 pinli ATX |
| CPU Güç Konektörü | 4-pin ATX 12V |
7. Garanti ve Destek
Ayrıntılı garanti bilgileri için lütfen ürününüzle birlikte verilen garanti kartına bakın veya resmi ASRock web sitesini ziyaret edin. website. ASRock provides technical support for its products. For assistance, please visit the ASRock support page or contact their customer service department.
ASRock Resmi Webalan: www.asrock.com


