1. Giriş
Thank you for choosing the HiLook HIKVISION 204U-K1 4-Channel 5MP HD DVR. This manual provides essential information for the proper installation, operation, and maintenance of your digital video recorder. Please read this manual thoroughly before using the product and retain it for future reference.
2. Önemli Güvenlik Talimatları
- Güç Kaynağı: Yalnızca bu cihaz için belirtilen güç adaptörünü kullanın. Güç hacminin doğru ayarlandığından emin olun.tage is stable and meets the requirements.
- Havalandırma: Havalandırma açıklıklarını kapatmayın. Üreticinin talimatlarına uygun şekilde kurulum yapın.
- Su ve Nem: Cihazı yağmur veya neme maruz bırakmayın. Üzerine vazo gibi sıvı dolu nesneler koymayın.
- Sıcaklık: Cihazı belirtilen sıcaklık aralığında çalıştırın. Aşırı sıcak veya soğuk ortamlardan kaçının.
- Temizlik: Sadece kuru bir bezle temizleyin. Sıvı ve sprey temizleyici kullanmayın.
- Servis: Bu ürüne kendiniz servis vermeye çalışmayın. Tüm servis işlemleri için kalifiye servis personeline başvurun.
- Sabit Disk: Handle the hard drive with care. Improper installation or removal can cause data loss or damage.
3. Paket İçeriği
Paketi açarken tüm ürünlerin eksiksiz ve iyi durumda olduğundan emin olun. Herhangi bir ürün eksik veya hasarlıysa, satıcınızla iletişime geçin.
- HiLook HIKVISION 204U-K1 DVR Unit
- Güç Adaptörü
- USB Mouse
- SATA Data Cable (for HDD connection)
- SATA Power Cable (for HDD connection)
- Hızlı Başlangıç Kılavuzu

Figure 3.1: The HiLook HIKVISION 204U-K1 DVR unit, shown with an optional hard drive and included accessories such as a mouse and cables.
4. İlk Kurulum
4.1. Connecting the DVR
Follow these steps to connect your DVR to cameras, a monitor, and the network.
- Sabit diski takın (İsteğe bağlı): Eğer DVR cihazınızda önceden takılmış bir sabit disk yoksa, DVR cihazını açın.asing, connect the SATA data and power cables to the HDD, and secure the HDD inside the DVR.
- Kameraları Bağlayın: Connect your surveillance cameras to the BNC video input ports on the rear panel of the DVR. This model supports 4 channels.
- Monitörü Bağla: Monitörü arka paneldeki HDMI veya VGA çıkış portuna bağlayın.
- Ağa Bağlan: Connect an Ethernet cable from the DVR's LAN port to your router or network switch for remote access and network features.
- USB Fareyi Bağlayın: Plug the included USB mouse into one of the USB ports for navigation.
- Gücü bağlayın: Güç adaptörünü DVR'ın güç girişine bağlayın ve ardından bir elektrik prizine takın.

Figure 4.1: Rear panel of the DVR, illustrating the various input and output ports including video in, audio in/out, VGA, HDMI, USB, network interface, and power supply.
4.2. Açma
After all connections are made, the DVR will power on automatically. The system will boot up, and you should see the HiLook logo on your connected monitor. Follow the on-screen prompts for initial setup, including setting up an administrator password and configuring network settings.
5. Çalıştırma Kılavuzu
5.1. Kullanıcı Arayüzü Bittiview
The DVR's graphical user interface (GUI) can be navigated using the USB mouse. Right-click to access the main menu, and left-click to select options. The live view displays feeds from connected cameras.
5.2. Kayıt ve Oynatma
- Manuel Kayıt: canlı yayından view, click the record icon to start or stop manual recording for a specific channel.
- Planlanmış Kayıt: Access the main menu, navigate to Record > Schedule to set up continuous or motion-triggered recording schedules for each camera.
- Playback: Ana menüden şunu seçin: Playback. Choose the date, time, and camera channel to review kaydedilmiş footage.
5.3. Hareket Algılama ve Uyarılar
The DVR supports smart motion detection and can send alerts via email or push notifications to a mobile application.
- Hareket Algılama Ayarları: Git Ana Menü > Alarm > Hareket Algılama. Select the camera channel, enable motion detection, and define the detection area and sensitivity.
- Set Up Email Alerts: In Main Menu > Network > Email, configure your SMTP server settings and recipient email addresses. Enable email linkage for motion detection events.
- Mobile App Notifications: Download the official HiLook mobile application. Add your DVR to the app and enable push notifications for alarm events.

Figure 5.1: A smartphone screen showing a real-time email notification triggered by smart motion detection.

Figure 5.2: A smartphone displaying multiple smart motion-triggered alerts, indicating movement detected in specific areas monitored by surveillance cameras.
6. Bakım
- Temizlik: Regularly clean the exterior of the DVR with a soft, dry cloth. Ensure ventilation openings are free from dust.
- Donanım Yazılımı Güncellemeleri: Resmi HiLook sayfasına göz atın. website for the latest firmware updates. Updating firmware can improve performance and add new features. Follow the provided instructions carefully.
- Sabit Disk Yönetimi: Periodically check the health of your hard drive through the DVR's system settings. Ensure sufficient storage space is available for recordings.
- Şifre Güvenliği: Regularly change your administrator password to maintain system security.
7. Sorun Giderme
If you encounter issues with your DVR, refer to the table below for common problems and solutions.
| Sorun | Olası Neden | Çözüm |
|---|---|---|
| Monitörde video çıkışı yok | Loose HDMI/VGA cable; Incorrect monitor input; DVR not powered on. | Check cable connections; Select correct input on monitor; Verify power supply. |
| Kamera görüntüsü yok | Camera not powered; Loose BNC cable; Faulty camera. | Ensure camera power; Check BNC connections; Test camera with another input if possible. |
| DVR'a uzaktan erişilemiyor | Network cable disconnected; Incorrect network settings; Firewall blocking access. | Verify Ethernet connection; Check IP address, gateway, DNS settings; Configure router/firewall. |
| Kayıt yok | Hard drive not installed/initialized; Recording schedule not set; HDD full. | Install/initialize HDD; Configure recording schedule; Check HDD status and capacity. |
| Hareket algılama çalışmıyor | Motion detection disabled; Sensitivity too low; Detection area not set. | Enable motion detection; Adjust sensitivity; Define detection area. |
8. Teknik Özellikler
Below are the key technical specifications for the HiLook HIKVISION 204U-K1 DVR.
| Özellik | Şartname |
|---|---|
| Örnek | 204U-K1 |
| Video Girişi | 4-channel BNC interface (supports HDTVI/AHD/CVI/CVBS/IP) |
| Video Sıkıştırma | H.265 Pro+/H.265 Pro/H.265/H.264 |
| Video Çıkışı | 1 HDMI, 1 VGA (simultaneous output) |
| HDMI Çıkış Çözünürlüğü | Up to 4K (3840 × 2160) for 204U-K1 |
| Ses Girişi/Çıkışı | 1-ch RCA (2-way audio) / 1-ch RCA |
| Sabit Disk Sürücüsü (HDD) | 1 SATA arayüzü, 10 TB'a kadar kapasite |
| Ağ Arayüzü | 1 adet RJ45 10M/100M kendinden uyarlanabilir Ethernet arayüzü |
| USB Arayüzü | 2 adet USB 2.0 |
| Güç Kaynağı | 12 VDC |
| Boyutlar (G × D × Y) | Approx. 200 × 200 × 45 mm (7.9 × 7.9 × 1.8 inch) |
| Ağırlık (HDD'siz) | Yaklaşık 1 kg (2.2 lb) |
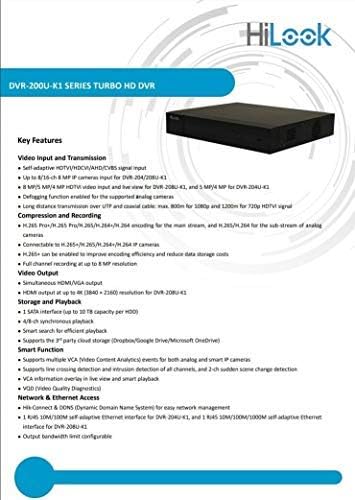
Figure 8.1: A detailed list of key features for the DVR-200U-K1 series, including video input/transmission, compression, video output, storage, smart functions, and network access.
9. Garanti ve Müşteri Desteği
Your HiLook HIKVISION 204U-K1 DVR comes with a limited warranty. Please refer to the warranty card included in your package or visit the official HiLook website for detailed warranty terms and conditions. For technical assistance, troubleshooting, or service inquiries, please contact your authorized HiLook dealer or customer support.
Çevrimiçi Kaynaklar: For additional support, firmware downloads, and FAQs, please visit the official HiLook support webalan.


