1. Giriş
This manual provides detailed instructions for the Waveshare 2-inch LCD Display Module. This module features an IPS screen with a 240x320 resolution, an embedded ST7789 controller, and communicates via a Serial Peripheral Interface (SPI). It is designed for integration with various microcontrollers and development boards, including Raspberry Pi, Arduino, and ESP32.
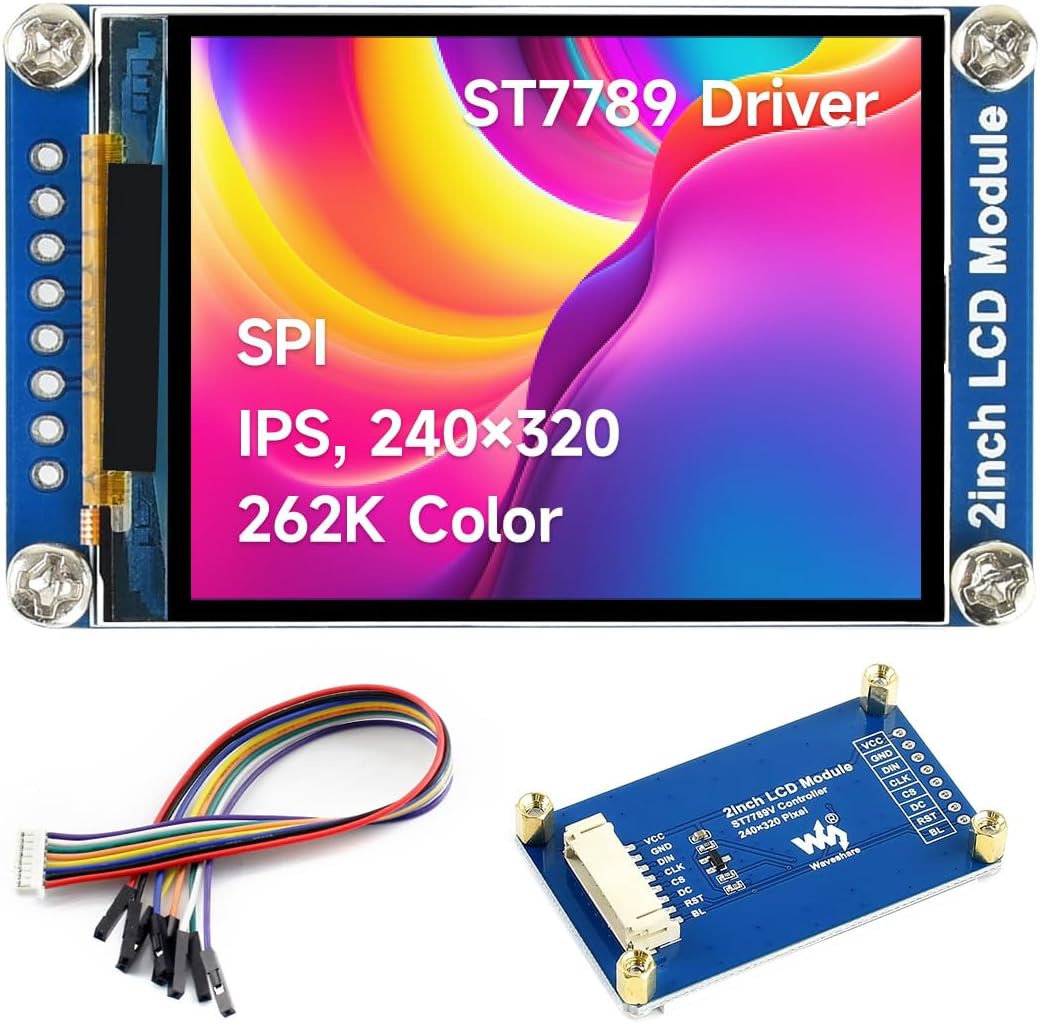
Image 1.1: The Waveshare 2-inch LCD Display Module, highlighting its key features like the ST7789 driver, SPI interface, IPS technology, 240x320 resolution, and 262K color support.
2. Özellikler
- Görüntüleme Türü: IPS screen, 2-inch diagonal.
- Çözünürlük: 240 × 320 pixels.
- Denetleyici: Embedded ST7789 driver.
- Arayüz: SPI (Serial Peripheral Interface), requiring minimal GPIO pins.
- Renk Derinliği: 262K colors (RGB).
- Arka aydınlatma: LED.
- Çalışma Hacmitage: 3.3V / 5V compatible.
- Uyumluluk: Designed for use with Raspberry Pi, Jetson Nano, Arduino, STM32, and similar platforms.

Image 2.1: Visual summary of the display module's core features, including size, resolution, color depth, interface type, and driver IC.
3. Paket İçeriği
The standard package for the Waveshare 2-inch LCD Display Module includes the following items:
- 1x Waveshare 2-inch LCD Display Module
- 1x Connection Cable (typically a 8-pin ribbon cable with female-to-female jumpers)

Image 3.1: The display module and its accompanying connection cable as typically found in the product package.
4. Özellikler
| Parametre | Değer |
|---|---|
| Çalışma Hacmitage | 3.3V / 5V |
| Çözünürlük | 240 × 320 piksel |
| İletişim Arayüzü | 4-kablolu SPI |
| Ekran Boyutu | 30.60×40.80 mm |
| Ekran Paneli | IPS |
| Piksel Boyutu | 0.0975×0.0975 mm |
| Sürücü IC | ST7789VW |
| Modül Boyutu | 58.0×35.0 mm |

Image 4.1: A visual representation of the module's technical specifications.
5. Pinout and Interface Description
The module utilizes an SPI control interface, requiring specific pin connections for proper operation. Below is a description of each pin:
| Pin | Tanım |
|---|---|
| VCC | Power input (3.3V / 5V) |
| Yeraltı | Zemin |
| DIN | SPI Data Input (MOSI) |
| CLK | SPI Clock Input (SCK) |
| CS | Chip Select, low active |
| DC | Veri/Komut seçimi (veri için yüksek, komut için düşük) |
| RST | Sıfırla, düşük aktif |
| BL | Aydınlatma kontrolü |

Image 5.1: Pin definitions and their functions on the display module.
6. Setup and Hardware Connection
This section details how to connect the 2-inch LCD Display Module to common development boards.
6.1. Connecting with Raspberry Pi
Follow the diagram below for connecting the display module to a Raspberry Pi board. Ensure correct pin mapping for VCC, GND, DIN (MOSI), CLK (SCK), CS, DC, RST, and BL.
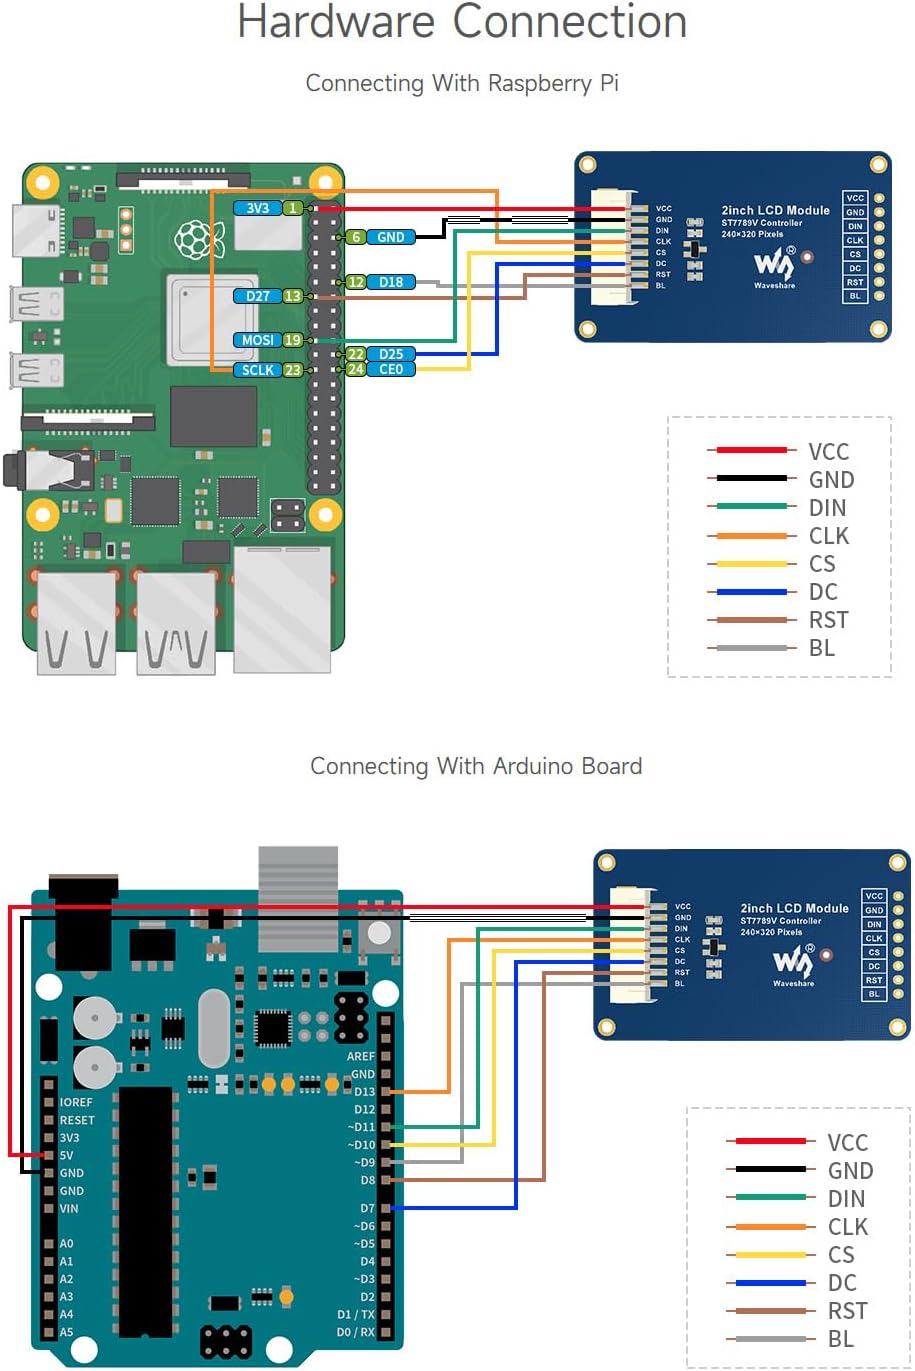
Image 6.1: Connection diagram for Raspberry Pi. Note the specific GPIO pins used for SPI communication and control.
6.2. Connecting with Arduino Board
Refer to the following diagram for connecting the display module to an Arduino board. Pay attention to the SPI pins and control pins on your specific Arduino model.

Image 6.2: Connection diagram for Arduino. Ensure proper voltage levels and pin assignments.
7. Kullanım Talimatları
Once the hardware connections are established, the display module requires software configuration to function. Waveshare provides development resources and example code for various platforms.
7.1. Software Libraries and Examples
It is recommended to use the official Waveshare development resources, which typically include:
- Libraries for ST7789 driver.
- Example code for Raspberry Pi, Arduino, STM32, etc.
These resources usually contain functions for initializing the display, drawing pixels, lines, shapes, text, and displaying images. Consult the specific documentation provided with the development resources for detailed API usage.
7.2. Basic Display Initialization Sequence
A typical initialization sequence in software involves:
- Powering up the module (VCC and GND).
- Asserting the RST (Reset) pin.
- Sending initialization commands to the ST7789 driver via SPI.
- Configuring display orientation and color mode.
- Enabling the backlight (BL pin).
8. Bakım
The Waveshare 2-inch LCD Display Module is a robust electronic component designed for long-term use with minimal maintenance. Adhering to the following guidelines will help ensure its longevity:
- İşleme: Always handle the module by its edges to avoid touching the display surface or electronic components.
- Temizlik: If the display surface requires cleaning, use a soft, lint-free cloth. For stubborn marks, lightly dampen the cloth with distilled water or an electronics-safe screen cleaner. Avoid abrasive materials or harsh chemicals.
- Depolamak: Store the module in a dry, anti-static environment, away from direct sunlight and extreme temperatures.
- Güç Kaynağı: Güç kaynağı hacmini sağlayıntage is within the specified 3.3V to 5V range. Over-voltagBu durum modüle zarar verebilir.
- Statik elektrik: Take precautions against electrostatic discharge (ESD) when handling the module, as static can damage sensitive electronic components.
9. Sorun Giderme
If you encounter issues with your Waveshare 2-inch LCD Display Module, consider the following troubleshooting steps:
- Ekran Yok/Boş Ekran:
- Verify all power connections (VCC, GND) are correct and stable.
- Check the backlight (BL) pin connection and ensure it is enabled in your software.
- Confirm the RST (Reset) pin is correctly connected and toggled during initialization.
- Ensure the SPI communication lines (DIN, CLK, CS, DC) are correctly wired and that your software is sending data.
- Double-check the initialization sequence in your code against the ST7789 datasheet or Waveshare examples.
- Yanlış Renkler/Bozulmuş Görüntü:
- Verify the color mode settings in your software match the display's 262K color depth.
- Check for loose or incorrect SPI data line connections.
- Ensure the display orientation settings (e.g., rotation, mirroring) are configured as desired.
- Yavaş Yenileme Hızı:
- Optimize your SPI communication speed in software, ensuring it's within the limits of your microcontroller and the ST7789 driver.
- Reduce the amount of data being sent to the display if possible, or optimize drawing routines.
- Modül Algılanmadı:
- Ensure the CS (Chip Select) pin is correctly asserted (low active) during SPI communication.
- Check for any short circuits or incorrect wiring that might prevent the module from responding.
10. Anahat Boyutları
The physical dimensions of the Waveshare 2-inch LCD Display Module are provided below for integration into your projects.

Image 10.1: Detailed outline dimensions of the display module in millimeters.
11. Garanti ve Destek
For warranty information, technical support, and additional resources, please refer to the official Waveshare website or contact their customer service. Development resources, including datasheets, schematics, and example code, are typically available on the product's dedicated wiki page or support portal.
Waveshare Resmi Webalan: www.waveshare.com


