1. Giriş
Satın aldığınız için teşekkür ederizasing the Ematic LED Projector. This manual provides essential information for setting up, operating, and maintaining your projector to ensure optimal performance and longevity. Please read this manual thoroughly before using the product and retain it for future reference.
2. Güvenlik Bilgileri
Yangın veya elektrik çarpmasını önlemek için bu cihazı yağmur veya neme maruz bırakmayın. Elektrik çarpmasını önlemek için cihazın kapağını açmayın. Servis işlemlerini yalnızca yetkili personele yaptırın.
- Projektör lensine doğrudan bakmayın.amp Açık.
- Projeksiyon cihazının çevresinde yeterli havalandırma olduğundan emin olun. Havalandırma açıklıklarını kapatmayın.
- Yalnızca projektörle birlikte verilen güç adaptörünü kullanın.
- Projeksiyon cihazını sudan veya herhangi bir sıvıdan uzak tutun.
- Do not place the projector on an unstable surface.
- Unplug the projector from the power outlet during lightning storms or when unused for long periods.
3. Paket İçeriği
- Ematic LED Projector
- Uzaktan kumanda
- Güç Adaptörü
- Kullanıcı Kılavuzu
- AV Kablosu (dahilse)
4. Ürün Bittiview
4.1 Ön View
Şekil 4.1: Ön view of the Ematic LED Projector, highlighting the projection lens.
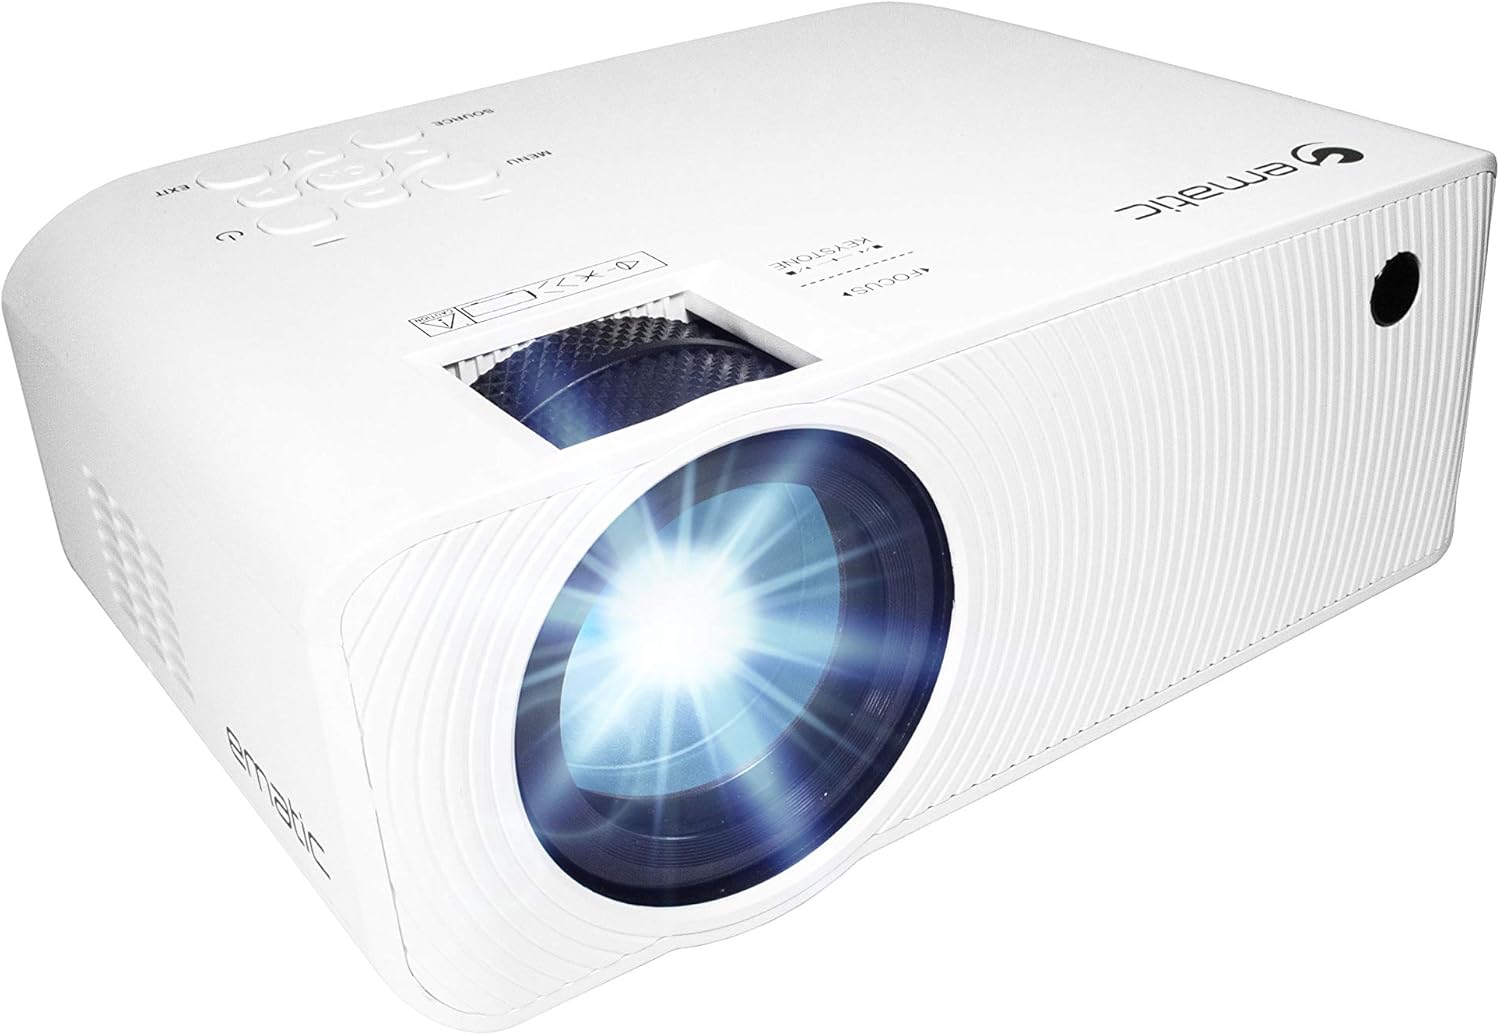
4.2 Üst View ve Kontroller

Şekil 4.2: Üst view of the projector showing the control panel (Menu, Source, Exit, Navigation buttons) and the Focus and Keystone correction dials. A remote control is also visible.
- Odak Halkası: Görüntü netliğini ayarlar.
- Keystone Düzeltmesi: Görüntüdeki yamuk bozulmayı düzeltir.
- Kontrol Paneli: Buttons for Menu, Source selection, Exit, and navigation.
4.3 Arka ve Yan ViewLimanlarla

Figure 4.3: Rear panel of the projector displaying the connectivity options: AUX audio output, AV input, MicroSD card slot, two HDMI inputs, USB port, and DC power input.

Şekil 4.4: Yan view of the projector, highlighting the VGA input port and the infrared (IR) receiver for the remote control.
- YARDIMCI: Harici hoparlör veya kulaklık için 3.5 mm ses çıkışı.
- AV: Kompozit video ve stereo ses girişi.
- MicroSD: Slot for MicroSD memory cards.
- HDMI 1 / HDMI 2: High-Definition Multimedia Interface inputs for digital audio/video.
- USB BAĞLANTI: USB sürücülerden medya oynatımı için USB bağlantı noktası.
- DC IN: Projeksiyon cihazı için güç girişi.
- VGA: Video Graphics Array input for computer connection.
5. Kurulum
- Atama: Projektörü sabit, düz bir yüzeye yerleştirin. Havalandırma için projektörün etrafında yeterli alan olduğundan emin olun. En iyi sonuçlar için viewing, position the projector perpendicular to the projection screen or wall.
- Güç Bağlantısı: Connect the supplied power adapter to the DC IN port on the projector and then plug the adapter into a power outlet.
- İlk Güç Açma: Projeksiyon cihazındaki veya uzaktan kumandadaki güç düğmesine basarak cihazı açın. Güç gösterge ışığı yanacaktır.
- Odak Ayarı: Once the projector is on, rotate the Focus Ring (refer to Figure 4.2) until the projected image is clear and sharp.
- Keystone Düzeltmesi: If the image appears trapezoidal (wider at the top or bottom), adjust the Keystone Correction dial (refer to Figure 4.2) until the image is rectangular.
6. Kullanım Talimatları
- Açma/Kapatma: Press the power button on the projector or remote control. Press again to turn off.
- Giriş Kaynağı Seçimi: Press the "Source" button on the projector or remote control to cycle through available input sources (HDMI 1, HDMI 2, AV, VGA, USB, MicroSD). Select the desired input.
- Menü Navigasyonu: Press the "Menu" button to access the projector's settings. Use the navigation buttons on the projector or remote to browse options and the "OK" button to confirm selections.
- Media Playback (USB/MicroSD): Insert a USB drive or MicroSD card into the respective port. Select "USB" or "MicroSD" as the input source. The projector will display a file browser. Navigate to your desired media file (video, photo, music, text) and press "OK" to play.
- Ses Çıkışı: The projector has built-in speakers (refer to Figure 6.1). For external audio, connect headphones or external speakers to the AUX port (3.5mm audio jack).

Figure 6.1: Projector highlighting its built-in speaker functionality.
7. Bağlantı
The Ematic LED Projector offers multiple connection options to various devices, ensuring versatility for your entertainment and presentation needs.

Figure 7.1: Multimedia device compatibility chart for the projector.

Şekil 7.2: Ör.amples of projector connections to a laptop and smartphone, highlighting supported input types.
- HDMI: Connect Blu-ray players, game consoles (PS4, Xbox), streaming devices (Amazon Fire TV Stick, Chromecast), laptops, and other HDMI-enabled devices.
- USB BAĞLANTI: Medya oynatın files (videos, photos, music) directly from USB flash drives.
- MicroSD: Medya oynatın files directly from MicroSD memory cards.
- AV: Connect older devices like DVD players or VCRs using the included AV cable.
- VGA: Masaüstü bilgisayarları veya eski model dizüstü bilgisayarları bağlayın.
- Audio Out (AUX): Gelişmiş ses deneyimi için harici hoparlörleri veya kulaklıkları bağlayın.
8. Bakım
- Lens Temizliği: Projeksiyon merceğini nazikçe silmek için optik lensler için özel olarak tasarlanmış, yumuşak ve tüy bırakmayan bir bez kullanın. Aşındırıcı temizleyiciler veya aşırı güç kullanmayın.
- Toz Giderimi: Regularly clean the ventilation grilles with a soft brush or compressed air to prevent dust buildup, which can affect performance and lifespan.
- Dış Temizlik: Projektörün dış yüzeyini yumuşak bir bezle silin.amp bez. Sert kimyasallar kullanmaktan kaçının.
- Depolamak: Uzun süre kullanılmadığı zamanlarda, toz birikmesini ve hasarı önlemek için projektörü serin ve kuru bir yerde, tercihen orijinal ambalajında veya koruyucu bir kılıf içinde saklayın.
9. Sorun Giderme
| Sorun | Olası Neden | Çözüm |
|---|---|---|
| Görüntü yansıtılmıyor. | No power; Incorrect input source; Cable not connected properly. | Check power connection; Select correct input source; Reconnect cables securely. |
| Görüntü bulanık | Odak ayarı yapılmamış; Projektör ekrana çok uzak/yakın. | Adjust the Focus Ring; Adjust projection distance. |
| Görüntü yamuk şeklindedir. | Keystone not adjusted; Projector not level. | Adjust the Keystone Correction dial; Ensure projector is on a flat surface. |
| Ses yok | Volume too low; Muted; External speakers not connected or off. | Increase volume; Unmute; Check external speaker connection and power. |
| Uzaktan kumanda çalışmıyor | Batteries dead; Obstruction between remote and IR receiver. | Pilleri değiştirin; Engelleri kaldırın; Uzaktan kumandayı doğrudan projektörün kızılötesi alıcısına doğrultun. |
10. Özellikler
| Özellik | Detay |
|---|---|
| Marka | duygusal |
| Örnek | EMP-720 (Generic) |
| Ekran Çözünürlüğü | 1280 x 720 (Orijinal) |
| Bağlantı Teknolojisi | HDMI, USB, AV, VGA, MicroSD, AUX |
| Özel Özellik | Portable, Built-in Speakers |
| Ürün Ağırlığı | 3.5 pound |
| Ürün Boyutları | 13.85 x 5 x 8.8 inç |
| Lamp Hayat | 20,000 saate kadar (Normal Mod) |
11. Garanti ve Destek
For warranty information and technical support, please refer to the warranty card included with your product or visit the official Ematic webSite. Satın alma belgenizi garanti talepleriniz için saklayın.
Ematic Customer Support: www.ematic.us/support (Örnamp(Bağlantı)


