1. Giriş ve Üzeriview
The Emtek Empowered Motorized Touchscreen Keypad Smart Deadbolt combines Emtek's renowned long-lasting quality with advanced smart home technology. Designed for security and convenience, this deadbolt offers keyless entry, remote access, and intelligent features to enhance your home's safety.
This manual will guide you through the installation, setup, and daily operation of your new smart deadbolt, ensuring you can fully utilize its capabilities.

Şekil 1.1: Ön view of the Emtek Empowered Motorized Touchscreen Keypad Smart Deadbolt.
2. Temel Özellikler
- Arkadan Aydınlatmalı Tuş Takımı: The keypad illuminates with a touch, featuring numbers designed for durability and resistance to wear.
- Opsiyonel Ayarlar: Customize settings such as auto re-lock, privacy mode, and tamper alarms for enhanced security.
- Motorized Deadbolt: Features a quiet motor and a tapered deadbolt to accommodate minor door misalignments.
- Basit Kurulum: Designed to replace existing deadbolts with minimal tools, fitting standard doors 1-3/4” to 2-1/4” thick with a 2-1/8” face bore prep.
- Weather Protected: Includes a rubber gasket for increased protection against outdoor elements.
- Akıllı Bağlantı: Integrated with August technology, allowing for unlimited entry codes, remote control via the August mobile app, and 24/7 activity history.
- Auto-Unlock Function: Features Home Mode and Away Mode, enabling automatic unlocking when you approach your door (within approximately 200 meters) and automatic locking when you leave.
- Sesli Asistan Uyumluluğu: Works seamlessly with Amazon Alexa, Google Assistant, and Siri.
- August Connect Wi-Fi Bridge & DoorSense: The smart bundle includes a pre-installed August module, August Connect Wi-Fi Bridge for remote access, and DoorSense for real-time door status monitoring.
- BILT App Support: Access easy step-by-step 3D instructions for installation and setup via the BILT app.
- 9V Battery Port: A convenient 9V battery port is included to prevent lockouts in case of main battery depletion.
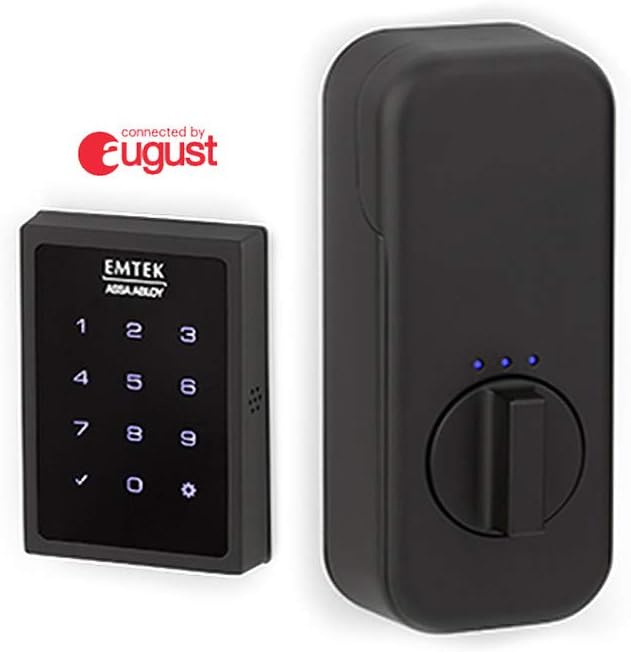
Figure 2.1: Emtek Empowered Smart Deadbolt exterior keypad and interior unit.

Şekil 2.2: Üzeriview of August connectivity features including the mobile app, Wi-Fi bridge, and DoorSense.
3. Paket İçeriği
Kuruluma başlamadan önce tüm bileşenlerin mevcut olduğundan emin olun:
- Pil Kapağı
- İç Rozeti
- Montaj Plakası
- Grev plakası
- Güvenlik Plakası
- Deadbolt Latch (2-3/4”)
- Deadbolt Latch (2-3/8”)
- August Connect
- Ağustos Kapı Duyusu
- AA Piller (x4)
- #8-32 x 5/16” Machine Screws (x4)
- #8 x 3/4” Wood Screws (x2)
- #10-32 x 1-3/8” Machine Screws (x2)
- #10 x 3” Wood Screws (x2)
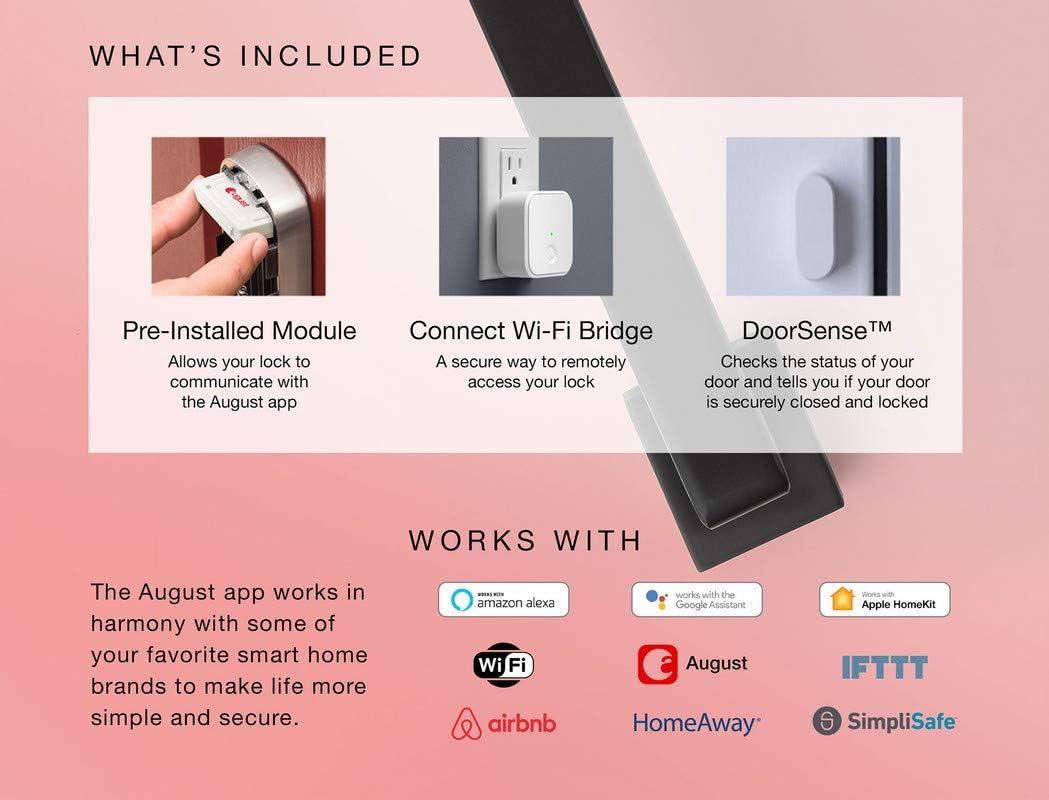
Figure 3.1: Visual representation of included components and smart home compatibility.
4. Kurulum ve Kurulum
The Emtek Empowered Smart Deadbolt is designed for simple installation, typically requiring only a screwdriver. It replaces most existing deadbolts and is compatible with standard doors 1-3/4” to 2-1/4” thick with a standard 2-1/8” face bore door prep.
4.1. Kurulum Öncesi Kontroller
- Ensure your door thickness and bore prep meet the specifications.
- Paket içeriğinin tamamının mevcut olduğundan emin olun.
- For optimal smart features, ensure you have a stable Wi-Fi connection at your installation location.
4.2. Kurulum Adımları
For detailed, step-by-step 3D instructions, it is highly recommended to download and use the BILT uygulaması. The app provides visual guidance for each stage yükleme işlemi.
General steps include:
- Mevcut sürgüyü çıkarın.
- Install the new deadbolt latch into the door edge.
- Dış tuş takımı düzeneğini monte edin.
- İç montaj plakasını takın.
- Connect the cable from the exterior assembly to the interior escutcheon.
- Secure the interior escutcheon.
- Install the batteries (4 AA batteries included).
- Perform the door handing process as instructed by the lock or BILT app.
- Install the August Connect Wi-Fi Bridge and DoorSense according to their respective instructions to enable smart features.

Şekil 4.1: Üzeriview of hassle-free setup and customizable features.
5. Kullanım Talimatları
5.1. Tuş Takımının Kullanımı
- Kilitlemek için: Simply touch the keypad with your palm or fingers. The deadbolt will extend.
- Kilidini Açmak İçin: Enter your programmed user code on the backlit keypad. The deadbolt will retract.
5.2. August App Control
The August mobile app provides comprehensive control and monitoring capabilities:
- Remote Locking/Unlocking: Control your deadbolt from anywhere using the app.
- Misafir Erişimi: Create and manage unlimited entry codes for guests, setting specific access schedules.
- Etkinlik İzleme: View a 24/7 history log of who enters and exits your home.
- DoorSense Status: Check if your door is securely closed and locked in real-time.
- Auto-Unlock (Home/Away Mode): Configure the lock to automatically unlock as you approach your home and lock when you leave.

Figure 5.1: Home Mode and Away Mode for automatic unlocking and locking.
5.3. Ses Kontrolü
Integrate your Emtek smart deadbolt with your preferred voice assistant for hands-free control:
- Amazon Alexa: "Alexa, lock the front door."
- Google Asistan: "Hey Google, is the back door locked?"
- Siri: "Hey Siri, unlock the garage door." (Requires Apple HomeKit setup via August app)
6. Bakım
6.1. Pil Değişimi
The deadbolt requires 4 AA alkaline batteries. When battery levels are low, the lock will provide an alert. To replace batteries:
- Remove the battery cover on the interior escutcheon.
- Eski pilleri çıkarın.
- Yeni AA alkalin pilleri, doğru kutuplara dikkat ederek takın.
- Pil kapağını yerine takın.
Önemli: In case of complete battery depletion, a 9V battery port is available on the exterior keypad for temporary power to unlock the deadbolt. Simply hold a 9V battery to the contacts on the bottom of the keypad while entering your code.
6.2. Temizlik
Clean the exterior keypad and interior unit with a soft, damp Bez kullanın. Aşındırıcı temizleyiciler veya çözücüler kullanmaktan kaçının, çünkü bunlar yüzeye ve elektronik bileşenlere zarar verebilir.
7. Sorun Giderme
If you encounter issues with your Emtek Empowered Smart Deadbolt, refer to the following common problems and solutions:
| Sorun | Olası Neden | Çözüm |
|---|---|---|
| Lock does not respond to keypad input. | Dead batteries; Keypad not waking up. | Replace AA batteries. Ensure you are touching the keypad to activate it. Use 9V battery backup if completely dead. |
| Sürgü tam olarak açılıp/kapanmıyor. | Door misalignment; Low battery; Obstruction in door frame. | Check door alignment and strike plate. Replace batteries. Clear any obstructions. Re-run door handing process. |
| Cannot connect to August app or Wi-Fi. | August Connect not properly set up; Wi-Fi signal weak; App issues. | Ensure August Connect is plugged in and within range of the lock and Wi-Fi router. Check Wi-Fi signal strength. Restart August Connect and your mobile device. Consult August app help or BILT app. |
| Auto-unlock not working consistently. | Phone location services disabled; App not running in background; Geofencing issues. | Ensure location services are enabled for the August app. Keep the app running in the background. Calibrate your home's geofence in the August app settings. |
| Lock is unresponsive after installation. | Incorrect wiring/connection; Missing battery contact; Manufacturing defect. | Double-check all cable connections. Verify battery contacts are correctly seated. If issues persist, contact Emtek customer support. |
For further assistance, refer to the BILT app or contact Emtek customer support.
8. Özellikler
| Özellik | Detay |
|---|---|
| Marka | emtek |
| Model Adı | Empowered Motorized Touchscreen Keypad Smart Deadbolt |
| Model Numarası | EMP1101US19 |
| Kilit Tipi | Tuş takımı |
| Özel Özellikler | Touchscreen, Wi-Fi, Motorized, Backlit Keypad |
| Malzeme | Pirinç |
| Renk | Flat Black Coated (US19) |
| Ürün Boyutları (U x G x Y) | 6 x 3 x 3 inç |
| Ürün Ağırlığı | 4.86 pound |
| Kapı Kalınlığı Uyumluluğu | 1-3/4” to 2-1/4” |
| Güç Kaynağı | 4 AA Pil (dahil) |
| Yedek Güç | 9V Akü Bağlantı Noktası |
| Bağlantı Protokolü | Wi-Fi (via August Connect) |
| Denetleyici Türü | Amazon Alexa, Google Asistan, Siri |
9. Garanti ve Destek
Emtek products are known for their quality and durability. For specific warranty information regarding your Empowered Motorized Touchscreen Keypad Smart Deadbolt, please refer to the warranty card included in your product packaging or visit the official Emtek webalan.
For technical support, troubleshooting assistance, or to inquire about replacement parts, please contact Emtek customer service. You can also find helpful resources and 3D installation guides on the BILT uygulaması.


