1. Giriş
This manual provides detailed instructions for the installation, operation, maintenance, and troubleshooting of your ASUS ROG STRIX GeForce RTX 2070 Overclocked 8G GDDR6 graphics card. The ASUS ROG STRIX RTX 2070 O8G is engineered for high-performance gaming, featuring NVIDIA's Turing Architecture, support for multiple monitors, VR-Ready capabilities, a reinforced frame, triple Axial-Tech fans with Max Contact technology for superior cooling, and customizable Aura Sync RGB lighting.
Please read this manual thoroughly before installing and using your graphics card to ensure optimal performance and longevity.
2. Paket İçeriği
Aşağıda listelenen tüm öğelerin ürün paketinizde mevcut olduğunu doğrulayın:
- ROG-STRIX-RTX2070-O8G-GAMING Graphics Card
- Destek DVD'si (sürücüler ve yardımcı programlar için)
- Kullanım Kılavuzu (bu belge)
3. Ürün Bittiview
The ASUS ROG STRIX GeForce RTX 2070 is designed for exceptional gaming performance and reliability. Key features include:
- NVIDIA Turing Architecture: Powered by NVIDIA Turing with a 1845 MHz Boost Clock (OC Mode) and 2304 CUDA cores.
- Yüksek Hızlı Bellek: Equipped with 8GB GDDR6 memory for fast texture loading and smooth gameplay.
- Multi-Monitor & VR Support: Supports up to 4 monitors with DisplayPort 1.4, HDMI 2.0, and a VR headset via USB Type-C ports.
- Gelişmiş Soğutma: Features triple Axial-Tech 0db Fans and Max Contact technology for increased cooling efficiency and IP5X dust-resistance.
- Premium Yapı: Auto Extreme Technology and Super Alloy Power II components ensure premium quality and reliability.
- Özelleştirilebilir Aydınlatma: ASUS Aura Sync RGB lighting offers a wide spectrum of colors and synchronization with other Aura Sync enabled products.
- Software Utility: GPU Tweak II provides real-time performance monitoring, streaming capabilities, and includes Game Booster, XSplit Gamecaster, WTFast, and Quantum Cloud.
Görsel Referans

Şekil 3.1: Ön view of the ASUS ROG STRIX RTX 2070 graphics card, showcasing its triple Axial-Tech fans.
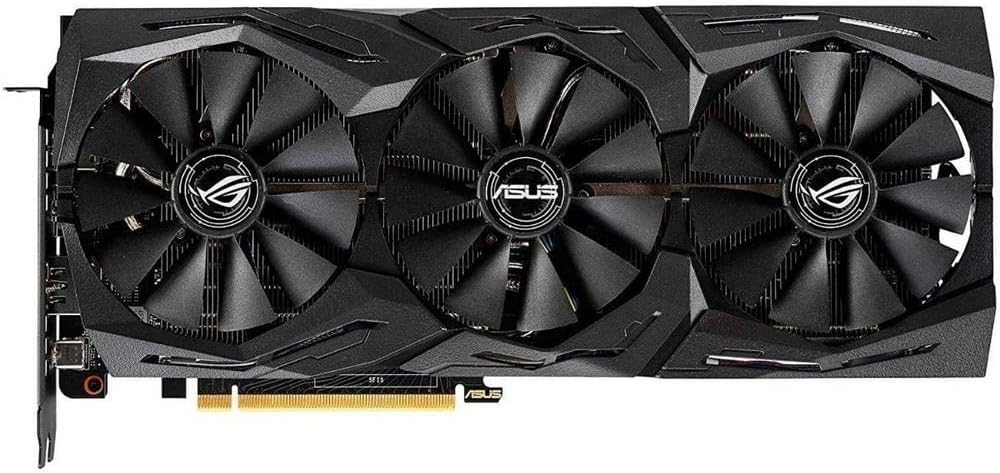
Şekil 3.2: Açısal ön view of the graphics card, highlighting the fan design and shroud aesthetics.

Figure 3.3: A different angled front view, providing another perspective of the cooling solution.

Şekil 3.4: Arka view of the graphics card, showing the protective backplate with ROG branding.

Figure 3.5: Input/Output (I/O) panel of the graphics card, detailing the DisplayPort 1.4, HDMI 2.0, and USB Type-C ports.

Şekil 3.6: Yan view of the graphics card, showing the two 8-pin power connectors required for operation.
4. Kurulum ve Kurulum
Follow these steps to properly install your ASUS ROG STRIX GeForce RTX 2070 graphics card:
- Sisteminizi Hazırlayın: Bilgisayarınızı kapatın ve tüm kabloları çıkarın. Bilgisayar kasasını açın.
- PCIe Yuvasını Bulun: Anakartınızda kullanılabilir bir PCI Express x16 yuvası bulun.
- Yuva Kapaklarını Çıkarın: Remove the necessary slot covers from your computer case to accommodate the graphics card.
- Grafik Kartını Takın: Carefully align the graphics card with the PCIe slot and press it firmly until it is securely seated. Secure the card to the case with screws.
- Gücü bağlayın: Connect two 8-pin PCIe power cables from your power supply unit (PSU) to the corresponding power connectors on the graphics card. Ensure a minimum 550W PSU is used for stable operation.
- Close Case & Connect Display: Close your computer case and reconnect all cables. Connect your display monitor(s) to the graphics card's DisplayPort, HDMI, or USB Type-C outputs.
- Sürücüleri Yükle: Power on your computer. Once the operating system loads, install the latest graphics drivers from the ASUS support webalan (www.asus.com/support/) or use the provided Support DVD.
5. Kullanım Talimatları
After successful installation and driver setup, your graphics card is ready for use. Here are some operational guidelines:
- Çoklu Monitör Kurulumu: Connect up to four displays to the available DisplayPort, HDMI, and USB Type-C ports. Configure display settings through your operating system or NVIDIA Control Panel.
- VR Headset Connectivity: Utilize the USB Type-C port for compatible VR headsets to enjoy immersive virtual reality experiences.
- ASUS GPU Tweak II: Install and use the ASUS GPU Tweak II software for advanced control over your graphics card. This utility allows you to:
- Monitor GPU clock speed, memory clock, voltage, and fan speed in real-time.
- Adjust performance settings for overclocking or power efficiency.
- Access Game Booster for optimizing system performance during gaming.
- Utilize XSplit Gamecaster for streaming and recording gameplay.
- ASUS Aura Sync: Customize the RGB lighting effects on your graphics card using the ASUS Aura Sync software. Synchronize lighting with other compatible ASUS components for a unified aesthetic.
6. Bakım
Doğru bakım, ekran kartınızın uzun ömürlü olmasını ve en iyi performansı göstermesini sağlar:
- Toz Giderimi: Regularly clean dust from the fans and heatsink using compressed air. Ensure the system is powered off and unplugged before cleaning.
- Taraftar Bakımı: The Axial-Tech fans are designed for durability and IP5X dust-resistance, reducing the need for frequent deep cleaning. However, ensure no obstructions impede fan rotation.
- Sürücü Güncellemeleri: Keep your graphics drivers updated to the latest version available from the ASUS support website. Driver updates often include performance improvements and bug fixes.
- Sistem Hava Akışı: Ensure your computer case has adequate airflow to prevent heat buildup, which can affect graphics card performance and lifespan.
7. Sorun Giderme
Ekran kartınızla ilgili sorun yaşıyorsanız, aşağıdaki sorun giderme adımlarını göz önünde bulundurun:
- Görüntü Çıkışı Yok:
- Ekran kablosunun hem ekran kartına hem de monitöre güvenli bir şekilde bağlı olduğundan emin olun.
- Monitörün açık olduğunu ve doğru giriş kaynağına ayarlandığını doğrulayın.
- Ekran kartının PCIe yuvasına tam olarak oturduğundan emin olun.
- Confirm that all required power connectors (two 8-pin) are securely attached to the graphics card.
- Sistem Kararsızlığı/Çökmeler:
- Güç kaynağı ünitenizin (PSU) minimum watt gereksinimlerini karşıladığından emin olun.tage requirement (recommended 550W).
- Grafik sürücülerinizi en son sürüme güncelleyin.
- Check GPU temperatures using monitoring software (e.g., GPU Tweak II) to ensure it's not overheating.
- Hız aşırtma yapıldıysa, kararlılığı kontrol etmek için varsayılan ayarlara geri döndürün.
- Oyunlarda Düşük Performans:
- Grafik sürücülerinizin güncel olduğundan emin olun.
- Check in-game graphics settings; try reducing settings if performance is consistently low.
- Monitor GPU and CPU utilization to identify potential bottlenecks.
- Arka planda çalışan uygulamaların aşırı sistem kaynağı tüketmediğinden emin olun.
8. Özellikler
| Özellik | Şartname |
|---|---|
| Grafik İşlemcisi | NVIDIA GeForce RTX 2070 (Turing Architecture) |
| CUDA Çekirdekleri | 2304 |
| Boost Clock (OC Mode) | 1845 MHz |
| Hafıza | 8GB GDDR6 |
| Bellek Saat Hızı | 14000 MHz |
| Video Çıkış Arayüzü | 3 x DisplayPort 1.4, 1 x HDMI 2.0, 1 x USB Type-C |
| Maximum Digital Resolution | 7680x4320 |
| Otobüs Standardı | PCI Ekspres |
| Güç Konnektörleri | 2 x 8-pin (recommended 550W PSU) |
| Soğutma | Triple Axial-Tech Fans with Max Contact Technology |
| Boyutlar (Yaklaşık) | 11.8 x 5.2 x 2.1 inç (300 x 132 x 53 mm) |
| Ağırlık | 4 Pound (1.81 kg) |
| Model Adı | ROG STRIX |
| Parça Numarası | ROG-STRIX-RTX-2070-O8G |
9. Garanti ve Destek
Your ASUS ROG STRIX GeForce RTX 2070 graphics card comes with a 3 Yıllık Garanti. For detailed warranty terms and conditions, please refer to the warranty card included in your package or visit the official ASUS webalan.
For technical support, driver downloads, FAQs, and further assistance, please visit the ASUS Support Center:
No official seller videos are available for this product in the provided data. For product demonstrations or additional visual guides, please refer to the ASUS support website or authorized ASUS channels.


