1. Giriş
This manual provides detailed instructions for the installation, operation, and maintenance of your Vibe Powerbox Micro Mono Amplifier, model POWERBOX400.1M-V7. Please read this manual thoroughly before attempting installation or operation to ensure proper use and to prevent damage to the unit or your vehicle's audio system.
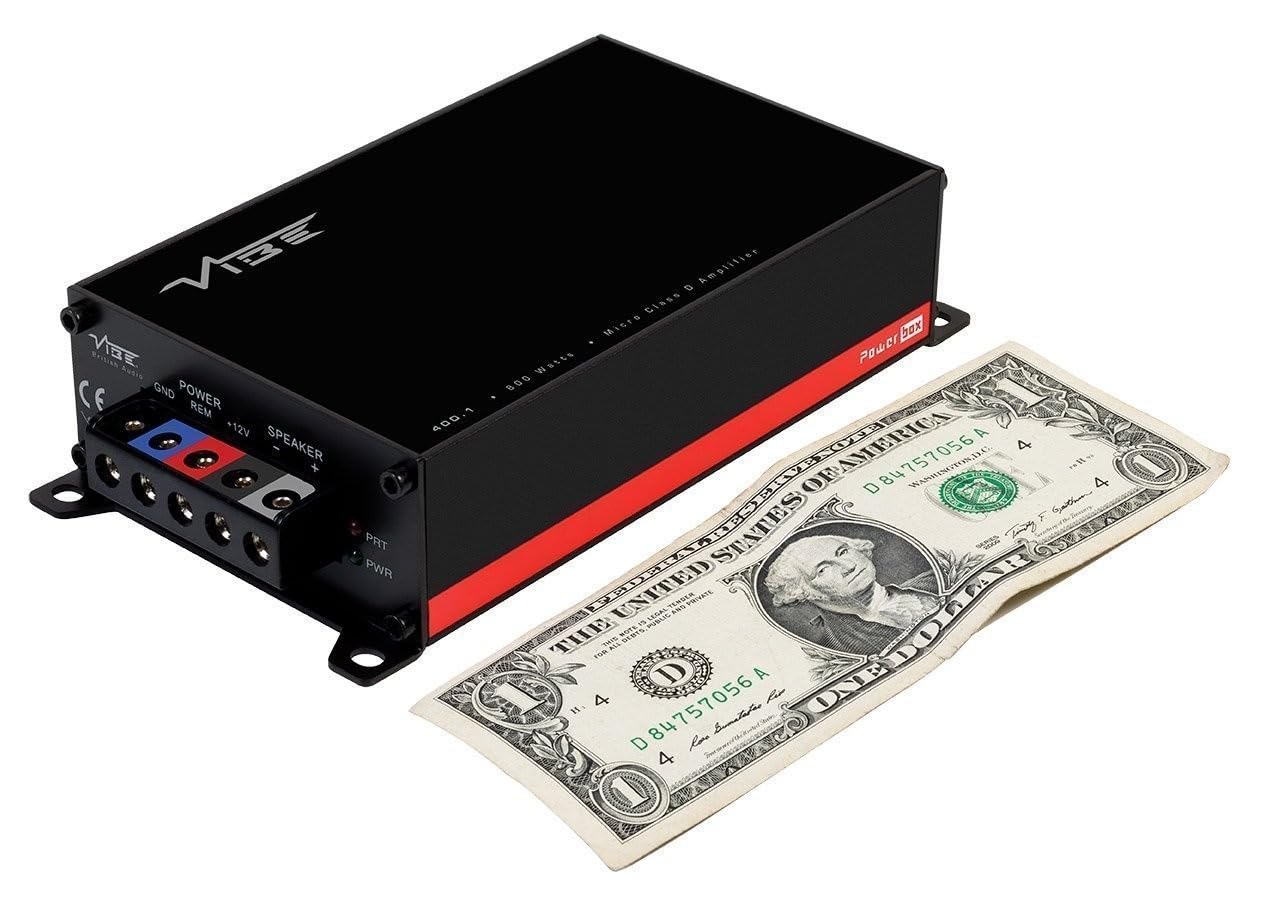
The Vibe Powerbox Micro Mono Amplifier is a compact, high-performance Class D amplifier designed for car audio systems. It delivers up to 400W RMS, making it suitable for powering subwoofers. Its small footprint allows for flexible installation options.
2. Güvenlik Bilgileri
- Herhangi bir elektrik işine başlamadan önce mutlaka aracın aküsünün negatif kutbunu ayırın.
- Ensure all wiring is correctly routed and secured to prevent damage from moving parts or sharp edges.
- Use appropriate gauge wiring for power and speaker connections as specified in this manual to prevent overheating and potential fire hazards.
- Şunu monte etmeyin: ampDoğrudan güneş ışığına, aşırı sıcağa, neme veya toza maruz kalan yerlerde daha dayanıklıdır.
- Montaj sürecinin herhangi bir aşamasından emin değilseniz, profesyonel bir araç ses sistemi montajcısına danışın.
- Çalıştırma amplifier at excessively high volumes for prolonged periods can cause hearing damage.
3. Paket İçeriği
Kuruluma devam etmeden önce pakette tüm öğelerin mevcut olduğundan emin olun:
- Vibe Powerbox Mikro Mono Amplifier (POWERBOX400.1M-V7)
- Remote Gain Control Unit
- RCA Ses Kabloları
- Mounting Hardware (screws, connectors)
- Kullanıcı Kılavuzu

4. Ürün Özellikleri
- Class D Micro Amplifier design for high efficiency and compact size.
- Ultra-compact footprint for easy and discreet installation.
- Output: 1 x 400W RMS at 1 ohm, with a maximum output of 800W.
- Dimensions: 37 x 157 x 82mm (approximately 1.46 x 6.18 x 3.23 inches).
- Compatible with Critical Link Rapid kits for simplified integration.
- Features Deltabox™ Connectivity auto turn-on.
- VIBE Sound Studio™ Active crossovers.
- 1 Ohm Stable operation.
5. Bileşen Tanımlaması
5.1 Power and Speaker Terminals

The power input section includes terminals for Ground (GND), Remote Turn-On (REM), and +12V power. The speaker output section provides terminals for connecting your subwoofer.
5.2 Giriş ve Kontrol Paneli
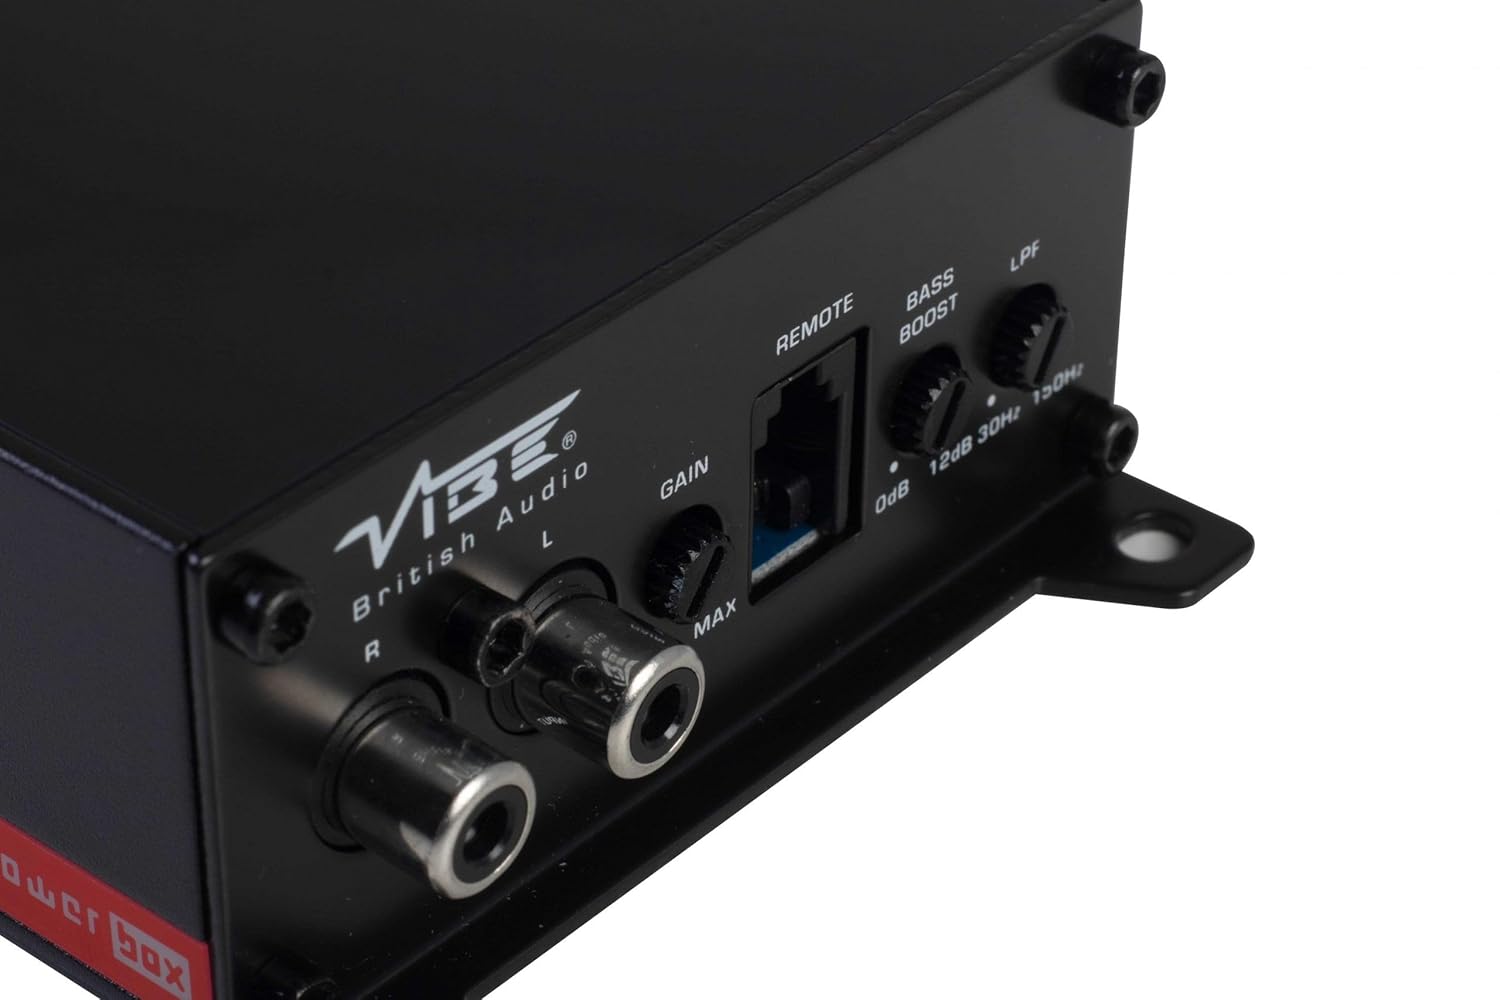
This panel features the RCA input jacks for audio signal, a Gain control knob to match the amplifier's input sensitivity to your head unit's output, a dedicated port for the remote gain control, a Bass Boost switch for enhancing low frequencies, and an LPF (Low Pass Filter) control to adjust the upper frequency limit for the subwoofer.
5.3 Remote Gain Control

The remote gain control unit connects to the amplifier via the 'REMOTE' port and allows for convenient adjustment of the subwoofer's output level from the vehicle's cabin.
6. Kurulum ve Kurulum
Proper installation is crucial for optimal performance and safety. If you are not confident in your ability to install the amplifier, seek professional assistance.
6.1 Montaj Yeri
Choose a mounting location that is dry, well-ventilated, and away from direct heat sources. The compact size of the Powerbox Micro allows for installation under seats, behind trim panels, or in other discreet locations. Ensure there is sufficient airflow around the ampsoğutma için lifier.
6.2 Kablo Bağlantıları
Güç Kablolaması:
- Bağlan +12V terminal to the vehicle's positive battery terminal using a suitable gauge power cable (e.g., 8 AWG or 10 AWG). Install an in-line fuse holder within 18 inches (45 cm) of the battery.
- Bağlan Yeraltı terminal to a clean, unpainted metal surface on the vehicle's chassis. Ensure a good electrical connection. The ground cable should be of the same gauge as the power cable and as short as possible.
- Bağlan REM (Remote Turn-On) terminal to the remote output of your head unit. This wire signals the amplifier to turn on and off with your stereo. If your head unit lacks a remote output, you can use an accessory wire that turns on with the ignition, or utilize the amplifier's auto-sense feature if applicable.
Hoparlör Kablolaması:
- Subwoofer'ınızı şuraya bağlayın: Hoparlör Çıkışı terminals (+ and -). Ensure correct polarity. This amplifier is 1 Ohm stable, allowing flexibility in subwoofer impedance configurations. Refer to your subwoofer's specifications for optimal impedance matching.
Signal Input (RCA):
- Connect the RCA output from your head unit or signal processor to the INPUT (L/R) RCA jacks on the ampcankurtaran.
Uzaktan Kazanç Kontrolü:
- Plug the remote gain control unit into the dedicated UZAK limanda amplifier. Route the cable to a convenient location for adjustment.
ISO T Harness / ISOAWK Kit:
- For simplified installation with existing stereo looms, an optional ISOAWK kit (available separately) can be used to make the amplifier compatible with an ISO T harness. This allows for plug-and-play integration for audio signal, power, and ground, potentially eliminating the need for separate battery connections.
7. Operasyon
7.1 İlk Güçlendirme
Tüm bağlantılar yapılıp doğrulandıktan sonra, aracın aküsünü tekrar bağlayın. Araçtaki multimedya sistemini açın. amplifier's power indicator (PWR) should illuminate green. If the protection indicator (PRT) illuminates red, refer to the troubleshooting section.
7.2 Kazanç Ayarı
Kazanç kontrolü şunlarla eşleşir: amplifier'in giriş duyarlılığı çıkış hacminetage of your head unit. To set the gain:
- Çevir amplifier's Gain control to its minimum (MIN) setting.
- Set your head unit's volume to about 75-80% of its maximum.
- Dinamik bir müzik parçası çalın.
- Yavaşça artırın amplifier's Gain control until you hear distortion, then back it off slightly until the sound is clear.
The remote gain control unit allows for real-time adjustment of the subwoofer level without affecting the main system volume.
7.3 Düşük Geçiş Filtresi (LPF)
The LPF control sets the upper frequency limit for the amplifier's output. This is essential for subwoofers, ensuring they only reproduce low frequencies. Adjust the LPF knob (typically 30Hz to 150Hz) to blend the subwoofer's output seamlessly with your main speakers. A common starting point is around 80-100Hz.
7.4 Bas Güçlendirme
The Bass Boost switch provides an adjustable low-frequency enhancement. Use this feature sparingly, as excessive bass boost can lead to distortion and potential damage to your subwoofer. Adjust the boost level (0dB to 12dB) to your preference.
8. Bakım
- Temizlik: Periyodik olarak silin amplifier'in dış yüzeyini yumuşak ve kuru bir bezle silin. Sert kimyasallar veya aşındırıcı temizleyiciler kullanmayın.
- Bağlantılar: Regularly check all power, ground, and speaker connections to ensure they are secure and free from corrosion. Loose connections can cause performance issues or damage.
- Havalandırma: Şunların sağlanmasını temin edin: ampIsı dağılımının düzgün bir şekilde sağlanabilmesi için, yükselticinin soğutma kanatçıkları engellenmez.
9. Sorun Giderme
| Sorun | Olası Neden | Çözüm |
|---|---|---|
| Güç Yok (Güç LED'i kapalı) | Sigorta atmış, güç/topraklama bağlantısı gevşek, uzaktan kumanda sinyali yok. | Check in-line fuse, verify +12V, GND, and REM connections. |
| Protection Mode (PRT LED on) | Aşırı ısınma, hoparlör kablolarında kısa devre, çok düşük empedans. | Ensure proper ventilation, check speaker wiring for shorts, verify speaker impedance. |
| Ses Çıkışı Yok | No input signal, gain too low, speaker wires disconnected. | Check RCA input connections, adjust gain, verify speaker wiring. |
| Bozuk ses | Gain set too high, LPF incorrectly set, poor ground connection. | Reduce gain, adjust LPF, check ground connection. |
10. Özellikler
- Model Numarası: GÜÇ KUTUSU400.1M-V7
- Ampkaldırıcı Türü: D Sınıfı Mono Ampcankurtaran
- RMS Güç Çıkışı: 1 x 400W RMS @ 1 Ohm
- Maksimum Güç Çıkışı: 800W
- Ürün Ölçüleri (U x G x Y): Yaklaşık 157 x 82 x 37 mm (6.18 x 3.23 x 1.46 inç)
- Ağırlık: Yaklaşık 1.54 Pound
- Cilttage: 12 Volt (Nominal)
- Maksimum Arz Hacmitage: 12 Volt
- Montaj Tipi: Yüzey Montajı
- Üretici: Vibe Audio
- İlk Mevcut Tarih: 21 Temmuz 2018
11. Garanti ve Destek
Vibe Audio products are designed and manufactured to the highest standards. For warranty information and technical support, please refer to the warranty card included with your product or visit the official Vibe Audio webSite. Satın alma belgenizi garanti talepleriniz için saklayın.


