1. Giriş
This manual provides comprehensive instructions for the installation, operation, and maintenance of your BlueBird A1390 Automatic Irrigation Tap Programmer. This device is designed to automate your garden watering schedule, ensuring efficient and consistent irrigation. Please read this manual thoroughly before using the product to ensure correct operation and to prevent damage.
2. Güvenlik Bilgileri
- Do not immerse the unit in water. The unit is designed to be weather-resistant, but not submersible.
- Use only 1.5V AA alkaline batteries. Do not mix old and new batteries, or different types of batteries.
- Ünite uzun süre kullanılmayacaksa, sızıntıyı önlemek için pilleri çıkarın.
- Çocukların erişemeyeceği yerde saklayınız.
- Cihazı kendiniz sökmeye veya onarmaya çalışmayın. Servis için yetkili personele başvurun.
- Sızıntıları önlemek için tüm bağlantıların güvenli olduğundan emin olun.
3. Paket İçeriği
Lütfen paketi aşağıdaki öğeler açısından kontrol edin:
- 1x BlueBird A1390 Automatic Irrigation Tap Programmer
- 1x Kullanım Kılavuzu (bu belge)
Note: 2 AA 1.5V batteries are required for operation and are not included in the package.
4. Ürün Bittiview
The BlueBird A1390 features two main rotary dials for setting irrigation frequency and duration, along with a battery indicator and an ON/OFF switch.
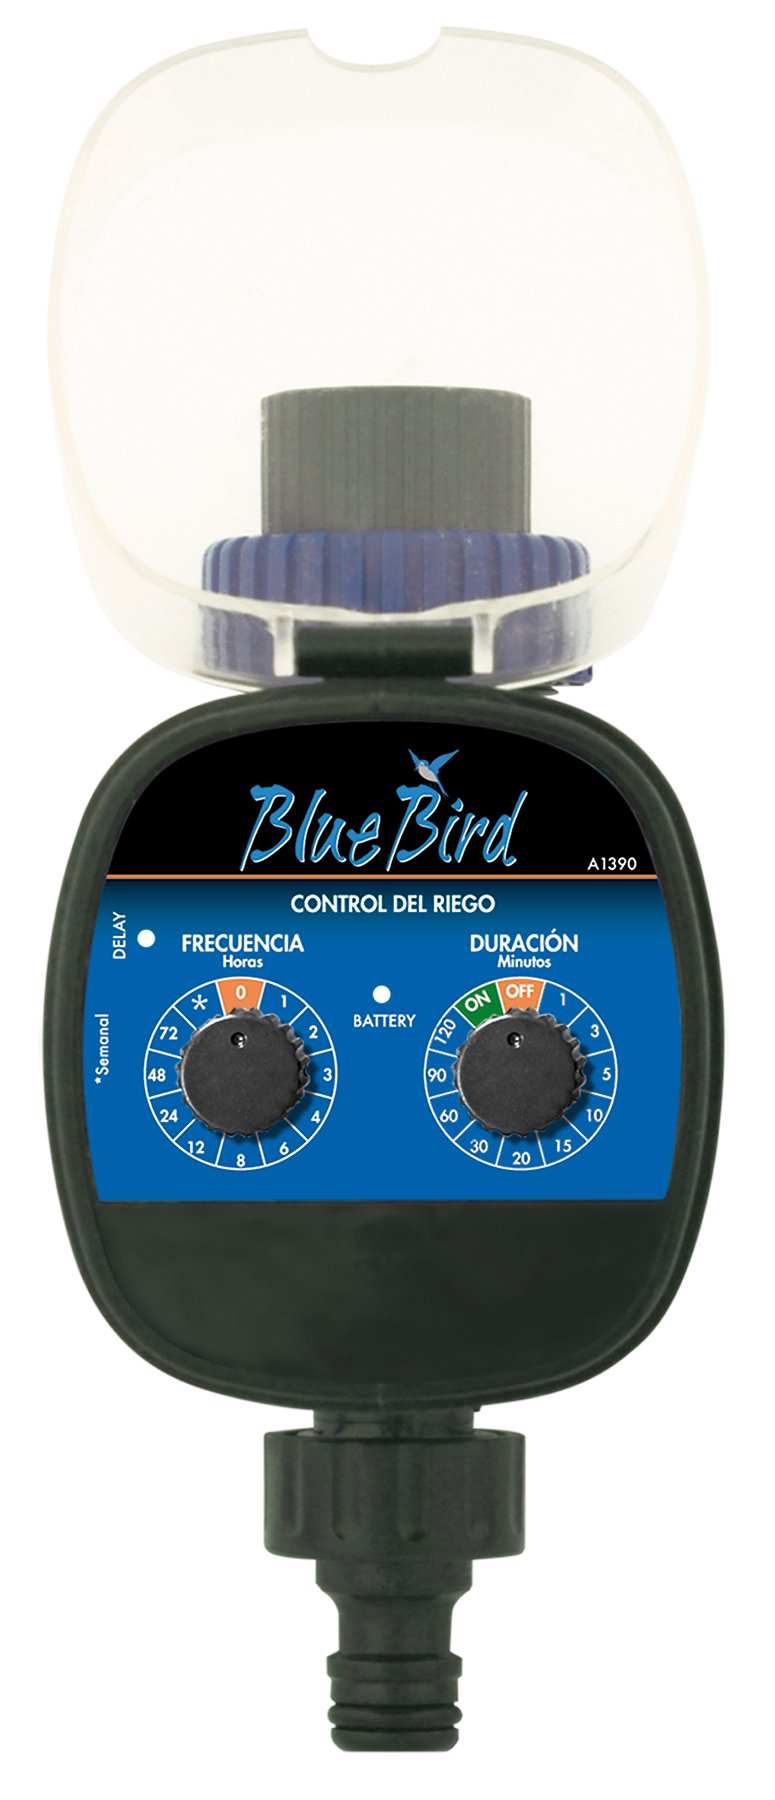
Şekil 1: Ön view of the BlueBird A1390 Irrigation Programmer. The left dial controls irrigation frequency, and the right dial controls irrigation duration. A battery indicator light is located between the dials.
Bileşenler:
- Frequency Dial (Frecuencia): Sets how often the irrigation occurs. Options include 0 (off), 1, 2, 3, 4, 6, 8, 12, 24, 48, 72 hours, and a '*' setting for manual or weekly operation.
- Duration Dial (Duración): Sets how long each irrigation cycle lasts. Options include 0 (off), 1, 3, 5, 10, 15, 20, 30, 60, 90, 120 minutes.
- Açma / kapama düğmesi: Located on the Duration Dial, allows for manual override or turning the unit off.
- Pil Göstergesi: A light that indicates battery status.
- Pil Bölmesi: Located at the rear of the unit (not visible in Figure 1).
- Su Girişi/Çıkışı: Standard tap and hose connections.
5. Kurulum
5.1 Pil Kurulumu
- Ünitenin arkasındaki pil bölmesi kapağını bulun.
- Remove the cover by twisting or sliding it open.
- Insert two (2) new 1.5V AA alkaline batteries, ensuring correct polarity (+/-).
- Replace the battery compartment cover securely to maintain water resistance.
5.2 Connecting to the Tap
- Ensure your outdoor tap is turned off.
- Screw the BlueBird A1390 programmer onto your tap. Hand-tighten only to prevent damage.
- Connect your garden hose or irrigation system to the outlet of the programmer. Ensure a tight connection to prevent leaks.
- Slowly turn on your outdoor tap. Check for any leaks at the connections.
6. Kullanım Talimatları
The BlueBird A1390 is designed for simple, intuitive programming using its two rotary dials.
6.1 Setting Irrigation Frequency
- Döndür Frekans Arama (left dial) to your desired irrigation interval.
- Kullanılabilir ayarlar şunlardır:
- 0: No irrigation (off).
- 1, 2, 3, 4, 6, 8, 12, 24, 48, 72: Irrigation every X hours.
- *: This setting typically indicates a manual mode or a weekly cycle, depending on the specific model's internal logic. Refer to the example below for common usage.
6.2 Setting Irrigation Duration
- Döndür Duration Dial (right dial) to your desired watering time per cycle.
- Kullanılabilir ayarlar şunlardır:
- KAPALI: No irrigation.
- AÇIK: Continuous irrigation (use with caution).
- 1, 3, 5, 10, 15, 20, 30, 60, 90, 120: Irrigation for X minutes.
6.3 Örn.ample Programlama
To water every 6 hours for 10 minutes:
- Ayarla Frekans Arama ile 6 (saat).
- Ayarla Duration Dial ile 10 (dakika).
The programmer will automatically begin the cycle based on these settings. The first cycle will typically start shortly after programming, or after a short delay.
6.4 Manuel Açma/Kapama
To manually turn on the water, rotate the Duration Dial to the ON position. To stop manual watering, rotate the dial back to KAPALI or a timed setting.
7. Bakım
7.1 Pil Değişimi
When the battery indicator light dims or the unit stops functioning, it's time to replace the batteries. Follow the steps in Section 5.1 for battery installation.
7.2 Temizlik
Clean the exterior of the programmer with a damp cloth. Do not use abrasive cleaners or solvents. Ensure no water enters the battery compartment or internal electronics.
7.3 Kış Muhafazası
Before the first frost, disconnect the programmer from the tap and hose. Remove the batteries. Store the unit indoors in a dry, frost-free location to prevent damage from freezing water.
8. Sorun Giderme
| Sorun | Olası Neden | Çözüm |
|---|---|---|
| Unit does not turn on/display. | Piller bitmiş veya yanlış takılmış. | Pilleri doğru kutuplara yerleştirerek değiştirin. |
| Su akmıyor. | Tap is off; programmer set to '0' or 'OFF'; low water pressure; clogged filter. | Ensure tap is fully open. Check frequency/duration settings. Verify water pressure. Clean any filters. |
| Unit leaks at connections. | Loose connections; missing or damaged washer. | Tighten connections. Check and replace washers if necessary. |
| Irrigation schedule is incorrect. | Incorrect frequency or duration settings. | Re-check and adjust the Frequency and Duration Dials according to your desired schedule. |
9. Özellikler
- Modeli: A1390
- Marka: Mavikuş
- Üretici: Altadex
- Güç Kaynağı: 2 x AA 1.5V Alkaline Batteries (not included)
- Sulama Sıklığı: 0, 1, 2, 3, 4, 6, 8, 12, 24, 48, 72 hours, or '*' (manual/weekly)
- Sulama Süresi: OFF, ON, 1, 3, 5, 10, 15, 20, 30, 60, 90, 120 minutes
- Ürün Ölçüleri: Yaklaşık 19.4x10.6x10 cm
- Ürün Ağırlığı: Yaklaşık 280 gr
- GTIN (UPC): 8426375113909
10. Garanti ve Destek
This product is covered by a standard manufacturer's warranty. For specific warranty details, please refer to the documentation provided at the time of purchase or contact your retailer. For technical support or inquiries, please contact the seller or manufacturer directly.