1. Giriş
This manual provides essential information and instructions for the safe and efficient use of your Nokia 8 Sirocco TA-1005 smartphone. Please read this guide thoroughly before operating your device to ensure optimal performance and longevity. This device is designed for use with GSM, 3G, and 4G LTE networks. Compatibility with CDMA networks, including Verizon, Sprint, and US Cellular, is not supported. Verify network compatibility with your service provider prior to use.
2. Kutuda Neler Var?
Upon unboxing your Nokia 8 Sirocco TA-1005, verify that all components are present:
- Nokia 8 Sirocco TA-1005 Device
- USB C Tipi Kablo
- Güç Adaptörü
- Kulaklık
- SIM İtici Aracı
- Hızlı Başlangıç Kılavuzu
- Güvenlik ve Garanti Bilgileri
3. Cihaz Düzeni
Familiarize yourself with the physical components of your Nokia 8 Sirocco TA-1005.
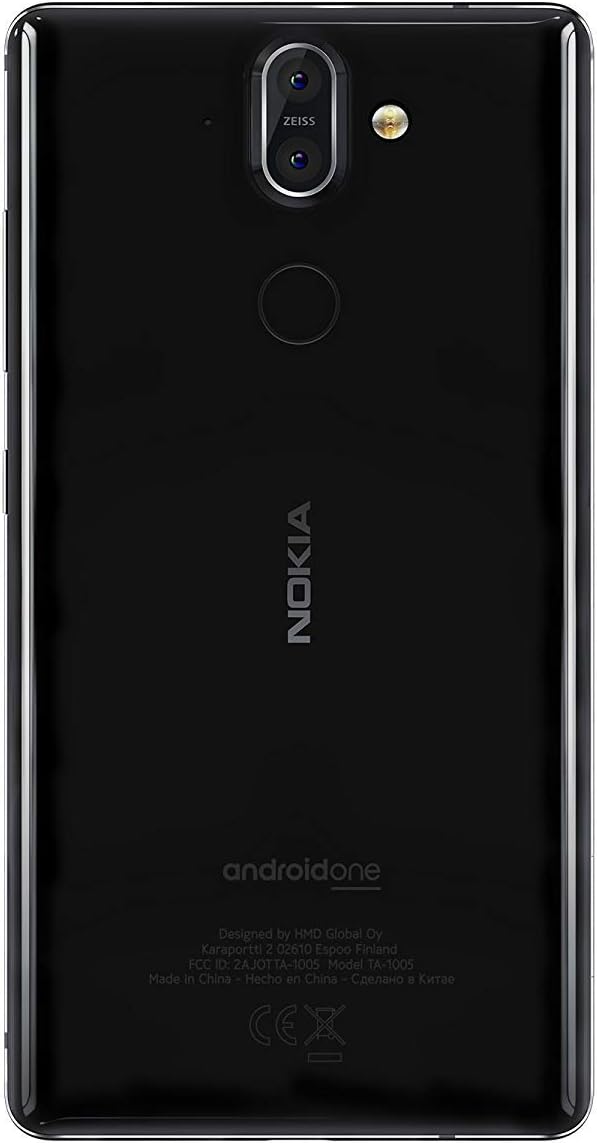
Şekil 3.1: Arka view of the Nokia 8 Sirocco TA-1005. This image displays the dual camera setup with ZEISS optics, the circular fingerprint sensor below the camera, and the Nokia logo centrally placed. The 'androidone' branding is visible towards the bottom.
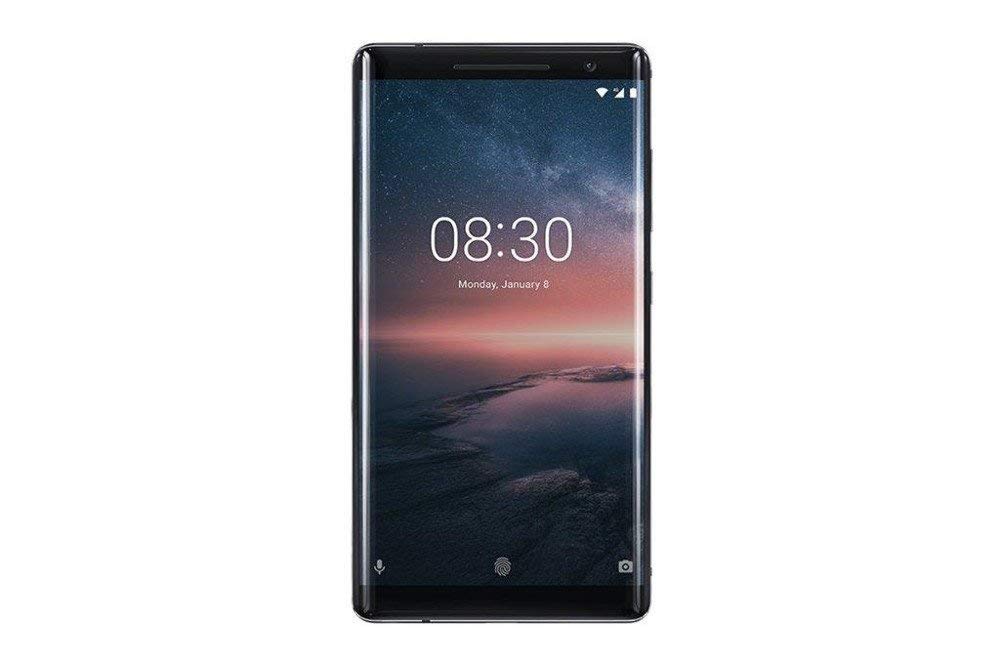
Şekil 3.2: Ön view of the Nokia 8 Sirocco TA-1005. The image highlights the 5.5-inch P-OLED curved display, the front-facing camera at the top, and the on-screen navigation buttons. The device features minimal bezels.

Şekil 3.3: Taraf view of the Nokia 8 Sirocco TA-1005. This image illustrates the slim profile of the device, with the power button and volume rocker located on the right side for easy access.
Temel Bileşenler:
- Ön Kamera: Ekranın en üstünde yer almaktadır.
- Kulaklık: For calls, located above the display.
- Görüntülemek: 5.5-inch P-OLED capacitive touchscreen.
- Ses Düğmeleri: On the right side, to adjust audio levels.
- Güç/Kilit Düğmesi: On the right side, to power on/off or lock/unlock the screen.
- USB Tip-C Bağlantı Noktası: Alt kısımda ise şarj ve veri aktarımı için.
- Mikrofon: Located at the bottom and top.
- Konuşmacı: Alt kısımda yer almaktadır.
- SIM/Hafıza Kartı Yuvası: On the side, for inserting SIM cards.
- Arka Kameralar: Dual cameras with ZEISS optics on the back.
- Flaş: Dual-tone flash next to the rear cameras.
- Parmak izi sensörü: On the back, below the rear cameras.
4. Kurulum
4.1. SIM Kartın Takılması
- Cihazınızın yan tarafında bulunan SIM kart tepsisini bulun.
- SIM çıkarma aracını tepsideki küçük deliğe sokarak açın.
- Place your Nano-SIM card(s) into the designated slot(s) on the tray, ensuring the gold contacts face downwards.
- Tepsiyi yerine oturana kadar dikkatlice cihazın içine doğru itin.
Not: This device does not support external memory cards.
4.2. Gücü Açma ve Kapatma
- Açmak İçin: Press and hold the Power/Lock button until the Nokia logo appears.
- Kapatmak İçin: Press and hold the Power/Lock button until the power options menu appears, then select "Power off".
4.3. İlk Kurulum
Upon first power-on, the device will guide you through the initial setup process. This includes selecting your language, connecting to a Wi-Fi network, setting up your Google account, and configuring security features like fingerprint unlock or a PIN/pattern.
5. Kullanım Talimatları
5.1. Arama Yapma
- Open the "Phone" application.
- Telefon numarasını tuş takımını kullanarak girin veya adres defterinizden bir kişi seçin.
- Aramayı başlatmak için arama simgesine dokunun.
5.2. Mesaj Gönderme
- Open the "Messages" application.
- "Sohbet başlat" veya "Yeni mesaj" simgesine dokunun.
- Alıcının numarasını girin veya kişilerden seçin.
- Metin alanına mesajınızı yazın.
- Gönderme simgesine dokunun.
5.3. Kamerayı Kullanma
- "Kamera" uygulamasını açın.
- Konunuzu ekranda çerçeveleyin.
- Fotoğraf çekmek için deklanşöre dokunun.
- Switch between photo and video modes, or access advanced settings like portrait mode or panorama, as desired.
5.4. İnternet Bağlantısı
- Wifi: Git Ayarlar > Ağ ve internet > Wi-Fi. Turn Wi-Fi on and select an available network. Enter the password if required.
- Mobil veri: Git Ayarlar > Ağ ve internet > Mobil ağ. Ensure "Mobile data" is enabled.
5.5. Güvenlik Özellikleri
Your Nokia 8 Sirocco TA-1005 offers various security options:
- Parmak İzi Kilidi: Parmak izlerinizi şu şekilde kaydedin: Settings > Security & Location > Fingerprint.
- Ekran kilidi: PIN, desen veya parola belirleyin. Settings > Security & Location > Screen lock.
6. Bakım
6.1. Cihazın Temizlenmesi
Use a soft, lint-free cloth to clean your device. Avoid using harsh chemicals or abrasive materials, which can damage the screen or finish.
6.2. Pil Bakımı
- Charge your device using only Nokia-approved chargers and cables.
- Cihazı aşırı sıcaklıklara maruz bırakmaktan kaçının.
- Akünün sık sık tamamen boşalmasına izin vermeyin.
6.3. Yazılım Güncellemeleri
Cihazınızın en son özelliklere, güvenlik yamalarına ve performans iyileştirmelerine sahip olduğundan emin olmak için yazılım güncellemelerini düzenli olarak kontrol edin ve yükleyin. Ayarlar > Sistem > Sistem güncellemesi.
7. Sorun Giderme
Cihazınızda sorunlarla karşılaşırsanız aşağıdaki yaygın çözümlere başvurun:
| Sorun | Çözüm |
|---|---|
| Cihaz açılmıyor | Ensure the battery is charged. Connect to a charger for at least 30 minutes. If unresponsive, perform a force restart by holding the Power button for 10-15 seconds. |
| Zayıf ağ sinyali | Check SIM card insertion. Move to an area with better network coverage. Restart the device. Verify network settings in Ayarlar > Ağ ve internet > Mobil ağ. |
| Applications are crashing | Uygulamanın önbelleğini temizle (Ayarlar > Uygulamalar ve bildirimler > [Uygulama Adı] > Depolama ve önbellek > Önbelleği temizleUygulamayı Google Play Store'dan güncelleyin. Sorun devam ederse, uygulamayı kaldırıp yeniden yükleyin. |
| Pil çabuk bitiyor | Reduce screen brightness. Close unused background apps. Disable Wi-Fi, Bluetooth, and GPS when not in use. Check battery usage in Ayarlar > Pil güç tüketen uygulamaları belirlemek için. |
| Cihaz yanıt vermiyor | Perform a force restart by holding the Power button for 10-15 seconds. If the issue continues, consider a factory reset (Ayarlar > Sistem > Sıfırlama seçenekleri > Tüm verileri sil (fabrika ayarlarına sıfırlama)). Uyarı: A factory reset will erase all data on your device. Back up important data before proceeding. |
8. Özellikler
Detailed technical specifications for the Nokia 8 Sirocco TA-1005:
| Özellik | Detay |
|---|---|
| Model Adı | 8 Sirocco |
| Model Numarası | TA-1005 |
| İşletim Sistemi | Android 8.0 (Oreo) |
| İşlemci | Qualcomm MSM8998 Snapdragon 835, Octa-core (4x2.5 GHz Kryo & 4x1.8 GHz Kryo) |
| Grafik işlemcisi | Adreno540 |
| Veri deposu | 6 GB |
| Dahili Depolama | 128 GB |
| Görüntülemek | 5.5 inches, P-OLED capacitive touchscreen, 1440 x 2560 pixels, Corning Gorilla Glass 5 |
| Arka Kamera | 12MP Wide (f/1.7) + 13 MP Tele (f/2.6), dual-tone flash |
| Ön Kamera | 5 MP |
| Pil Kapasitesi | 3250 mAh |
| Şarj etme | Hızlı Şarj Desteği |
| Bağlantı | Wi-Fi 802.11a/b/g/n, Bluetooth, USB Type-C |
| Boyutlar | 43.36x43.17x0.75 cm |
| Ağırlık | 181 gr |
| SIM Tipi | Nano-SIM |
| Ağ Desteği | 2G GSM, 3G, 4G LTE (Note: Not compatible with CDMA networks) |
9. Safety and Warranty Information
9.1. Güvenlik Yönergeleri
- Do not use the device in prohibited areas, such as aircraft or hospitals.
- Cihazı suya veya aşırı neme maruz bırakmaktan kaçının.
- Use only original or approved accessories.
- Cihazı kendiniz sökmeye veya onarmaya çalışmayın.
- Cihazı ve pilini yerel yönetmeliklere uygun şekilde sorumlu bir şekilde atın.
9.2. Garanti Bilgileri
Your Nokia 8 Sirocco TA-1005 is covered by a limited manufacturer's warranty. Please refer to the separate warranty document included in your product packaging or visit the official Nokia support webAyrıntılı şartlar ve koşullar için web sitesini ziyaret edin. Satın alma belgenizi garanti talepleriniz için saklayın.


