giriiş
This manual provides detailed instructions for the assembly, operation, and maintenance of your TOOLPORT 4x8m Reception Tent FLEX Light. Please read these instructions carefully before setup to ensure safe and correct usage. This tent is designed for temporary outdoor events and offers protection from sun and light rain.
Güvenlik Talimatları
Önemli Güvenlik Bilgileri:
- Wind and snow loads have not been tested for these tents. We therefore decline all responsibility for damages of this nature.
- Please assemble the tent according to the instructions. In case of light snowfall, immediately remove snow from the roof.
- When wind picks up, please use our storm kit (if applicable, or secure properly).
- In case of strong gusts and heavy snowfall, we recommend temporarily dismantling the tent.
- For tents with a side height of 2.6m or more, a Safety Pack Plus is available, which provides static calculations for wind and snow resistance limits.
- We decline all responsibility for direct and indirect damages caused to persons, animals, and materials. Please observe all safety instructions.
- *According to DIN EN ISO 13934-1, tensile strength is determined by a stretch test on a 5 cm wide strip of the tarpaulin. The specified value indicates the tear strength per 5 cm width of the tarpaulin (in the longitudinal direction).
Always ensure the tent is securely anchored to the ground using the provided stakes and tension cables, especially in windy conditions.
Ürün Bileşenleri
The TOOLPORT 4x8m Reception Tent FLEX Light includes the following main components:
- Steel Frame Structure: Entirely galvanized steel tubes (approx. 38 mm diameter) and connectors (approx. 42 mm diameter) for improved corrosion protection. Features a quality clip system for tool-free assembly.
- Roof Tarpaulin: Single-piece PE (Polyethylene) tarpaulin, 100% waterproof with heat-sealed seams. Tear-resistant, UV resistance 20+, temperature resistance -20°C to 50°C.
- Side Walls and Gable Walls: Continuous side panels and gable walls with robust 12-layer PVC windows. Includes two large entrances with solid zippers.
- Fixing Accessories: Ground stakes for soft ground and tension cables for secure anchoring.
- Montaj Talimatları: Detailed manual for quick and easy setup.

Image: Key features and components of the TOOLPORT tent.

Image: Detailed features of the roof and frame construction.
Kurulum Talimatları
Follow these steps for a quick and easy assembly of your reception tent. It is recommended that 2-4 people assist with the assembly, which typically takes 1.5 to 3.5 hours.
- Unpack and Organize Components: Carefully unpack all parts and lay them out. Verify that all components listed in the packing list are present. The delivery includes the steel frame structure, roof tarpaulin, two gable parts, two side parts, elastic fasteners, solid stakes, tension cables, and the assembly instructions.

Resim: Üzeriview of side walls, assembly details, and included items.
- Çatı iskeletini monte edin: Begin by connecting the roof tubes and connectors. The galvanized steel tubes connect easily using the quality clip system, requiring no tools.

Image: Detail of the tool-free clip system for frame assembly.
- Attach the Roof Tarpaulin: Drape the single-piece roof tarpaulin over the assembled roof frame. Ensure it is centered and aligned correctly. The heat-sealed seams provide 100% waterproofing.
- Ayak direklerini birleştirin: Attach the vertical leg poles to the roof frame connectors.
- Yapıyı Yükseltin: With assistance, carefully raise the tent structure.
- Attach Foot Plates: Secure the wide foot plates to the bottom of each leg pole. These provide secure fixation and increased stability.
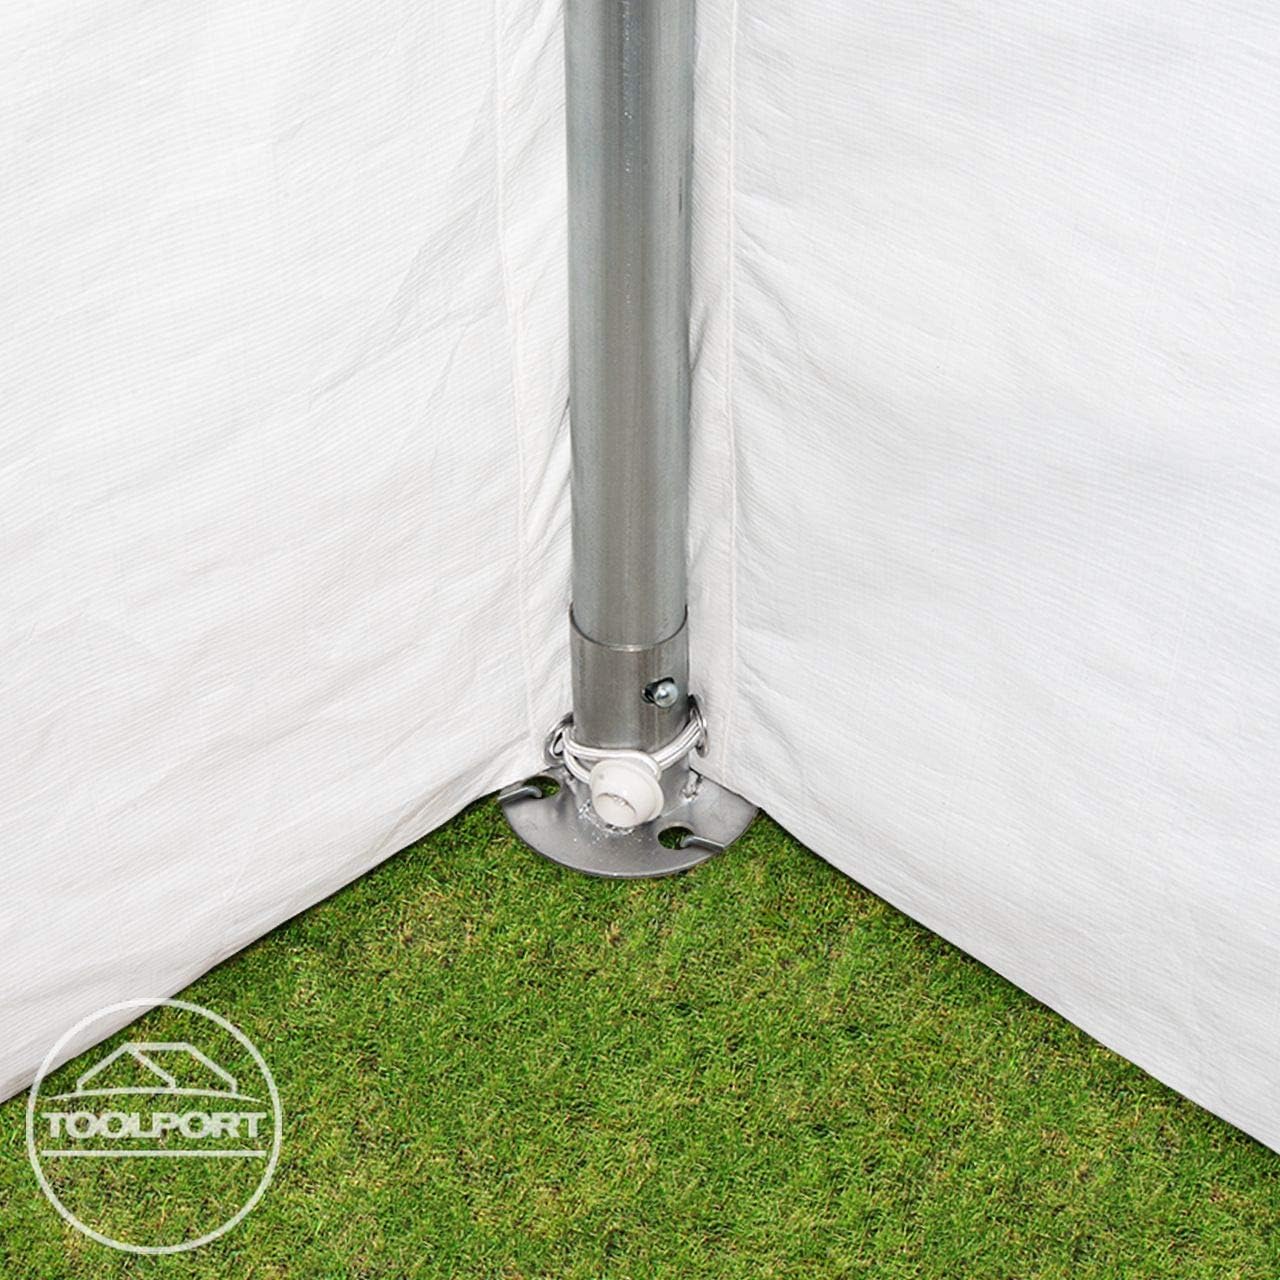
Image: Detail of the tent leg pole and foot plate connection.
- Install Side and Gable Walls: Attach the side walls and gable walls using elastic fasteners. The side walls are continuous for quick assembly. The gable walls include two large zippered entrances.
- Çadırı sabitleyin: Use the provided ground stakes and tension cables to firmly anchor the tent to the ground. This is crucial for stability, especially in varying weather conditions.
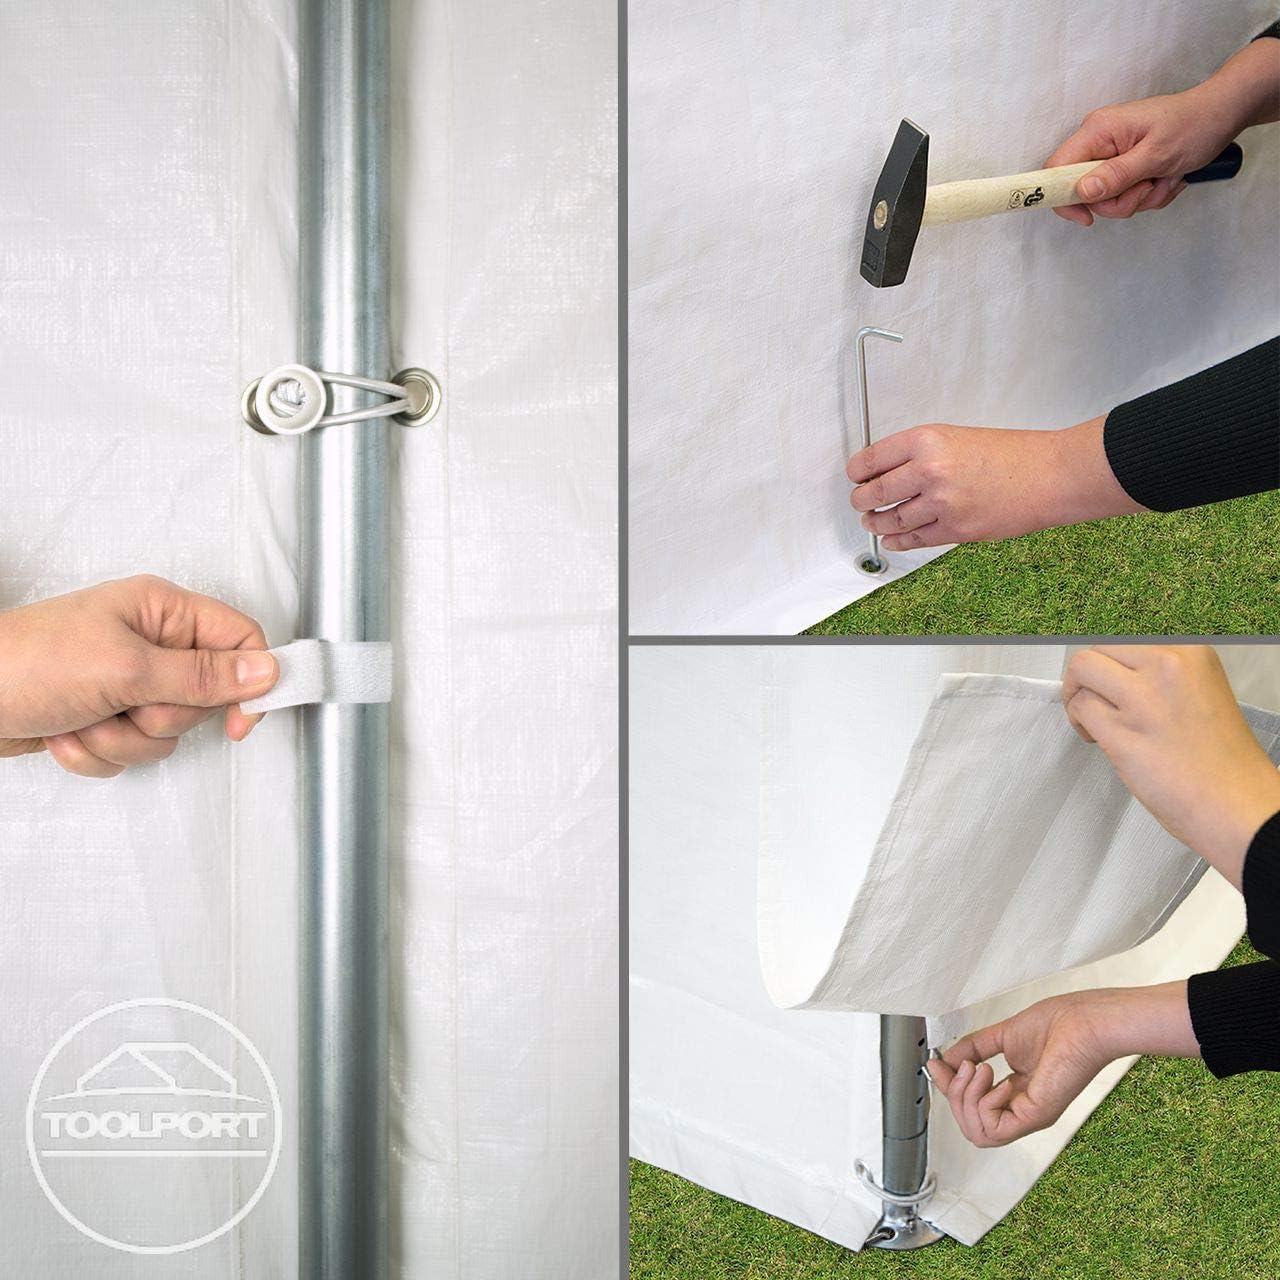
Image: Steps for securing tent components and anchoring to the ground.

Image: Fully assembled TOOLPORT 4x8m Reception Tent.
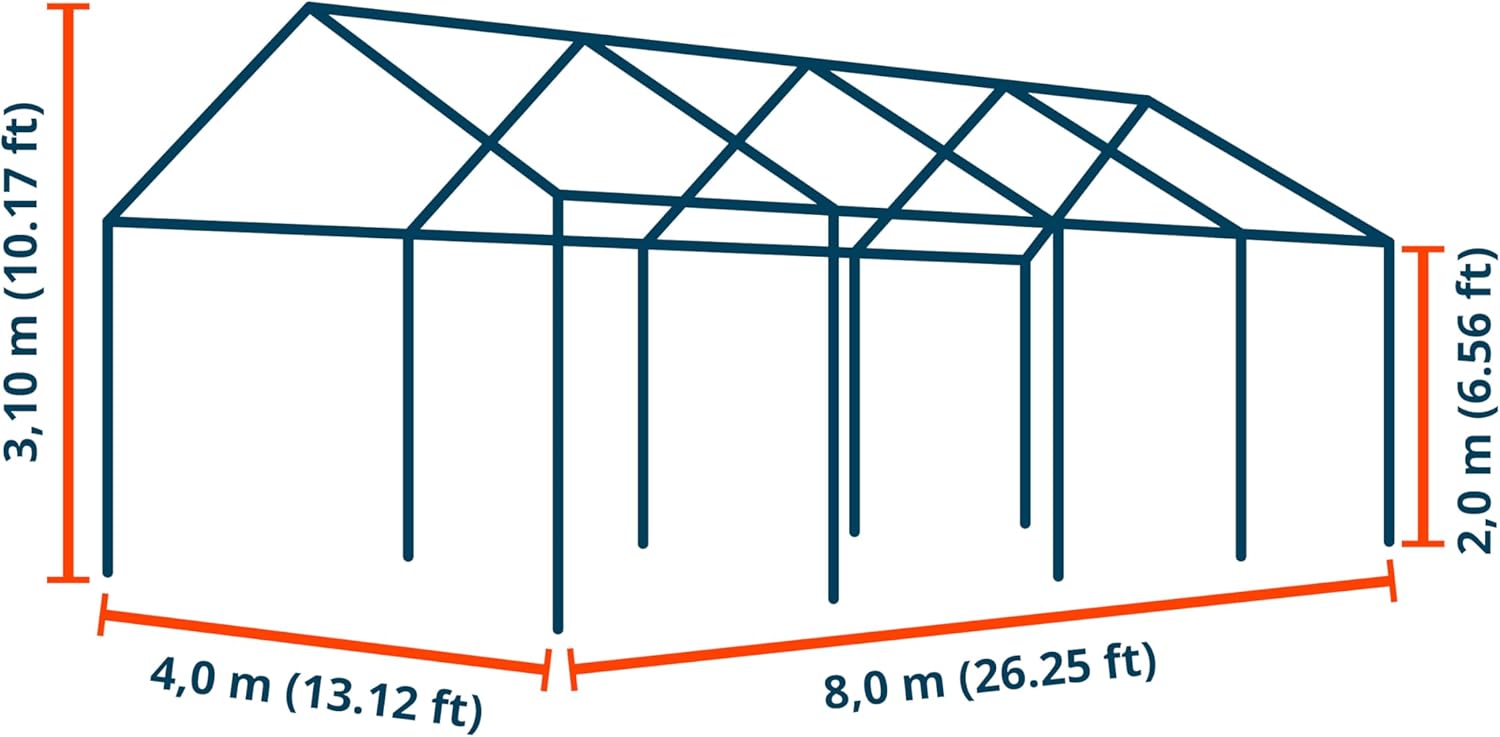
Image: Dimensional diagram of the 4x8m tent.
Kullanım Talimatları
The TOOLPORT 4x8m Reception Tent is designed for various outdoor activities and events. To ensure optimal performance and longevity:
- Hava Koşulları: This tent provides protection from sun and light rain. It is not designed for heavy winds, strong storms, or significant snowfall. Refer to the safety instructions regarding dismantling in adverse weather.
- Havalandırma: Utilize the zippered entrances and side panels to adjust ventilation as needed.
- Demirleme: Always ensure the tent is properly anchored to the ground using all provided stakes and tension cables. Regularly check the tension of the cables.
- Isıtma: If using external heating sources inside the tent, ensure adequate ventilation and maintain a safe distance from the tent fabric to prevent fire hazards.
Bakım
- Temizlik: Clean the tarpaulins with mild soap and water. Avoid harsh chemicals or abrasive cleaners, as these can damage the PE material and its waterproof coating. Rinse thoroughly and allow to air dry completely before storage.
- Çerçeve Bakımı: The galvanized steel frame is corrosion-resistant. If any rust spots appear, clean them and apply a rust-inhibiting primer and paint.
- Depolamak: When not in use, disassemble the tent and store all components in a dry, cool place, away from direct sunlight and extreme temperatures. Ensure all fabric parts are completely dry to prevent mold and mildew.
- Denetleme: Periodically inspect all components for wear and tear, especially before and after each use. Check for tears in the tarpaulin, bent frame parts, or damaged connectors. Replace any damaged parts immediately.
Sorun giderme
- Çadır Dengesizliği: Ensure all frame connections are secure and the tent is fully anchored with all stakes and tension cables. Check ground conditions; soft or loose soil may require additional anchoring.
- Su Kaçağı: Verify that the roof tarpaulin is correctly positioned and taut. While the tarpaulin is 100% waterproof, improper installation can lead to pooling or leaks. Check for any tears or punctures in the fabric.
- Çerçeve Montajının Zorluğu: Ensure you are using the correct tubes and connectors for each section. The clip system should allow for easy, tool-free assembly. If a part is bent or damaged, do not force it; contact customer support.
- Fermuar Arızası: Keep zippers clean and lubricated. Avoid excessive force when opening or closing.
Özellikler
| Özellik | Detay |
|---|---|
| Ürün Boyutları (U x G x Y) | 800 x 400 x 200 cm (8m x 4m x 2m); 45.6 kg |
| Model Numarası | 90106 (FLEX Light) |
| Marka | ARAÇ BAĞLANTISI |
| Çerçeve Malzemesi | Galvanized Alloy Steel (Tubes approx. 38mm diameter, Connectors approx. 42mm diameter) |
| Tarpaulin Material | Polyethylene (PE) 350 N* (Roof), 12-layer PVC (Windows) |
| Renk | Beyaz |
| Ürün Ağırlığı | 45600 Gram (45.6 kg) |
| Önerilen Kullanımlar | Outdoor activities, Parties |
| UV Koruması | True (UV resistance 20+) |
| Su Direnç Seviyesi | Waterproof (100% waterproof PE tarpaulin with heat-sealed seams) |
| Sıcaklık Direnci | -20°C ila 50°C |
| Montaj Zamanı | Approx. 1.5 to 3.5 hours (with 2-4 people) |
Garanti ve Destek
TOOLPORT products are designed for quality and durability. For specific warranty information, please refer to your purchase documentation or contact the retailer. Generally, a 30-day return/replacement policy applies from the date of purchase.
For technical support, missing parts, or any questions regarding your TOOLPORT 4x8m Reception Tent, please contact TOOLPORT customer service or your authorized dealer. Keep your purchase receipt and model number (FLEX Light, 90106) ready when contacting support.


