1. Giriş
The Godox XPro-C TTL Wireless Flash Trigger is designed for Canon EOS cameras, offering advanced control over various flash units. This trigger utilizes the Godox 2.4G wireless X system, enabling multi-channel triggering and stable signal transmission up to 100 meters. It supports E-TTL II autoflash, high-speed sync (HSS) up to 1/8000s, multi-flash, and manual flash modes.
Key features include a large LCD panel, five dedicated group buttons, and four function buttons for intuitive operation. The XPro-C also incorporates a TCM (TTL-Convert-Manual) transform function, magnification function, one-shoot & multi-shoot settings, group modeling lamp control, and group zooming. Firmware upgrades are supported via a Type-C USB port.
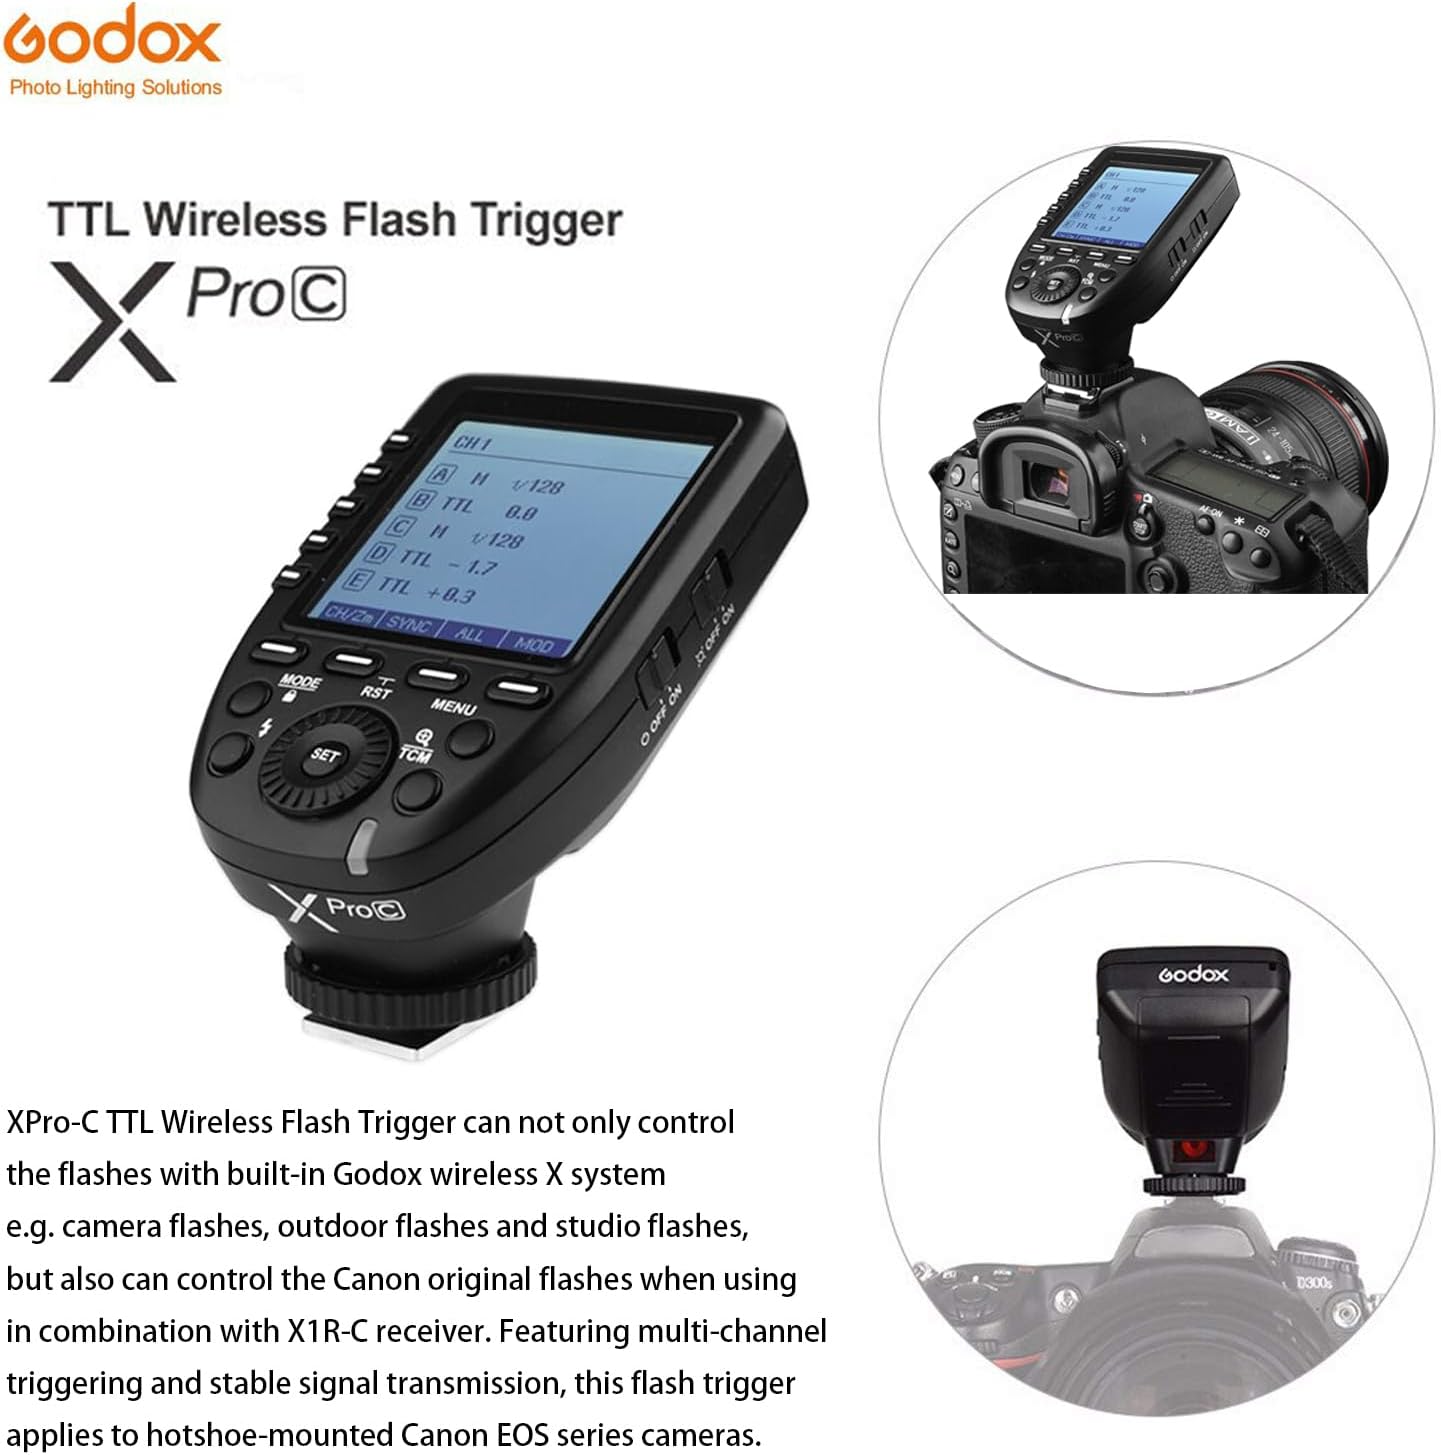
Figure 1.1: Godox XPro-C TTL Wireless Flash Trigger mounted on a Canon camera, showcasing tasarımı ve entegrasyonu.
2. Kurulum
2.1 Pil Kurulumu
The XPro-C requires two AA batteries for power. To install:
- Locate the battery compartment cover on the side of the unit.
- Kapağı kaydırarak açın.
- İki adet AA pil takın ve kutupların doğru olmasına dikkat edin (+/-).
- Pil bölmesi kapağını sıkıca kapatın.

Şekil 2.1: Yan view of the Godox XPro-C, highlighting the battery compartment and Type-C USB port.
2.2 Kamera Üzerine Montaj
To mount the XPro-C on your Canon camera:
- Slide the XPro-C's hotshoe foot into your camera's hotshoe.
- Rotate the locking ring clockwise until it is securely tightened.
2.3 Açma/Kapatma
Use the power switch located on the side of the unit to turn the XPro-C ON or OFF.
Video 2.1: Detailed operation and setup guide for the Godox XPro-C, demonstrating physical features and basic controls.
3. Kullanım Talimatları
3.1 Arayüz Bittiview
The XPro-C features an extra-large LCD panel for clear display of settings. On the left side are five group selection buttons (A-E), and below the screen are four function buttons (MODE, RST, MENU, TCM) and a central SET button with a rotary dial.

Şekil 3.1: Ön view of the Godox XPro-C, illustrating the extra-large LCD panel, group buttons, and function buttons.
3.2 Group and Mode Selection
To control flash groups and modes:
- Grup Seç: Press one of the dedicated group buttons (A-E) on the left side to select a specific flash group.
- Mod seç: After selecting a group, press the MOD button to cycle through available flash modes: TTL, Manual (M), and OFF.
- Adjust Output/Compensation: Turn the rotary dial to adjust the flash output power (in Manual mode) or Flash Exposure Compensation (FEC) (in TTL mode). Press the AYARLAMAK Onaylamak için düğmeye basın.
3.3 Geleneksel Çin Tıbbı Dönüşüm Fonksiyonu
The TCM (TTL-Convert-Manual) function allows you to quickly convert a TTL flash value into a manual power output. This is useful for maintaining consistent lighting when switching from TTL to manual mode.
- Activate TCM: Uzun basın Geleneksel Çin Tıbbı button for 2 seconds. The current TTL flash value will be transformed and displayed as a manual power output.
3.4 Yakınlaştırma Ayarı
To adjust the flash zoom value:
- Enter Zoom Setting: Long press the function button 1 (CH/ZM) for 1-2 seconds.
- Yakınlaştırmayı Ayarla: Use the rotary dial to change the zoom value (e.g., AUTO, 24mm, 50mm, 80mm, 200mm). Press AYARLAMAK onaylamak için.
3.5 Channel and Wireless ID Settings
The XPro-C supports 16 groups and 32 channels for wireless control. Additionally, 01 to 99 wireless ID settings can be used to prevent signal interference.
- Kanal Ayarla: Short press function button 1 (CH/ZM) to enter channel selection. Use the rotary dial to select a channel (1-32) and press AYARLAMAK onaylamak için.
- Set Wireless ID: Access the custom function settings (C.Fn) via the MENÜ button. Navigate to the ID setting and use the rotary dial to select an ID (1-99) or turn it OFF.
3.6 Senkronizasyon Modları
The XPro-C supports High-Speed Sync (HSS) and Second Curtain Sync.
- Select Sync Mode: Short press function button 2 (SYNC) to cycle through available sync modes.
3.7 Modelleme Lamp Kontrol
Modellemeyi kontrol edebilirsiniz.amps of compatible flashes directly from the XPro-C.
- Toggle All Modeling Lamps: Short press function button 4 (MOD) to turn all modeling lamps ON or OFF.
- Toggle Individual Group Modeling Lamps: Select a specific group (A-E) and then short press function button 4 (MOD) to toggle its modeling lamp.
3.8 Ekran Kilidi
To prevent accidental changes to settings, you can lock the screen.
- Kilit Ekranı: Uzun basın MOD 2 saniye boyunca düğmeye basın.
- Ekranın Kilidini Aç: Uzun basın MOD 2 saniye boyunca tekrar düğmesine basın.
Video 3.1: Bittiview of the Godox XPro-C's features and basic operation, including button functions and screen display.
4. Bakım
4.1 Firmware Yükseltme
The XPro-C supports firmware upgrades via its Type-C USB port. This allows for improved functionality and compatibility updates.
- Connect the XPro-C to a computer using a Type-C USB cable.
- Godox'un resmi sitesini ziyaret edin. website to download the latest firmware and update instructions.
4.2 Genel Bakım
To ensure the longevity of your XPro-C:
- Keep the unit dry and clean. Avoid exposure to water or excessive humidity.
- Use a soft, dry cloth (like the included LETWING cloth) to clean the unit.
- Kullanmadığınız zaman serin ve kuru bir yerde saklayınız.
- Uzun süre saklayacaksanız, sızıntıyı önlemek için pilleri çıkarın.
5. Sorun Giderme
5.1 Fabrika Ayarlarına Sıfırlama
If you encounter persistent issues or wish to revert all settings to their default values:
- Long press the function buttons simultaneously for 2-3 seconds to restore factory defaults.
5.2 Ortak Sorunlar
- Flaş tetiklenmiyor: Ensure the XPro-C is securely mounted, batteries are charged, and the flash unit is powered on and set to a compatible wireless mode (e.g., Godox X system slave mode). Verify channel and ID settings match between the trigger and flash.
- Inconsistent triggering: Check for environmental interference. Ensure the trigger and flash are within the effective transmission range (0-100m).
- Ekran yanıt vermiyor: Try locking and unlocking the screen (long press MODE button). If unresponsive, remove and reinsert batteries.
6. Özellikler
| Özellik | Detay |
|---|---|
| Ürün Boyutları | 4.8 x 4.8 x 2.44 inç |
| Ürün Ağırlığı | 6.4 ons |
| Güç Kaynağı | 2 * AA piller (dahil değildir) |
| Kablosuz sistemi | Godox 2.4G Kablosuz X Sistemi |
| transmisyon Menzili | Approx. 0-100m |
| Flaş Senkronizasyon Hızı | 1/8000 saniyeye kadar (HSS) |
| Flaş Modları | TTL Otomatik Flaş, Manuel Flaş, Çoklu Flaş |
| Flaş Pozlama Telafisi | ±3 durak, 1/3 duraklık artışlarla |
| Gruplar | 16 Groups (A-F, 0-9) or 5 Groups (A-E) |
| Kanallar | 32 Kanal |
| Kablosuz Kimlik Ayarları | 01-99 (for newer flashes) |
| Yazılım Yükseltmesi | Tip-C USB bağlantı noktası |
| Senkronizasyon Kablosu Jakı | 2.5mm |
7. Uyumluluk
7.1 Compatible Canon Camera Models
The Godox XPro-C is compatible with Canon EOS cameras that support E-TTL II autoflash and have a PC sync socket. Tested models include, but are not limited to:
- 1Dx Mark II, 1Dx, 5Ds/5Dsr, 5DIV, 5D Mark III, 5D Mark II, 5D
- 7D Mark II, 7D, 6D, 80D, 70D, 60D, 50D
- 500D, 450D, 400D Digital, 350D DIGITAL, 100D, 1200D, 1000D, 1100D
- M5, M3
For other Canon camera models, self-testing is recommended to confirm compatibility.
7.2 Compatible Godox Flashes and Receivers
The XPro-C can control flashes with built-in Godox wireless X system (e.g., camera flashes, outdoor flashes, studio flashes). It can also control Canon original flashes when used with an X1R-C receiver.
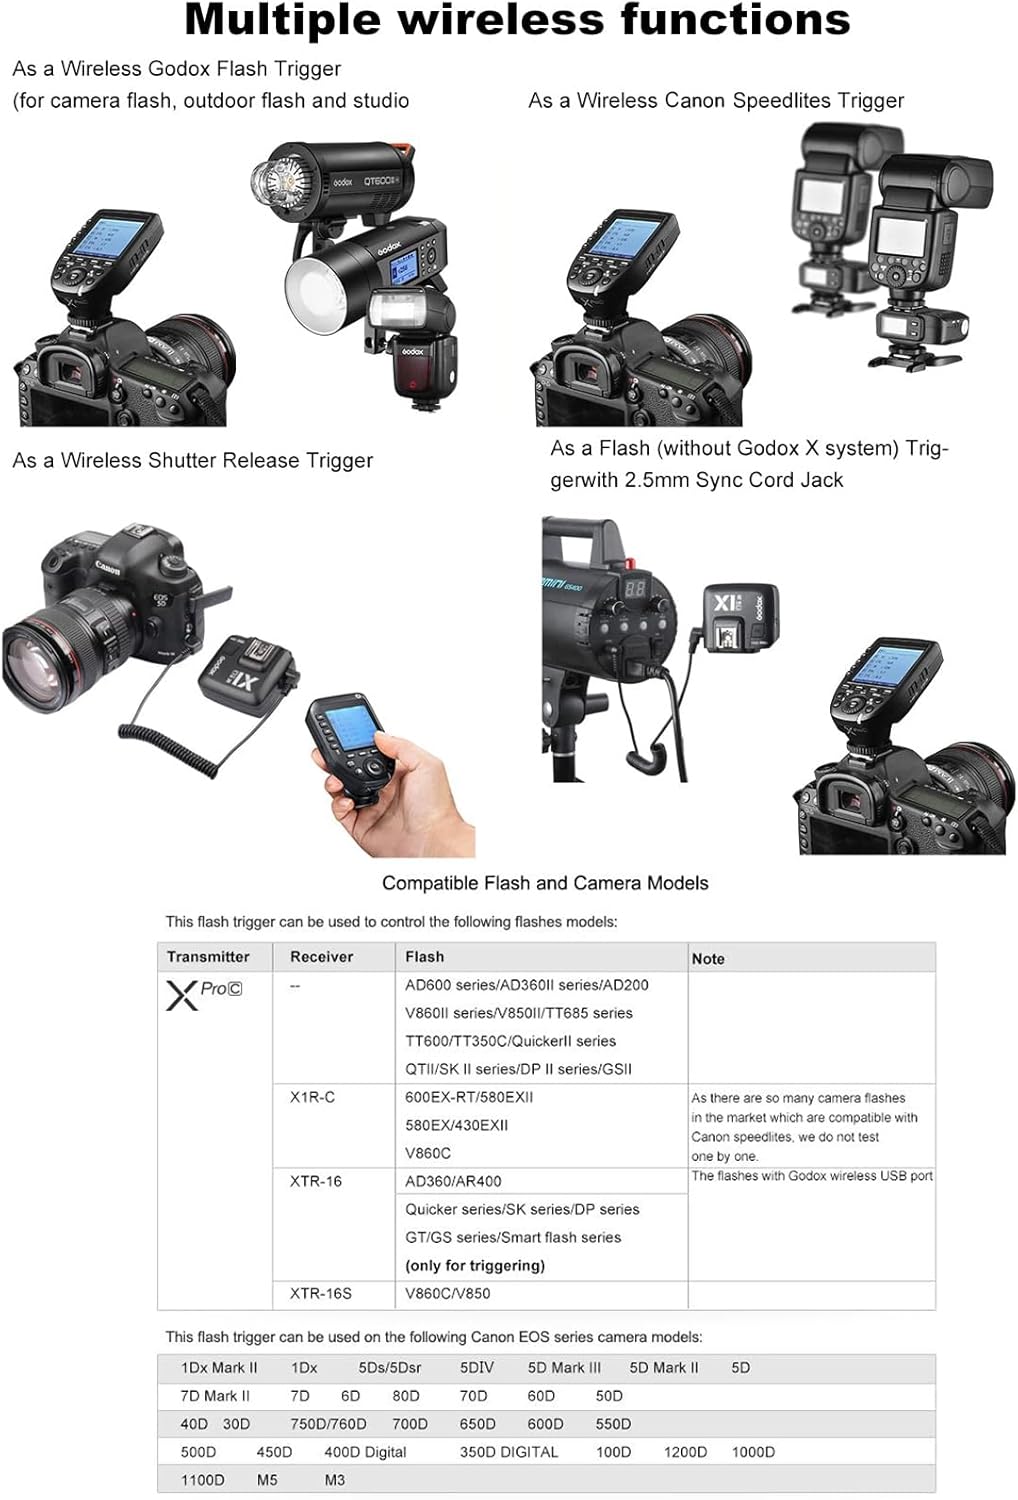
Figure 7.1: The Godox XPro-C trigger shown in a setup controlling multiple Godox flash units, demonstrating its versatility.
8. Garanti ve Destek
8.1 Garanti Bilgileri
Please refer to the warranty card included with your product for detailed warranty terms and conditions. Warranty coverage typically includes manufacturing defects for a specified period from the date of purchase.
8.2 Müşteri Desteği
Teknik destek, sorun giderme veya servis sorularınız için lütfen Godox müşteri desteğiyle resmi web siteleri aracılığıyla iletişime geçin. website or the contact information provided in your product packaging. Keep your purchase receipt and product serial number handy for faster service.


