giriiş
The ASUS ROG Maximus IX Hero is an ATX motherboard designed for 7th generation Intel Core processors. It features an LGA1151 socket, DDR4 memory support, and various connectivity options including DisplayPort, HDMI, M.2 slots, and USB 3.1. This motherboard provides a robust foundation for building a high-performance personal computer.

Resim: Yukarıdan aşağıya view of the ASUS ROG Maximus IX Hero motherboard, showcasing its layout, CPU socket, RAM slots, and various expansion slots.
Kutuda Neler Var?
Aşağıda listelenen tüm bileşenlerin paketinizde bulunduğunu doğrulayın:
- Kullanıcı kılavuzu
- Destek DVD'si
- I / O Kalkanı
- 2-in-1 SATA 6Gb/s cables (2)
- SLI™ HB Bridge (2-way-M)
- Q-Konnektör
- ROG Coaster
- 3D printing mount
- 10-in-1 ROG cable label
- CPU Kurulum Aracı
- 2-in-1 M.2 Screw set
- ROG çıkartması
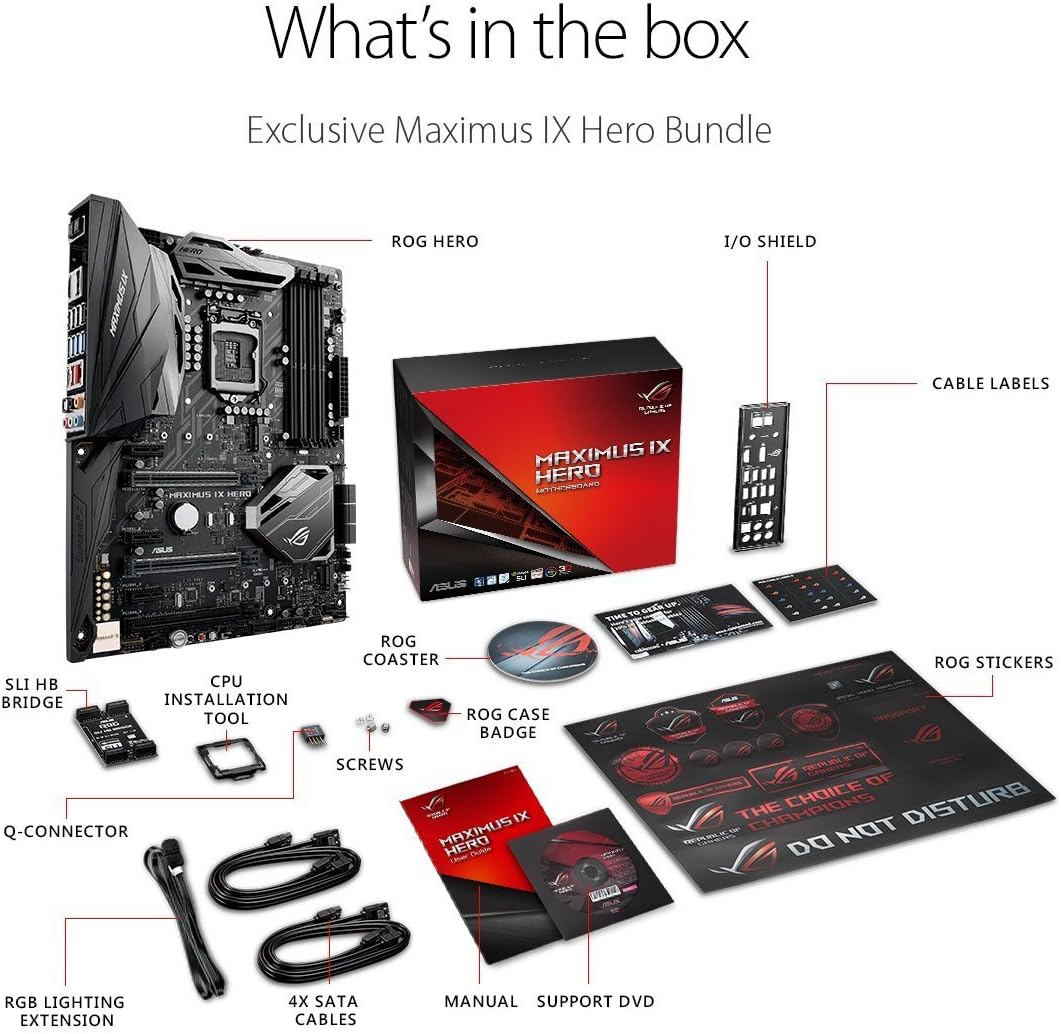
Image: A visual representation of the ASUS ROG Maximus IX Hero motherboard and its included accessories, such as cables, manuals, and installation tools.
Temel Özellikler
- Supports 7th generation Intel Core processors, enhancing connectivity and speed with Dual M.2 slots, front panel USB 3.1, and Intel Optane Memory compatibility.
- Includes 5-Way Optimization with Auto-Tuning and FanXpert 4 for automated overclocking profile adjustments and dynamic system cooling.
- Features ASUS AURA Sync RGB lighting and a 3D-printing friendly mount for customization.
- Equipped with two Patent-pending Safe Slots, which integrate metal framing for enhanced support and rigidity of large graphics processing units (GPUs).
- Provides industry-leading 8-channel HD audio through the ROG exclusive SupremeFX S1220, powered by Japanese capacitors.
Kurulum ve Yükleme
This section provides general guidelines for installing your ASUS ROG Maximus IX Hero motherboard. Refer to the detailed user guide for specific instructions and safety precautions.
1. İlk Muayene
Before installation, carefully inspect the motherboard for any physical damage. Ensure the CPU socket pins are not bent.
2. İşlemci Kurulumu (LGA1151)
- CPU soketinin kolunu açın.
- Align the notches on your 7th generation Intel Core processor with the socket.
- CPU'yu zorlamadan yavaşça sokete yerleştirin.
- CPU'yu sabitlemek için soket kolunu kapatın.
3. RAM Kurulumu (DDR4)
- DDR4 DIMM yuvalarındaki klipsleri açın.
- DDR4 bellek modülündeki çentiği DIMM yuvasındaki anahtarla hizalayın.
- Klipsler yerine oturana kadar bellek modülünün her iki ucuna sıkıca bastırın.
- The motherboard supports up to 64GB of DDR4 memory across four slots.
4. M.2 SSD Kurulumu
The motherboard features dual M.2 slots for high-speed storage. Refer to the user guide for specific M.2 slot locations and screw set usage.
- Locate an available M.2 slot.
- M.2 SSD'yi açılı bir şekilde yuvaya yerleştirin.
- SSD'yi yavaşça aşağı doğru bastırın ve verilen M.2 vidayla sabitleyin.
5. PCIe Card Installation (Safe Slots)
The motherboard includes reinforced Safe Slots for graphics cards and other PCIe devices.
- Align your PCIe card with an available PCIe slot.
- Kart tamamen oturana ve tutma klipsi yerine oturana kadar sıkıca bastırın.
6. Connecting Power and Front Panel Headers
Connect the 24-pin ATX power connector and the 8-pin CPU power connector from your power supply to the motherboard. Connect the front panel headers (power button, reset button, HDD LED, power LED, USB ports, audio) according to the motherboard manual's pinout diagram.
7. Arka Giriş/Çıkış Bağlantıları
Connect your peripherals to the rear I/O ports. This includes USB devices, display cables (HDMI, DisplayPort), Ethernet, and audio devices.

Resim: Yakın çekim view of the rear input/output panel of the ASUS ROG Maximus IX Hero motherboard, showing various ports including USB, HDMI, DisplayPort, Ethernet, and audio jacks.
8. RGB Aydınlatma Kurulumu
The motherboard features integrated AURA Sync RGB lighting. Additional RGB LED strips can be connected to the dedicated RGB LED headers for expanded lighting control.
9. Liquid Cooling Integration
For custom liquid cooling setups, the motherboard includes H2O sensor headers to monitor temperature and flow within your cooling loop.
Ürün Bittiview Video
Video: Bir fazlaview of the ASUS ROG Maximus IX Hero motherboard, highlighting its key features, connectivity options, and design elements. This video provides a visual guide to the board's components and capabilities.
Kullanım Talimatları
1. İlk Önyükleme
After completing hardware installation, connect your display, keyboard, and mouse. Power on your system. The system should display the BIOS/UEFI interface or begin the operating system installation process.
2. BIOS/UEFI Yapılandırması
Press the designated key (usually DEL or F2) during boot-up to enter the BIOS/UEFI setup. Here you can configure boot order, system time, enable/disable features, and apply overclocking settings. The 5-Way Optimization feature can assist with automated tuning.
3. Sürücü Kurulumu
Install all necessary drivers for the motherboard chipset, audio, LAN, and other integrated components. These can typically be found on the included Support DVD or downloaded from the ASUS official webalan.
4. Yazılım Yardımcı Programları
Utilize ASUS software utilities such as AURA Sync for RGB lighting control and FanXpert 4 for fan speed management to optimize your system's performance and aesthetics.
Bakım
1. Temiz Tutun
Regularly clean dust from the motherboard and connected components using compressed air. Ensure the system is powered off and unplugged before cleaning.
2. BIOS/UEFI Güncellemeleri
ASUS desteğini periyodik olarak kontrol edin website for BIOS/UEFI updates. Updates can improve system stability, compatibility, and performance. Follow the update instructions carefully to avoid system damage.
3. Sürücü Güncellemeleri
Keep your system drivers updated to ensure optimal performance and compatibility with new hardware and software.
Sorun giderme
1. Güç Yok/Açılış Yok
- Tüm güç kablolarının (24-pin ATX, 8-pin CPU) güvenli bir şekilde bağlandığından emin olun.
- Güç kaynağının açık olduğundan emin olun.
- Check front panel power button connection.
- En az bileşenle (işlemci, bir RAM çubuğu, entegre grafik kartı yoksa ekran kartı) önyükleme yapmayı deneyin.
2. Ekranda Görüntü Çıktısı Yok
- Ensure the monitor is connected to the correct graphics output (either motherboard or dedicated GPU).
- Grafik kartını ve bellek modüllerini yeniden yerleştirin.
- Farklı bir ekran kablosu veya monitörle deneyin.
3. Sistem Kararsızlığı/Çökmeleri
- CPU ve GPU sıcaklıklarını kontrol edin.
- Tüm sürücülerin güncel olduğundan emin olun.
- If overclocked, revert to default settings to test stability.
- RAM bütünlüğünü kontrol etmek için bellek tanılama araçlarını çalıştırın.
Özellikler
| Özellik | Detay |
|---|---|
| Marka | ASUS |
| Model Adı | ROG MAXIMUS IX HERO |
| CPU Soketi | LGA1151 |
| Uyumlu İşlemciler | 7. Nesil Intel Core |
| Yonga Seti Türü | Intel Z270 |
| RAM Bellek Teknolojisi | DDR4 |
| Mevcut Bellek Yuvaları | 4 |
| Maximum RAM Size | 64 GB |
| Grafik Kartı Arayüzü | PCI Ekspres |
| Toplam HDMI Bağlantı Noktaları | 1 |
| Toplam USB Bağlantı Noktaları | 2 (USB 3.1 Type-A, USB 3.1 Type-C on rear I/O) |
| Sistem Veri Yolu Standardı Destekleniyor | SATA 3 |
| Ürün Ağırlığı | 2.9 Pound |
Garanti ve Destek
Bu ürün bir 3 Yıl Garanti from ASUS. For technical support, driver downloads, and further assistance, please visit the official ASUS support webweb sitesi veya ASUS Mağazası.


