Chief KRA221SXRH Expansion Arm Kit Instruction Manual
Model: KRA221SXRH
1. Giriş
This manual provides detailed instructions for the installation and use of the Chief KRA221SXRH Expansion Arm Kit. This kit is designed to expand existing Chief K1C series monitor arm installations, allowing for additional monitor configurations.
The KRA221SXRH facilitates upgrading a single-arm K1C120SXRH to a dual-arm K1C220SXRH setup or adding a third and/or fourth arm to a multi-workstation configuration when used with the KRA226 grommet plate accessory.
2. Güvenlik Bilgileri
Read all instructions carefully before installation. Failure to do so may result in personal injury or property damage.
Ensure that the mounting surface can safely support the combined weight of the arm kit, monitors, and any attached accessories.
Do not overtighten screws. Overtightening can cause damage to the product or mounting surface.
Küçük parçaları çocuklardan uzak tutun.
If you have any doubts about the installation process, consult a qualified professional.
3. Paket İçeriği
Verify that all components are present and undamaged before proceeding with installation. If any parts are missing or damaged, contact Chief customer support.
Expansion Arm (KRA221SXRH)
Montaj Donanımı Takımı
Kullanım Kılavuzu (bu belge)
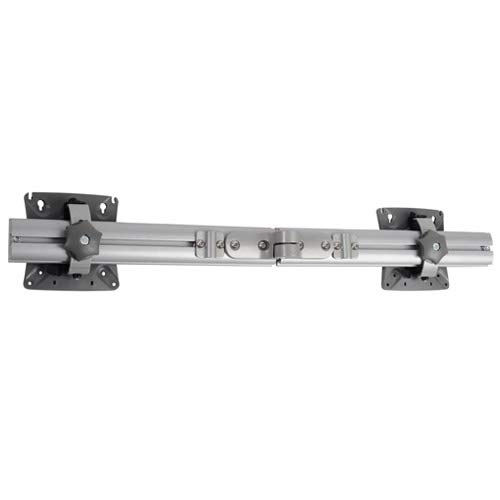
Image: Components of the Chief KRA221SXRH Expansion Arm Kit. This image displays the primary arm component and associated mounting hardware.
4. Kurulum ve Kurulum
This section outlines the steps to install the KRA221SXRH Expansion Arm Kit. Ensure you have all necessary tools and an existing Chief K1C series mount in place.
4.1. Expanding a Single-Arm K1C120SXRH to a Dual-Arm K1C220SXRH
Prepare the Existing Mount: Ensure your existing K1C120SXRH single-arm mount is securely installed.
Attach the Expansion Arm: Locate the designated attachment point on the existing K1C mount's pole or central hub. Align the KRA221SXRH expansion arm with this point.
Secure the Arm: Use the provided mounting hardware (screws, washers, etc.) to firmly attach the expansion arm. Refer to the specific diagrams in your K1C base mount manual for precise screw locations and torque specifications.
Mount the Second Monitor: Attach your second monitor to the newly installed expansion arm using the VESA mounting plate.
Kablo yönetimi: Route monitor cables through the integrated cable management channels of both arms for a clean setup.
4.2. Adding a Third or Fourth Arm (Requires KRA226 Grommet Plate)
For configurations requiring three or four arms, the Chief KRA226 Grommet Plate Accessory is necessary. This accessory provides additional mounting points for expansion arms in a center-of-table setup.
Install KRA226 Grommet Plate: If not already installed, follow the instructions provided with the KRA226 grommet plate to securely mount it to your workstation.
Attach Expansion Arms: Identify the available mounting points on the KRA226 grommet plate. Attach the KRA221SXRH expansion arms to these points using the provided hardware.
Monitörleri Monte Et: Secure your monitors to the expansion arms.
Ayarlayın ve Güvenli Hale Getirin: Make any necessary adjustments to monitor height, tilt, and swivel. Ensure all connections are tight and secure.
5. Ayarlamalar
Once installed, the KRA221SXRH expansion arm allows for various adjustments to optimize your viewDeneyim.
Yükseklik Ayarı: Yakayı gevşetin clamp on the main pole (if applicable to your K1C base mount), adjust the arm to the desired height, and retighten the clamp.
Eğim ve Döndürme: Use the adjustment knobs or screws on the monitor head to set the desired tilt and swivel angles for your monitor.
Kol Uzatma/Geri Çekme: The arm can be extended or retracted to bring the monitor closer or further away from the user.
Rotasyon: Monitors can typically be rotated from landscape to portrait orientation.
Always ensure that adjustments are made smoothly and that all locking mechanisms are securely fastened after positioning to prevent accidental movement.
6. Bakım
Regular maintenance ensures the longevity and safe operation of your Chief KRA221SXRH Expansion Arm Kit.
Periyodik muayene: Tüm vidaları ve bağlantıları düzenli olarak kontrol ederek sıkı olduklarından emin olun. Gerekirse tekrar sıkın.
Temizlik: Clean the arm surfaces with a soft, damp Bez. Cilaya zarar verebilecek aşındırıcı temizleyicilerden veya çözücülerden kaçının.
Yağlama: No lubrication is typically required for the moving parts of this arm kit.
Ağırlık Sınırları: Do not exceed the maximum weight capacity specified for your K1C series monitor arm and the expansion kit.
7. Sorun Giderme
Sorun
Olası Neden
Çözüm
Arm feels loose or wobbly.
Montaj vidaları yeterince sıkı değil.
Check and retighten all mounting screws on the expansion arm and the main K1C mount.
Monitör sarkıyor veya konumunu koruyamıyor.
Weight capacity exceeded or tension adjustment needed.
Ensure monitor weight is within limits. Adjust the tension mechanism on the monitor head if available (refer to your K1C base mount manual).
Difficulty attaching expansion arm.
Incorrect alignment or missing hardware.
Review installation steps. Ensure correct orientation and that all necessary hardware is used. Confirm compatibility with your existing K1C mount.
If you encounter issues not listed here, please contact Chief customer support for assistance.
8. Özellikler
Modeli: KRA221SXRH
Ürün Türü: Expansion Arm Kit
Uyumluluk: Chief K1C series monitor arms (e.g., K1C120SXRH, K1C220SXRH)
Renk: Siyah
Ürün Ağırlığı: Yaklaşık 11.5 pound (5.2 kg)
Ürün Ölçüleri: Yaklaşık 17.5 x 6.5 x 33.75 inç (44.45 x 16.51 x 85.73 cm)
Özel Özellikler: Designed for expanding existing K1C installations, supports multi-monitor configurations with KRA226 accessory.
9. Garanti ve Destek
For information regarding warranty coverage, please refer to the official Chief website or the warranty documentation included with your original K1C series monitor arm. Chief provides customer support for product inquiries, technical assistance, and troubleshooting.
Chief PDR Serisi Büyük Düz Panel Çift Kollu Duvar Montajı Kurulum Talimatları Büyük düz panel ekranlar için tasarlanmış Chief PDR Serisi Çift Kollu Duvar Montaj Aparatı için detaylı kurulum talimatları. Duvara montaj, ekranın takılması, kablo yönetimi, gerilim ayarlamaları ve döner kol konfigürasyonlarını kapsar. Güvenlik uyarıları, ürün özellikleri ve iletişim bilgileri de içerir.
Chief PNR Serisi Büyük Düz Panel Çift Kollu Duvara Montaj Talimatları Chief PNR Serisi Büyük Düz Panel Çift Kollu Duvar Montaj Aparatı için detaylı kurulum kılavuzu; güvenlik önlemleri, parçalar, aletler, montaj prosedürleri, ayarlamalar ve ekranın çıkarılması konularını kapsamaktadır.
Chief MSBV VESA Arayüz Braketi Kurulum Talimatları Ekranlar için bir montaj çözümü olan Chief MSBV VESA Arayüz Braketi için ayrıntılı kurulum kılavuzu. Güvenlik, boyutlar, parçalar, VESA uyumluluğu (100x100 ila 400x200) ve montaj prosedürlerini kapsar. Legrand | AV iletişim bilgilerini içerir.
Chief RMF3/RMT3/RLF3/RLT3 Kurulum Talimatları Chief'in RMF3, RMT3, RLF3 ve RLT3 düz panel montaj aparatları için kapsamlı kurulum kılavuzu; çeşitli duvar tipleri için donanım gereksinimlerini, montaj adımlarını ve güvenlik önlemlerini ayrıntılı olarak açıklamaktadır.
Chief Thinstall Büyük Eğimli Üniversal Montaj Kılavuzu Chief Thinstall™ Büyük Eğimli Evrensel Montaj Aparatı (LTTU) için kapsamlı kurulum talimatları. Bu kılavuz, duvar plakası montajı, ekran bağlantısı, eğim ayarı ve kablo yönetimi için ayrıntılı adımlar sunarak ekranınızın güvenli ve doğru şekilde kurulmasını sağlar.