1. Giriş
This manual provides detailed instructions for the installation, operation, and maintenance of your Avision FL-1501B document scanner. Please read this manual thoroughly before using the scanner to ensure proper and safe operation. Keep this manual for future reference.

Figure 1: Avision FL-1501B Document Scanner with its automatic document feeder (ADF) and output tray extended.
2. Güvenlik Bilgileri
Observe the following safety precautions to prevent damage to the scanner and ensure user safety:
- Yalnızca tarayıcıyla birlikte verilen güç adaptörünü kullanın.
- Tarayıcıyı suya veya aşırı neme maruz bırakmayın.
- Tarayıcıyı sabit ve düz bir yüzeye yerleştirin.
- Havalandırma açıklıklarını tıkamaktan kaçının.
- Tarayıcıyı kendiniz sökmeye veya onarmaya çalışmayın. Yetkili servis personeline başvurun.
- Tarayıcıyı doğrudan güneş ışığından ve ısı kaynaklarından uzak tutun.
3. Paket İçeriği
Paketin içinde tüm öğelerin mevcut olduğundan emin olun:
- Avision FL-1501B Scanner Unit
- Güç Adaptörü
- USB kablosu
- Hızlı Başlangıç Kılavuzu
- Yazılım CD'si (veya indirme talimatları)
4. Kurulum
4.1 Paketten Çıkarma ve Yerleştirme
- Tarayıcıyı ambalajından dikkatlice çıkarın.
- Remove all protective tapes and packing materials.
- Place the scanner on a flat, stable surface with adequate space for document feeding and output.

Figure 2: The Avision FL-1501B scanner in its closed position, suitable for storage or before extending trays.
4.2 Tarayıcının Bağlanması
- Connect the power adapter to the scanner's power input port and then to an electrical outlet.
- Connect the USB cable to the scanner's USB port and then to an available USB port on your computer.
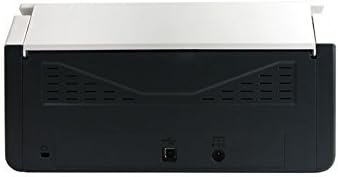
Figure 3: Rear panel of the scanner, illustrating the power input and USB connection ports.
4.3 Sürücü ve Yazılım Kurulumu
Before using the scanner, you must install the necessary drivers and scanning software on your computer.
- Insert the provided Software CD into your computer's optical drive, or download the latest drivers and software from the official Avision webalan.
- Follow the on-screen instructions to complete the installation process. It is recommended to install all bundled software for full functionality.
- İstendiğinde bilgisayarınızı yeniden başlatın.
5. Operasyon
5.1 Belgelerin Yüklenmesi
- Extend the input tray and output tray of the scanner.
- Kağıt kılavuzlarını belgelerinizin genişliğine uyacak şekilde ayarlayın.
- Place the documents face down, top edge first, into the automatic document feeder (ADF). Ensure the stack is neatly aligned. The scanner supports a maximum input sheet capacity of 100 sheets.

Şekil 4: Yan profile of the scanner, showing the fully extended input and output trays ready for document feeding.
5.2 Kontrol Panelini Kullanma
The scanner features a control panel for quick access to common scanning functions.

Şekil 5: Ayrıntılı view of the scanner's control panel, featuring a digital display, function selection buttons, Cancel, Scan, and Power buttons.
- Güç Düğmesi: Press to turn the scanner on or off.
- Function Buttons (Up/Down Arrows): Use these to select different scanning profiles or functions displayed on the digital screen.
- Tarama Düğmesi: Initiates the scanning process based on the currently selected function.
- İptal Düğmesi: Stops the current scanning operation.
5.3 Tarama Gerçekleştirme
- Tarayıcının açık olduğundan ve bilgisayarınıza bağlı olduğundan emin olun.
- Load your documents into the ADF as described in section 5.1.
- Open the Avision scanning software on your computer (e.g., Button Manager, Capture Tool).
- Select your desired scanning settings (e.g., color mode, resolution, destination folder, single-sided/duplex).
- Click the "Scan" button in the software or press the Tarama button on the scanner's control panel to begin scanning.
- The scanned images will be processed and saved according to your software settings.
6. Bakım
6.1 Tarayıcıyı Temizleme
Düzenli temizlik, tarama performansının en üst düzeyde kalmasına yardımcı olur.
- Temizleme işlemine başlamadan önce tarayıcıyı kapatın ve güç kablosunu çıkarın.
- Hafifçe yumuşak, tüy bırakmayan bir bez kullanın.ampTarayıcının dış yüzeyini suyla veya hafif, aşındırıcı olmayan bir temizleyiciyle silin.
- To clean the glass platen (if applicable) and rollers, open the scanner cover. Use a specialized scanner cleaning kit or a soft cloth with isopropyl alcohol.
- Allow all components to dry completely before reconnecting power.
6.2 Firmware Güncellemesi
Periodically check the Avision website for firmware updates. Firmware updates can improve performance, add features, or resolve issues. Follow the instructions provided with the firmware update package carefully.
7. Sorun Giderme
Tarayıcınızla ilgili sorunlarla karşılaşırsanız, aşağıdaki yaygın sorunlara ve çözümlere bakın:
| Sorun | Olası Neden | Çözüm |
|---|---|---|
| Tarayıcı açılmıyor. | Güç kablosu bağlı değil; elektrik prizi arızalı. | Güç kablosunun güvenli bir şekilde bağlı olduğundan emin olun. Farklı bir elektrik prizi deneyin. |
| Computer does not detect scanner. | USB kablosu gevşek; sürücüler yüklenmemiş veya bozuk. | USB kablo bağlantısını kontrol edin. Tarayıcı sürücülerini yeniden yükleyin. Farklı bir USB bağlantı noktası deneyin. |
| Taranan görüntüler bulanık veya çizgili. | Scanner glass or rollers are dirty; document misfeed. | Clean the scanner's internal components (refer to Section 6.1). Ensure documents are loaded correctly. |
| Avustralya Savunma Kuvvetleri'nde belgeler sıkışıyor. | Documents are wrinkled or stapled; paper guides not adjusted. | Straighten documents. Remove staples/clips. Adjust paper guides to fit document width. |
8. Özellikler
| Özellik | Detay |
|---|---|
| Marka | vizyon |
| Örnek | FL-1501B |
| Tarayıcı Türü | Belge Tarayıcı |
| Tarayıcı Çözünürlüğü | 600 dpi |
| Maksimum Giriş Sayfası Kapasitesi | 100 sayfa |
| Medya Türü | Kağıt |
| Netage | 24 watt |
| Ürün Boyutları | 33x32.32x80.94 cm |
| Ürün Ağırlığı | 5.67 kilo |
| İlk Mevcut Tarih | 6 Haziran 2016 |
9. Garanti ve Destek
9.1 Garanti Bilgileri
Avision products are manufactured to high-quality standards. This product is covered by a limited warranty against defects in materials and workmanship. The specific terms and duration of the warranty may vary by region. Please refer to the warranty card included with your product or visit the official Avision webayrıntılı garanti bilgileri için site.
9.2 Teknik Destek
For technical assistance, driver downloads, or further information, please visit the official Avision support website or contact your local Avision service center. Contact details can typically be found on the Avision websitenizde veya ürününüzün belgelerinde.