1. Giriş
This manual provides essential information for the safe and correct assembly, operation, and maintenance of your TOOLPORT Party Tent 3x4 m Gazebo. Please read these instructions carefully before beginning assembly and retain them for future reference. Proper installation and care will ensure the longevity and performance of your tent.
2. Güvenlik Bilgileri
Önemli Güvenlik Uyarıları:
- Always ensure the tent is securely anchored to the ground using the provided pegs and tension ropes, especially in windy conditions.
- This tent is designed for temporary outdoor events and moderate weather. It is not intended for permanent installation.
- Snow and heavy wind loads have not been tested for this tent. In case of strong winds or snowfall, it is recommended to temporarily remove the canopy.
- Remove any snow accumulation from the roof promptly to prevent structural damage.
- Check weather conditions before installing and using the tent. High winds can cause damage or collapse.
- Çadır kumaşını tüm alev ve ısı kaynaklarından uzak tutun. Kumaş yanmaz değildir.
- Do not use electrical appliances inside the tent without proper ventilation and safety precautions.
3. Paket İçeriği
Before assembly, verify that all components are present and undamaged. The package includes:
- Steel frame components (tubes and connectors)
- Roof canopy (PE 450 N)
- Side panels with windows
- Front and rear panels with entrances
- Gergi halatları
- Zemin mandalları
- Montaj talimatları
If any parts are missing or damaged, please contact TOOLPORT customer support before proceeding with assembly.
4. Kurulum Talimatları
Assembly typically requires two or more people. Follow the steps below for a secure setup.
4.1. Alanı Hazırlayın
Choose a flat, level surface free from obstructions. Ensure adequate space for the 3x4 meter tent footprint and surrounding anchoring.
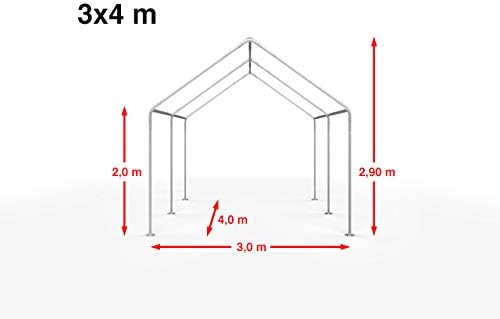
Resim: Tent dimensions diagram (3x4 m). The tent measures 3 meters in width, 4 meters in length, with a side height of 2 meters and a peak height of 2.9 meters.
4.2. Çerçeveyi Birleştirin
- Unpack all steel frame components. The frame consists of galvanized steel tubes (approx. 38mm diameter) and connectors (approx. 42mm diameter).
- Connect the roof frame sections first. Use the provided through-bolts to secure connections, ensuring a robust and stable structure.
- Attach the leg poles to the roof frame.
- Tüm bağlantıların sıkı ve güvenli olduğundan emin olun.

Resim: Detail of frame connection. This image shows how the galvanized steel tubes connect using through-bolts, providing a secure and easy-to-assemble joint.
4.3. Install the Roof Canopy
- Carefully unfold the roof canopy (PE 450 N). The canopy is 100% waterproof and UV protected.
- Drape the canopy over the assembled frame, ensuring it is centered and evenly distributed.
- Secure the canopy to the frame using the integrated fastening points and elastic cords or straps. The single-span roof design enhances stability.
4.4. Attach Side and End Panels
- Attach the side panels, which are individual 2-meter wide modules. These can be applied individually, allowing for flexible configurations.
- Secure the panels to the frame using the integrated fasteners.
- Install the front and rear panels, which include entrance openings.
- The side panels feature ground deflectors for automatic climate control within the tent.

Resim: Side panel window and attachment. This image illustrates the arched window design on the side panels and the method of securing the panel to the tent frame using a hook-and-loop strap.
4.5. Çadırı Sabitleyin
- Use the provided ground pegs and tension ropes to firmly anchor the tent to the ground.
- Ensure all ropes are taut and evenly distributed to provide maximum stability.

Resim: Base plate and anchoring. This image shows the tent's base plate, approximately 9.5 cm in diameter, securely fastened to the ground with a peg and a tension rope, ensuring stability.

Resim: Fully assembled TOOLPORT Party Tent. This image displays the tent fully erected on a lawn, showcasing its overall appearance with side panels and windows.

Resim: İç mekan view of the party tent. This image provides a perspective from inside the tent, highlighting the spaciousness and the natural light entering through the arched windows.
5. Kullanım Talimatları
This TOOLPORT Party Tent is designed for temporary use at events, markets, and private gatherings. It provides shelter from sun and light rain.
- Hava Koşulları: Always monitor weather forecasts. Disassemble the tent or remove the canopy in anticipation of strong winds, heavy rain, or snow to prevent damage.
- Havalandırma: The modular side panels allow for flexible opening and closing, providing ventilation as needed.
- Demirleme: Regularly check the tension ropes and ground pegs to ensure they remain secure, especially after changes in weather.
6. Bakım
Doğru bakım, parti çadırınızın ömrünü uzatacaktır.
- Temizlik: Clean the canopy and side panels with mild soap and water. Avoid harsh chemicals or abrasive cleaners, as these can damage the PE material. Rinse thoroughly and allow to air dry completely before storage.
- Çerçeve Bakımı: The galvanized steel frame is corrosion-resistant. If any rust spots appear, clean them and apply a rust-inhibiting paint.
- Depolamak: Ensure all fabric components are completely dry before folding and storing them in a cool, dry place. Store frame components neatly to prevent bending or damage.
- Denetleme: Periodically inspect all components for wear and tear, especially before and after each use. Replace any damaged parts immediately.
7. Sorun Giderme
İşte sık karşılaşılan sorunlara yönelik çözümler:
- Çadır Dengesizliği: Ensure all frame connections are tight and all ground pegs and tension ropes are securely fastened and taut. Re-anchor if necessary.
- Çatıda Su Birikimi: Ensure the roof canopy is stretched tightly and evenly over the frame. Remove any standing water promptly to prevent damage.
- Kayıp parçalar: If you discover missing parts upon unpacking, refer to the package contents list and contact TOOLPORT customer support for assistance.
- Montajda Zorluk: Review the assembly instructions carefully. Ensure all components are correctly oriented. A second person can significantly ease the assembly process.
8. Özellikler
| Özellik | Detay |
|---|---|
| Ürün Boyutları (U x G x Y) | 400 x 300 x 200 cm (Side Height: 200 cm, Peak Height: 290 cm) |
| Ağırlık | 45.5 kilo |
| Çerçeve Malzemesi | Galvanized Steel (Tubes: approx. 38mm, Connectors: approx. 42mm) |
| Gölgelik Malzemesi | PE 450 N (100% waterproof, UV 30+ protection) |
| Renk | Beyaz-Gri |
| Model Numarası | 91119 |
| Önerilen Kullanım | Parties, events, temporary outdoor shelter |
9. Garanti Bilgileri
For specific warranty details regarding your TOOLPORT Party Tent, please refer to the warranty card included with your purchase or visit the official TOOLPORT website. Generally, products are covered against manufacturing defects for a specified period from the date of purchase. Damage resulting from improper assembly, misuse, extreme weather conditions, or lack of maintenance is typically not covered.
10. Destek
If you require further assistance, have questions about assembly, or need to report a missing/damaged part, please contact TOOLPORT customer support. You can typically find contact information on the product packaging, the official TOOLPORT websitenizden veya perakendeciniz aracılığıyla.
Çevrimiçi kaynaklar için lütfen şu adresi ziyaret edin: TOOLPORT Brand Store on Amazon.


