1. Giriş
This manual provides detailed instructions for the assembly, operation, maintenance, and troubleshooting of your TOOLPORT 16x33 ft. Storage Tent. This tent is designed to provide a robust and portable storage solution, protecting contents from seasonal weather and offering additional space. Please read all instructions carefully before beginning assembly or use to ensure safe and correct installation.
2. Güvenlik Bilgileri
- Always assemble the tent on level ground.
- Ensure all connections are securely fastened as per instructions.
- Kuvvetli rüzgarlarda veya olumsuz hava koşullarında montaj yapmayınız.
- Regularly inspect the tent for any signs of wear or damage, especially after severe weather.
- Keep open flames and heat sources away from the tent fabric.
- Duman çıkarabilecek eşyaları saklıyorsanız yeterli havalandırma sağlayın.
- This tent is for storage purposes; it is not intended for permanent habitation.
3. Paket İçeriği
Montaj işlemine başlamadan önce aşağıda listelenen tüm bileşenlerin mevcut olduğundan emin olun:
- Steel frame components (poles and connectors)
- Base frame components
- Roof tarpaulin (single piece PVC)
- Side walls with individual sections
- Gable walls with customizable entrances
- Ropes and stakes for securing
- Montaj talimatları (bu kılavuz)
4. Montaj Talimatları
Assembly requires at least two people. Follow these steps carefully.
4.1. Understand Tent Dimensions
Before starting, familiarize yourself with the overall dimensions of the tent to ensure you have adequate space for assembly and placement.
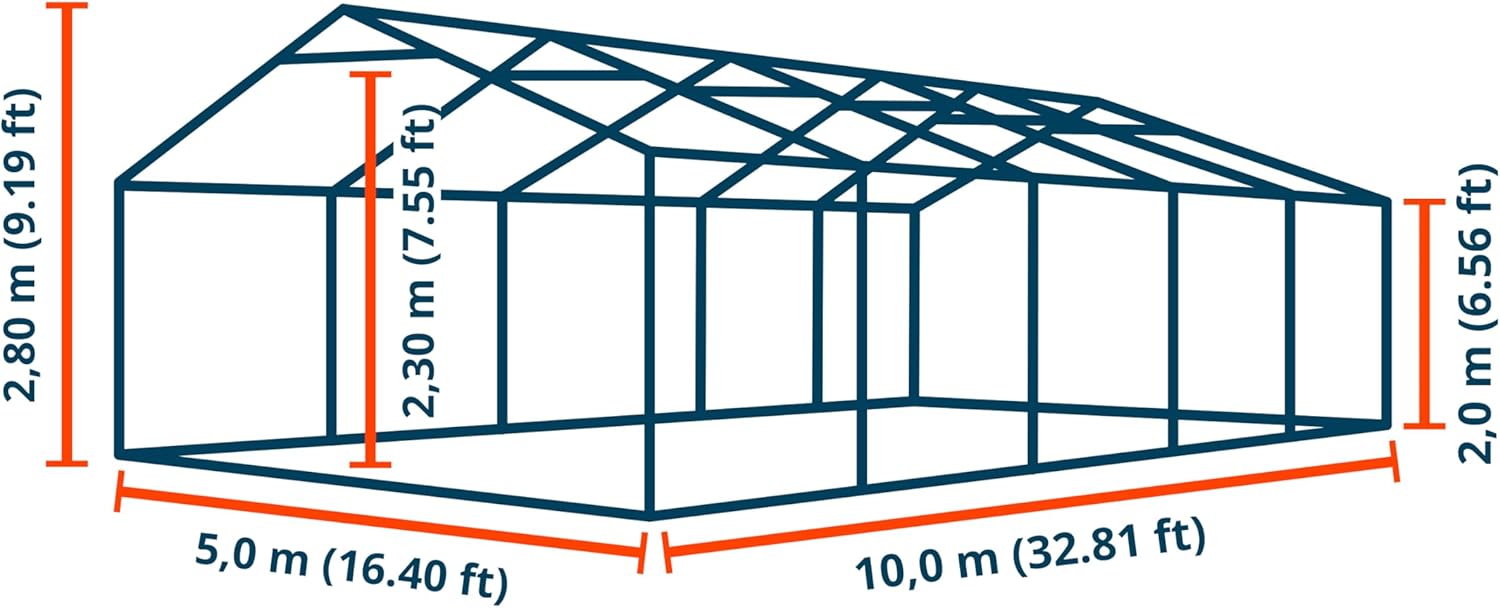
Figure 4.1: Tent Dimensions Diagram. The diagram illustrates the tent's length (10.0 m / 32.81 ft), width (5.0 m / 16.40 ft), side height (2.0 m / 6.56 ft), and peak height (2.80 m / 9.19 ft).
4.2. Çerçeve Düzeneği
Begin by laying out all steel frame components. Connect the poles and connectors to form the base frame, then erect the vertical poles and roof structure. The frame is reinforced with a base frame and roof supports for enhanced stability.

Figure 4.2: Assembled Steel Frame. This image shows the complete steel framework of the tent, including the roof trusses and vertical supports, before the tarpaulin is applied.
Ensure all steel poles (approx. Ø 1.5 in.) and connectors (approx. Ø 1.65 in.) are bolted securely together.
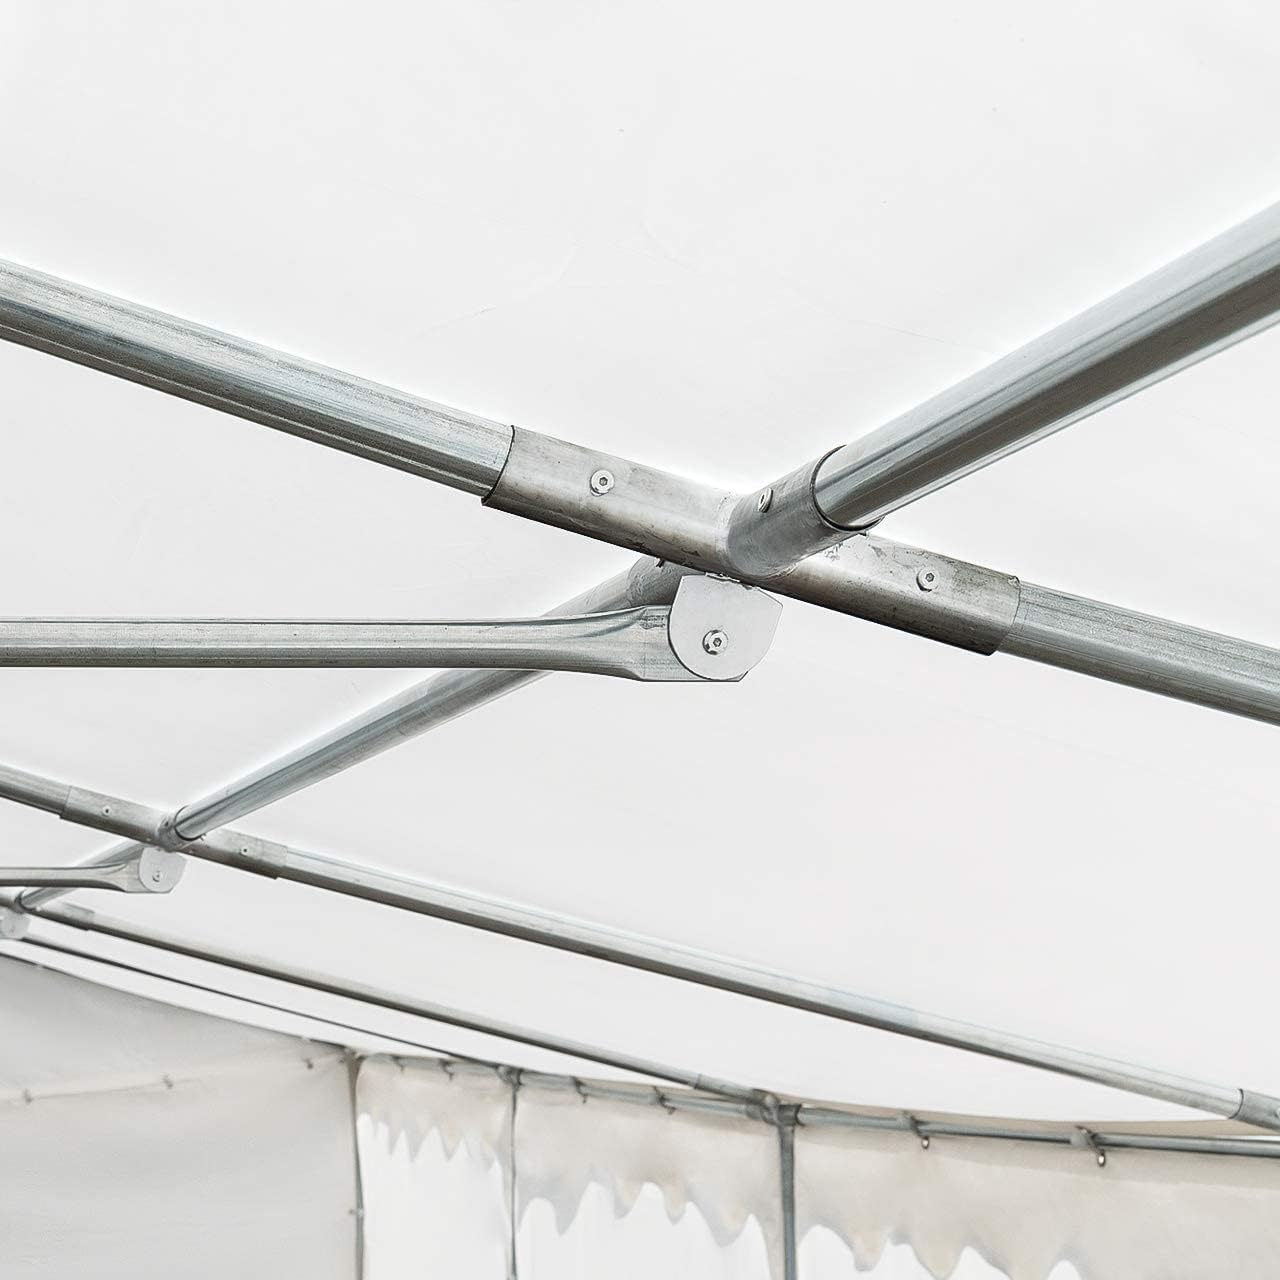
Figure 4.3: Roof Frame Connection. This detail shows how the roof poles connect at a central point, ensuring structural integrity.

Figure 4.4: Vertical Pole Connection. This image demonstrates the secure attachment of a vertical support pole to the tent frame.

Figure 4.5: Ground Frame Corner Connection. This image highlights the robust corner connection of the base frame, designed for stability.
4.3. Kapak Montajı
Drape the single-piece PVC roof tarpaulin over the assembled frame. Attach the side and gable walls. The sidewalls attach individually between poles, approximately every 6.5 ft. The gable walls allow for customizable entrances.

Figure 4.6: PVC Tarpaulin Material. This image provides a detailed view of the high-quality, waterproof PVC fabric used for the tent cover.
4.4. Çadırı Sabitleme
Once the frame and covers are in place, use the provided ropes and stakes to secure the tent to the ground. Proper anchoring is crucial for stability, especially in windy conditions.

Figure 4.7: Securing with Ground Stakes. This image shows the process of anchoring the tent's base frame to the ground using stakes for added stability.
5. Operasyon
The TOOLPORT storage tent is designed for versatile use. The customizable entrances on the gable and sidewalls allow you to adjust access points as needed. Ensure all zippers and fasteners are properly closed to protect contents from weather elements. For optimal protection, avoid leaving entrances open during adverse weather.
6. Bakım
- Temizlik: Clean the PVC tarpaulin with mild soap and water. Avoid harsh chemicals or abrasive brushes that could damage the material. Rinse thoroughly and allow to air dry completely before folding or storing.
- Denetleme: Periodically inspect the frame for any loose bolts or connections. Tighten as necessary. Check the tarpaulin for tears, punctures, or signs of wear. Repair minor damage promptly to prevent further deterioration.
- Depolamak: If disassembling for storage, ensure all components are clean and dry. Store the frame parts and tarpaulin in a dry, cool place away from direct sunlight to prolong their lifespan.
7. Sorun Giderme
- Çadır Dengesizliği: Ensure all frame connections are tight and the tent is properly anchored with all ropes and stakes. Verify the ground is level.
- Su Kaçağı: Check the roof tarpaulin for any tears or gaps. Ensure the tarpaulin is correctly tensioned and overlaps properly at all seams.
- Montajda Zorluk: Refer to the assembly diagrams and ensure all parts are correctly identified and oriented. Do not force connections; if parts do not fit, re-check the instructions.
8. Özellikler
| Özellik | Detay |
|---|---|
| Marka | ARAÇ BAĞLANTISI |
| Model Numarası | 7170 |
| Boyut | 16x33 ft. (5.0m x 10.0m) |
| Ürün Boyutları (U x G x Y) | 393.7"U x 196.85"G x 110.24"Y |
| Kat Alanı | 50 Metrekare |
| Malzeme | Metal (Frame), PVC (Tarpaulin) |
| Renk | Gri |
| Ürün Ağırlığı | 453 pound (205.7 Kilogram) |
| Steel Pole Diameter | Yaklaşık 1.5 inç |
| Konnektör Çapı | Yaklaşık 1.65 inç |
| Branda Çekme Mukavemeti | 750 Gün |
| Montaj Gerekli | Evet |
9. Garanti ve Destek
For warranty information or technical support, please contact TOOLPORT customer service directly. Refer to your purchase documentation for specific warranty terms and contact details. Keep your proof of purchase for any warranty claims.