giriiş
Thank you for choosing the Hifonics ZRX1216.2 Zeus Car Audio AmpBu kılavuz, amplifikatörünüzün doğru kurulumu, çalıştırılması ve bakımı için gerekli bilgileri sağlar. ampDaha kaliteli. Optimum performans ve güvenliği sağlamak için lütfen kurulum veya çalıştırmaya başlamadan önce bu kılavuzu dikkatlice okuyun.
Güvenlik Bilgileri
Her zaman aşağıdaki güvenlik önlemlerine uyun:
- Montaja başlamadan önce aracın aküsünün negatif kutbunu ayırın.
- Hasar veya kısa devreleri önlemek için tüm kabloların doğru şekilde yönlendirildiğinden ve sabitlendiğinden emin olun.
- Bu kılavuzda belirtildiği gibi, güç ve topraklama bağlantıları için uygun kalınlıkta kablo kullanın.
- Kurulum ampAsansörü, yeterli havalandırma sağlayan ve nemden ve aşırı sıcaktan korunan bir yere yerleştirin.
- Çalıştırmayın amplifier if it is damaged or malfunctioning. Refer to the troubleshooting section or contact qualified service personnel.
- High sound pressure levels can cause permanent hearing loss. Adjust volume levels responsibly.
Paket İçeriği
Paketinizin aşağıdaki öğeleri içerdiğini doğrulayın:
- Hifonics ZRX1216.2 Zeus Car Audio Ampcankurtaran
- Kullanım Kılavuzu (bu belge)
- Montaj Donanımı
Ürün Bittiview
The Hifonics ZRX1216.2 is a 2-channel car audio amplifier designed to deliver powerful and clear sound. It features robust construction and a range of controls for fine-tuning your audio experience.
AmpLifier Üst View

This image displays the top surface of the amplifier, featuring the Hifonics brand name and 'ZEUS' model series designation. The brushed silver finish and overall compact design are visible.
Input and Control Panel

This image shows the input and control side of the amplifier. Visible controls include Level, Bass EQ, HPF (High Pass Filter), LPF (Low Pass Filter), X-OVER (Crossover) switch, and Mode switch (Mono/Stereo). RCA input and output jacks, along with a high-level input connector, are also present.
Power and Speaker Terminal Panel
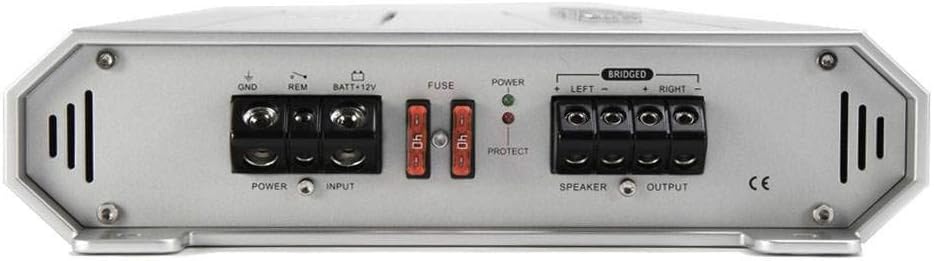
Bu görsel, güç ve hoparlör bağlantı tarafını göstermektedir. amplifier. It includes terminals for GND (Ground), REM (Remote Turn-On), BATT+12V (Power), fuse holders, and speaker output terminals for Left and Right channels, with bridging capability indicated.
Kurulum ve Yükleme
Doğru kurulum, cihazınızın performansı ve uzun ömürlülüğü için çok önemlidir. amplifier. If you are unsure about any step, consult a professional installer.
Montaj Yeri
Montaj için kuru, iyi havalandırılmış ve güvenli bir yer seçin. Montaj sırasında, yüksek yerlere monte etmekten kaçının. amplifier directly on carpet or in enclosed spaces that restrict airflow. Ensure sufficient space around the amplifier for wiring and heat dissipation.
Kablolama Bağlantıları
All wiring should be done with the vehicle's battery disconnected.
- Güç Bağlantısı (+12V): Connect a heavy-gauge power cable (e.g., 4-gauge or larger, depending on total system power) directly from the positive terminal of the vehicle's battery to the BATT+12V terminal on the amplifier. Install an in-line fuse holder with a fuse (rated appropriately for the amplifier's total current draw, typically 80A for this model, check amp(Kesin değerler için amplifikatör özelliklerine bakınız) Aküden 45 cm (18 inç) mesafede.
- Toprak Bağlantısı (GND): Güç kablosuyla aynı kalınlıkta, kalın bir topraklama kablosunu GND terminalinden bağlayın. ampKaldırıcıyı aracın şasisinin temiz, boyasız metal yüzeyine yerleştirin. Sağlam ve düşük dirençli bir bağlantı olduğundan emin olun.
- Uzaktan Açma (REM): REM terminalinden daha ince bir kablo (örneğin, 18 gauge) bağlayın. ampAmplifikatörü, araçtaki ana ünitenin uzaktan açma/kapama çıkışına bağlayın. Bu kablo, sinyal gönderir. ampBaş ünitesi aktif olduğunda açılması için lifier.
- Input Signal (RCA or High-Level):
- RCA Girişleri: Ön bağlantıdan RCA kablolarını bağlayın.amp outputs of your head unit to the INPUT L and R RCA jacks on the ampcankurtaran.
- Yüksek Seviye Girişler: If your head unit does not have RCA outputs, use the provided high-level input connector. Connect the speaker wires from your head unit's speaker outputs to the corresponding terminals on the high-level input connector.
- Hoparlör Bağlantıları: Connect your speakers to the SPEAKER OUTPUT terminals. For stereo operation, connect the left speaker to the LEFT terminals and the right speaker to the RIGHT terminals. For bridged mono operation, refer to the "Operating Instructions" section. Ensure correct polarity (+ to + and - to -).
Kullanım Talimatları
Bir kez amplifier is installed, you can configure its settings for optimal audio performance.
İlk Güçlendirme
After all connections are made and verified, reconnect the vehicle's negative battery terminal. Turn on your head unit. The POWER indicator light on the amplifier should illuminate (typically green). If the PROTECT light illuminates (typically red), refer to the troubleshooting section.
Control Panel Adjustments
- LEVEL (Gain Control): Bu kontrol, aşağıdakilerle eşleşir: amplifier'in giriş duyarlılığı çıkış hacminetage of your head unit. Start with the LEVEL control at its minimum setting. Play a familiar music track at about 75% of your head unit's maximum volume. Slowly increase the amplifier's LEVEL control until you hear slight distortion, then back it off slightly.
- BAS EQ: Adjusts the bass boost level. Use sparingly to avoid distortion and speaker damage.
- HPF (Yüksek Geçişli Filtre): This filter allows frequencies above the set point to pass through to the speakers. Useful for protecting smaller speakers from low bass frequencies.
- LPF (Alçak Geçiş Filtresi): This filter allows frequencies below the set point to pass through. Typically used for subwoofers to reproduce only bass frequencies.
- X-OVER (Çapraz Bağlantı Anahtarı): Selects the type of crossover. Options typically include FULL (full range), HPF, or LPF. Match this to your speaker configuration.
- MODE (Mono/Stereo Switch): Selects between stereo operation (for two speakers) or mono/bridged operation (for a single subwoofer).
Köprülü Operasyon
The ZRX1216.2 amplifier can be bridged to provide higher power output to a single speaker, typically a subwoofer. To bridge the ampkaldırıcı:
- MODE anahtarını MONO konumuna getirin.
- Connect the positive (+) terminal of your speaker to the RIGHT (+) speaker output terminal of the ampcankurtaran.
- Connect the negative (-) terminal of your speaker to the LEFT (-) speaker output terminal of the ampcankurtaran.
- Ensure the speaker's impedance is suitable for bridged operation (typically 4 ohms minimum).
Bakım
Your Hifonics ampBu yükseltici, uzun vadeli performans sağlamak için minimum bakım gerektirir.
- Temizlik: Periyodik olarak silin amplifier'in dış yüzeyini yumuşak ve kuru bir bezle silin. Sert kimyasallar veya aşındırıcı temizleyiciler kullanmayın.
- Havalandırma: Şunların sağlanmasını temin edin: amplifier's cooling fins are free from dust and obstructions. Good airflow is essential for heat dissipation.
- Bağlantılar: Ara sıra tüm güç, topraklama, uzaktan kumanda ve hoparlör bağlantılarını kontrol ederek sağlam olduklarından ve korozyondan arınmış olduklarından emin olun.
Sorun giderme
Eğer cihazınızla ilgili sorunlar yaşıyorsanız amplifier, refer to the following common issues and solutions before contacting support.
| Sorun | Olası Neden | Çözüm |
|---|---|---|
| Güç Yok / Amplifier açılmıyor |
|
|
| Ses Çıkışı Yok |
|
|
| Bozuk ses |
|
|
| Amplifier Overheats / Goes into Protect Mode |
|
|
Özellikler
| Özellik | Detay |
|---|---|
| Marka | Hifonik |
| Model Numarası | ZRX1216.2 |
| Kanal Sayısı | 2 |
| Güç Çıkışı | 2 x 600W (Stereo), 1 x 1200W (Bridged) |
| Ürün Boyutları (U x G x Y) | 10 x 10 x 10 inç |
| Ürün Ağırlığı | 12 pound |
| Montaj Tipi | Yüzey Montajı |
| Renk | Gümüş |
| Piller Gerekli | 1 12V battery (for vehicle operation) |
Garanti ve Destek
Hifonics products are designed for reliability and performance. For specific warranty information, please refer to the warranty card included with your product or visit the official Hifonics website. For technical support or service inquiries, please contact Hifonics customer service.
Note: Unauthorized service or modification may void your warranty.


