1. Ürün Bittiview
The Vortex SQT-12 Cartridge Bottom Bracket is engineered for reliable and efficient power transfer in bicycle drivetrains. Its robust construction with steel cups provides superior durability and ease of installation compared to bottom brackets with resin components. The sealed bearing design ensures protection against environmental elements, contributing to a longer lifespan and consistent performance.

Image: The Vortex SQT-12 Cartridge Bottom Bracket, showing the main unit, steel cups, and included bolts.
2. Kurulum ve Kurulum
Proper installation of the Vortex SQT-12 bottom bracket is crucial for optimal performance and longevity. Ensure you have the correct tools, including a bottom bracket tool compatible with Shimano BBs, a crank puller, and a torque wrench.
Kurulum Adımları:
- Çerçeveyi hazırlayın: Clean the bottom bracket shell threads on your bicycle frame thoroughly. Remove any old grease or debris.
- Yağ sürün: Apply a thin, even layer of bicycle-specific grease to the bottom bracket shell threads inside the frame.
- Identify Cups: The main body of the bottom bracket with the longer spindle side is the drive side (right). The separate cup is the non-drive side (left).
- Install Drive Side: Thread the drive side (right) of the bottom bracket into the frame's bottom bracket shell. For BSA (English) threads, the drive side is reverse-threaded (tightens counter-clockwise).
- Install Non-Drive Side: Thread the non-drive side (left) cup into the frame. This side is standard threaded (tightens clockwise).
- Güvenli bir şekilde sıkın: Use a bottom bracket tool to tighten both cups securely. The steel construction allows for firm tightening without hesitation. Refer to your bicycle frame's specifications for recommended torque values.
- Install Cranks: Install your square taper cranks onto the bottom bracket spindle, securing them with the provided crank bolts. Ensure these bolts are also tightened to the manufacturer's specifications.
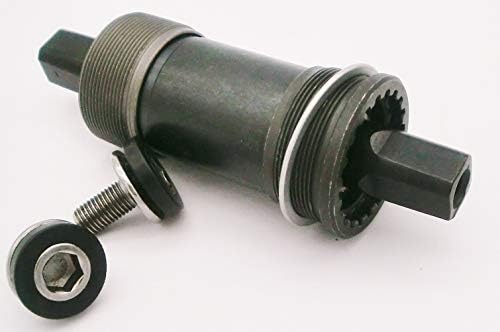
Image: Close-up of the Vortex SQT-12 bottom bracket, highlighting the steel cups and square taper axle, ready for installation.
3. Çalışma Prensipleri
Once correctly installed, the Vortex SQT-12 bottom bracket functions as the central pivot for your bicycle's crankset, allowing for smooth and efficient rotation of the pedals. Its sealed bearings are designed to minimize friction and protect the internal components from dirt, water, and other contaminants, ensuring consistent performance in various riding conditions. You should experience quiet and efficient pedaling with minimal resistance.
4. Bakım
The Vortex SQT-12 bottom bracket is designed for low maintenance due to its sealed cartridge bearings. However, regular inspection and basic care will help extend its lifespan and ensure optimal performance.
- Temizlik: Periodically clean the exterior of the bottom bracket and the surrounding crank area to prevent the buildup of dirt and grime, which can lead to premature wear of other components.
- Denetleme: Regularly check for any signs of looseness, play in the cranks, or unusual noises (such as creaking or grinding) during pedaling. Address any issues promptly.
- Yağlama: The sealed bearings are pre-lubricated and do not require external lubrication. Focus on ensuring that crank bolts are torqued correctly and that threads were properly greased during installation to prevent creaking.
5. Sorun Giderme
Most issues with bottom brackets can be resolved with proper diagnosis. Here are some common problems and their solutions:
| Sorun | Olası Neden | Çözüm |
|---|---|---|
| Gıcırdama Sesi | Loose crank bolts, loose bottom bracket cups, dry threads, or other crank/pedal issues. | Check and re-torque crank bolts. Ensure bottom bracket cups are tightened to specification. Disassemble, clean, grease threads, and reassemble if necessary. |
| Play/Looseness in Cranks | Crank bolts not tightened sufficiently, or bottom bracket cups are loose. | Re-tighten crank bolts to recommended torque. Verify bottom bracket cups are fully tightened. |
| Stiff Pedaling | Over-tightened bottom bracket cups (less common with steel cups), or external interference. | Ensure cups are tightened correctly, not excessively. Check for any frame or component interference. |
6. Özellikler
Detailed specifications for the Vortex SQT-12 Cartridge Bottom Bracket:
| Özellik | Detay |
|---|---|
| Marka | Girdap |
| Örnek | SQT-12 |
| Tip | Cartridge Sealed Bearing Bottom Bracket |
| Aks Tipi | Square Taper |
| Kabuk Genişliği | 68mm (BSA) |
| Axle Length | 118mm |
| Konu Standardı | BSA 1.37 x 24 TPI |
| Cup Material | Steel (Left and Right) |
| Uyumluluk | Equivalent to Shimano BB-UN26 |
| Gerekli Araçlar | Standard Shimano BB tools |
| Kökeni | Tayvan |
7. Garanti ve Destek
Specific warranty information for the Vortex SQT-12 Cartridge Bottom Bracket is not provided within this manual. For detailed warranty terms, technical support, or assistance with product issues, please contact Vortex directly or the authorized retailer from whom you purchased the product. It is advisable to retain your proof of purchase for any warranty inquiries.


